基于 OpenCV 的人脸检测、图像预处理、图像分割、图像增强以及特征提取项目
基于OpenCV的人脸检测、图像预处理、图像分割、图像增强以及特征提取项目
·
基于 OpenCV 的多功能图像处理和计算机视觉识别人脸项目
🎯 项目功能概述
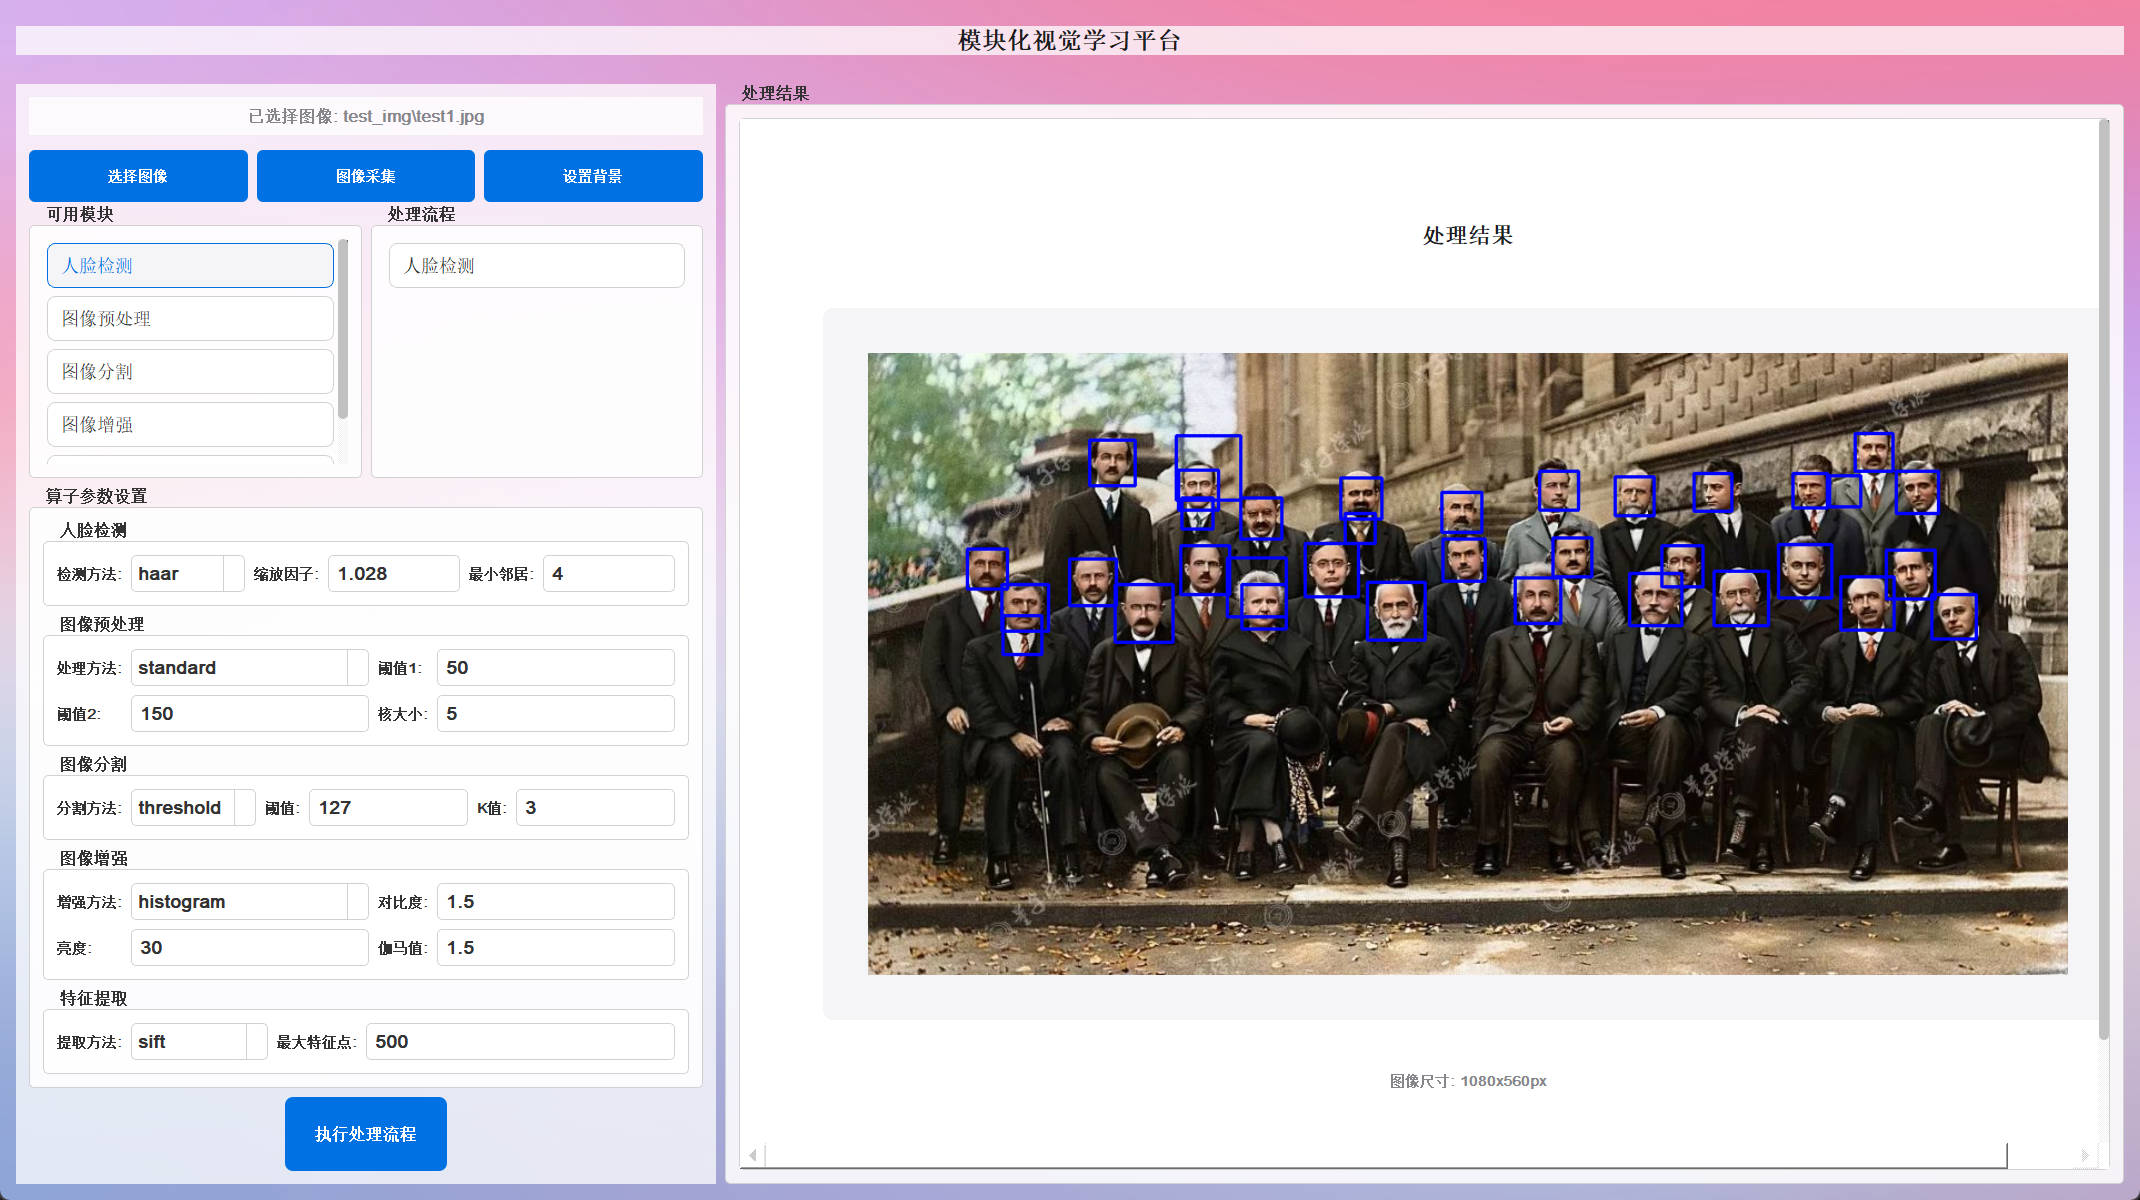
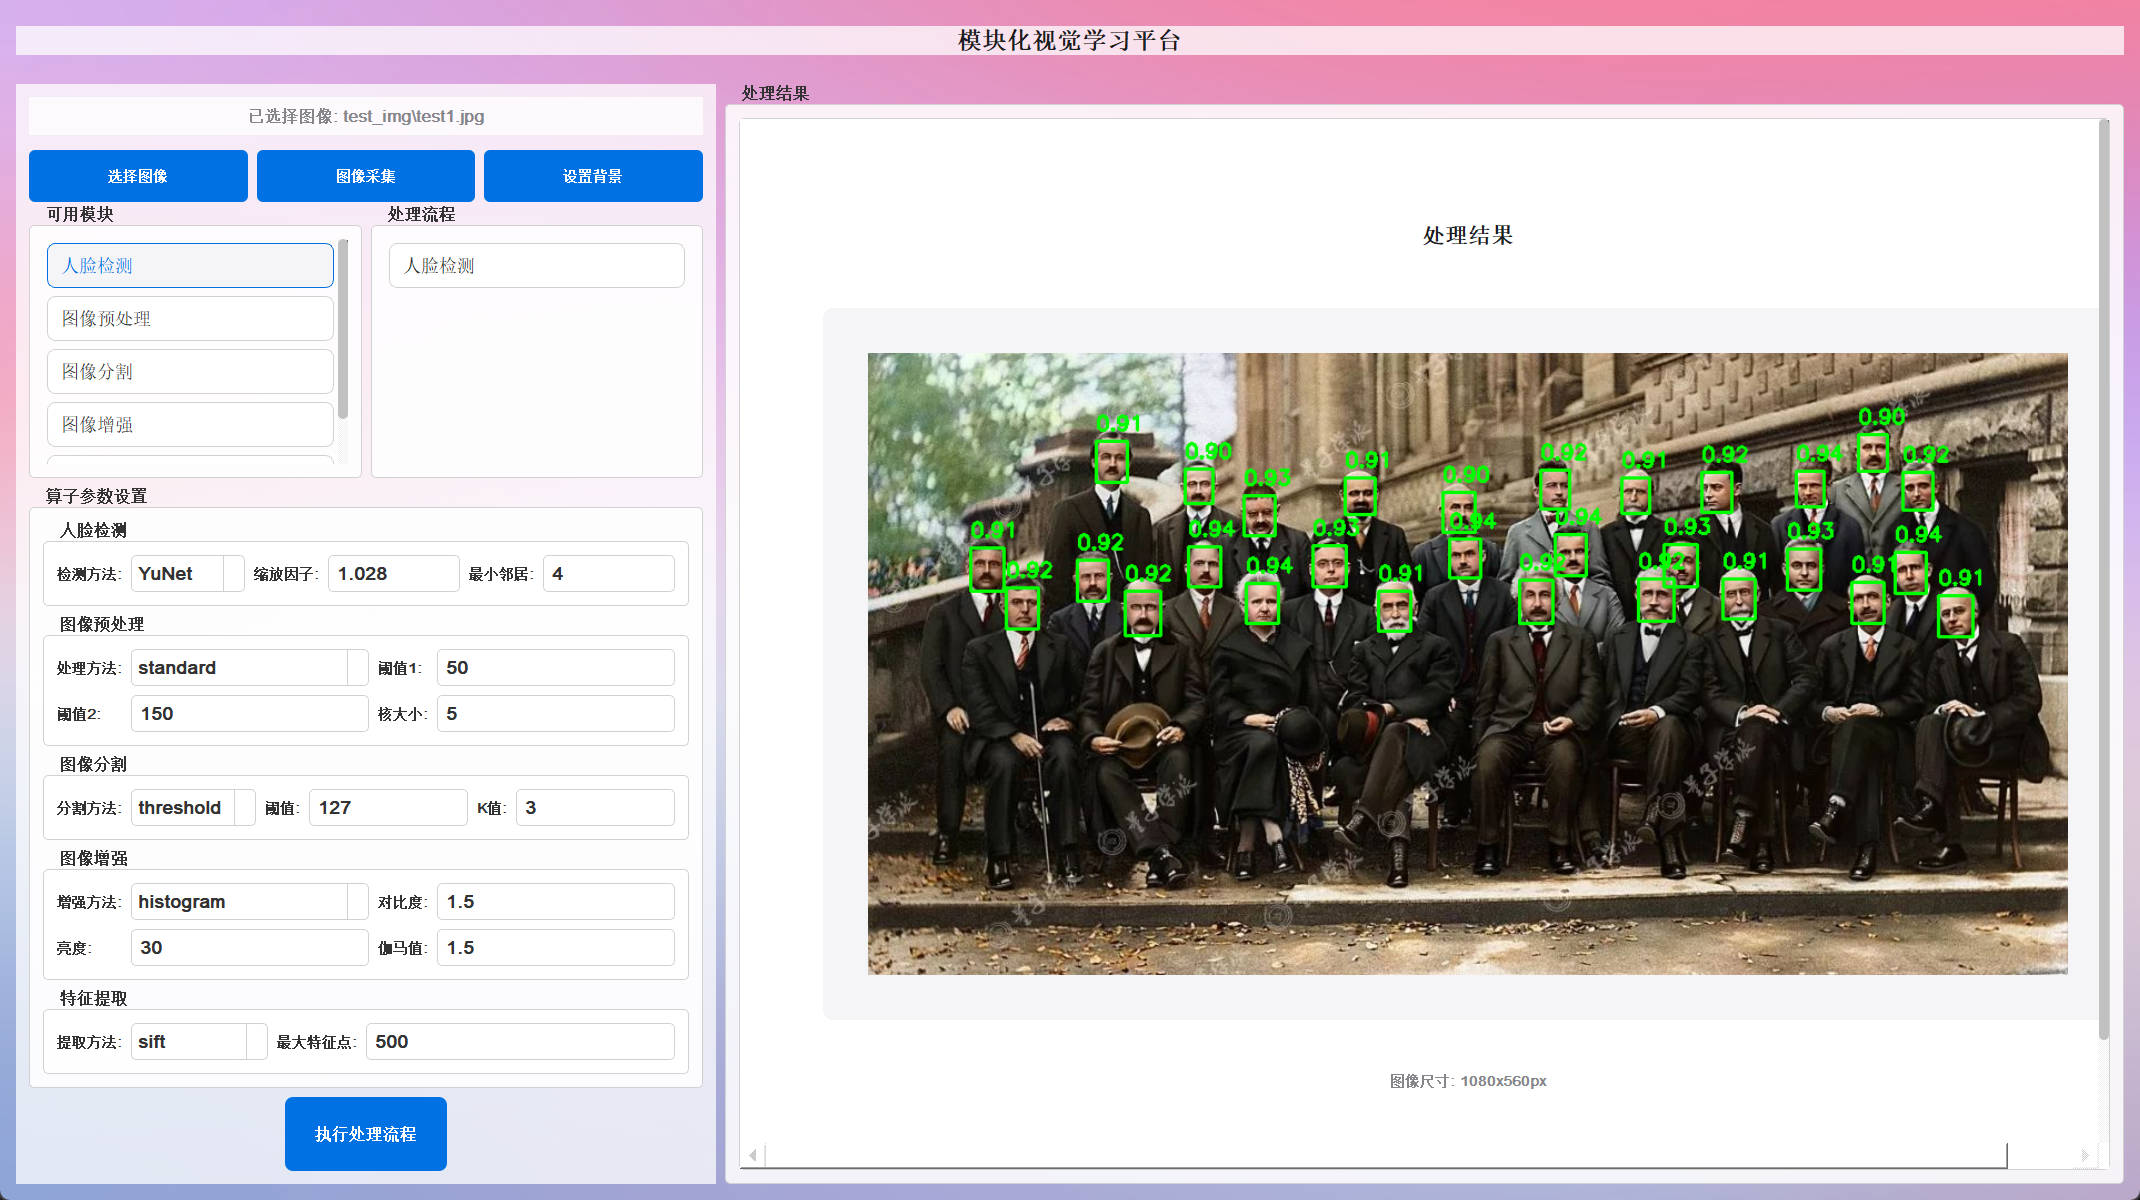
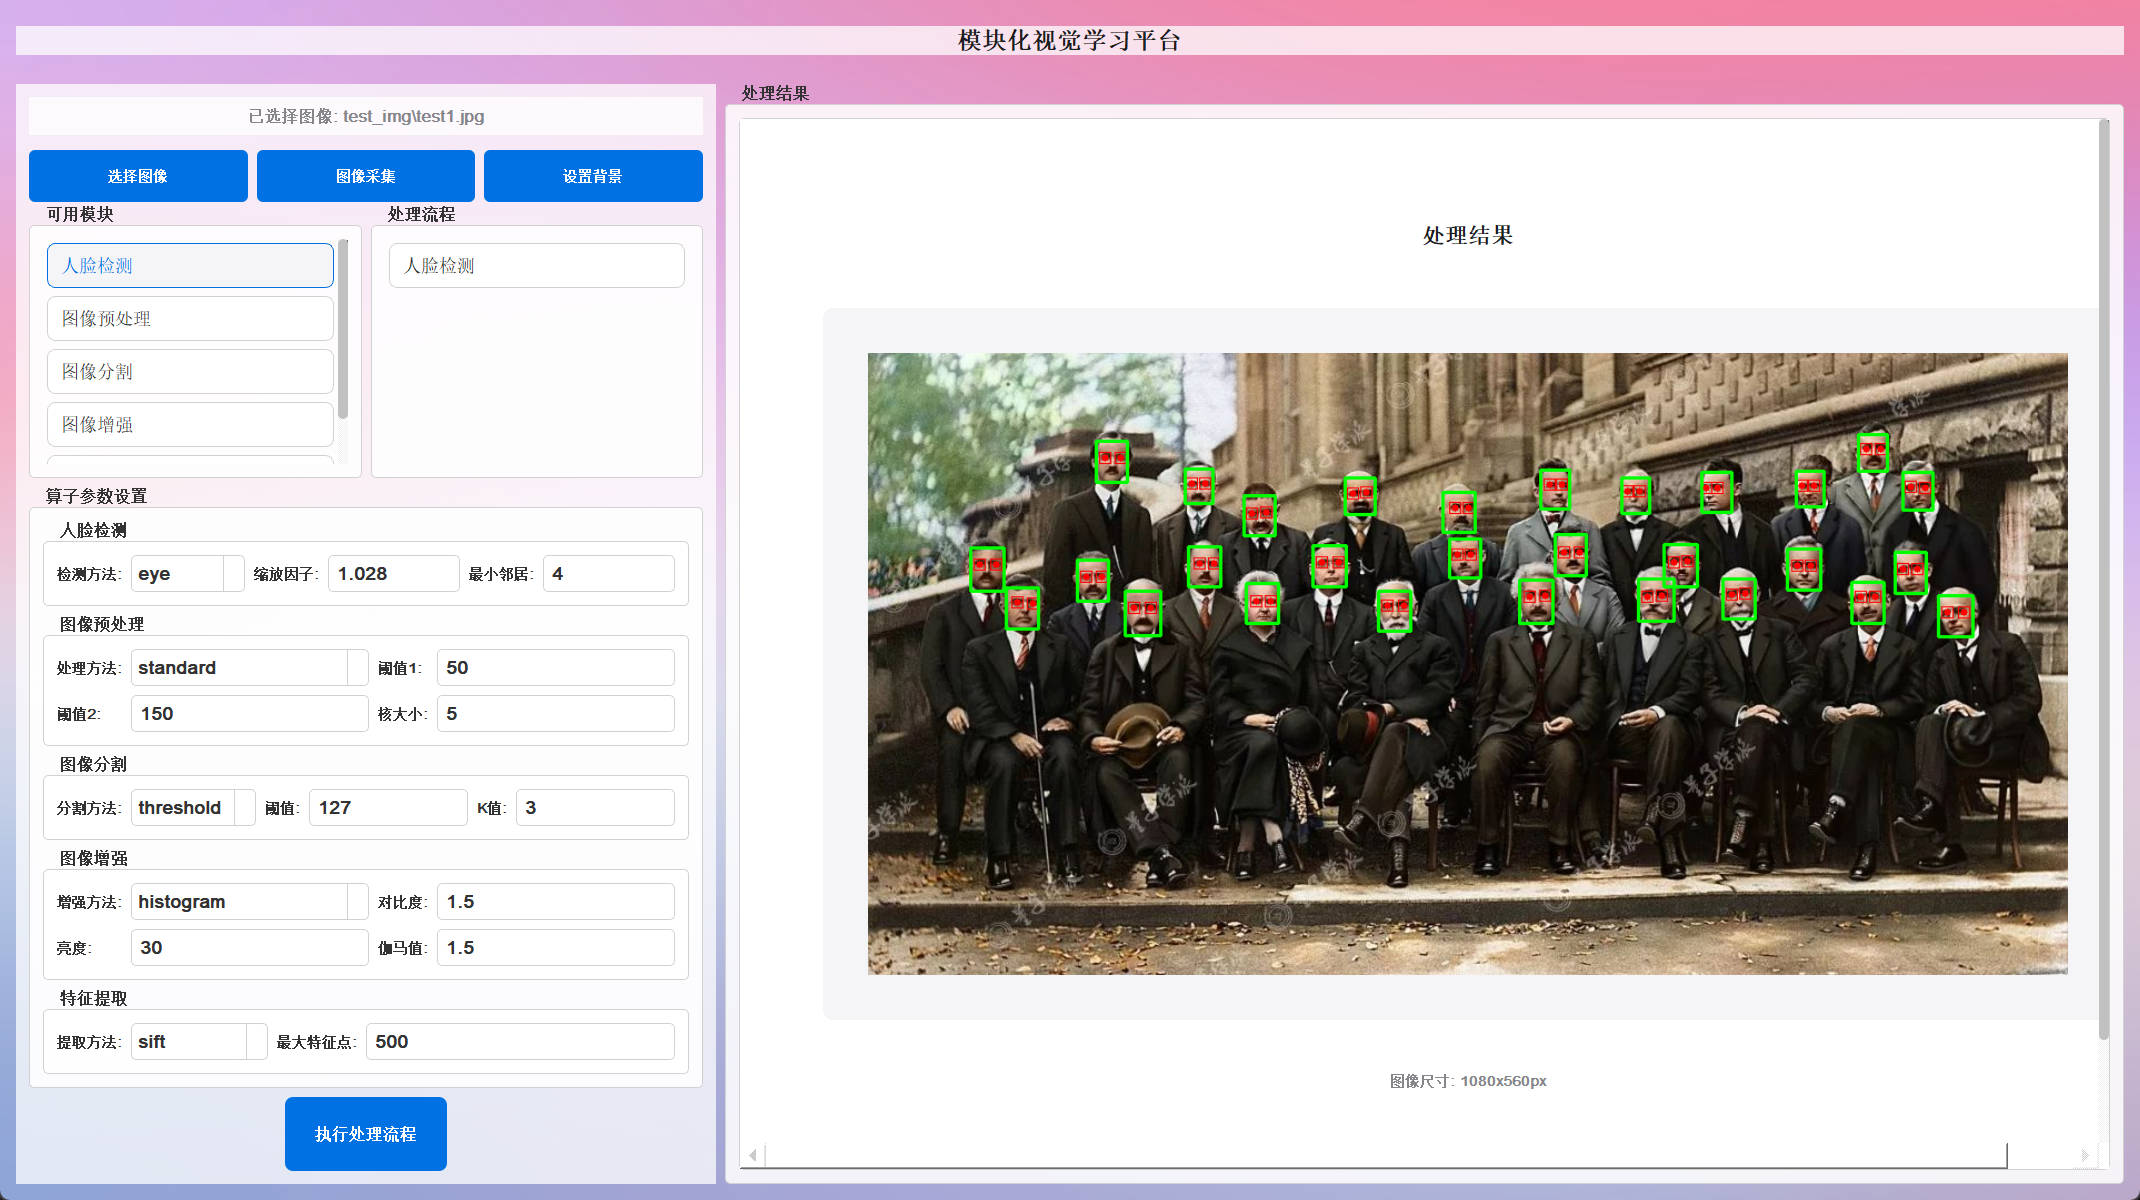
1. 多种人脸检测方法
-
Haar 级联分类器 :经典快速检测方法,适合实时应用
-
YuNet 深度学习模型 :基于 ONNX 的现代深度学习模型,检测精度更高
-
眼睛检测 :在人脸区域内进一步检测眼部特征点
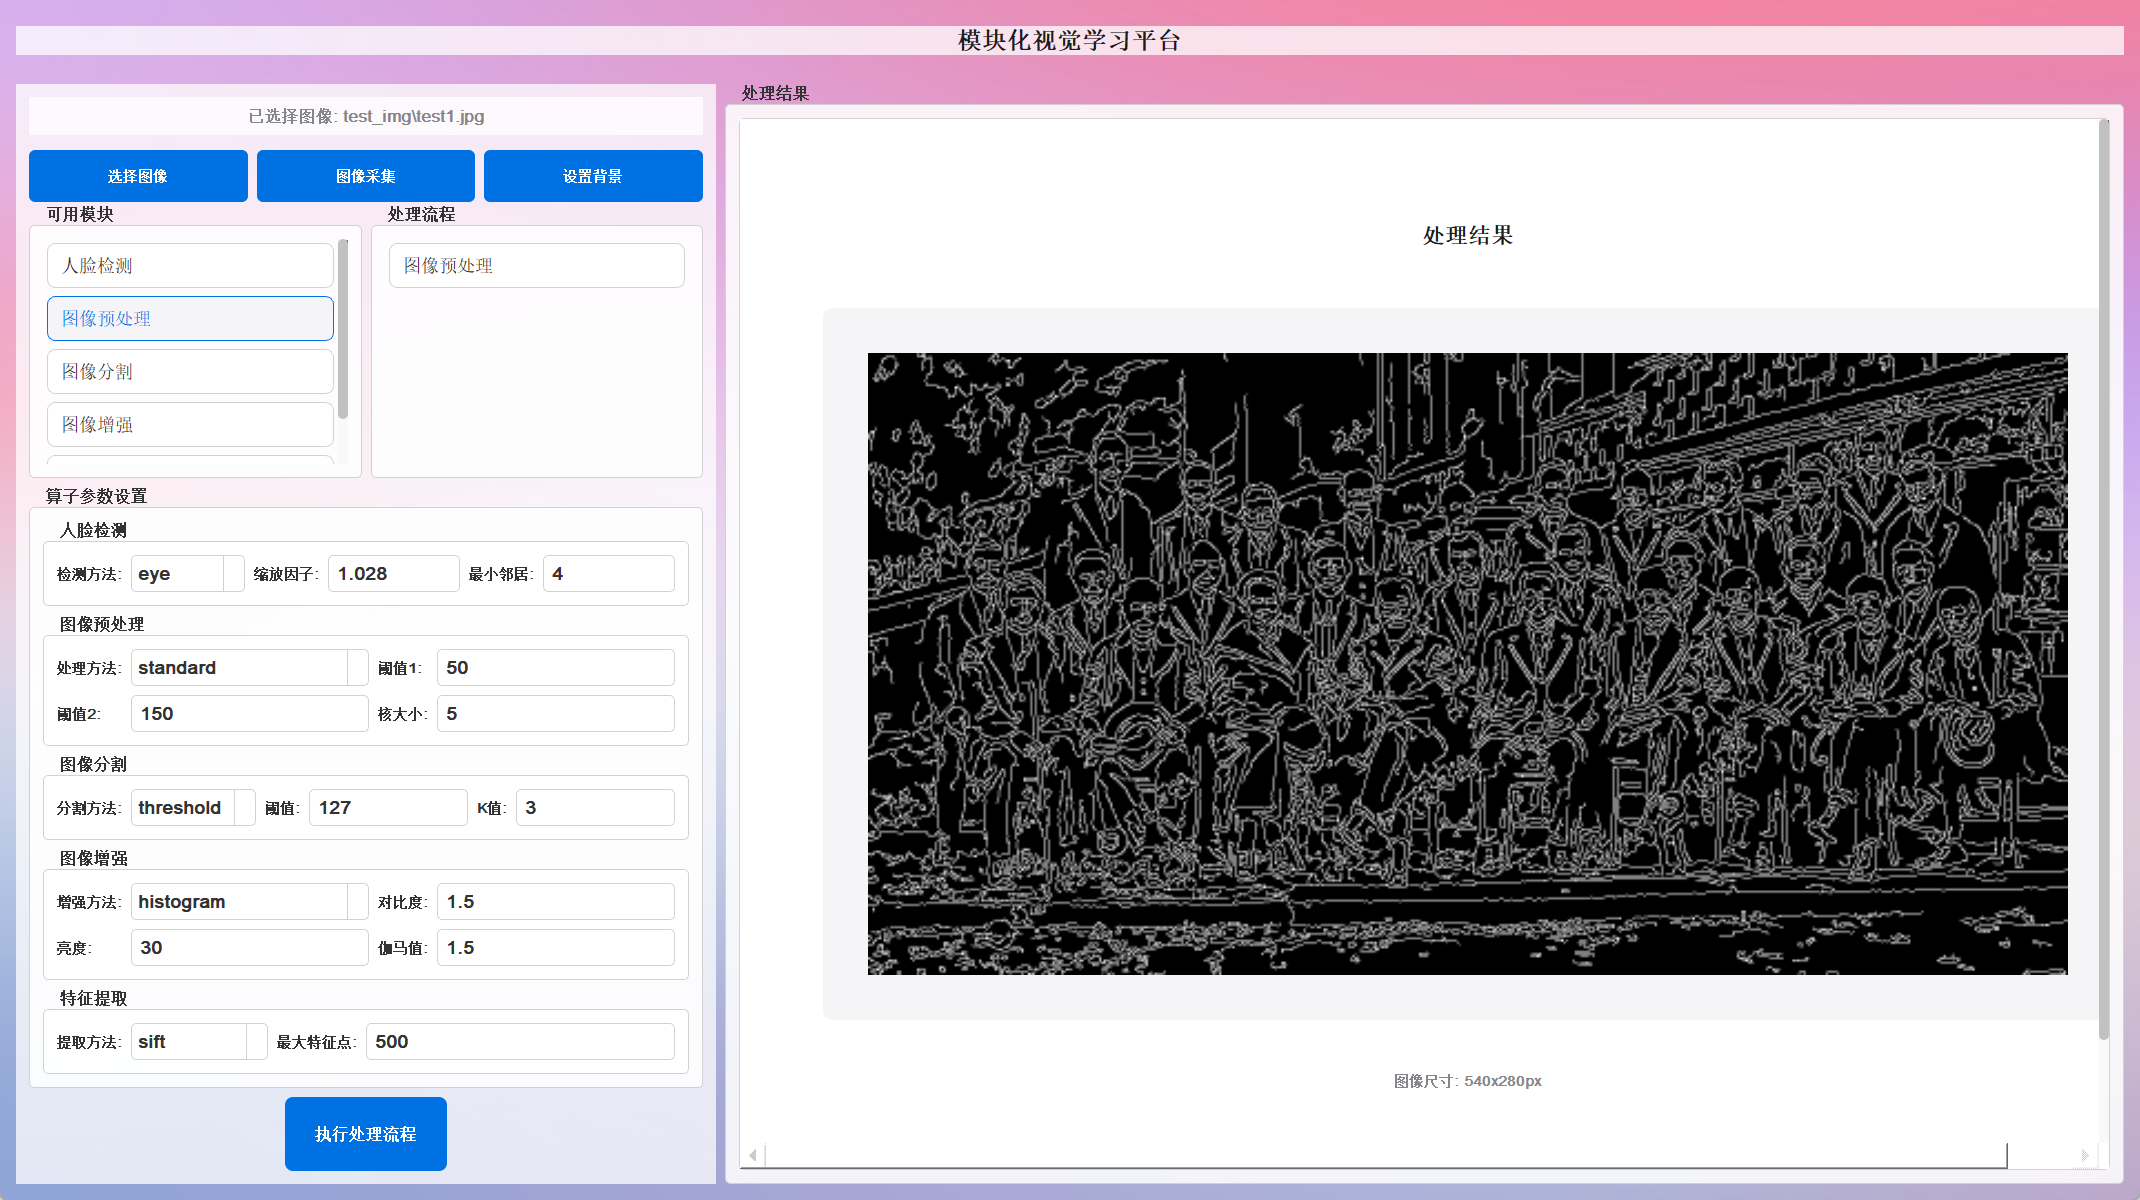
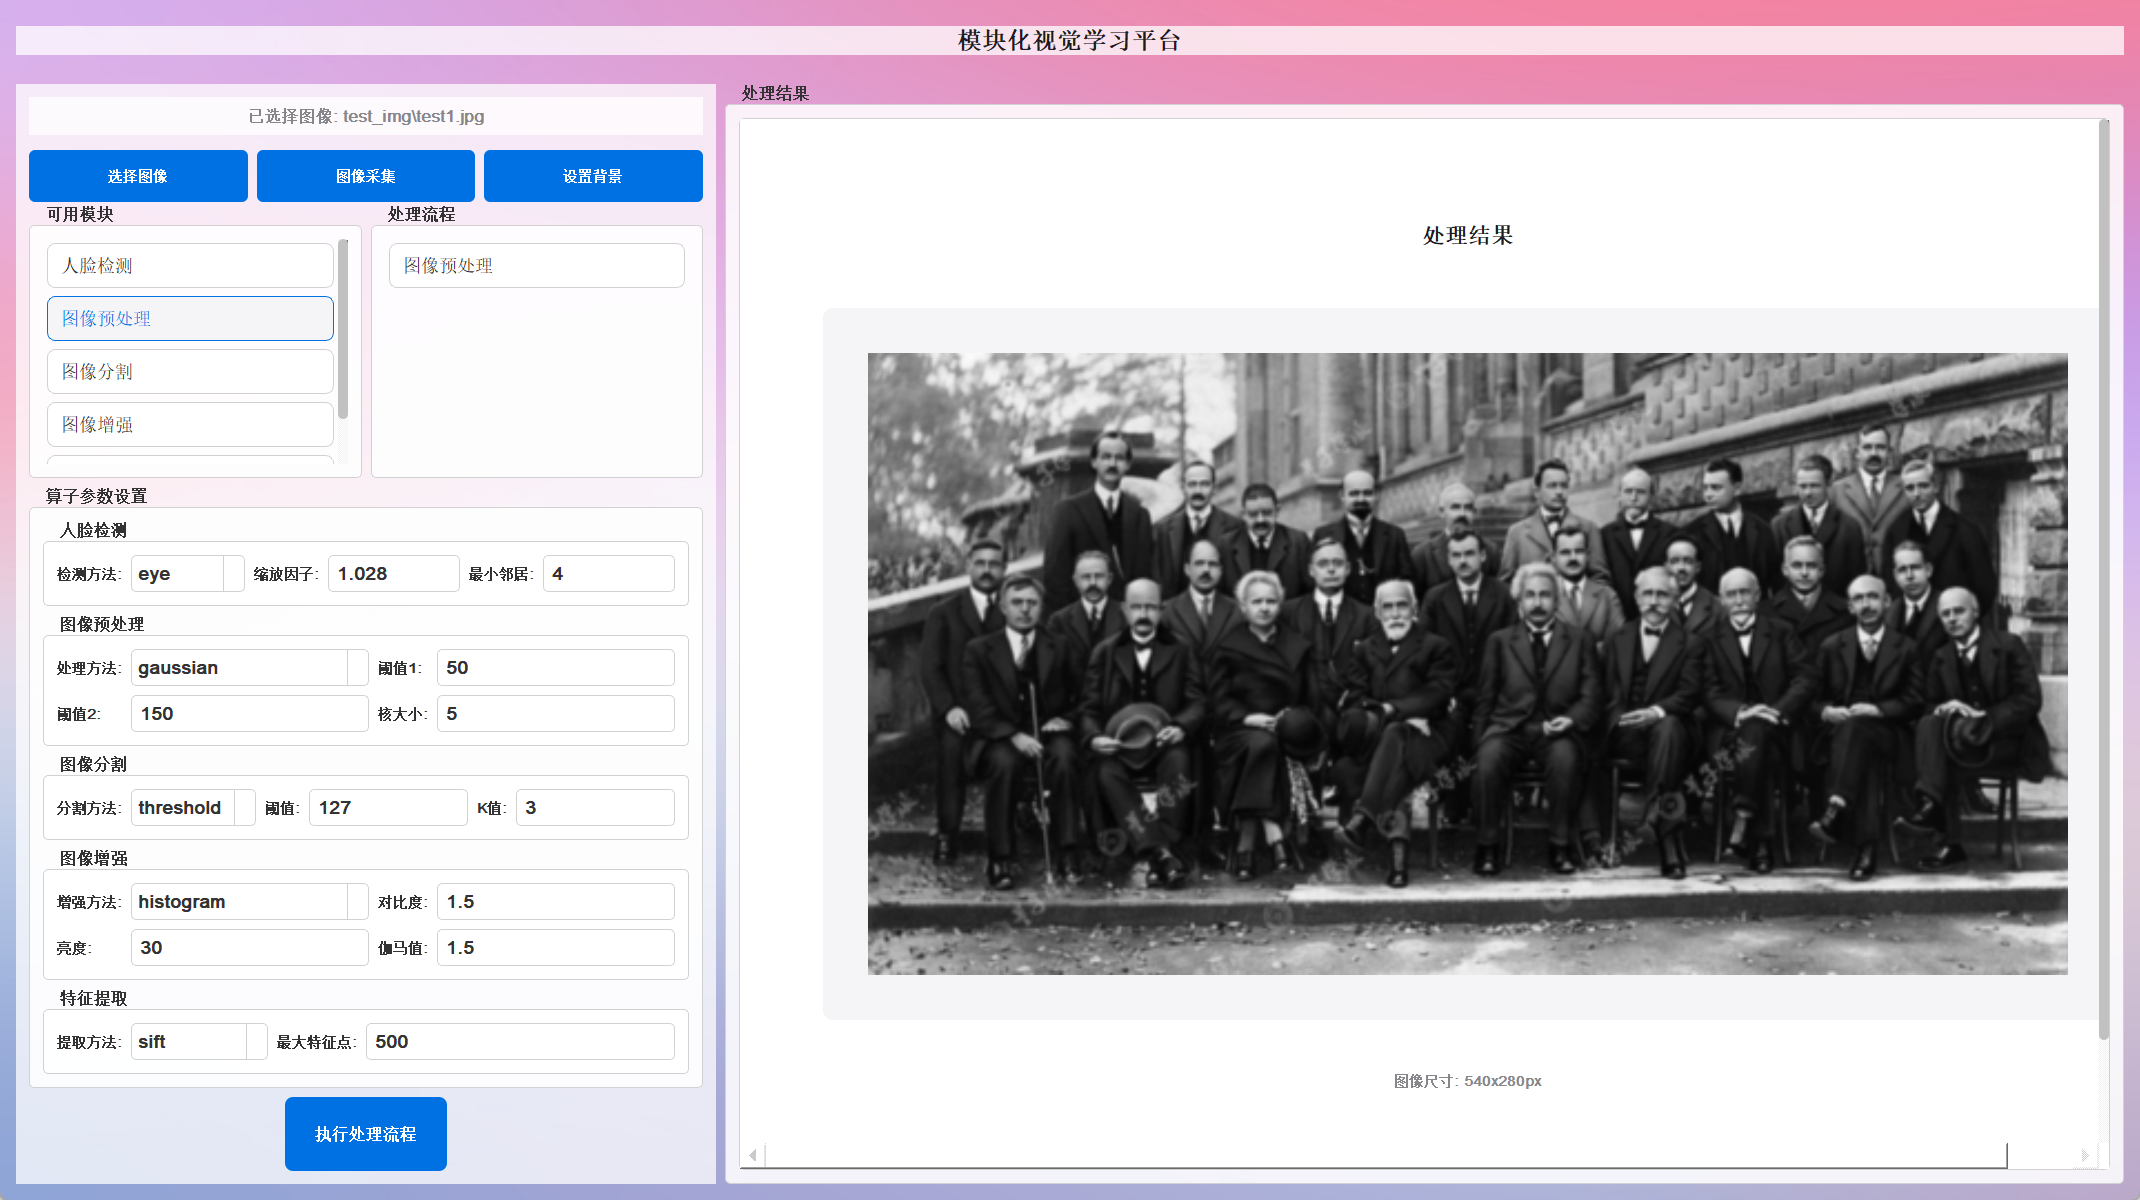
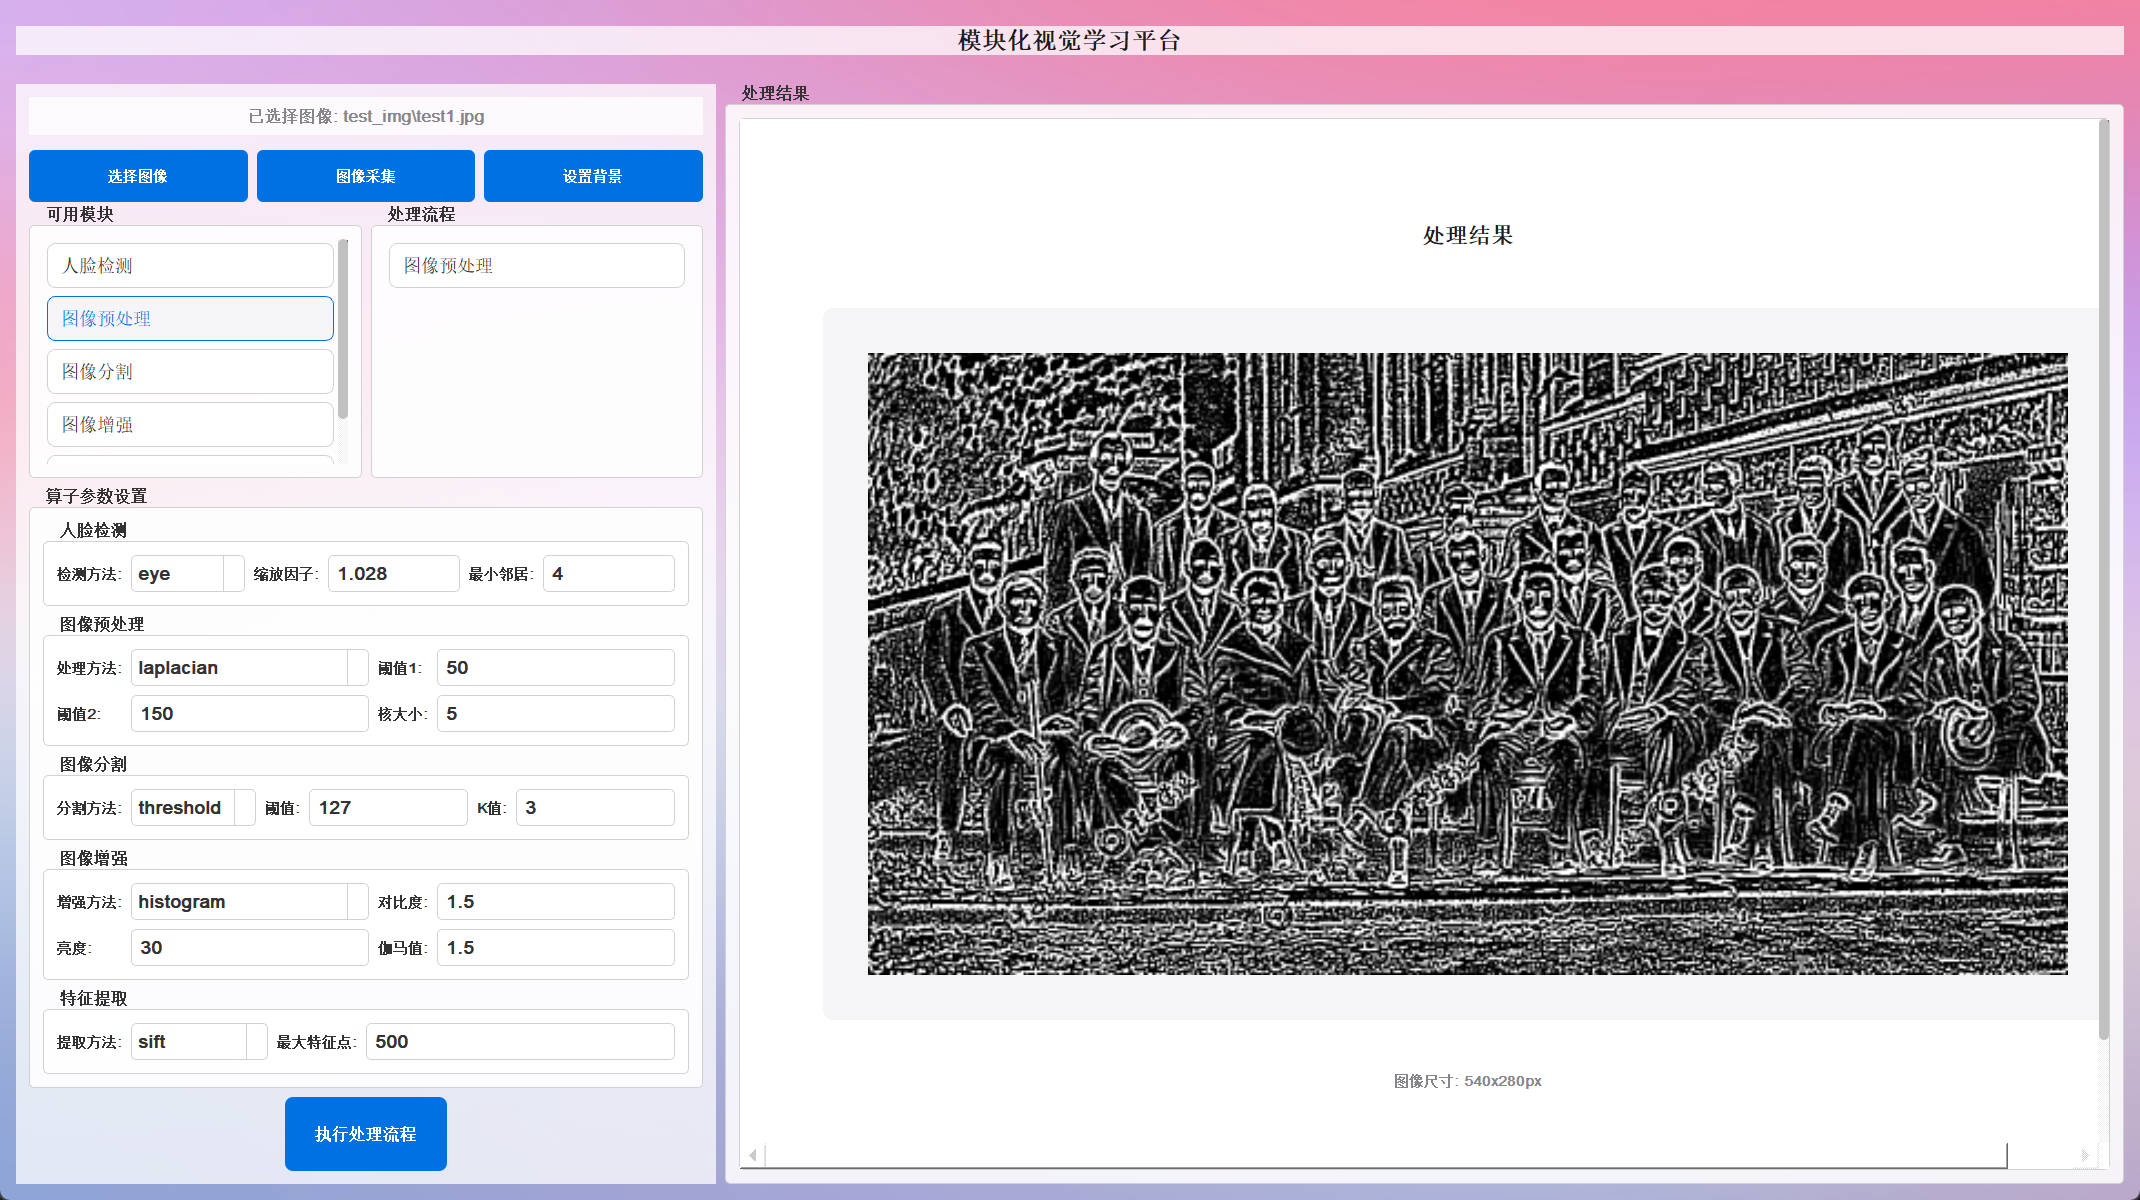
2. 图像预处理功能
-
标准处理流程 :灰度转换 → 高斯模糊 → 直方图均衡化 → Canny边缘检测
-
高斯模糊处理 :图像降噪和平滑
-
拉普拉斯锐化 :边缘增强和细节提升
3. 图像分割技术
- 颜色分割 :基于 HSV 色彩空间的颜色范围分割
- 边缘分割 :基于 Canny 算法的轮廓检测
- 阈值分割 :自适应和固定阈值二值化
4. 图像增强功能
- 直方图均衡化 :提高图像对比度
- CLAHE 自适应均衡化 :局部对比度增强
- Gamma 校正 :亮度和对比度调整
5. 特征提取
- SIFT 特征检测 :尺度不变特征变换,用于图像匹配和识别
🚀 技术亮点
多算法融合
- 传统计算机视觉算法(Haar、SIFT)
- 现代深度学习模型(YuNet、DNN)
- 自适应参数调整系统
用户友好的界面
- 图形化操作界面(基于 PyQt/PySide)
- 实时参数调整
- 即时效果预览
高度可配置
- 支持多种检测方法切换
- 丰富的参数调节选项
- 灵活的处理流程组合
🎨 应用效果展示
人脸检测效果
- ✅ 检测准确率高,支持多人脸场景
- ✅ 实时显示置信度分数
- ✅ 同时输出人脸框和关键点(眼睛位置)
图像处理效果
- ✅ 有效的噪声去除和图像增强
- ✅ 精确的边缘检测和轮廓提取
- ✅ 智能的颜色分割(如分离黑色西装区域)
特征分析能力
- ✅ 提取图像关键特征点
- ✅ 支持图像匹配和比较
- ✅ 适用于目标识别和跟踪
🛠️ 技术栈
- 核心框架 :OpenCV 4.x
- 深度学习 :ONNX Runtime、Caffe
- 用户界面 :PyQt/PySide
- 编程语言 :Python 3.x
- 图像格式 :支持常见的 JPG、PNG、BMP 等
部分代码
人脸检测类,用于检测图像中的人脸
class FaceDetection:  # 人脸检测类,用于检测图像中的人脸
    def __init__(self, scaleFactor=1.028, minNeighbors=4, detection_method="haar",
                 yunet_model_path="model/face_detection_yunet_2023mar_int8bq.onnx",
                 yunet_conf_thresh=0.7,
                 yunet_nms_thresh=0.3):
        """初始化人脸检测器,设置参数

        参数:
            scaleFactor: 图像缩放比例因子,值越小,检测越精确但速度越慢
            minNeighbors: 确定候选矩形区域被确认为人脸的相邻矩形数
            detection_method: 检测方法,可选 "haar", "dnn", "eye"
                - haar: 使用传统的Haar级联分类器检测人脸
                - dnn: 使用深度学习模型检测人脸(更精确但需更多计算资源)
                - eye: 在检测到的人脸区域内检测眼睛
                - yunet: 使用YUNet模型进行人脸检测(需要下载模型文件)
            yunet_model_path: YUNet模型文件路径
            yunet_conf_thresh: YUNet模型的置信度阈值,低于此值的检测结果将被忽略
            yunet_nms_thresh: YUNet模型的非极大值抑制阈值,用于去除重叠的检测框
        """
        # 加载预训练的Haar级联分类器
        self.face_cascade = cv2.CascadeClassifier(cv2.data.haarcascades + 'haarcascade_frontalface_default.xml')
        self.eye_cascade = cv2.CascadeClassifier(cv2.data.haarcascades + 'haarcascade_eye.xml')
        self.scaleFactor = scaleFactor  # 每次缩放的比例因子
        self.minNeighbors = minNeighbors  # 构成检测对象的最小相邻矩形数
        self.detection_method = detection_method  # 检测方法
        self.yunet_model_path = yunet_model_path  # YUNet模型路径
        self.yunet_conf_threshold = yunet_conf_thresh  # YUNet模型置信度阈值
        self.yunet_nms_threshold = yunet_nms_thresh  # YUNet模型非极大值抑制阈值

    def detect_faces(self, image):
        """根据选择的方法检测图像中的人脸

        根据初始化时指定的detection_method选择不同的人脸检测算法
        """
        if image is None:
            print("无法读取图像,请检查图像路径。")
            return

        # 确保图像为三通道彩色图像
        if len(image.shape) == 2:
            image = cv2.cvtColor(image, cv2.COLOR_GRAY2BGR)

        # 创建图像副本以避免修改原始数据
        result_image = image.copy()

        # 将图像转换为灰度图像,以便进行人脸检测
        gray = cv2.cvtColor(result_image, cv2.COLOR_BGR2GRAY)
        print("使用的检测方法:", self.detection_method)  # 打印当前使用的检测方法
        # 根据选择的方法执行人脸检测
        if self.detection_method == "haar":
        # 使用Haar级联分类器检测人脸
            faces = self.face_cascade.detectMultiScale(gray, self.scaleFactor, self.minNeighbors)

            # 在原图像上绘制人脸边界框
            for (x, y, w, h) in faces:
                cv2.rectangle(result_image, (x, y), (x + w, y + h), (255, 0, 0), 2)

        elif self.detection_method == "YuNet" or self.detection_method == "eye":
            # 使用YUNet模型进行人脸检测
            # 注意:这需要模型文件,如果不存在会报错
            h, w = image.shape[:2]
            if not os.path.exists(self.yunet_model_path):
                print("模型文件不存在,请下载模型文件。")
                return image
            else:
                try:
                    # 创建 YuNet 检测器实例
                    # 注意:input_size 设为 (0, 0) 表示在 detect 时自动适应图像尺寸
                    self.detector_yunet = cv2.FaceDetectorYN.create(
                        model=self.yunet_model_path,
                        config="", # ONNX 通常不需要 config
                        input_size=(0, 0), # 在 detect 时设置
                        score_threshold=self.yunet_conf_threshold,
                        nms_threshold=self.yunet_nms_threshold,
                        top_k=5000 # 保留多少候选框
                    )
                    if self.detector_yunet is None:
                         print("错误: 创建 YuNet 检测器失败。")
                except Exception as e:
                    print(f"错误: 加载 YuNet 模型时出错: {e}")
                    self.detector_yunet = None
            # 设置当前图像的输入尺寸
            self.detector_yunet.setInputSize((w, h))
            # 检测人脸
            try:
                retval, faces = self.detector_yunet.detect(image)
            except Exception as e:
                print(f"错误: YuNet 检测过程中出错: {e}")
                return image # 返回原始图像

            # 绘制结果
            if self.detection_method == "YuNet" and faces is not None:
                print(f"YuNet 检测到 {len(faces)} 张人脸。") # 打印检测到的人脸数量
                for face in faces:
                    box = list(map(int, face[:4])) # 边界框 [x1, y1, width, height]
                    confidence = face[-1] # 置信度分数

                    # 绘制边界框
                    cv2.rectangle(result_image, (box[0], box[1]), (box[0] + box[2], box[1] + box[3]), (0, 255, 0), 2)

                    # 准备置信度文本
                    text = f"{confidence:.2f}"
                    # 计算文本放置位置 (框的上方)
                    text_pos_y = box[1] - 10 if box[1] - 10 > 10 else box[1] + 15 # 避免文本超出图像顶部
                    cv2.putText(result_image, text, (box[0], text_pos_y), cv2.FONT_HERSHEY_SIMPLEX, 0.6, (0, 255, 0), 2)
            elif self.detection_method == "eye":
                for face in faces:
                    box = list(map(int, face[:4])) # 边界框 [x1, y1, width, height]

                    landmarks = list(map(int, face[4:14]))
                    right_eye = (landmarks[0], landmarks[1])
                    left_eye = (landmarks[2], landmarks[3])
                    # --- 结束提取 ---
                    confidence = face[-1] # 置信度分数

                    # 绘制人脸边界框 (保持不变, 仍为绿色)
                    cv2.rectangle(result_image, (box[0], box[1]), (box[0] + box[2], box[1] + box[3]), (0, 255, 0), 2)

                    # --- 绘制眼睛的红色方框 ---
                    eye_box_size = 5 # 方框半径 (总大小为 10x10)
                    # 右眼方框
                    cv2.rectangle(result_image,
                                  (right_eye[0] - eye_box_size, right_eye[1] - eye_box_size), # 左上角
                                  (right_eye[0] + eye_box_size, right_eye[1] + eye_box_size), # 右下角
                                  (0, 0, 255), # 红色 (BGR)
                                  1) # 线条粗细为 1
                    # 左眼方框
                    cv2.rectangle(result_image,
                                  (left_eye[0] - eye_box_size, left_eye[1] - eye_box_size), # 左上角
                                  (left_eye[0] + eye_box_size, left_eye[1] + eye_box_size), # 右下角
                                  (0, 0, 255), # 红色 (BGR)
                                  1) # 线条粗细为 1

                    # --- 绘制红色的眼睛 ---
                    # --- 提取关键点 ---
                    # 假设前两个点是右眼和左眼中心 (请根据实际模型输出确认)
                    # landmarks = list(map(int, face[4:14]))
                    # right_eye = (landmarks[0], landmarks[1])
                    # left_eye = (landmarks[2], landmarks[3])
                    # # nose = (landmarks[4], landmarks[5])
                    # # right_mouth = (landmarks[6], landmarks[7])
                    # # left_mouth = (landmarks[8], landmarks[9])
                    # # --- 结束提取 ---
                    confidence = face[-1] # 置信度分数

                    # 绘制人脸边界框 (保持不变)
                    cv2.rectangle(result_image, (box[0], box[1]), (box[0] + box[2], box[1] + box[3]), (0, 255, 0), 2)

                    # --- 绘制眼睛关键点 ---
                    cv2.circle(result_image, right_eye, 3, (0, 0, 255), -1) # 红色圆点标记右眼
                    cv2.circle(result_image, left_eye, 3, (0, 0, 255), -1)  # 红色圆点标记左眼
            else:
                print("YuNet 未检测到人脸。")


        # elif self.detection_method == "eye":
        #     # 先检测人脸,然后在人脸区域内检测眼睛
        #     faces = self.face_cascade.detectMultiScale(gray, self.scaleFactor, self.minNeighbors)

        #     for (x, y, w, h) in faces:
        #         # 绘制人脸区域
        #         cv2.rectangle(result_image, (x, y), (x + w, y + h), (255, 0, 0), 2)

        #         # 在检测到的人脸区域内分割出人脸部分
        #         roi_gray = gray[y:y + h, x:x + w]
        #         roi_color = result_image[y:y + h, x:x + w]

        #         # 在人脸区域内检测眼睛
        #         eyes = self.eye_cascade.detectMultiScale(roi_gray)
        #         for (ex, ey, ew, eh) in eyes:
        #             # 在人脸区域内绘制眼睛矩形
        #             cv2.rectangle(roi_color, (ex, ey), (ex + ew, ey + eh), (0, 255, 0), 2)

        return result_image  # 返回标记了人脸/眼睛的图像
图像预处理类,用于执行各种图像预处理操作
class ImagePreprocessing:  # 图像预处理类,用于执行各种图像预处理操作
    def __init__(self, threshold1=50, threshold2=150, kernel_size=5, process_method="standard"):
        """初始化图像预处理器,设置参数

        参数:
            threshold1: Canny边缘检测的第一个阈值
            threshold2: Canny边缘检测的第二个阈值
            kernel_size: 高斯模糊或拉普拉斯算子的核大小
            process_method: 预处理方法,可选 "standard", "gaussian", "laplacian"
                - standard: 标准处理流程(灰度转换、边缘检测、均衡化、二值化)
                - gaussian: 高斯模糊处理,用于平滑和降噪
                - laplacian: 拉普拉斯锐化,用于增强边缘和细节
        """
        self.threshold1 = threshold1  # Canny边缘检测的第一个阈值
        self.threshold2 = threshold2  # Canny边缘检测的第二个阈值
        self.kernel_size = kernel_size  # 滤波器核大小
        self.process_method = process_method  # 预处理方法

    def preprocess_image(self, image):
        """根据选择的方法对图像进行预处理

        根据初始化时指定的process_method选择不同的预处理方法
        """
        if image is None:
            print("无法读取图像,请检查图像路径。")
            return

        # 创建图像副本以避免修改原始数据
        result_image = image.copy()

        # 根据选择的方法执行预处理
        if self.process_method == "standard":
            # 1. 将彩色图像转换为灰度图像
            gray_image = cv2.cvtColor(result_image, cv2.COLOR_BGR2GRAY)

            # 2. 高斯模糊去噪(确保 kernel_size 为奇数)
            k = self.kernel_size if self.kernel_size % 2 == 1 else self.kernel_size + 1
            blurred = cv2.GaussianBlur(gray_image, (k, k), 0)

            # 3. 直方图均衡化增强对比度
            equalized = cv2.equalizeHist(blurred)

            # 4. Canny 边缘检测,使用 threshold1/threshold2
            edges = cv2.Canny(equalized, self.threshold1, self.threshold2)

            # 5. 二值化(可选,对 equalized 做固定阈值)
            # _, binary = cv2.threshold(equalized, 127, 255, cv2.THRESH_BINARY)

            # 6. 缩放到 50%
            h, w = edges.shape[:2]
            scale = 0.5
            dim = (int(w * scale), int(h * scale))
            edges = cv2.resize(edges, dim, interpolation=cv2.INTER_AREA)

            return edges

        elif self.process_method == "gaussian":
            # 高斯模糊处理,用于降噪和平滑
            # 如果是彩色图像,直接进行高斯模糊处理

            # 确保kernel_size是奇数
            kernel_size = self.kernel_size
            if kernel_size % 2 == 0:
                kernel_size += 1

            # 应用高斯模糊
            gaussian_blur = cv2.GaussianBlur(result_image, (kernel_size, kernel_size), 0)

            # 缩放图像到50%的原始大小
            scale_percent = 50
            width = int(gaussian_blur.shape[1] * scale_percent / 100)
            height = int(gaussian_blur.shape[0] * scale_percent / 100)
            dim = (width, height)

            gaussian_blur = cv2.resize(gaussian_blur, dim, interpolation=cv2.INTER_AREA)

            # 转为灰度图以便于显示和后续处理
            if len(gaussian_blur.shape) == 3:
                gaussian_blur = cv2.cvtColor(gaussian_blur, cv2.COLOR_BGR2GRAY)

            return gaussian_blur

        elif self.process_method == "laplacian":
            # 拉普拉斯锐化,增强边缘和细节

            # 将彩色图像转换为灰度图像
            if len(result_image.shape) == 3:
                gray_image = cv2.cvtColor(result_image, cv2.COLOR_BGR2GRAY)
            else:
                gray_image = result_image.copy()

            # 应用高斯模糊以减少噪声(可选)
            blurred = cv2.GaussianBlur(gray_image, (3, 3), 0)

            # 应用拉普拉斯算子进行边缘检测和锐化
            # 使用不同的核大小参数
            kernel_size = self.kernel_size
            if kernel_size % 2 == 0:
                kernel_size = 3  # 默认使用3x3核

            # 应用拉普拉斯变换
            laplacian = cv2.Laplacian(blurred, cv2.CV_8U, ksize=kernel_size)

            # 归一化结果以增强细节
            laplacian = cv2.normalize(laplacian, None, 0, 255, cv2.NORM_MINMAX)

            # 缩放图像到50%的原始大小
            scale_percent = 50
            width = int(laplacian.shape[1] * scale_percent / 100)
            height = int(laplacian.shape[0] * scale_percent / 100)
            dim = (width, height)

            laplacian = cv2.resize(laplacian, dim, interpolation=cv2.INTER_AREA)

            return laplacian

        # 如果没有匹配的方法,返回原始图像的灰度版本
        if len(result_image.shape) == 3:
            result_image = cv2.cvtColor(result_image, cv2.COLOR_BGR2GRAY)

        # 缩放结果
        scale_percent = 50
        width = int(result_image.shape[1] * scale_percent / 100)
        height = int(result_image.shape[0] * scale_percent / 100)
        dim = (width, height)
        result_image = cv2.resize(result_image, dim, interpolation=cv2.INTER_AREA)

        return result_image
这个项目展示了从传统计算机视觉到现代深度学习的技术演进,提供了一个完整的图像处理解决方案,适合于需要多种算法对比和参数调优的应用场景。

火山引擎开发者社区是火山引擎打造的AI技术生态平台,聚焦Agent与大模型开发,提供豆包系列模型(图像/视频/视觉)、智能分析与会话工具,并配套评测集、动手实验室及行业案例库。社区通过技术沙龙、挑战赛等活动促进开发者成长,新用户可领50万Tokens权益,助力构建智能应用。
更多推荐
 39
39 0
0- 0


 已为社区贡献1条内容

所有评论(0)