大模型工具调用演进史:从Function Calling到MCP协议完全解析!
文章详细介绍了大模型工具调用的演进历程,从早期的函数调用(Function Calling)到现在的MCP(Model Context Protocol)标准化协议。文章解析了不同厂商函数调用的实现差异,阐述了MCP协议的架构、三种传输协议(Stdio、SSE、Streamable HTTP)及其在实际应用中的价值。MCP作为AI时代函数调用的事实标准,解决了多模型兼容问题,使大模型能通过工具调用
早期有些人寄希望于大模型能力提升能实现AGI,但是现在慢慢地发现,工具调用才是现阶段模型最需要的,工具调用也是大模型与外界交互的一个窗口。现在流行的Function Calling、Computer-Use、**MCP(Model Context Protocol)**都是在这个方向延伸出来的。
这一篇我把函数调用和MCP放在了一起,是因为这些东西本质上都是一样的东西,只是早期刚开始没有任何标准的时候,各家模型都自我实现了一套函数调用,接下去我们会一一过一下工具调用的分类和演进
1 函数调用
最开始调用大模型时,是可以通过传入厂商预定义的结构化数据(JSON Schema),来告诉大模型一些预定义的工具可以使用,这个结构根据厂商的不同而不同,这个阶段大家一般称呼为函数调用(Function Calling)。最早可追溯到OpenAI的这篇Function calling and other API updates[1],Anthropic也在2024年5月宣布[2]Claude支持Tool Use(aka function calling)。
我们简单看一下OpenAI[3]和Google[4]各自模型怎么调用工具的例子。
OpenAI的:
curl -X POST https://api.openai.com/v1/responses \
-H "Authorization: Bearer $OPENAI_API_KEY" \
-H "Content-Type: application/json" \
-d '{
"model": "gpt-5",
"input": [
{"role": "user", "content": "What is the weather like in Paris today?"}
],
"tools": [
{
"type": "function",
"name": "get_weather",
"description": "Get current temperature for a given location.",
"parameters": {
"type": "object",
"properties": {
"location": {
"type": "string",
"description": "City and country e.g. Bogotá, Colombia"
}
},
"required": ["location"],
"additionalProperties": false
},
"strict": true
}
]
}'
Google的:
curl "https://generativelanguage.googleapis.com/v1beta/models/gemini-2.5-flash:generateContent" \
-H "x-goog-api-key: $GEMINI_API_KEY" \
-H 'Content-Type: application/json' \
-X POST \
-d '{
"contents": [
{
"role": "user",
"parts": [
{
"text": "What'\''s the temperature in London?"
}
]
}
],
"tools": [
{
"functionDeclarations": [
{
"name": "get_current_temperature",
"description": "Gets the current temperature for a given location.",
"parameters": {
"type": "object",
"properties": {
"location": {
"type": "string",
"description": "The city name, e.g. San Francisco"
}
},
"required": ["location"]
}
}
]
}
]
}'
如果你也想通过学大模型技术去帮助自己升职和加薪,可以扫描下方链接👇👇

可以看到通过JSON的方式来定义函数,基本上是函数名、描述、相关字段和类型这些信息,都集中在调用时tools这个字段下,只不过下面的字段名有些许差异(这也是MCP流行的一个重要原因)。
现在我们来看看函数调用的一个流程,我们这边直接引用前面提到的OpenAI和Google的模型做函数调用时的流程图:
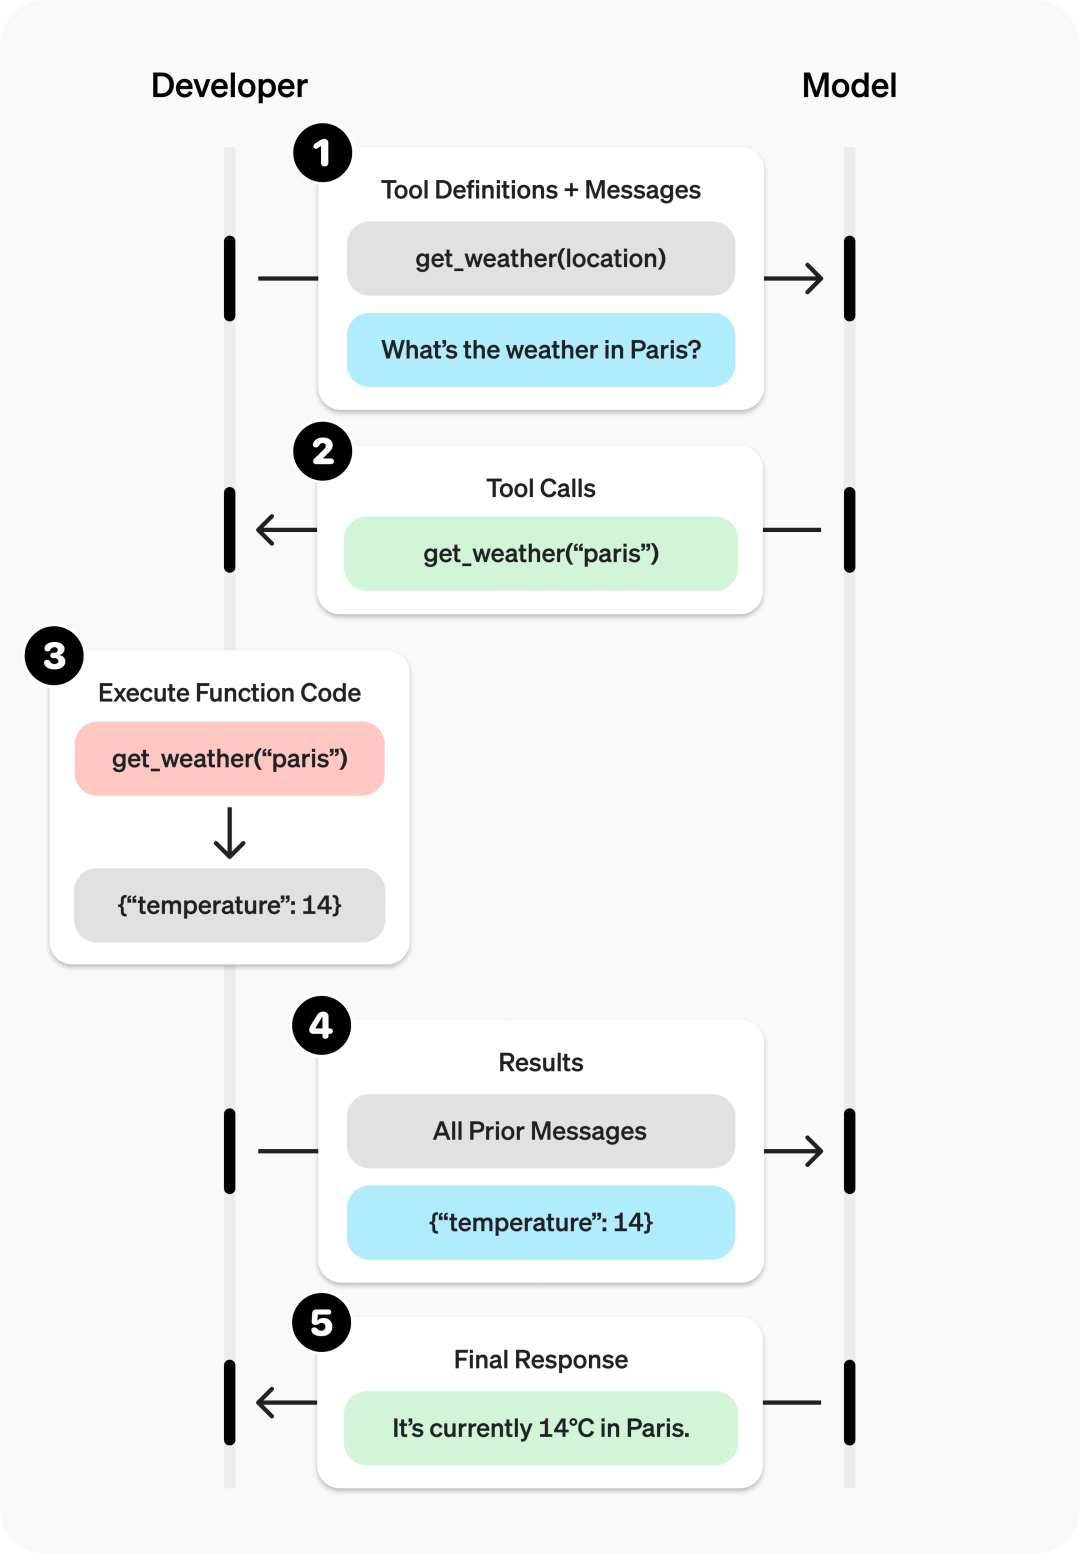
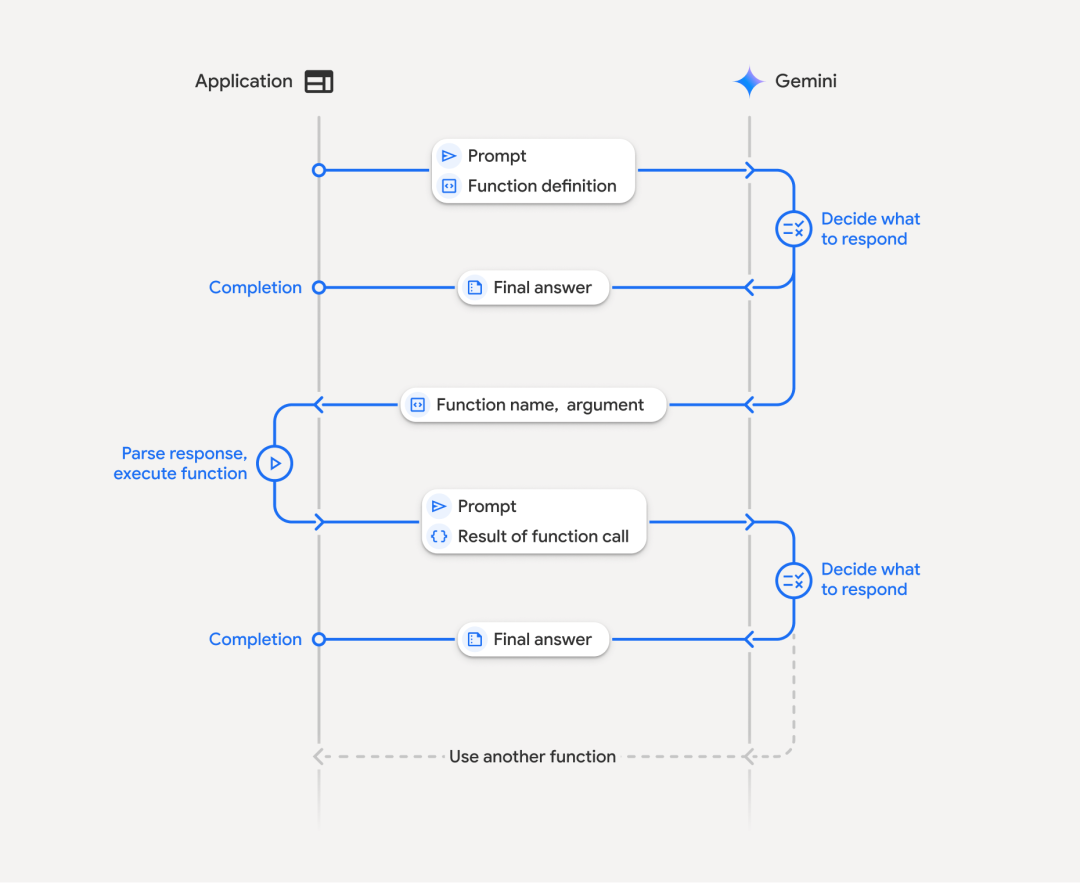
这个流程可以很清楚的看出,函数调用的流程是:
1.提供一组函数在上下文中
2.让大模型根据上下文来决定是否要调用函数
3.调用则返回对应格式的内容,如:get_weather("paris")
4.应用负责具体去执行这个函数,得到结果
5.将结果附带在上下文再次请求大模型
6.根据执行结果来决定后续的动作,比如告知用户完成任务了,或者还需要在执行其他任务
最后,我们从前面的OpenAI和Google的函数调用对比,可以非常明显的观测到,针对函数的定义是完全不一样的格式,这就造成了兼容的困难,也就是说系统里接入了多个模型的情况下,就有可能要写多个调用方式来兼容,这造成了极大的不便,在这种情况下,MCP应运而生了
2 MCP
Anthropic于2024年11月[5]推出了MCP(Model Context Protocol)[6],经过几个月的沉淀,很多服务涌现,到2025年上半年,MCP在非常短的时间内火出圈,所有人都在谈论MCP,随着Google、OpenAI等主流的模型厂商都宣布并支持了MCP之后,这一开放标准已经成为AI时代函数调用的事实标准协议。
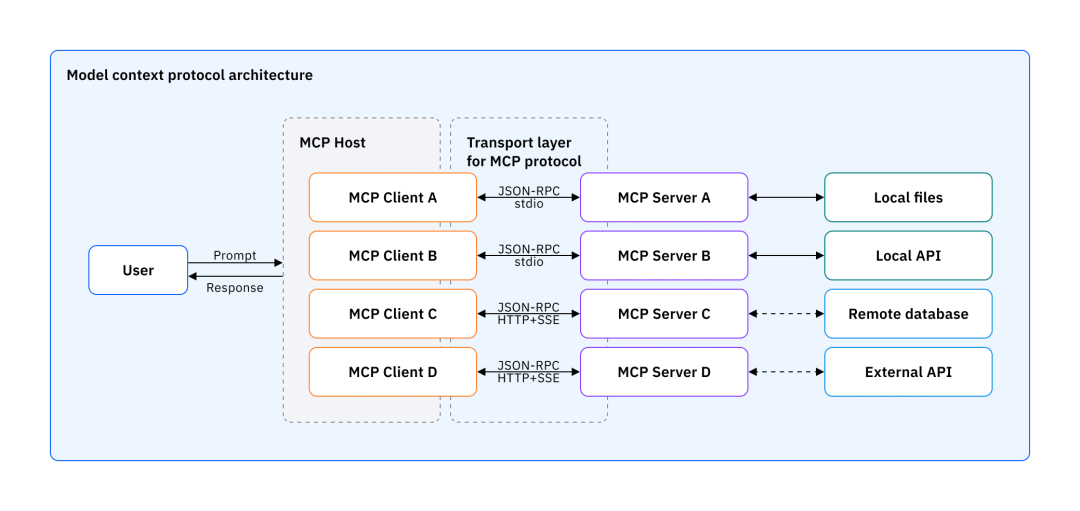
这张图[7]展示了MCP的架构,虽然MCP里定义了:
•Host:运行LLM应用的设备
•Client:MCP客户端,负责LLM和Server的通信,起到一个中介作用
•Server:MCP服务端,负责实际的逻辑,也可能调用外部的服务、命令等
我觉得可以更简化的理解,MCP最主要的就是MCP Server,包含了一些功能的一个服务,而客户端可以通过MCP协议去调用这个Server,结果返回给大模型。引用一下这篇文章[8]中的图:
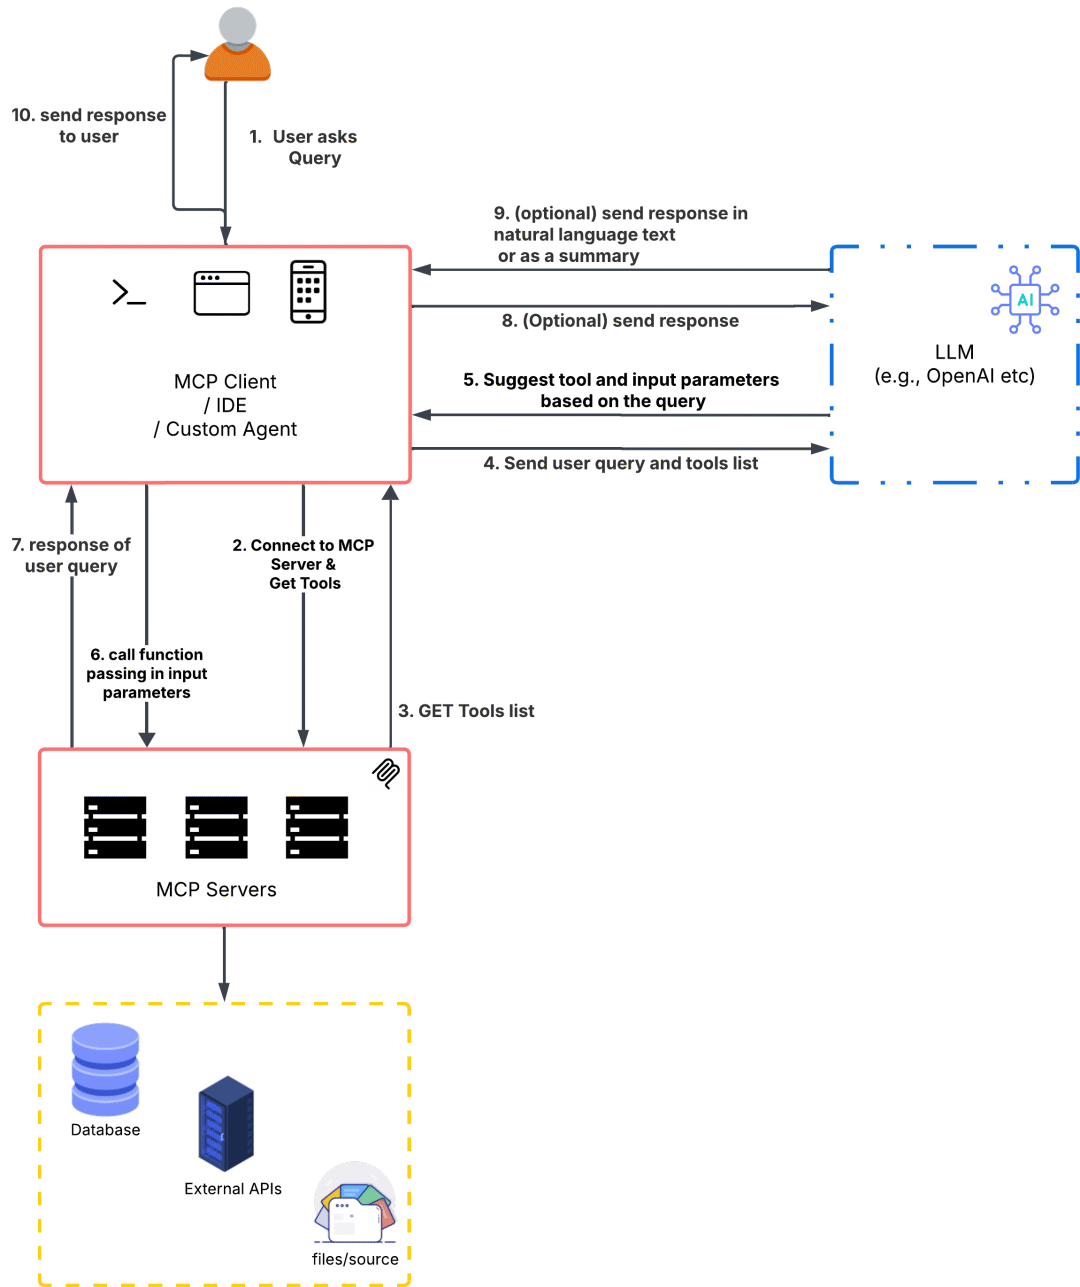
可以很清晰地看清楚整个流程:
1.用户发送问题
2.AI应用连接到MCP Server(这个过程有可能发生在应用启动的时候,在用户发送问题之前建立好连接)
3.获取工具列表(最常见的一个请求,不过MCP还支持获取提示词之类的资源),是JSON格式的数据
4.将用户问题和工具列表一起发送给大模型
5.大模型根据判断,如果不产生调用直接返回。如果产生调用就返回到AI应用
6.AI应用根据返回的信息知道请求哪个工具,参数是什么,组装后请求
7.AI应用得到MCP Server返回的结果
8.AI应用将工具执行后的结果再给到大模型(前面的聊天记录也会一起)
9.大模型做最后的结果输出
10.AI应用将最终结果返回给用户(整个周期期间可能已经通过流式不断返回了)
这是完整的流程,实际中根据应用形态、编排和业务等情况,有些步骤是非必要的。了解完架构和流程,整体有个印象了,现在我们深入了解一下MCP协议,至少知道实际使用中我们应该怎么选择。
2.1 MCP协议
MCP协议里最重要的当属传输协议[9](Transport Protocol),我写这篇文章的时候,MCP标准演进到2025-06-18这个修订版了,目前支持的是:
•Stdio:通过命令直接拉起MCP Server
•Streamable HTTP:通过流式HTTP去请求MCP Server
最早的版本是Stdio和SSE,但是因为SSE需要长期保持一个连接,且偏有状态,在很多场景下不适用,后来才演进成流式HTTP。
这个其实也展现了MCP在业界的发展。我们可以理解Stdio更适用于C端的应用,比如我们用的ChatGPT、Cursor等,可以在端侧就直接连接和处理。而HTTP则支持一些远端的MCP,尤其适合一些B端场景。比如高德地图MCP,就是直接通过官方的URL连接使用。当然这个分类不是绝对的,只是按照经验来说是这个倾向。
值得一提的是,在MCP发展的阶段,出现了Stdio、SSE、StreamableHTTP三种协议互转的需求,也催生了很多开源项目,几个月前我开源的Unla[10]正是处理这种需求的一个开源项目,并且更进一步,支持了反向代理存量的HTTP接口,这对于B端来说,可以快速通过配置化的方式将很多存量的API转成MCP Server而不需要任何代码的改造。另外还有一些情况下,因为接入太多MCP Server了,导致上下文膨胀得很厉害,因此也出现了一些MCP Server聚合的项目,将多个MCP Servers绑定到某个MCP下,甚至可以智能的选择激活的工具。这些都是MCP发展和普及过程中产生的一些衍生物。
用一个非常简单的代码来展示一下MCP是如何运作的:
#!/usr/bin/env python3
"""
Simple MCP Server for Teaching Purposes
使用 FastMCP 实现的简单教学服务器
支持三种传输协议:stdio, SSE, streamable HTTP
"""
import sys
from fastmcp import FastMCP
# 创建 MCP 服务器实例
mcp = FastMCP("Demo Teaching Server")
@mcp.tool()
def hello_world(name: str = "World") -> str:
"""
简单的 Hello World 工具
Args:
name: 要问候的名字,默认为 "World"
Returns:
问候消息
"""
return f"Hello, {name}! 👋"
@mcp.tool()
def ping_pong(message: str) -> str:
"""
Ping-Pong 回声工具
Args:
message: 要发送的消息
Returns:
如果消息是 "ping" 返回 "pong",否则返回原消息的回声
"""
if message.lower() == "ping":
return "pong! 🏓"
return f"Echo: {message}"
@mcp.tool()
def add_numbers(a: float, b: float) -> float:
"""
简单的加法计算器
Args:
a: 第一个数字
b: 第二个数字
Returns:
两个数字的和
"""
return a + b
@mcp.tool()
def get_server_info() -> dict:
"""
获取服务器信息
Returns:
服务器的基本信息
"""
return {
"name": "Demo Teaching Server",
"version": "1.0.0",
"description": "一个用于教学的简单 MCP 服务器",
"tools_count": 4,
"framework": "FastMCP"
}
if __name__ == "__main__":
import argparse
parser = argparse.ArgumentParser(description="MCP Demo Server - 支持多种传输协议")
parser.add_argument(
"--transport",
type=str,
choices=["stdio", "sse", "http"],
default="stdio",
help="传输协议类型 (stdio/sse/http)"
)
parser.add_argument(
"--host",
type=str,
default="127.0.0.1",
help="HTTP/SSE 服务器主机地址 (默认: 127.0.0.1)"
)
parser.add_argument(
"--port",
type=int,
default=8000,
help="HTTP/SSE 服务器端口 (默认: 8000)"
)
args = parser.parse_args()
# 根据传输协议类型运行服务器
if args.transport == "stdio":
print("🚀 启动 STDIO 传输模式...", file=sys.stderr)
mcp.run(transport="stdio")
elif args.transport == "sse":
print(f"🚀 启动 SSE 传输模式 @ http://{args.host}:{args.port}/sse", file=sys.stderr)
mcp.run(transport="sse", host=args.host, port=args.port)
elif args.transport == "http":
print(f"🚀 启动 HTTP (Streamable) 传输模式 @ http://{args.host}:{args.port}/mcp", file=sys.stderr)
mcp.run(transport="http", host=args.host, port=args.port, path="/mcp")
定义了4个工具,并且同时支持了Stdio, SSE, Streamable HTTP,我们使用Inspector[11]来连接一下
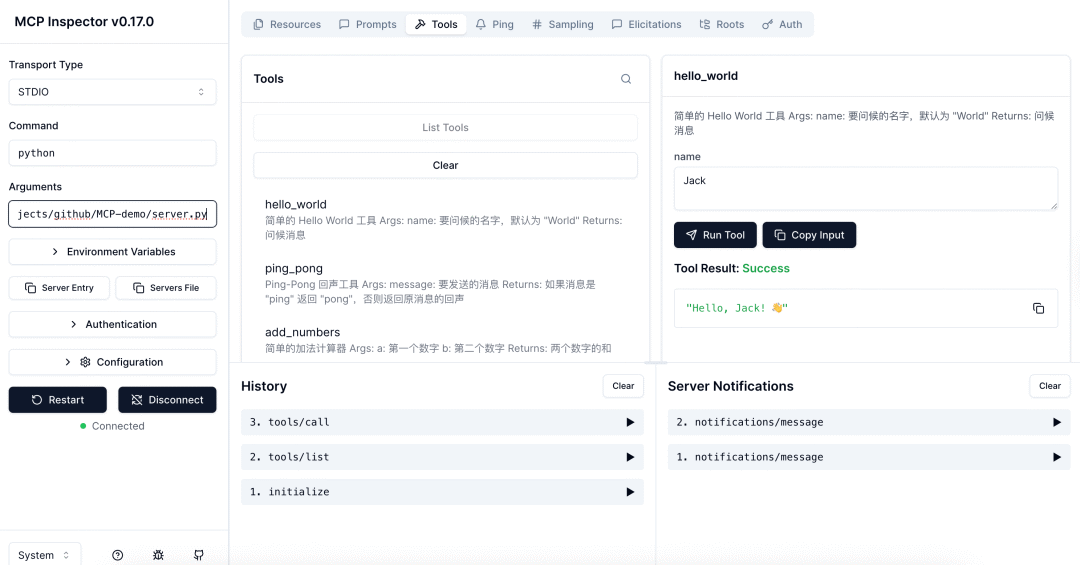
Stdio是直接通过命令的方式拉起运行,通信方式是通过STDIN和STDOUT,简单理解就是在命令行里输入请求(符合MCP定义的规范JSON-RPC),然后接收响应的内容。流程如下:
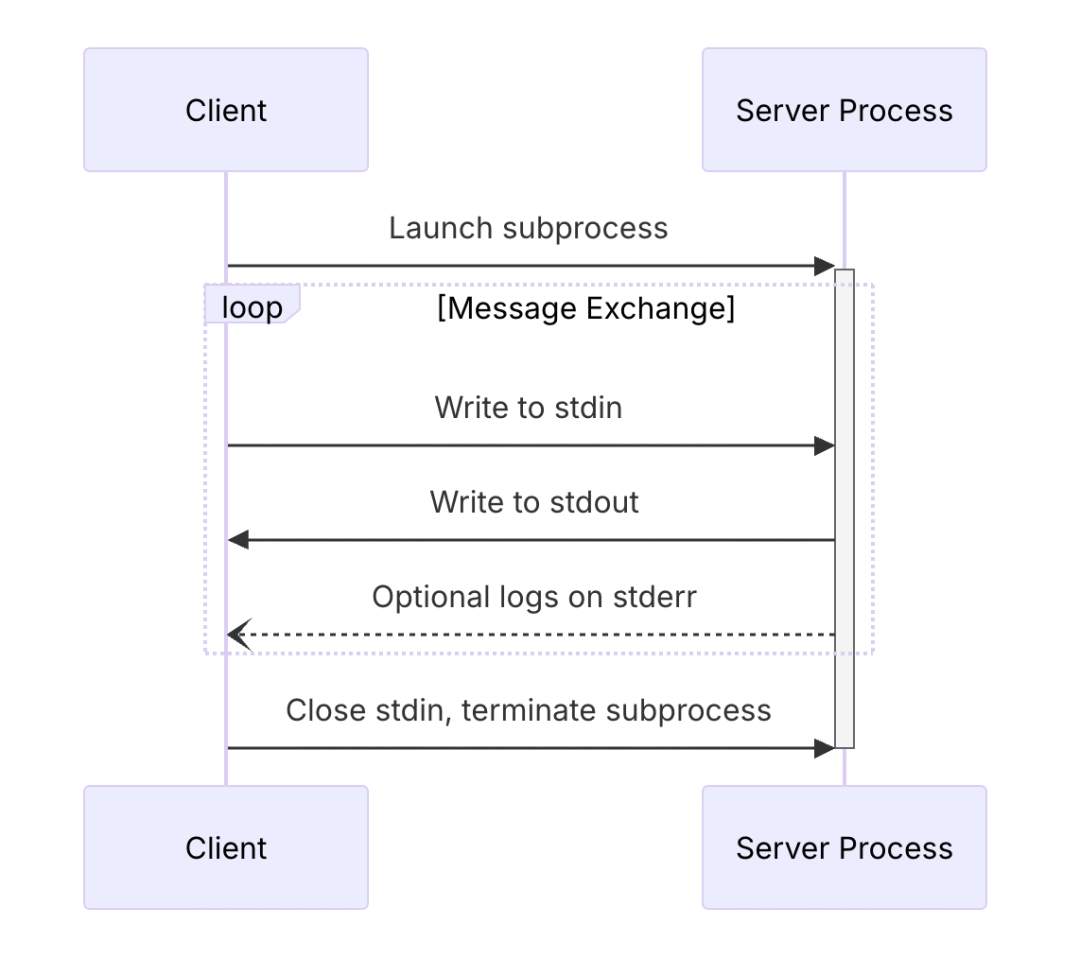
更具体的内容可以参考官方文档[12]。接下来是SSE和StreamableHTTP
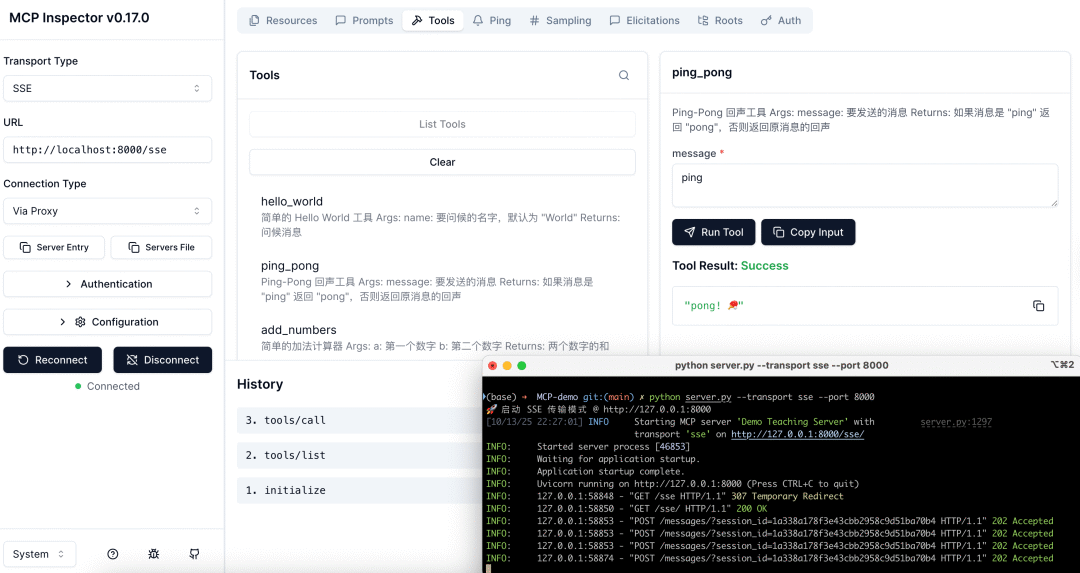
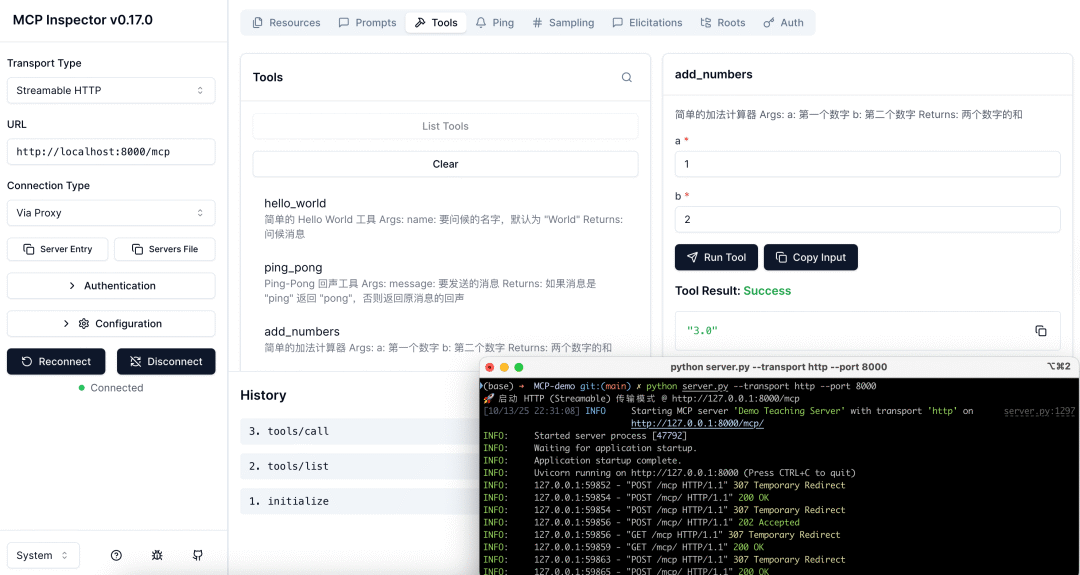
都是一样需要提前运行MCP Server,会通过监听HTTP来接受MCP Client的请求。SSE通常以/sse结尾,通过/message发送消息,而Streamable HTTP则都是通过/mcp。
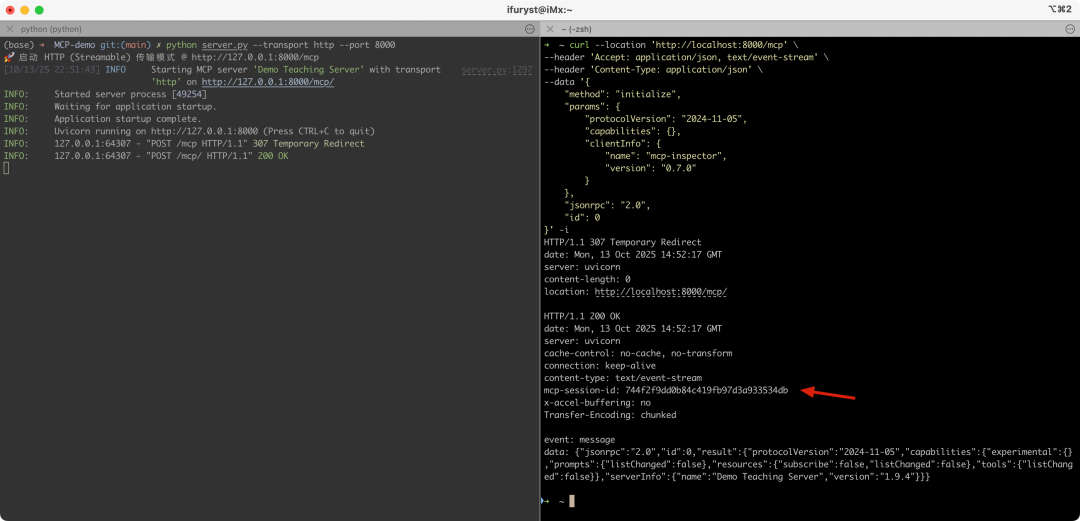
这边我们通过几个连续的curl请求来展示一下Streamable HTTP的实际流程:
1.initialize:初始化,这步最关键的时一定要拿到HTTP响应头里的mcp-session-id,后续都是基于这个会话id进行的
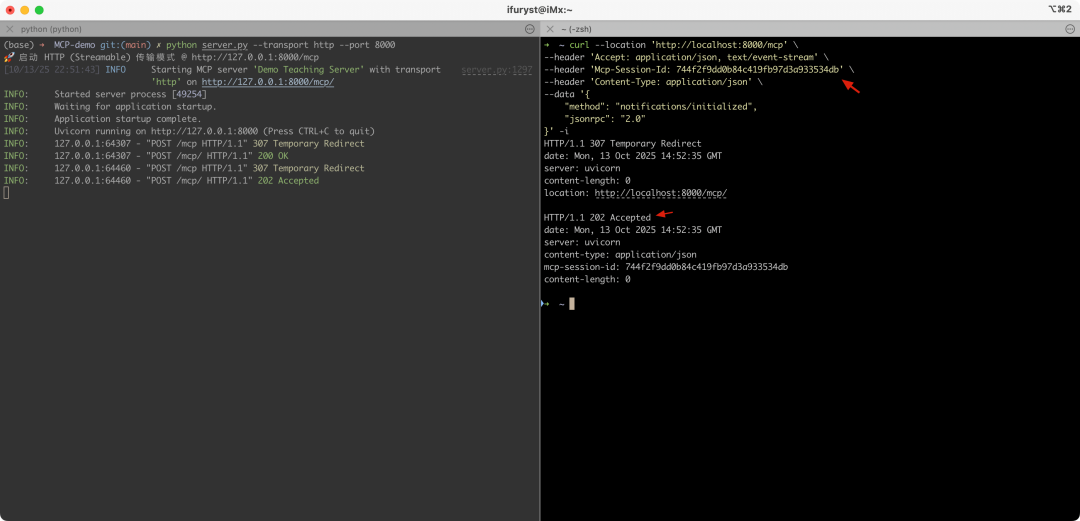
1.notifications/initialized:客户端初始化完后通知服务端,需要在HTTP请求头里增加mcp-session-id,收到的HTTP响应不是200,而是202
1.tools/list:客户端请求工具列表

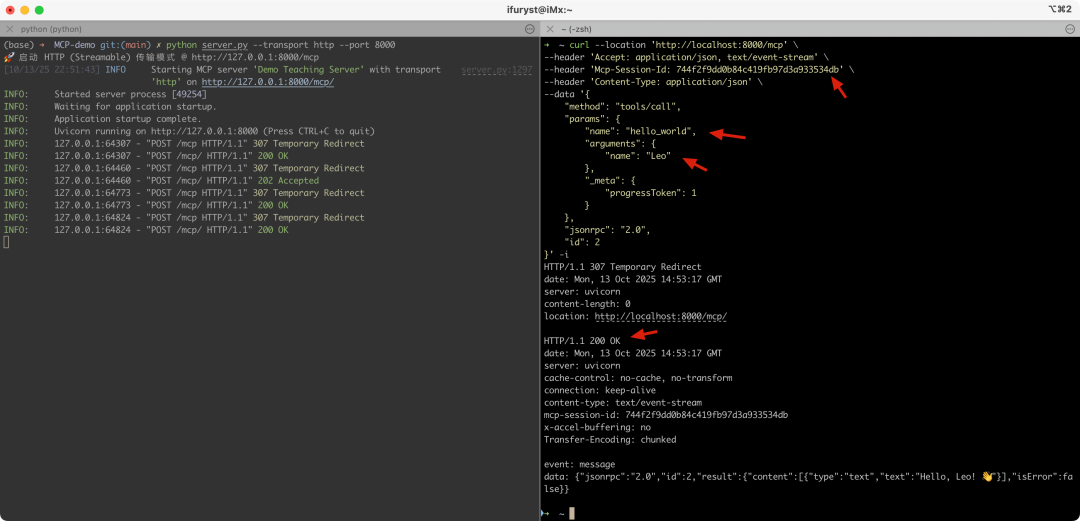
1.tools/call:客户端根据前面的工具列表里的一些定义(如请求参数和类型),调用某个工具得到结果
所有涉及的命令如下:
# 1. initialize
curl --location 'http://localhost:8000/mcp' \
--header 'Accept: application/json, text/event-stream' \
--header 'Content-Type: application/json' \
--data '{
"method": "initialize",
"params": {
"protocolVersion": "2024-11-05",
"capabilities": {},
"clientInfo": {
"name": "mcp-inspector",
"version": "0.7.0"
}
},
"jsonrpc": "2.0",
"id": 0
}' -i
# 2. notifications/initialized
curl --location 'http://localhost:8000/mcp' \
--header 'Accept: application/json, text/event-stream' \
--header 'Mcp-Session-Id: 744f2f9dd0b84c419fb97d3a933534db' \
--header 'Content-Type: application/json' \
--data '{
"method": "notifications/initialized",
"jsonrpc": "2.0"
}' -i
# 3. tools/list
curl --location 'http://localhost:8000/mcp' \
--header 'Accept: application/json, text/event-stream' \
--header 'Mcp-Session-Id: 744f2f9dd0b84c419fb97d3a933534db' \
--header 'Content-Type: application/json' \
--data '{
"method": "tools/list",
"params": {},
"jsonrpc": "2.0",
"id": 1
}' -i
# 4. tools/call
curl --location 'http://localhost:8000/mcp' \
--header 'Accept: application/json, text/event-stream' \
--header 'Mcp-Session-Id: 744f2f9dd0b84c419fb97d3a933534db' \
--header 'Content-Type: application/json' \
--data '{
"method": "tools/call",
"params": {
"name": "hello_world",
"arguments": {
"name": "Leo"
},
"_meta": {
"progressToken": 1
}
},
"jsonrpc": "2.0",
"id": 2
}' -i
可以看出,实际上MCP的通信协议没什么神秘的,MCP带来的好处并不是技术上的革新,而是统一协议,这样服务提供方和用户都可以有共识,就好像HTTP本质上也是基于TCP传输,但是正是因为有了开放协议,制定了标准之后,才有了网站和各类APP的繁荣发展。
如果你也想通过学大模型技术去帮助自己升职和加薪,可以扫描下方链接👇👇
2.2 Claude Code
了解完MCP协议,我们结合Claude Code来看看MCP如何结合在实际应用中的。
Claude Code(下称为CC)作为Anthropic的AI Agent,目前被很多人使用,我们可以通过系统提示词看到CC是通过MCP定义工具的,总体的工具如下(v1.*):
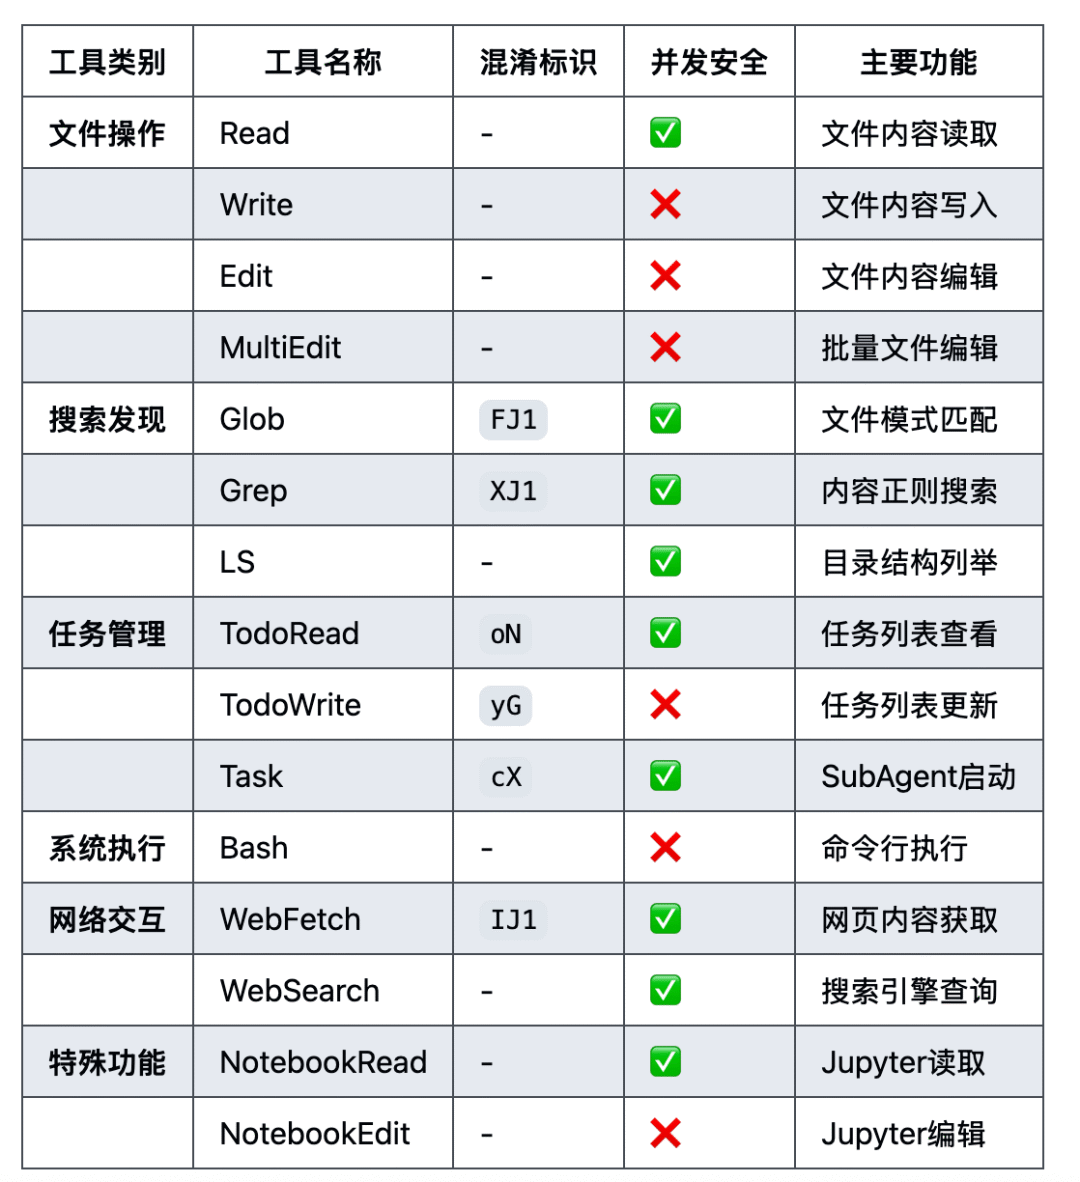
我们可以在请求的tools里看到对应的工具定义
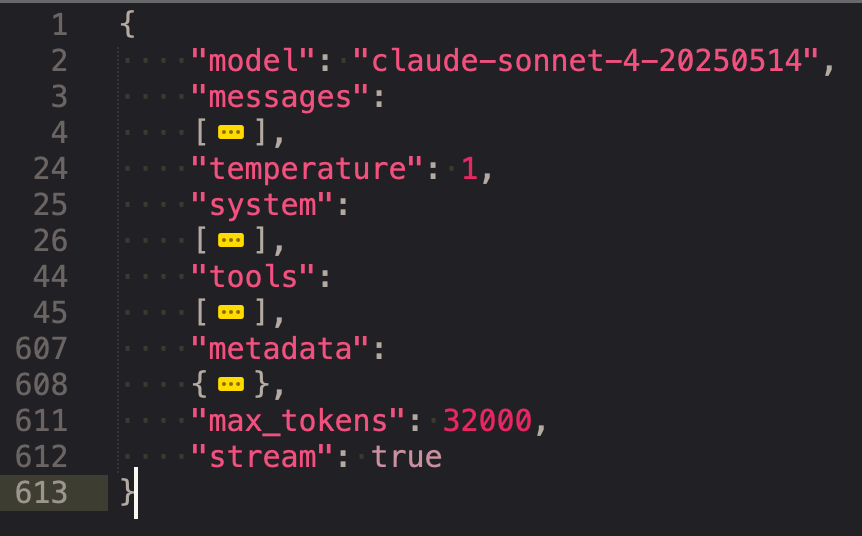
我们看看Bash的定义
{
"name": "Bash",
"description": "Executes a given bash command in a persistent shell session with optional timeout, ensuring proper handling and security measures.\n\nBefore executing the command, please follow these steps:\n\n1. Directory Verification:\n   - If the command will create new directories or files, first use the LS tool to verify the parent directory exists and is the correct location\n   - For example, before running \"mkdir foo/bar\", first use LS to check that \"foo\" exists and is the intended parent directory\n\n2. Command Execution:\n   - Always quote file paths that contain spaces with double quotes (e.g., cd \"path with spaces/file.txt\")\n   - Examples of proper quoting:\n     - cd \"/Users/name/My Documents\" (correct)\n     - cd /Users/name/My Documents (incorrect - will fail)\n     - python \"/path/with spaces/script.py\" (correct)\n     - python /path/with spaces/script.py (incorrect - will fail)\n   - After ensuring proper quoting, execute the command.\n   - Capture the output of the command.\n\nUsage notes:\n  - The command argument is required.\n  - You can specify an optional timeout in milliseconds (up to 600000ms / 10 minutes). If not specified, commands will timeout after 120000ms (2 minutes).\n  - It is very helpful if you write a clear, concise description of what this command does in 5-10 words.\n  - If the output exceeds 30000 characters, output will be truncated before being returned to you.\n  - VERY IMPORTANT: You MUST avoid using search commands like `find` and `grep`. Instead use Grep, Glob, or Task to search. You MUST avoid read tools like `cat`, `head`, `tail`, and `ls`, and use Read and LS to read files.\n - If you _still_ need to run `grep`, STOP. ALWAYS USE ripgrep at `rg` first, which all ${PRODUCT_NAME} users have pre-installed.\n  - When issuing multiple commands, use the ';' or '&&' operator to separate them. DO NOT use newlines (newlines are ok in quoted strings).\n  - Try to maintain your current working directory throughout the session by using absolute paths and avoiding usage of `cd`. You may use `cd` if the User explicitly requests it.\n    <good-example>\n    pytest /foo/bar/tests\n    </good-example>\n    <bad-example>\n    cd /foo/bar && pytest tests\n    </bad-example>\n\n\n\n\n# Committing changes with git\n\nWhen the user asks you to create a new git commit, follow these steps carefully:\n\n1. You have the capability to call multiple tools in a single response. When multiple independent pieces of information are requested, batch your tool calls together for optimal performance. ALWAYS run the following bash commands in parallel, each using the Bash tool:\n  - Run a git status command to see all untracked files.\n  - Run a git diff command to see both staged and unstaged changes that will be committed.\n  - Run a git log command to see recent commit messages, so that you can follow this repository's commit message style.\n2. Analyze all staged changes (both previously staged and newly added) and draft a commit message:\n  - Summarize the nature of the changes (eg. new feature, enhancement to an existing feature, bug fix, refactoring, test, docs, etc.). Ensure the message accurately reflects the changes and their purpose (i.e. \"add\" means a wholly new feature, \"update\" means an enhancement to an existing feature, \"fix\" means a bug fix, etc.).\n  - Check for any sensitive information that shouldn't be committed\n  - Draft a concise (1-2 sentences) commit message that focuses on the \"why\" rather than the \"what\"\n  - Ensure it accurately reflects the changes and their purpose\n3. You have the capability to call multiple tools in a single response. When multiple independent pieces of information are requested, batch your tool calls together for optimal performance. ALWAYS run the following commands in parallel:\n   - Add relevant untracked files to the staging area.\n   - Create the commit with a message ending with:\n   🤖 Generated with [Claude Code](https://claude.ai/code)\n\n   Co-Authored-By: Claude <noreply@anthropic.com>\n   - Run git status to make sure the commit succeeded.\n4. If the commit fails due to pre-commit hook changes, retry the commit ONCE to include these automated changes. If it fails again, it usually means a pre-commit hook is preventing the commit. If the commit succeeds but you notice that files were modified by the pre-commit hook, you MUST amend your commit to include them.\n\nImportant notes:\n- NEVER update the git config\n- NEVER run additional commands to read or explore code, besides git bash commands\n- NEVER use the TodoWrite or Task tools\n- DO NOT push to the remote repository unless the user explicitly asks you to do so\n- IMPORTANT: Never use git commands with the -i flag (like git rebase -i or git add -i) since they require interactive input which is not supported.\n- If there are no changes to commit (i.e., no untracked files and no modifications), do not create an empty commit\n- In order to ensure good formatting, ALWAYS pass the commit message via a HEREDOC, a la this example:\n<example>\ngit commit -m \"$(cat <<'EOF'\n   Commit message here.\n\n   🤖 Generated with [Claude Code](https://claude.ai/code)\n\n   Co-Authored-By: Claude <noreply@anthropic.com>\n   EOF\n   )\"\n</example>\n\n# Creating pull requests\nUse the gh command via the Bash tool for ALL GitHub-related tasks including working with issues, pull requests, checks, and releases. If given a Github URL use the gh command to get the information needed.\n\nIMPORTANT: When the user asks you to create a pull request, follow these steps carefully:\n\n1. You have the capability to call multiple tools in a single response. When multiple independent pieces of information are requested, batch your tool calls together for optimal performance. ALWAYS run the following bash commands in parallel using the Bash tool, in order to understand the current state of the branch since it diverged from the main branch:\n   - Run a git status command to see all untracked files\n   - Run a git diff command to see both staged and unstaged changes that will be committed\n   - Check if the current branch tracks a remote branch and is up to date with the remote, so you know if you need to push to the remote\n   - Run a git log command and `git diff [base-branch]...HEAD` to understand the full commit history for the current branch (from the time it diverged from the base branch)\n2. Analyze all changes that will be included in the pull request, making sure to look at all relevant commits (NOT just the latest commit, but ALL commits that will be included in the pull request!!!), and draft a pull request summary\n3. You have the capability to call multiple tools in a single response. When multiple independent pieces of information are requested, batch your tool calls together for optimal performance. ALWAYS run the following commands in parallel:\n   - Create new branch if needed\n   - Push to remote with -u flag if needed\n   - Create PR using gh pr create with the format below. Use a HEREDOC to pass the body to ensure correct formatting.\n<example>\ngh pr create --title \"the pr title\" --body \"$(cat <<'EOF'\n## Summary\n<1-3 bullet points>\n\n## Test plan\n[Checklist of TODOs for testing the pull request...]\n\n🤖 Generated with [Claude Code](https://claude.ai/code)\nEOF\n)\"\n</example>\n\nImportant:\n- NEVER update the git config\n- DO NOT use the TodoWrite or Task tools\n- Return the PR URL when you're done, so the user can see it\n\n# Other common operations\n- View comments on a Github PR: gh api repos/foo/bar/pulls/123/comments",
"input_schema":
{
"type": "object",
"properties":
{
"command":
{
"type": "string",
"description": "The command to execute"
},
"timeout":
{
"type": "number",
"description": "Optional timeout in milliseconds (max 600000)"
},
"description":
{
"type": "string",
"description": " Clear, concise description of what this command does in 5-10 words. Examples:\nInput: ls\nOutput: Lists files in current directory\n\nInput: git status\nOutput: Shows working tree status\n\nInput: npm install\nOutput: Installs package dependencies\n\nInput: mkdir foo\nOutput: Creates directory 'foo'"
}
},
"required":
[
"command"
],
"additionalProperties": false,
"$schema": "http://json-schema.org/draft-07/schema#"
}
}
MCP是Anthropic推行的标准,自然快速在自家产品采用了,我们可以看到,在AI Agent中需要有一个MCP Client的模块,这样才可以完成前面提到的流程,去获取对应的工具列表给拼接到上下文中给到大模型,最后从大模型返回的上下文拿到需要执行的工具,再调用MCP Server进行执行。
现在很多AI Agent集成了MCP调用的能力,可以通过配置的方式进行调用,比如CC的下可以用.mcp.json:
{
"mcpServers": {
"demo-server-stdio": {
"command": "python",
"args": ["/Users/ifuryst/projects/github/MCP-demo/server.py"],
"env": {
"DEMO_API_KEY": "stdio-key-12345",
"DEMO_ENV": "development"
}
},
"demo-server-sse": {
"type": "sse",
"url": "http://127.0.0.1:8001/sse",
"headers": {
"X-API-Key": "sse-key-67890",
"X-Environment": "testing"
}
},
"demo-server-http": {
"type": "http",
"url": "http://127.0.0.1:8002/mcp",
"headers": {
"X-API-Key": "http-key-abcde",
"X-Environment": "production"
}
}
}
}
3 总结
这章的篇幅不长,很快的就将工具调用相关的内容过完,实际应用中不一定局限在函数调用或MCP,具体例子是这几天Anthropic推出的Claude Skills[13],给出了一个很实在的例子。我们在实际的AI应用研发中,关注MCP是为了关注协议兼容,可以快速享用一些协议带来的好处,包括商业机会、开源复用等等。而使用函数调用可能更多是一方的工具快速集成、性能最大化等作用,在此基础之上是可以类似Calude Skills一样做一定的扩展,扩宽一点大模型的边界,让大模型拥有更多的能力支撑更复杂的业务场景(这也是模型能力持续提升带来的转变)。
最终回归到工具使用,目前更多是服务于AI Agent,在AI Agent中工具的使用主要集中在这么几个重点上:
1.工具的集成:根据Agent的不同,可以集成不同的工具,最常见的有ShellExec、FileOp、BrowserUse、APICall等
2.定义和加载工具:现在基本可以依据MCP做定义了,至于加载可以启动时加载也可以运行时加载,更可以通过一些更智能的手段加载必要的工具
3.执行和结果收集:这个主要是Agent内部的流程实现
4.结果卸载:AI Agent长时段(Long-horizon)运行基本上上下文会被各种工具调用的结果塞满,如何抽离卸载工具执行结果是上下文管理中很重要的一部分
有了工具调用的AI Agent,拥有了与外界交互的能力,结合前面的提到记忆系统和持久化能力,大模型的应用从一来一回的多轮次对话式生成进入到了可自主决策执行的阶段了。接下去我们就会以可自主执行的AI Agent为核心去结合前面了解的技术来深入AI Agent的内部。
最后
我在一线科技企业深耕十二载,见证过太多因技术卡位而跃迁的案例。那些率先拥抱 AI 的同事,早已在效率与薪资上形成代际优势,我意识到有很多经验和知识值得分享给大家,也可以通过我们的能力和经验解答大家在大模型的学习中的很多困惑。
我整理出这套 AI 大模型突围资料包:
- ✅AI大模型学习路线图
- ✅Agent行业报告
- ✅100集大模型视频教程
- ✅大模型书籍PDF
- ✅DeepSeek教程
- ✅AI产品经理入门资料
如果你也想通过学大模型技术去帮助自己升职和加薪,可以扫描下方链接👇👇
为什么说现在普通人就业/升职加薪的首选是AI大模型?
人工智能技术的爆发式增长,正以不可逆转之势重塑就业市场版图。从DeepSeek等国产大模型引发的科技圈热议,到全国两会关于AI产业发展的政策聚焦,再到招聘会上排起的长队,AI的热度已从技术领域渗透到就业市场的每一个角落。

智联招聘的最新数据给出了最直观的印证:2025年2月,AI领域求职人数同比增幅突破200% ,远超其他行业平均水平;整个人工智能行业的求职增速达到33.4%,位居各行业榜首,其中人工智能工程师岗位的求职热度更是飙升69.6%。
AI产业的快速扩张,也让人才供需矛盾愈发突出。麦肯锡报告明确预测,到2030年中国AI专业人才需求将达600万人,人才缺口可能高达400万人,这一缺口不仅存在于核心技术领域,更蔓延至产业应用的各个环节。


资料包有什么?
①从入门到精通的全套视频教程
包含提示词工程、RAG、Agent等技术点
② AI大模型学习路线图(还有视频解说)
全过程AI大模型学习路线

③学习电子书籍和技术文档
市面上的大模型书籍确实太多了,这些是我精选出来的

④各大厂大模型面试题目详解

⑤ 这些资料真的有用吗?
这份资料由我和鲁为民博士共同整理,鲁为民博士先后获得了北京清华大学学士和美国加州理工学院博士学位,在包括IEEE Transactions等学术期刊和诸多国际会议上发表了超过50篇学术论文、取得了多项美国和中国发明专利,同时还斩获了吴文俊人工智能科学技术奖。目前我正在和鲁博士共同进行人工智能的研究。
所有的视频教程由智泊AI老师录制,且资料与智泊AI共享,相互补充。这份学习大礼包应该算是现在最全面的大模型学习资料了。
资料内容涵盖了从入门到进阶的各类视频教程和实战项目,无论你是小白还是有些技术基础的,这份资料都绝对能帮助你提升薪资待遇,转行大模型岗位。


智泊AI始终秉持着“让每个人平等享受到优质教育资源”的育人理念,通过动态追踪大模型开发、数据标注伦理等前沿技术趋势,构建起"前沿课程+智能实训+精准就业"的高效培养体系。
课堂上不光教理论,还带着学员做了十多个真实项目。学员要亲自上手搞数据清洗、模型调优这些硬核操作,把课本知识变成真本事!


如果说你是以下人群中的其中一类,都可以来智泊AI学习人工智能,找到高薪工作,一次小小的“投资”换来的是终身受益!
应届毕业生:无工作经验但想要系统学习AI大模型技术,期待通过实战项目掌握核心技术。
零基础转型:非技术背景但关注AI应用场景,计划通过低代码工具实现“AI+行业”跨界。
业务赋能 突破瓶颈:传统开发者(Java/前端等)学习Transformer架构与LangChain框架,向AI全栈工程师转型。
👉获取方式:
😝有需要的小伙伴,可以保存图片到wx扫描二v码免费领取【保证100%免费】🆓


火山引擎开发者社区是火山引擎打造的AI技术生态平台,聚焦Agent与大模型开发,提供豆包系列模型(图像/视频/视觉)、智能分析与会话工具,并配套评测集、动手实验室及行业案例库。社区通过技术沙龙、挑战赛等活动促进开发者成长,新用户可领50万Tokens权益,助力构建智能应用。
更多推荐
 15
15 0
0- 0


 已为社区贡献752条内容

所有评论(0)