RAG是什么?一文带你了解RAG(检索增强生成) | 概念理论介绍+ 代码实操
RAG(Retrieval Augmented Generation, 检索增强生成)是一种技术框架,其核心在于当 LLM 面对解答问题或创作文本任务时,首先会在大规模文档库中搜索并筛选出与任务紧密相关的素材,继而依据这些素材精准指导后续的回答生成或文本构造过程,旨在通过此种方式提升模型输出的准确性和可靠性。
一、 RAG是什么?
RAG(Retrieval Augmented Generation, 检索增强生成)是一种技术框架,其核心在于当 LLM 面对解答问题或创作文本任务时,首先会在大规模文档库中搜索并筛选出与任务紧密相关的素材,继而依据这些素材精准指导后续的回答生成或文本构造过程,旨在通过此种方式提升模型输出的准确性和可靠性。
二、环境准备
确保已安装必要的Python库。如果尚未安装,可以通过pip进行安装:
pip install nltk sentence-transformers faiss-cpu transformers torch
对于初次使用nltk的用户,可能需要下载其punkt资源包,用于句子分词:
import nltk
try:
    nltk.data.find('tokenizers/punkt')
except nltk.downloader.DownloadError:
    nltk.download('punkt')
构建步骤与核心代码片段
步骤1:数据加载与分块 (Data Loading and Chunking)
首先,我们需要从文件系统加载文本数据,并将其分割成较小的、易于处理的文本块。
import os
from nltk.tokenize import sent_tokenize
import re

# 假设数据在 ./data/ 目录下
DATA_DIR = "./data_rag_scratch"
# 创建示例数据文件夹和文件
if not os.path.exists(DATA_DIR):
    os.makedirs(DATA_DIR)

sample_data = {
    "rag_intro.txt": "检索增强生成(RAG)是一种人工智能技术,它结合了信息检索系统和大型语言模型(LLM)的优势。RAG旨在通过从外部知识源中检索相关信息来增强LLM生成答案的准确性和相关性。这有助于解决LLM固有的知识截止和幻觉问题。",
    "rag_benefits.txt": "RAG的主要优势包括提升答案的准确性、提供最新的信息、减少模型幻觉以及增强输出的可解释性。通过引用外部知识,RAG系统生成的答案更值得信赖。此外,它比微调整个LLM更具成本效益,知识更新也更灵活。",
    "rag_process.txt": "典型的RAG流程始于用户查询。系统首先对查询进行编码,然后在向量数据库中检索相似的文档片段。这些片段与原始查询一起被送入LLM,LLM据此生成最终答案。嵌入模型和向量索引是此过程的关键组成部分。"
}

for filename, content in sample_data.items():
    with open(os.path.join(DATA_DIR, filename), 'w', encoding='utf-8') as f:
        f.write(content)

def load_documents_from_directory(dir_path):
    """从指定目录加载所有.txt文件内容"""
    docs_content = []
    doc_metadata = [] # 存储每个文档的元数据,如文件名
    for filename in os.listdir(dir_path):
        if filename.endswith(".txt"):
            file_path = os.path.join(dir_path, filename)
            with open(file_path, 'r', encoding='utf-8') as f:
                content = f.read()
                if content.strip(): #确保内容不为空
                    docs_content.append(content)
                    doc_metadata.append({"source": filename})
    return docs_content, doc_metadata

def chunk_texts_by_sentence(texts, doc_metadatas, sentences_per_chunk=3, overlap_sentences=1):
    """将文本按句子数量分割成块,并保留来源信息"""
    all_chunks = []
    chunk_metadatas = []

    for i, text in enumerate(texts):
        # 简单预处理:移除多余空白符
        text = re.sub(r'\s+', ' ', text).strip()
        sentences = sent_tokenize(text)

        start_index = 0
        while start_index < len(sentences):
            end_index = min(start_index + sentences_per_chunk, len(sentences))
            chunk_sentences = sentences[start_index:end_index]
            chunk_text = " ".join(chunk_sentences)

            if chunk_text.strip(): # 确保块不为空
                all_chunks.append(chunk_text)
                # 关联块元数据与原始文档元数据
                current_chunk_meta = doc_metadatas[i].copy()
                current_chunk_meta["chunk_seq"] = len(all_chunks) # 块序号
                chunk_metadatas.append(current_chunk_meta)

            if end_index == len(sentences):
                break
            start_index += (sentences_per_chunk - overlap_sentences)
            if start_index >= end_index : # 避免死循环或重复
                 start_index = end_index if end_index < len(sentences) -1 else len(sentences)


    return all_chunks, chunk_metadatas

# 加载和分块
raw_documents, raw_doc_metadatas = load_documents_from_directory(DATA_DIR)
if not raw_documents:
    print(f"警告: 未在 '{DATA_DIR}' 目录中找到任何 .txt 文件或文件内容为空。请确保该目录存在且包含有效的文本文件。")
    # 为避免后续代码出错,可以填充一些默认数据或退出
    # text_chunks, text_chunk_metadatas = ["示例块1", "示例块2"], [{"source":"dummy.txt"}] * 2
    exit("无有效数据加载,程序终止。")


text_chunks, text_chunk_metadatas = chunk_texts_by_sentence(raw_documents, raw_doc_metadatas)

print(f"加载了 {len(raw_documents)} 个文档。")
print(f"分割成了 {len(text_chunks)} 个文本块。")
# for i, chunk in enumerate(text_chunks[:2]): # 打印前2个块看看
# print(f"块 {i+1} (来自 {text_chunk_metadatas[i]['source']}): {chunk}")
这里,我们定义了加载函数和简单的分块函数。实际应用中,分块策略可能更复杂,例如基于Token数量、Markdown标题或HTML标签。
步骤2:文本向量化与索引构建 (Embedding and Indexing)
接下来,使用sentence-transformers将文本块转换为向量,并用faiss-cpu构建索引。
from sentence_transformers import SentenceTransformer
import faiss
import numpy as np

# 加载预训练的嵌入模型 (中文推荐 BAAI/bge-small-zh-v1.5, 英文示例 all-MiniLM-L6-v2)
# 确保已安装模型或首次运行时会自动下载。对于某些模型,可能需要手动下载到本地。
# model_name = 'all-MiniLM-L6-v2' # 英文模型
model_name = 'BAAI/bge-small-zh-v1.5' # 中文模型
try:
    embedding_model = SentenceTransformer(model_name)
except Exception as e:
    print(f"加载嵌入模型 {model_name} 失败: {e}")
    print("请尝试使用 HuggingFace Hub 支持的另一个模型,或者确保模型已正确下载。")
    print("例如,对于英文,可以尝试: 'sentence-transformers/all-MiniLM-L6-v2'")
    embedding_model = SentenceTransformer('sentence-transformers/all-MiniLM-L6-v2') #备用


def get_text_embeddings(text_list, model):
    """获取文本列表的嵌入向量"""
    if not text_list: # 处理空列表情况
        return np.array([])
    embeddings = model.encode(text_list, convert_to_numpy=True, show_progress_bar=True)
    return embeddings

def build_faiss_index(embeddings_matrix):
    """构建FAISS索引"""
    if embeddings_matrix.size == 0: # 处理空嵌入矩阵
        print("嵌入矩阵为空,无法构建FAISS索引。")
        return None
    dimension = embeddings_matrix.shape[1]
    index = faiss.IndexFlatL2(dimension)  # 使用L2距离
    # index = faiss.IndexFlatIP(dimension) # 或者使用内积 (与余弦相似度相关)
    try:
        index.add(embeddings_matrix.astype(np.float32)) # FAISS 需要 float32
    except Exception as e:
        print(f"添加到FAISS索引失败: {e}")
        return None
    return index

# 获取嵌入并构建索引
if text_chunks:
    chunk_embeddings = get_text_embeddings(text_chunks, embedding_model)
    if chunk_embeddings.size > 0:
        faiss_index = build_faiss_index(chunk_embeddings)
        if faiss_index:
            print(f"FAISS索引构建完成,包含 {faiss_index.ntotal} 个向量。")
    else:
        print("未能生成有效的嵌入向量,无法构建索引。")
        faiss_index = None
else:
    print("没有文本块可供嵌入和索引。")
    chunk_embeddings = np.array([])
    faiss_index = None
我们选择了BAAI/bge-small-zh-v1.5作为示例中文嵌入模型,它在MTEB等榜单上表现良好。IndexFlatL2是FAISS中基础的精确L2距离搜索索引,适用于中小规模数据集。对于大规模数据,应考虑更高级的索引类型如IndexIVFPQ。
步骤3:实现检索器 (Retriever Implementation)
检索器接收用户查询,将其向量化,然后在FAISS索引中搜索最相似的文本块。
def retrieve_from_faiss(query_text, model, index, chunks_list, metadata_list, top_k=3):
    """从FAISS索引中检索相关块"""
    if index is None or index.ntotal == 0:
        print("FAISS索引不可用或为空。")
        return [], []

    query_embedding = model.encode([query_text], convert_to_numpy=True).astype(np.float32)

    distances, indices = index.search(query_embedding, top_k)

    retrieved_chunks = [chunks_list[i] for i in indices[0] if 0 <= i < len(chunks_list)]
    retrieved_metadatas = [metadata_list[i] for i in indices[0] if 0 <= i < len(metadata_list)]

    return retrieved_chunks, retrieved_metadatas

# # 示例查询
# user_query_example = "RAG有什么好处?"
# if faiss_index:
#     relevant_chunks, relevant_metadatas = retrieve_from_faiss(user_query_example, embedding_model, faiss_index, text_chunks, text_chunk_metadatas, top_k=2)
#     print(f"\n针对查询 '{user_query_example}' 检索到的相关块:")
#     for i, chunk in enumerate(relevant_chunks):
#         print(f"--- 块 {i+1} (来自: {relevant_metadatas[i]['source']}) ---")
#         print(chunk)
# else:
#     print("无法执行检索,因为FAISS索引未成功构建。")
步骤4:构建Prompt并调用LLM生成答案 (Prompt Engineering and Generation)
将检索到的上下文和原始查询格式化为Prompt,然后使用transformers库加载一个本地的小型LLM(如GPT-2的中文版或适配版本)生成答案。对于实际应用,通常会选择更强大的模型或API。
from transformers import AutoTokenizer, AutoModelForCausalLM, pipeline

# 为简单起见,这里选用一个非常小型的模型作为示例。
# 实际中文RAG项目建议使用更强大的中文LLM,如 ChatGLM, Qwen, Baichuan, Yi 等的Chat版本,
# 或者通过API调用商业模型如文心一言、讯飞星火。
# 以下模型仅为演示流程,效果可能不佳。
llm_model_name = "uer/gpt2-chinese-cluecorpussmall"
# llm_model_name = "gpt2" # 英文模型示例
try:
    tokenizer = AutoTokenizer.from_pretrained(llm_model_name)
    # model_for_generation = AutoModelForCausalLM.from_pretrained(llm_model_name) # 直接加载模型,需要更多RAM/GPU
    # generator_pipeline = pipeline('text-generation', model=model_for_generation, tokenizer=tokenizer, device=-1) # device=-1 for CPU

    # 若资源有限,或仅想快速测试pipeline是否能跑通,可仅用pipeline加载模型名,它会自动处理下载和加载
    generator_pipeline = pipeline('text-generation', model=llm_model_name, tokenizer=tokenizer, device=-1 if torch.cuda.is_available() == False else 0) # device=0 for GPU if available
except Exception as e:
    print(f"加载LLM ({llm_model_name}) 失败: {e}. 请确保模型名称正确且网络连接良好。采用备用英文模型gpt2。")
    generator_pipeline = pipeline('text-generation', model='gpt2', device=-1 if torch.cuda.is_available() == False else 0)


def format_prompt_for_llm(query, context_chunks):
    """构建提供给LLM的Prompt"""
    context_str = "\n\n".join(f"相关信息片段{i+1}: {chunk}" for i, chunk in enumerate(context_chunks))

    # 中文Prompt示例 (根据LLM特性调整)
    prompt = f"""基于以下已知信息,请简洁和专业地回答用户的问题。如果已知信息无法回答问题,请直接说“根据已知信息无法回答该问题”。

已知信息:
{context_str}

用户问题: {query}

回答:"""
    return prompt

def generate_answer_with_local_llm(prompt_text, llm_pipeline, max_length=200, min_length=10):
    """使用本地LLM Pipeline生成答案"""
    # pipeline的max_length参数通常包含输入prompt的长度
    # 所以生成的长度需要计算,这里我们设定max_new_tokens
    # 但是HuggingFace pipeline的text-generation默认参数行为可能因版本和模型不同
    # 简单的做法是让max_length比prompt长一些

    # 确保tokenizer有pad_token_id,对于GPT2类模型通常是eos_token_id
    if llm_pipeline.tokenizer.pad_token_id is None:
        llm_pipeline.tokenizer.pad_token_id = llm_pipeline.tokenizer.eos_token_id

    response = llm_pipeline(
        prompt_text,
        max_new_tokens=max_length, # 控制新生成的token数量
        # min_length=len(prompt_text.split()) + min_length, # 确保生成文本的总长度
        num_return_sequences=1,
        eos_token_id=llm_pipeline.tokenizer.eos_token_id, # 确保在遇到EOS时停止
        pad_token_id=llm_pipeline.tokenizer.pad_token_id # 设置pad_token_id以避免警告
    )

    # 从返回结果中提取生成的文本部分
    generated_text = response[0]['generated_text']
    # 移除原始prompt部分,只留新生成的答案
    answer = generated_text[len(prompt_text):].strip()
    return answer

# # 示例(续)
# if faiss_index and relevant_chunks: # 确保检索到了内容
#     final_prompt = format_prompt_for_llm(user_query_example, relevant_chunks)
#     print(f"\n构建的Prompt:\n{final_prompt}")
#     llm_answer = generate_answer_with_local_llm(final_prompt, generator_pipeline, max_length=100) # max_length是新token数
#     print(f"\nLLM生成的答案:\n{llm_answer}")
# elif not relevant_chunks and faiss_index:
#      print("\n未检索到相关信息,尝试无上下文直接问LLM (可能产生幻觉):")
#      # 也可以设计成 无上下文则回答“无法在知识库中找到相关信息”
#      # 这里演示直接问LLM
#      prompt_without_context = f"用户问题: {user_query_example}\n回答:"
#      llm_answer_no_context = generate_answer_with_local_llm(prompt_without_context, generator_pipeline, max_length=100)
#      print(f"\nLLM (无上下文) 的答案:\n{llm_answer_no_context}")
# else:
#      print("\n由于索引问题或无相关块,无法生成答案。")
注意:本地运行LLM(即使是小型模型)对计算资源有要求。device=-1 表示使用CPU,如果安装了CUDA且GPU可用,可以设置为 device=0。对于更复杂的任务和更高的答案质量,需要使用更大的模型,这通常意味着更高的硬件要求或使用云端API。
步骤5:整合RAG流程并测试
将以上步骤串联起来,形成一个完整的RAG查询函数并进行测试。
def simple_rag_pipeline(user_query, embedding_model_inst, faiss_index_inst,
                          text_chunks_list, chunk_metadata_list, llm_pipeline_inst,
                          retriever_top_k=3, llm_max_new_tokens=150):
    """一个简单的RAG流程函数"""
    print(f"用户查询: {user_query}")

    # 1. 检索 (Retrieve)
    if not faiss_index_inst or faiss_index_inst.ntotal == 0:
        print("知识库索引不可用。无法进行检索。")
        retrieved_context_chunks = []
    else:
        retrieved_context_chunks, retrieved_metadatas_info = retrieve_from_faiss(
            user_query,
            embedding_model_inst,
            faiss_index_inst,
            text_chunks_list,
            chunk_metadata_list,
            top_k=retriever_top_k
        )
        if retrieved_context_chunks:
            print(f"\n检索到的上下文 ({len(retrieved_context_chunks)}条):")
            for idx, chunk_ctx in enumerate(retrieved_context_chunks):
                print(f"  来源: {retrieved_metadatas_info[idx]['source']}, 内容片段: {chunk_ctx[:100]}...") # 显示部分内容
        else:
            print("未检索到相关上下文。")

    # 2. 增强 (Augment - Build Prompt)
    current_prompt = format_prompt_for_llm(user_query, retrieved_context_chunks)
    # print(f"\n发送给LLM的Prompt:\n{current_prompt}\n") # 调试时可以打印

    # 3. 生成 (Generate)
    answer = generate_answer_with_local_llm(current_prompt, llm_pipeline_inst, max_length=llm_max_new_tokens)

    print(f"\nRAG系统回答:\n{answer}")
    return answer

# --- 执行RAG流程 ---
# 确保所有组件都已初始化
# (raw_documents, raw_doc_metadatas, text_chunks, text_chunk_metadatas,
#  embedding_model, chunk_embeddings, faiss_index, generator_pipeline 在前面步骤已定义)

test_query = "RAG技术是什么?"
if faiss_index and generator_pipeline: # 确保关键组件可用
    _ = simple_rag_pipeline(test_query, embedding_model, faiss_index, text_chunks, text_chunk_metadatas, generator_pipeline)
elif not faiss_index:
    print("错误:FAISS索引未成功初始化。无法运行RAG流程。")
elif not generator_pipeline:
    print("错误:LLM生成器未能成功初始化。无法运行RAG流程。")

test_query_2 = "RAG有什么好处?"
if faiss_index and generator_pipeline:
    _ = simple_rag_pipeline(test_query_2, embedding_model, faiss_index, text_chunks, text_chunk_metadatas, generator_pipeline)

# 测试一个可能知识库里没有的问题
test_query_3 = "介绍一下量子计算的最新进展。"
if faiss_index and generator_pipeline:
    _ = simple_rag_pipeline(test_query_3, embedding_model, faiss_index, text_chunks, text_chunk_metadatas, generator_pipeline)
分析与说明:
- 上述代码构建了一个最基础的RAG流程。它演示了数据加载、分块、嵌入、索引、检索、Prompt构建和LLM调用的核心步骤。
- 错误处理、日志记录、更复杂和鲁棒的分块策略、高级Prompt技巧、性能优化等在实际生产系统中是必不可少的,但在此入门示例中被简化了。
- 嵌入模型和LLM的选择对RAG系统的性能至关重要。上述示例中使用的模型可能仅适用于演示目的,实际应用需要根据任务需求(语言、领域、性能要求等)选择更合适的模型。例如,中文场景下,嵌入模型可替换为
BAAI/bge-large-zh-v1.5,LLM可替换为ChatGLM、Qwen等模型或商业API。 - FAISS的
IndexFlatL2适用于小型数据集的精确搜索。对于大数据集,应使用如IndexIVFPQ等支持压缩和近似搜索的索引,以平衡速度和精度。 - 这个“从零构建”的示例能帮助我们清晰地理解RAG的内部工作机制,为后续使用框架或进行深度定制打下基础。
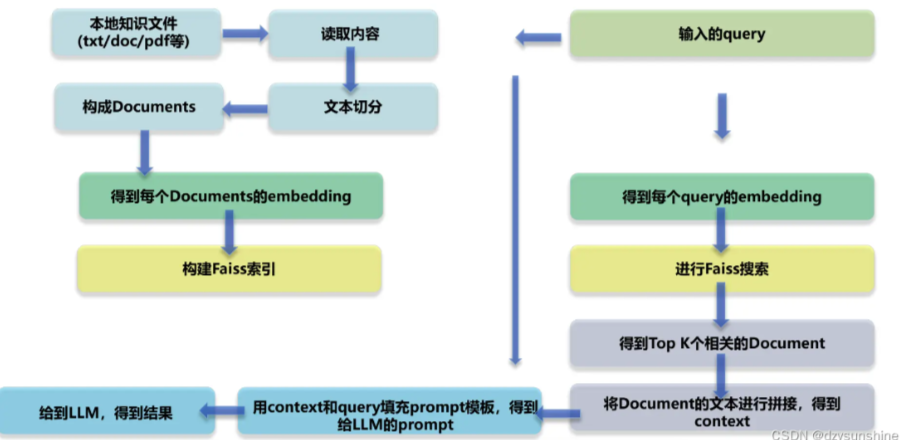
从零构建RAG关键步骤总结
- 数据准备: 加载原始文档,进行清洗和预处理。
- 文本分块: 将长文本切分成语义连贯、大小适中的块。
- 向量化嵌入: 使用嵌入模型将每个文本块转换为数字向量。
- 构建向量索引: 将向量存入FAISS等向量数据库并构建索引,以支持快速相似度搜索。
- 查询检索: 对用户查询进行向量化,在索引中搜索最相关的Top-K文本块。
- Prompt构建: 将检索到的上下文与用户查询整合成对LLM友好的Prompt。
- LLM生成: 调用LLM(本地或API)基于增强的Prompt生成答案。
- 整合与测试: 将所有步骤串联成一个完整的流程并进行效果测试。
那么,如何系统的去学习大模型LLM?
作为一名从业五年的资深大模型算法工程师,我经常会收到一些评论和私信,我是小白,学习大模型该从哪里入手呢?我自学没有方向怎么办?这个地方我不会啊。如果你也有类似的经历,一定要继续看下去!这些问题啊,也不是三言两语啊就能讲明白的。
所以我综合了大模型的所有知识点,给大家带来一套全网最全最细的大模型零基础教程。在做这套教程之前呢,我就曾放空大脑,以一个大模型小白的角度去重新解析它,采用基础知识和实战项目相结合的教学方式,历时3个月,终于完成了这样的课程,让你真正体会到什么是每一秒都在疯狂输出知识点。
由于篇幅有限,⚡️ 朋友们如果有需要全套 《2025全新制作的大模型全套资料》,扫码获取~
👉大模型学习指南+路线汇总👈
我们这套大模型资料呢,会从基础篇、进阶篇和项目实战篇等三大方面来讲解。

👉①.基础篇👈
基础篇里面包括了Python快速入门、AI开发环境搭建及提示词工程,带你学习大模型核心原理、prompt使用技巧、Transformer架构和预训练、SFT、RLHF等一些基础概念,用最易懂的方式带你入门大模型。
👉②.进阶篇👈
接下来是进阶篇,你将掌握RAG、Agent、Langchain、大模型微调和私有化部署,学习如何构建外挂知识库并和自己的企业相结合,学习如何使用langchain框架提高开发效率和代码质量、学习如何选择合适的基座模型并进行数据集的收集预处理以及具体的模型微调等等。
👉③.实战篇👈
实战篇会手把手带着大家练习企业级的落地项目(已脱敏),比如RAG医疗问答系统、Agent智能电商客服系统、数字人项目实战、教育行业智能助教等等,从而帮助大家更好的应对大模型时代的挑战。
👉④.福利篇👈
最后呢,会给大家一个小福利,课程视频中的所有素材,有搭建AI开发环境资料包,还有学习计划表,几十上百G素材、电子书和课件等等,只要你能想到的素材,我这里几乎都有。我已经全部上传到CSDN,朋友们如果需要可以微信扫描下方CSDN官方认证二维码免费领取【保证100%免费】
相信我,这套大模型系统教程将会是全网最齐全 最易懂的小白专用课!!

火山引擎开发者社区是火山引擎打造的AI技术生态平台,聚焦Agent与大模型开发,提供豆包系列模型(图像/视频/视觉)、智能分析与会话工具,并配套评测集、动手实验室及行业案例库。社区通过技术沙龙、挑战赛等活动促进开发者成长,新用户可领50万Tokens权益,助力构建智能应用。
更多推荐
 14
14 0
0- 0


 已为社区贡献311条内容

所有评论(0)