llfc-IM通讯项目-下载源码-直接运行
客户端的话直接用QT打开就行了,版本记得是Qt 5.15.2 MinGW 64-bit,然后点击运行会出现一个BUG。我们只需要复制BUG给DeepSeek,它就解决了,方法是:缺少一个头文件,我们加上去就好了。服务端的话你直接打开是运行不了的,我这边建议是先不打开服务端clone下来的代码而是先配置一下这些东西。链接:https://pan.baidu.com/s/1Uf-7gZxWpCOl7d
大家好,最近秋招,大家时间可能有限制。有的伙伴想直接git clone源码直接运行这个项目,这里给大家介绍一下。
一:客户端client
客户端的话直接用QT打开就行了,版本记得是Qt 5.15.2 MinGW 64-bit,然后点击运行会出现一个BUG。我们只需要复制BUG给DeepSeek,它就解决了,方法是:缺少一个头文件,我们加上去就好了。
二:服务端Server
服务端的话你直接打开是运行不了的,我这边建议是先不打开服务端clone下来的代码而是先配置一下这些东西。
2.1服务端配置一:Boost库
链接:https://pan.baidu.com/s/1Uf-7gZxWpCOl7dnYzlYRHg?pwd=xt01
提取码:xt01
下载好后解压, 其中booststrap.bat点击后生成编译程序
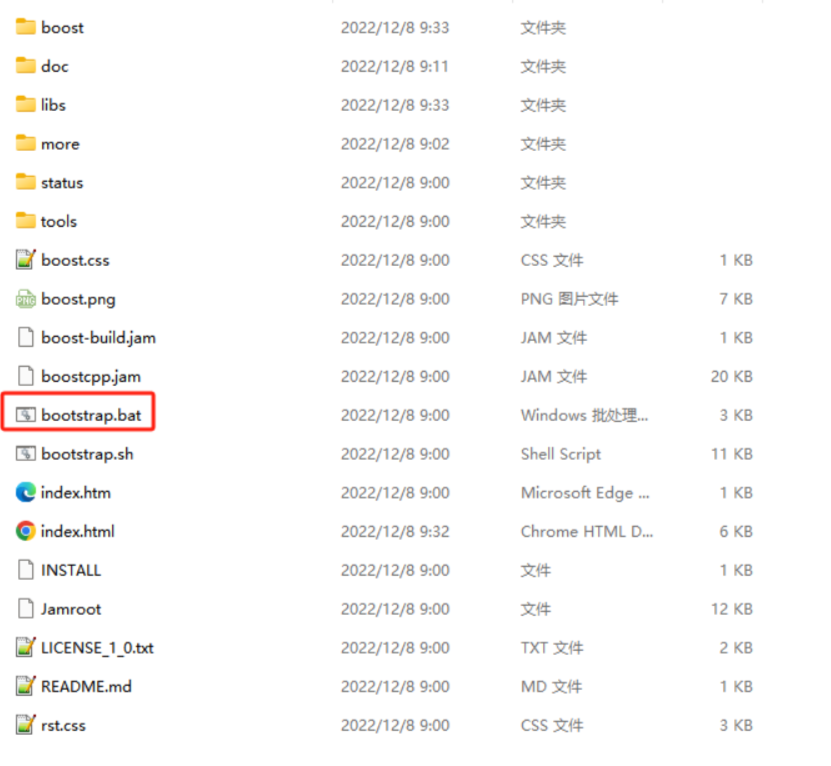
点击后,生成b2.exe,我们执行如下命令
.\b2.exe install --toolset=msvc-14.2 --build-type=complete --prefix="D:\cppsoft\boost_1_81_0" link=static runtime-link=shared threading=multi debug release
下面是编译界面
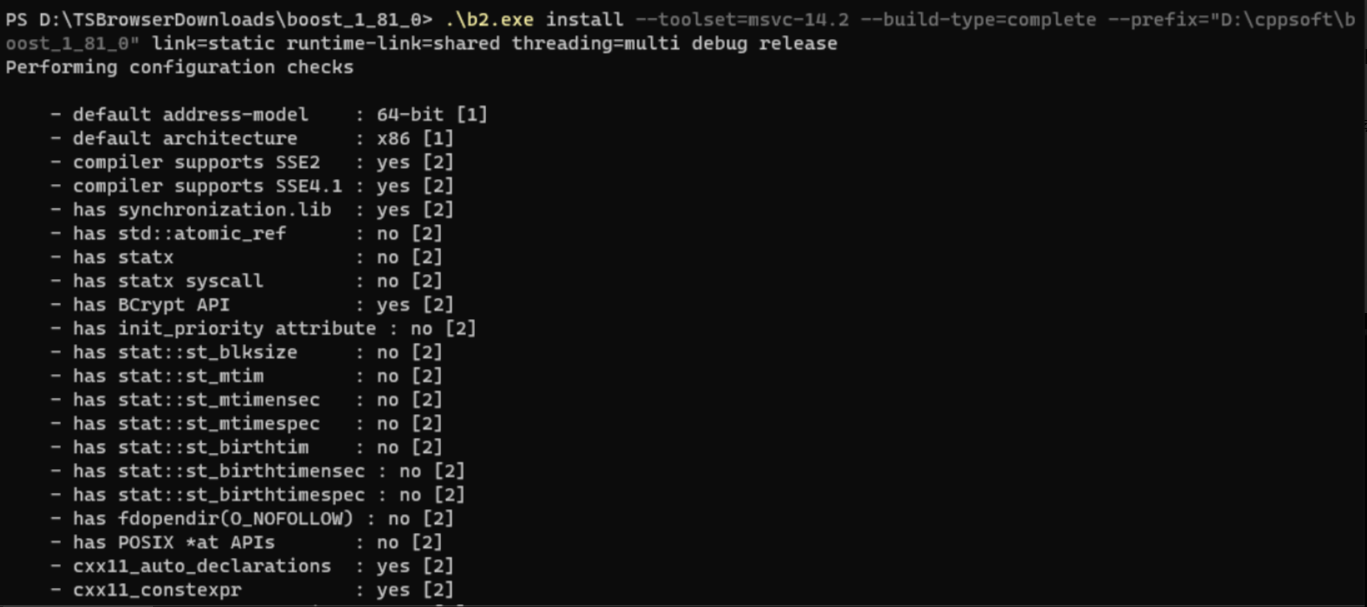
编译后生成如下目录和文件, 建议大家跟我一样弄在D盘 cppsoft目录下的boost文件夹。
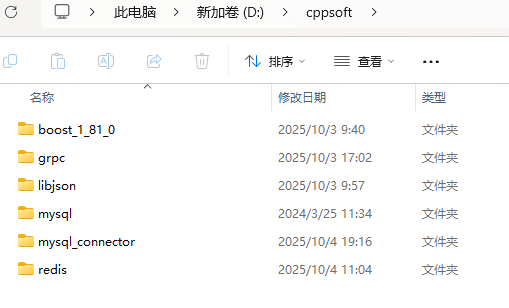
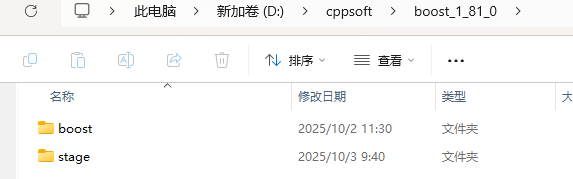
我跟着博主创建了一个stage文件夹,将lib文件夹和内容移动到stage中了。然后将include文件夹下的boost文件夹移出到boost_1_81_0目录下,整体看就就是如下
接下来就是在VS下配置boost库
打开visual studio 创建项目
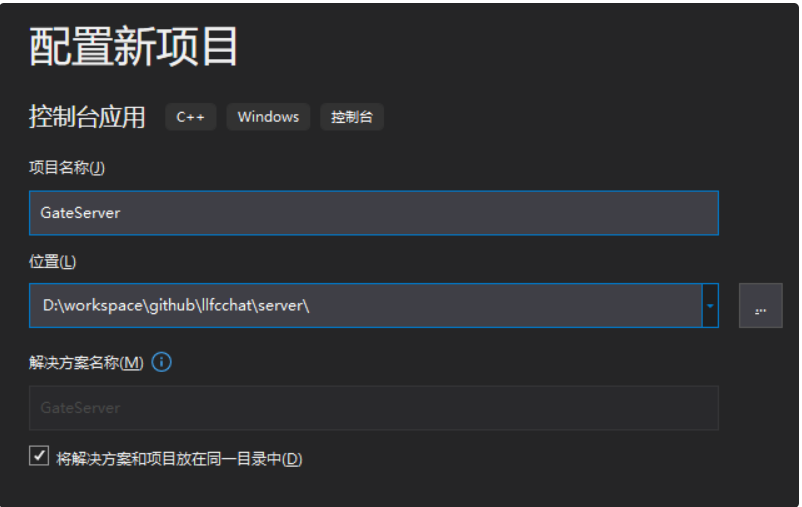
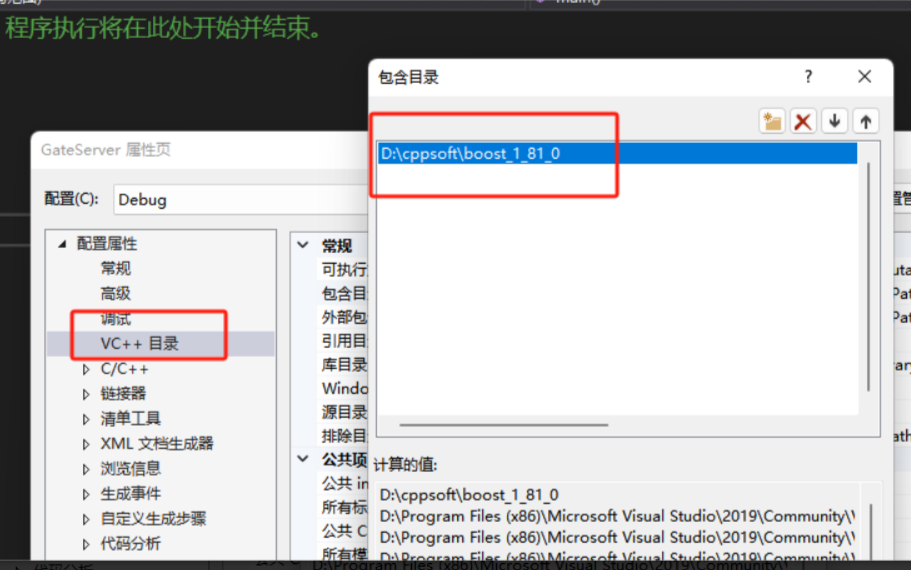
接下来配置boost到项目中,右键项目选择属性,配置VC++包含目录,添加D:\cppsoft\boost_1_81_0
 再配置VC++库目录, 添加
D:\cppsoft\boost_1_81_0\stage\lib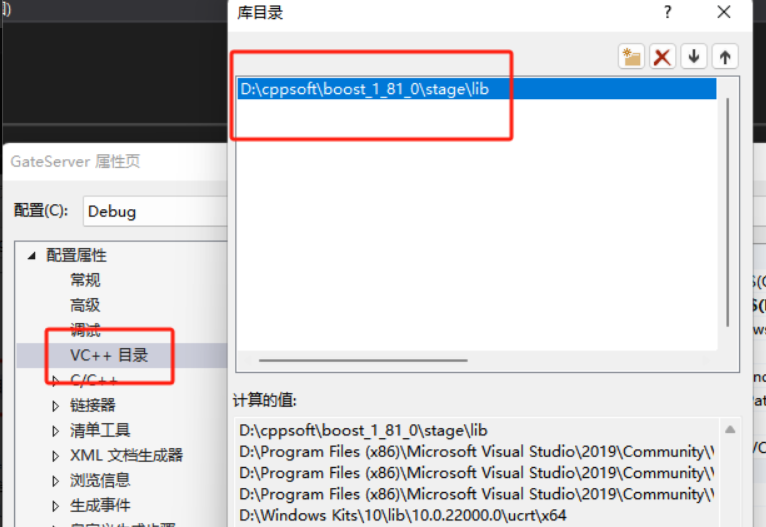
写个代码测试一下,运行成功,可以看到弹出了窗口运行成功。
#include <iostream>
#include <string>
#include "boost/lexical_cast.hpp"
int main()
{
    using namespace std;
    cout << "Enter your weight: ";
    float weight;
    cin >> weight;
    string gain = "A 10% increase raises ";
    string wt = boost::lexical_cast<string> (weight);
    gain = gain + wt + " to ";      // string operator()
    weight = 1.1 * weight;
    gain = gain + boost::lexical_cast<string>(weight) + ".";
    cout << gain << endl;
    system("pause");
    return 0;
}
2.2服务器配置二:jsoncpp
可以去博主的网盘地址下载
https://pan.baidu.com/s/1Yg9Usdc3T-CYhyr9GiePCw?pwd=ng6x
验证码ng6x
下载后我们解压文件夹,解压后文件夹如下图
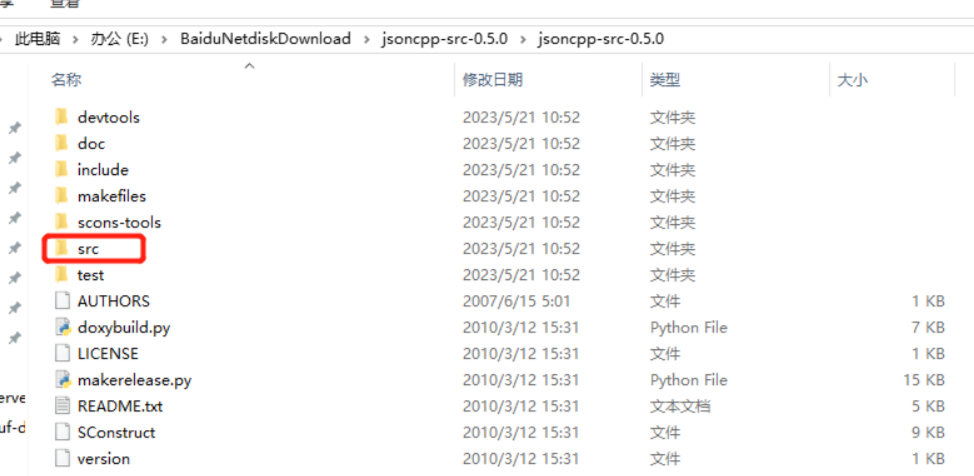
然后进行编译,编译需要进入makefile文件夹下
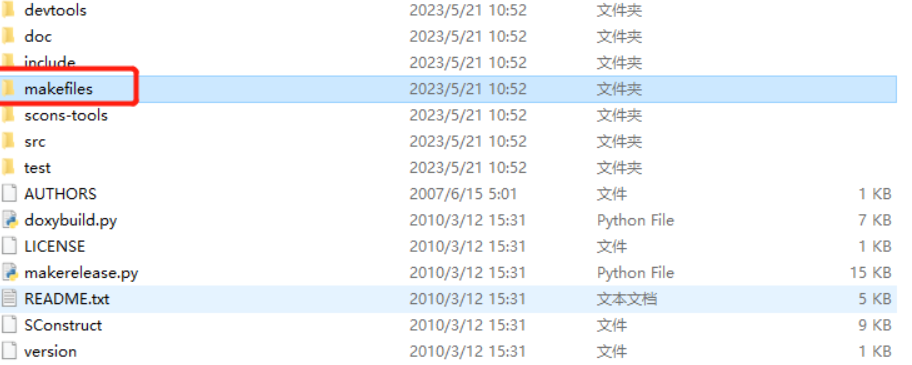
找到jsoncpp.sln文件,用visual studio打开,因为我的是visual studio2019版本,所以会提示我升级。
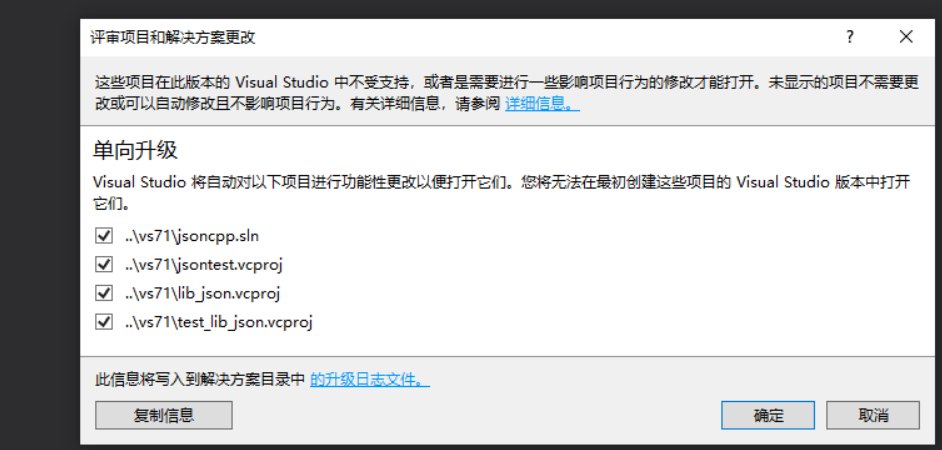
点击确定升级,之后我们选择编译lib_json即可,当然偷懒可以选择编译整个解决方案。
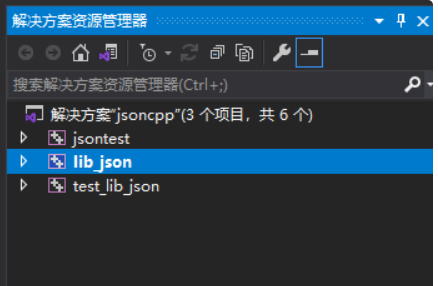
然后我们配置编译属性,我想要用x64位的,所以配置编译平台为X64位,编译模式为debug模式,大家最好把release版和debug版都编译一遍。
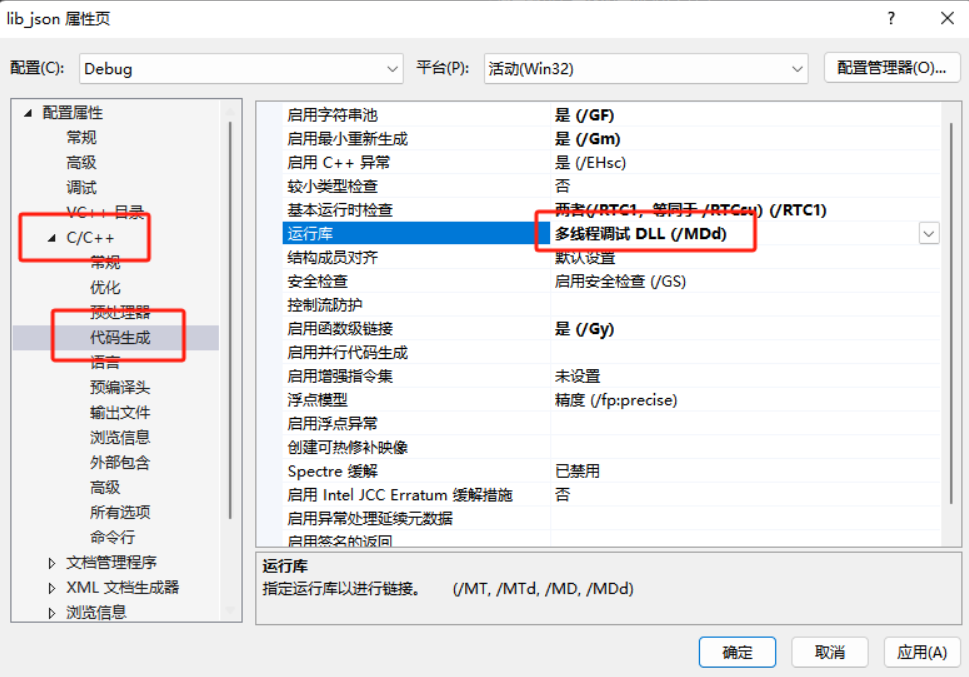
右键lib_json属性里选择C++,再选择代码生成,之后在右侧选择运行库,选择md(release版), mdd(debug版).
 编译生成后,我们的json库生成在项目同级目录的x64文件夹下的debug目录下
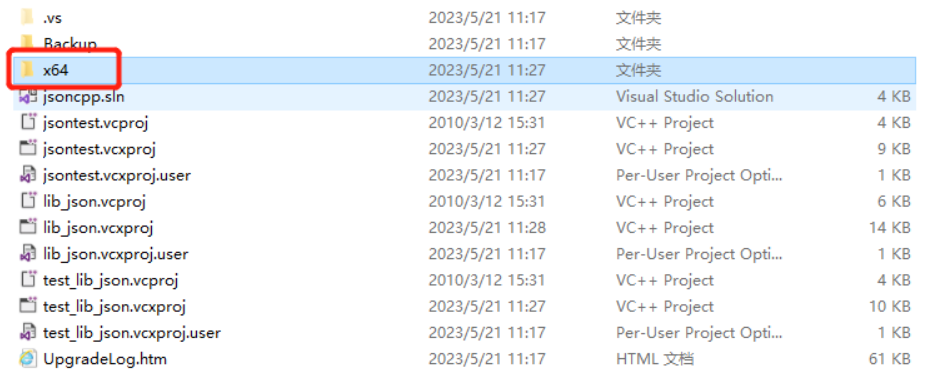
接下来我们在D盘cppsoft新建一个文件夹libjson,然后在其内部分别建立include和lib文件夹
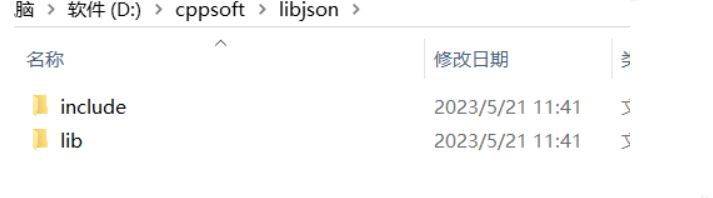
将jsoncpp-src-0.5.0源码文件夹下include文件夹里的内容copy到libjson下的include文件夹内。
将jsoncpp-src-0.5.0源码文件夹下x64位debug文件夹和Release文件夹下生成的库copy到libjson下的lib文件夹内。
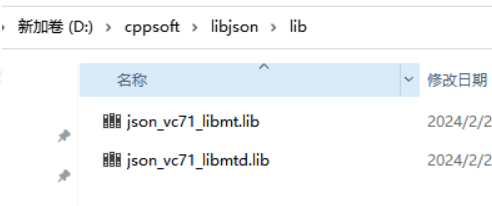 、
、
项目属性中,VC++包含目录设置为 D:\cppsoft\libjson\include
库目录选择为 VC++库目录设置为 D:\cppsoft\libjson\lib
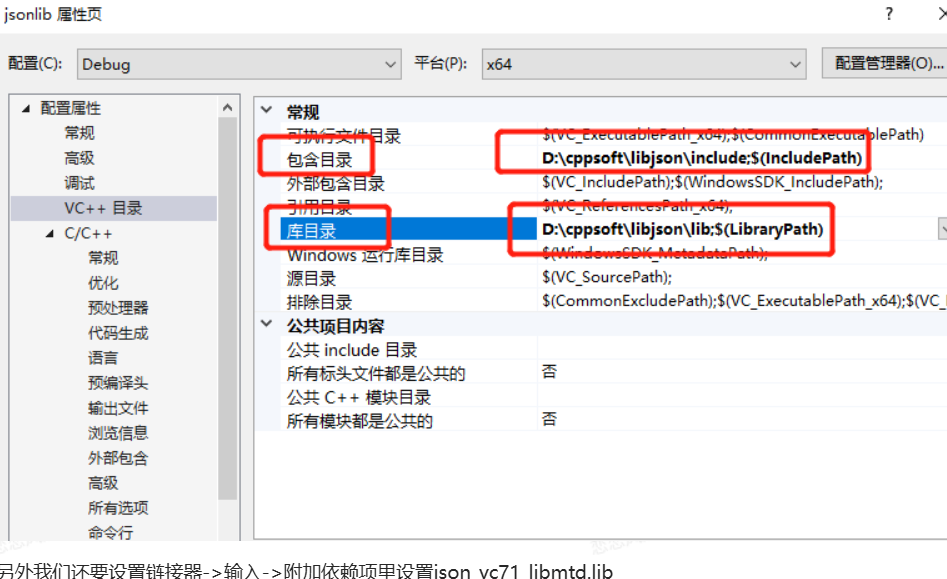
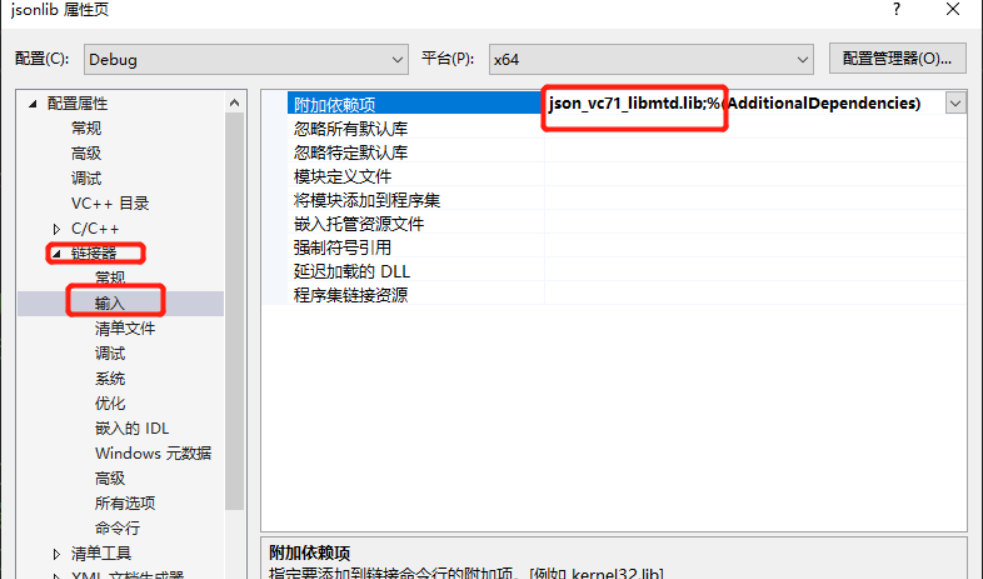
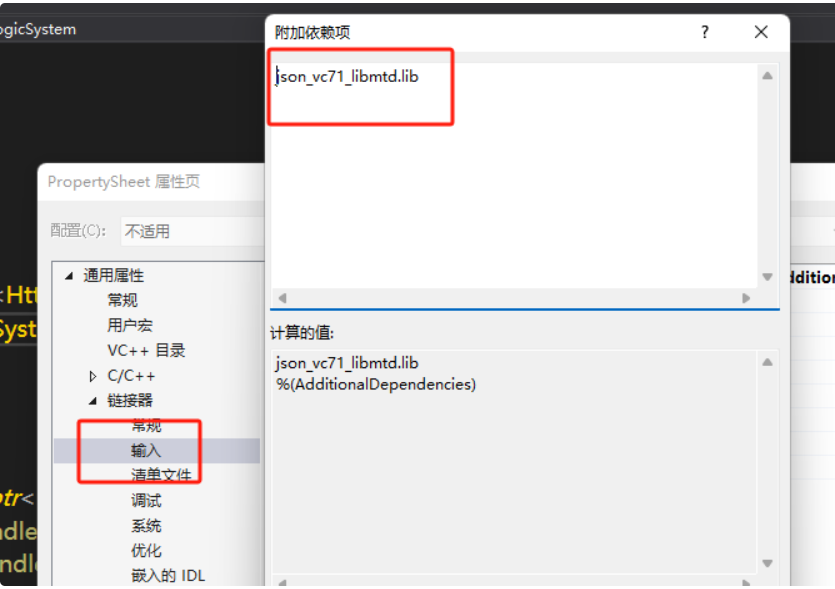
另外我们还要设置链接器->输入->附加依赖项里设置json_vc71_libmtd.lib、
写个程序测试一下json库安装的情况
#include <iostream>
#include <json/json.h>
#include <json/value.h>
#include <json/reader.h>

int main()
{
    Json::Value root;
    root["id"] = 1001;
    root["data"] = "hello world";
    std::string request = root.toStyledString();
    std::cout << "request is " << request << std::endl;

    Json::Value root2;
    Json::Reader reader;
    reader.parse(request, root2);
    std::cout << "msg id is " << root2["id"] << " msg is " << root2["data"] << std::endl;
}
2.3服务器配置三:grpc
cmake v3.31.6 官网可以下(不是最新版)
grpc v1.34.0 根据网盘下
go v1.24.0 官网下的(最新的)
perl v5.16.2 根据文档里的网盘地址下的
nasm v2.16.0 官网下的(不是最新版)
1.grpc的话建议直接下载博主网盘下的
网盘地址:
https://pan.baidu.com/s/1BBaAZ8-R-GSxxcy2s7TRWA?pwd=ybno
提取码:ybno
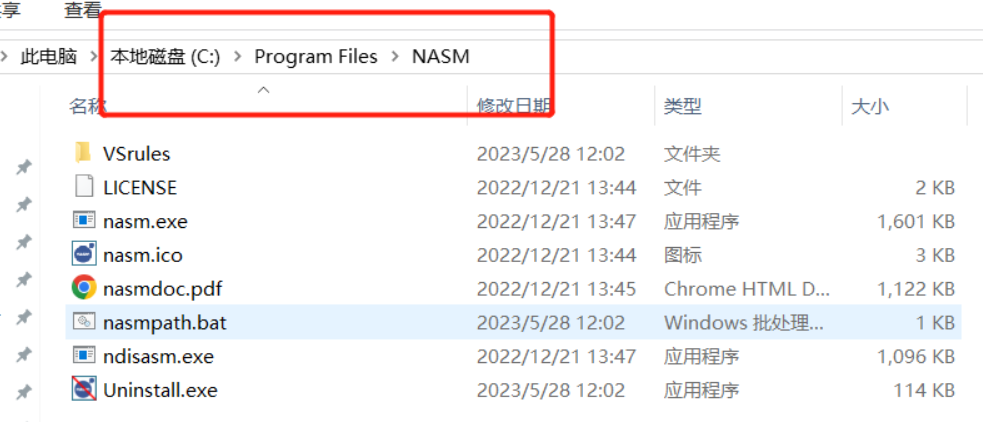
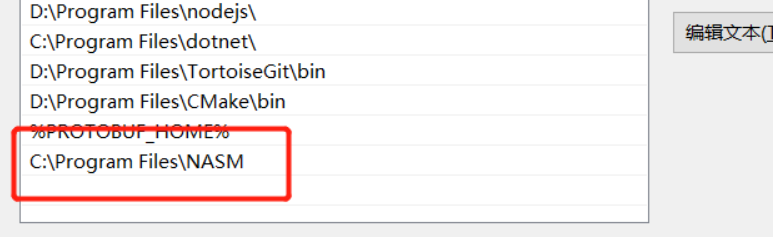
2.编译grpc需要准备nasm,所以也要下载nasm,下载地址为https://www.nasm.us/。然后配置环境变量。
 3.windows环境下下载go,地址https://studygolang.com/dl。
选择我们对应系统的安装包下载即可。一路下载安装,最后go会自动写入我们的环境变量。
4.去网盘下载Perl,直接安装,网盘地址https://pan.baidu.com/s/1i3GLKAp。
5.下载Cmake来编译grpc
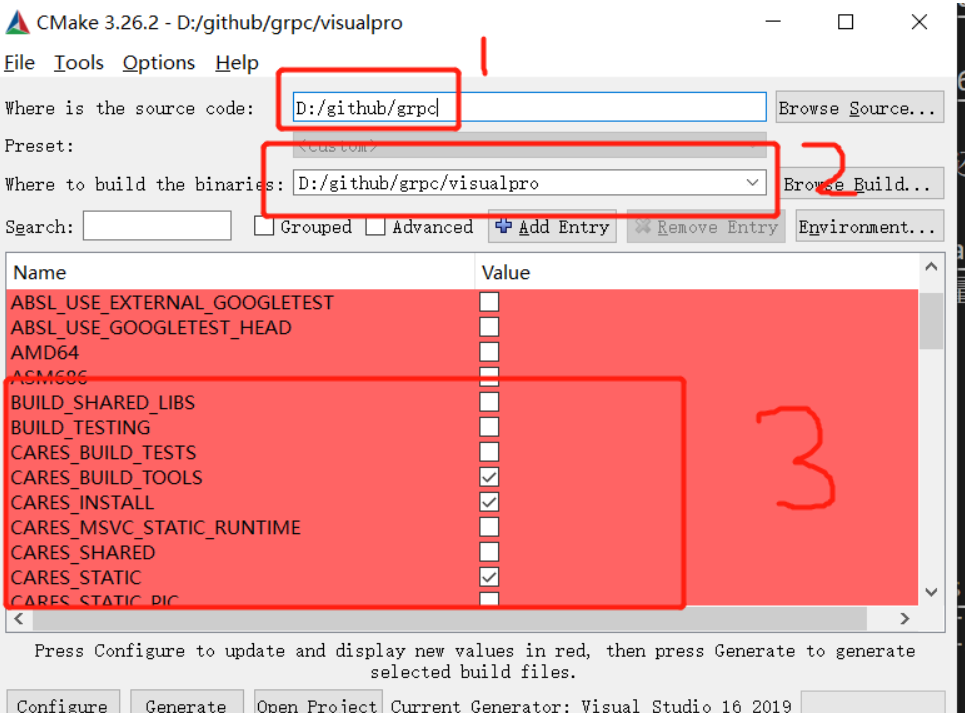
我建议大家跟我一样的文件路径,visualpro是要在grpc创建的我记得。
1.D:\cppsoft
2.D:\cppsoft\grpc\visualpro
3.然后一直点击下一步就好了。
2.4服务器配置四:VS配置grpc
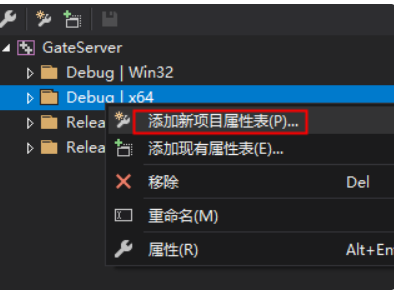
2.3.1在VS点击搜索那搜索属性管理器,选择Debug|x64添加新项目属性表
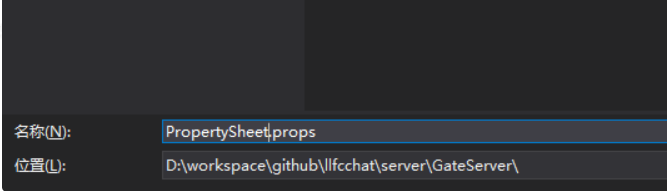
然后它自动的名字就是
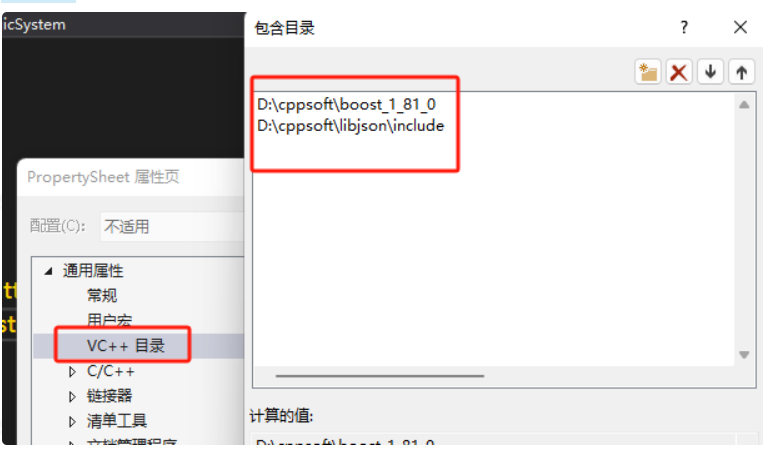
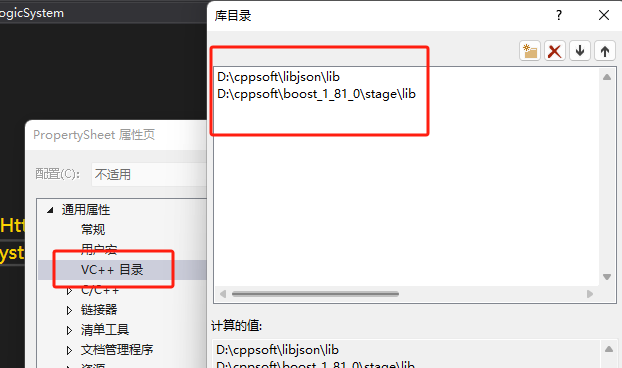
接下来双击我们创建好的属性文件,将之前配置的boost和jsoncpp库属性移动到这里,把之前在项目中配置的删除。
包含目录:
库目录:
链接库:
接下来配置grpc头文件包含目录,C++ 常规-> 附加包含目录添加如下:
D:\cppsoft\grpc\third_party\re2
D:\cppsoft\grpc\third_party\address_sorting\include
D:\cppsoft\grpc\third_party\abseil-cpp
D:\cppsoft\grpc\third_party\protobuf\src
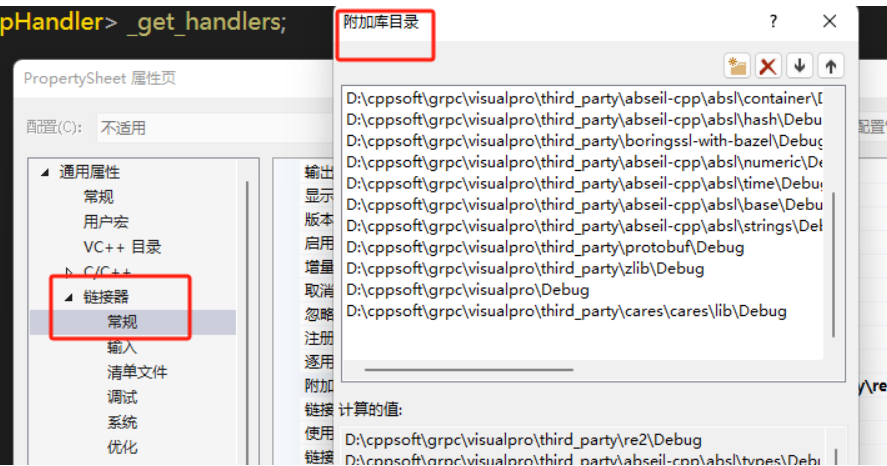
D:\cppsoft\grpc\include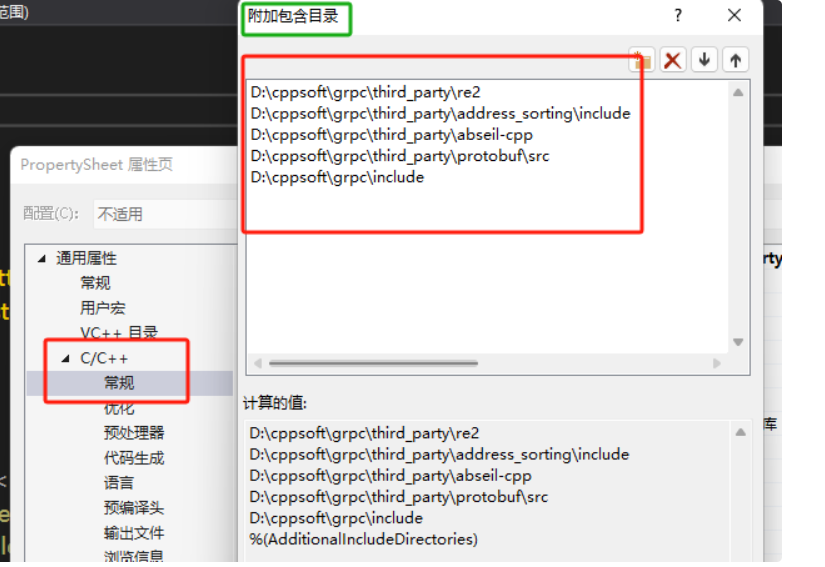 接下来配置库路径, 在链接器常规选项下,点击附加库目录,添加我们需要的库目录D:\cppsoft\grpc\visualpro\third_party\re2\Debug
D:\cppsoft\grpc\visualpro\third_party\abseil-cpp\absl\types\Debug
D:\cppsoft\grpc\visualpro\third_party\abseil-cpp\absl\synchronization\Debug
D:\cppsoft\grpc\visualpro\third_party\abseil-cpp\absl\status\Debug
D:\cppsoft\grpc\visualpro\third_party\abseil-cpp\absl\random\Debug
D:\cppsoft\grpc\visualpro\third_party\abseil-cpp\absl\flags\Debug
D:\cppsoft\grpc\visualpro\third_party\abseil-cpp\absl\debugging\Debug
D:\cppsoft\grpc\visualpro\third_party\abseil-cpp\absl\container\Debug
D:\cppsoft\grpc\visualpro\third_party\abseil-cpp\absl\hash\Debug
D:\cppsoft\grpc\visualpro\third_party\boringssl-with-bazel\Debug
D:\cppsoft\grpc\visualpro\third_party\abseil-cpp\absl\numeric\Debug
D:\cppsoft\grpc\visualpro\third_party\abseil-cpp\absl\time\Debug
D:\cppsoft\grpc\visualpro\third_party\abseil-cpp\absl\base\Debug
D:\cppsoft\grpc\visualpro\third_party\abseil-cpp\absl\strings\Debug
D:\cppsoft\grpc\visualpro\third_party\protobuf\Debug
D:\cppsoft\grpc\visualpro\third_party\zlib\Debug
D:\cppsoft\grpc\visualpro\Debug
D:\cppsoft\grpc\visualpro\third_party\cares\cares\lib\Debug
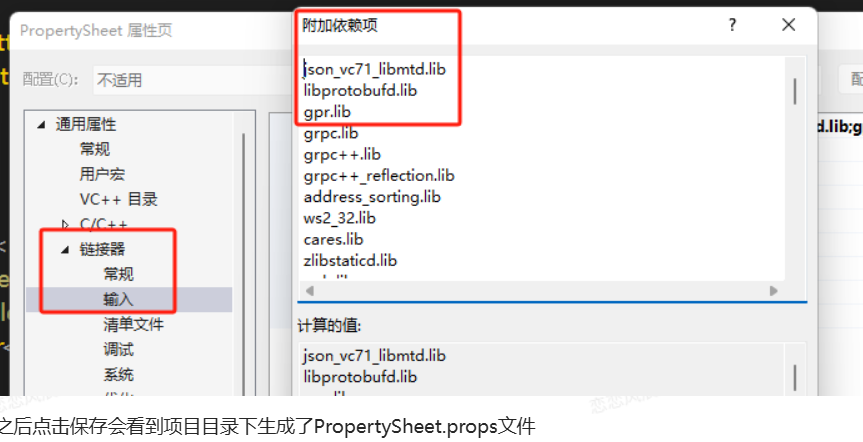
在链接器->输入->附加依赖项中添加libprotobufd.lib
gpr.lib
grpc.lib
grpc++.lib
grpc++_reflection.lib
address_sorting.lib
ws2_32.lib
cares.lib
zlibstaticd.lib
upb.lib
ssl.lib
crypto.lib
absl_bad_any_cast_impl.lib
absl_bad_optional_access.lib
absl_bad_variant_access.lib
absl_base.lib
absl_city.lib
absl_civil_time.lib
absl_cord.lib
absl_debugging_internal.lib
absl_demangle_internal.lib
absl_examine_stack.lib
absl_exponential_biased.lib
absl_failure_signal_handler.lib
absl_flags.lib
absl_flags_config.lib
absl_flags_internal.lib
absl_flags_marshalling.lib
absl_flags_parse.lib
absl_flags_program_name.lib
absl_flags_usage.lib
absl_flags_usage_internal.lib
absl_graphcycles_internal.lib
absl_hash.lib
absl_hashtablez_sampler.lib
absl_int128.lib
absl_leak_check.lib
absl_leak_check_disable.lib
absl_log_severity.lib
absl_malloc_internal.lib
absl_periodic_sampler.lib
absl_random_distributions.lib
absl_random_internal_distribution_test_util.lib
absl_random_internal_pool_urbg.lib
absl_random_internal_randen.lib
absl_random_internal_randen_hwaes.lib
absl_random_internal_randen_hwaes_impl.lib
absl_random_internal_randen_slow.lib
absl_random_internal_seed_material.lib
absl_random_seed_gen_exception.lib
absl_random_seed_sequences.lib
absl_raw_hash_set.lib
absl_raw_logging_internal.lib
absl_scoped_set_env.lib
absl_spinlock_wait.lib
absl_stacktrace.lib
absl_status.lib
absl_strings.lib
absl_strings_internal.lib
absl_str_format_internal.lib
absl_symbolize.lib
absl_synchronization.lib
absl_throw_delegate.lib
absl_time.lib
absl_time_zone.lib
absl_statusor.lib
re2.lib
 在项目的根目录下创建一个proto名字为message.proto:
syntax = "proto3";

package message;

service VarifyService {
  rpc GetVarifyCode (GetVarifyReq) returns (GetVarifyRsp) {}
}

message GetVarifyReq {
  string email = 1;
}

message GetVarifyRsp {
  int32 error = 1;
  string email = 2;
  string code = 3;
}
接下来我们利用grpc编译后生成的proc.exe生成proto的grpc的头文件和源文件D:\cppsoft\grpc\visualpro\third_party\protobuf\Debug\protoc.exe -I="." --grpc_out="." --plugin=protoc-gen-grpc="D:\cppsoft\grpc\visualpro\Debug\grpc_cpp_plugin.exe" "message.proto"
上述命令会生成message.grpc.pb.h和message.grpc.pb.cc文件。
接下来我们生成用于序列化和反序列化的pb文件
D:\cppsoft\grpc\visualpro\third_party\protobuf\Debug\protoc.exe --cpp_out=. "message.proto"
2.5VerifyServe验证服务需要我们使用Node.js与Redis,这一部分是关于Server注册的时候邮箱验证的,不是很麻烦,也不影响你其它三个Server的启动,直接看博主的文档node.js实现邮箱认证服务与多服务验证的开头。
2.6服务器配置五:Windows安装Redis
链接: https://pan.baidu.com/s/1v_foHZLvBeJQMePSGnp4Ow?pwd=yid3 提取码: yid3
下载完成后解压
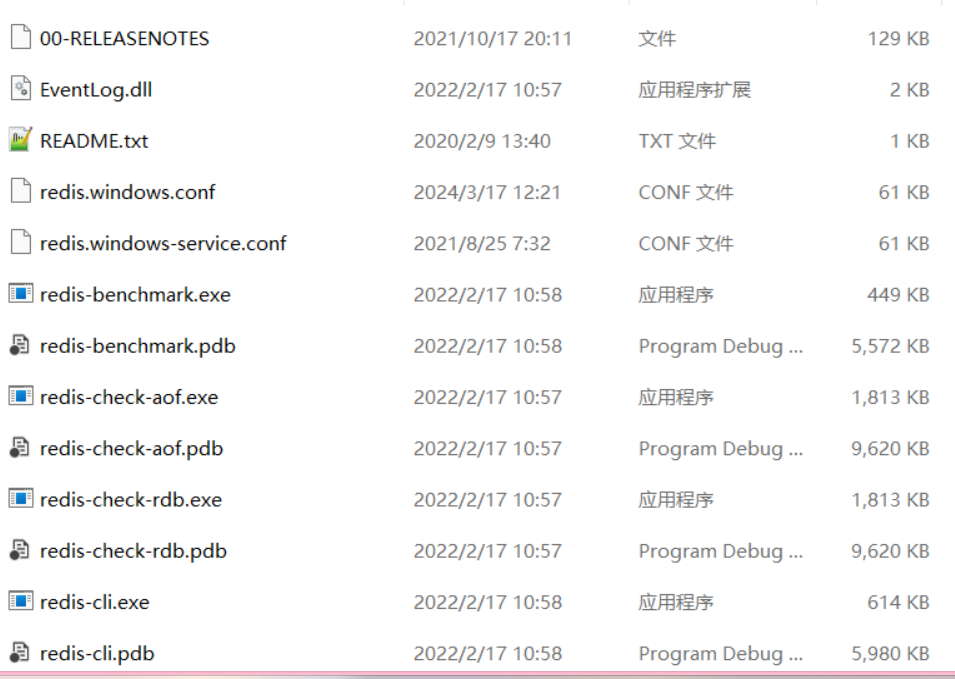
1.修改redis.windows.conf, 并且修改端口
port 6380
2.找到requirepass foobared,下面添加requirepass
# requirepass foobared
requirepass 123456
打开cmd输入到你下载的路径下启动redis 服务器 .\redis-server.exe .\redis.windows.conf
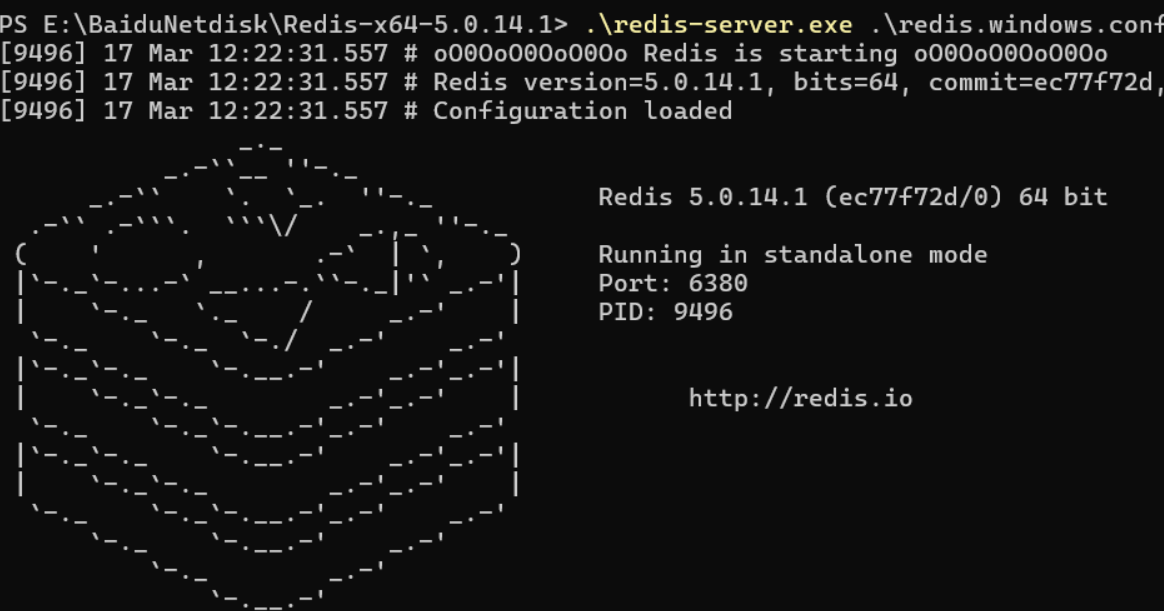
再打开一个cmd:启动客户端 .\redis-cli.exe -p 6380, 输入密码登录成功

2.7服务器配置六:Windows编译和配置redis、
大家可以下载博主的代码。博主那里有先给你讲错的,然后再叫你下载这个,我这里直接让你下载最新的,没有BUG的。
https://gitee.com/secondtonone1/windows-redis
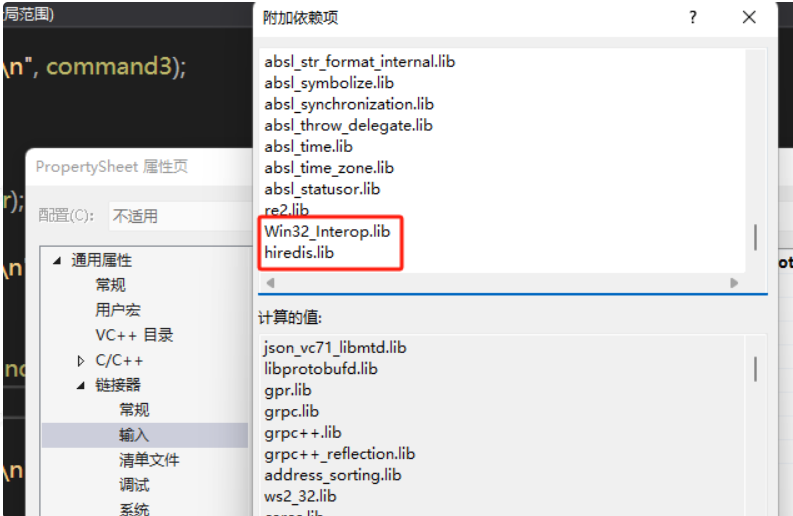
编译生成hredis和Win32_Interop的lib库。
因为是源码,所以进入msvc目录
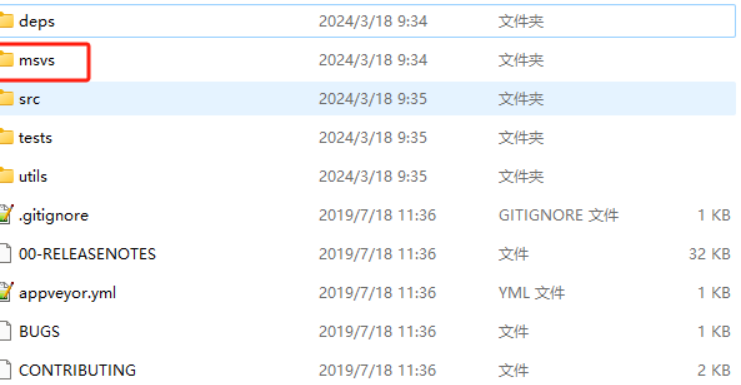
用visual studio打开sln文件,弹出升级窗口, 我的是vs2019所以升级到142
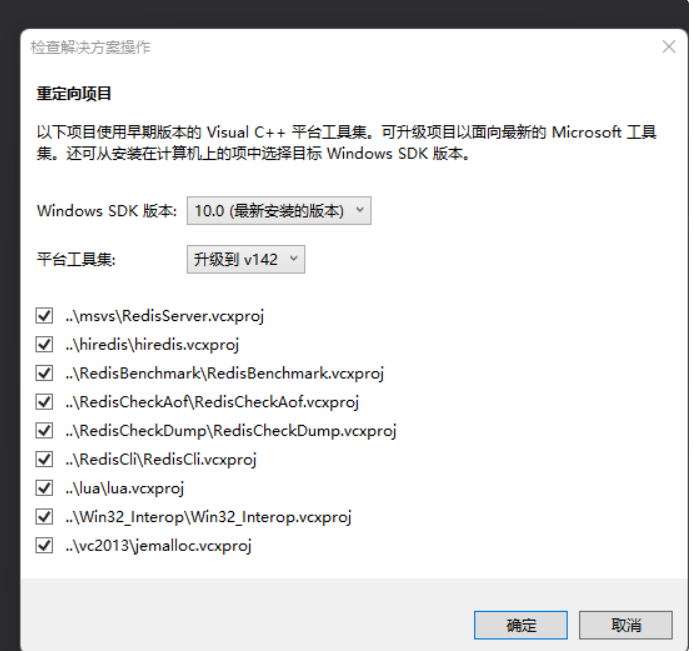
只需要生成hiredis工程和Win32_Interop工程即可,分别点击生成,生成hiredis.lib和Win32_Interop.lib即可
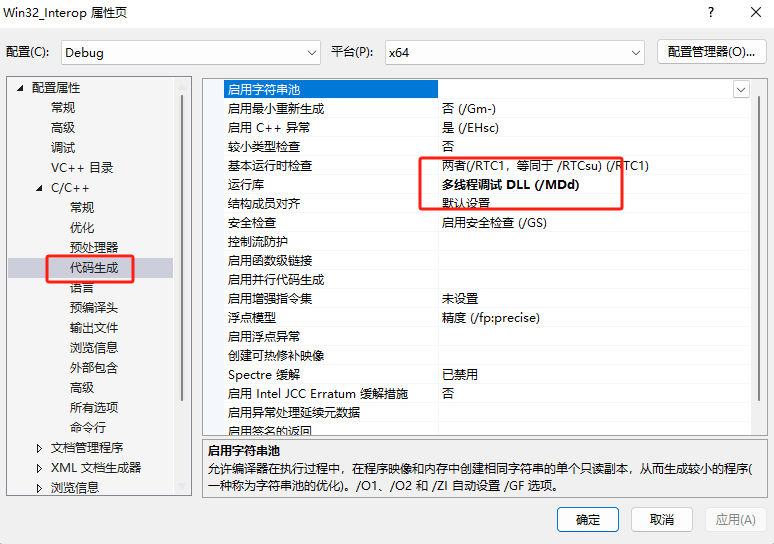
右键两个工程的属性,代码生成里选择运行时库加载模式为MDD(Debug模式动态运行加载),为了兼容我们其他的库,其他的库也是MDD模式
编译Win32_Interop.lib时报错, system_error不是std成员。
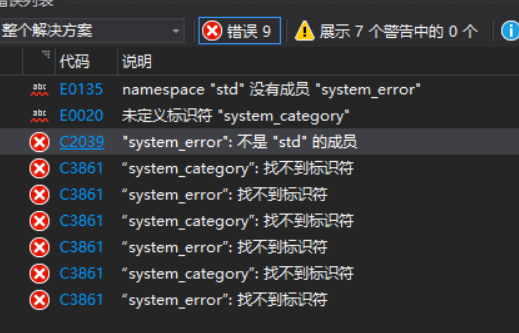
解决办法为在Win32_variadicFunctor.cpp和Win32_FDAPI.cpp添加#include <system_error>
再右键生成成功。
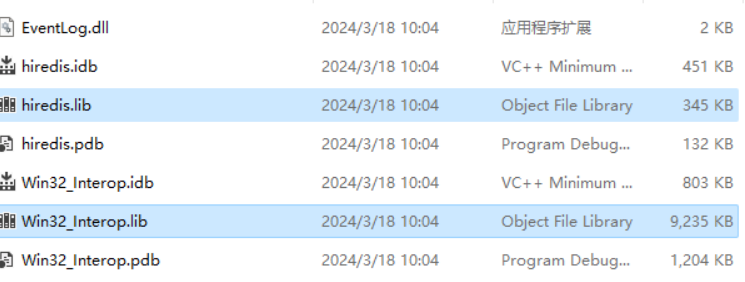
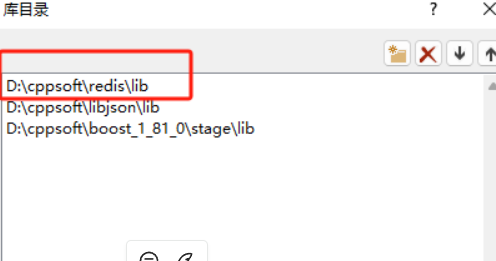
将hiredis.lib和Win32_Interop.lib拷贝到D:\cppsoft\reids\lib
将redis-3.0\deps和redis-3.0\src文件夹拷贝到D:\cppsoft\reids
然后我们在visual studio中配置VC++ 包含目录
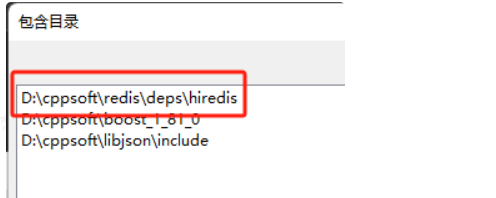
配置VC++库目录
然后在链接器->输入->附加依赖项中添加
2.8服务器配置七:Mysql
https://pan.baidu.com/s/1BTMZB31FWFUq4mZZdzcA9g?pwd=6xlz
提取码:6xlz
在bin目录同级下创建一个文件,命名为my.ini
编辑my.ini文件
[mysqld]
# 设置3308端口
port=3308
# 设置mysql的安装目录 ---这里输入你安装的文件路径----
basedir=D:\cppsoft\mysql
# 设置mysql数据库的数据的存放目录
datadir=D:\mysql\data
# 允许最大连接数
max_connections=200
# 允许连接失败的次数。
max_connect_errors=10
# 服务端使用的字符集默认为utf8
character-set-server=utf8
# 创建新表时将使用的默认存储引擎
default-storage-engine=INNODB
# 默认使用“mysql_native_password”插件认证
#mysql_native_password
default_authentication_plugin=mysql_native_password
[mysql]
# 设置mysql客户端默认字符集
default-character-set=utf8
[client]
# 设置mysql客户端连接服务端时默认使用的端口
port=3308
default-character-set=utf8
有两点需要注意修改的:
A、basedir这里输入的是mysql解压存放的文件路径
B、datadir这里设置mysql数据库的数据存放目录
打开cmd以管理员模式,进入mysql的bin文件下,一定要以管理员。
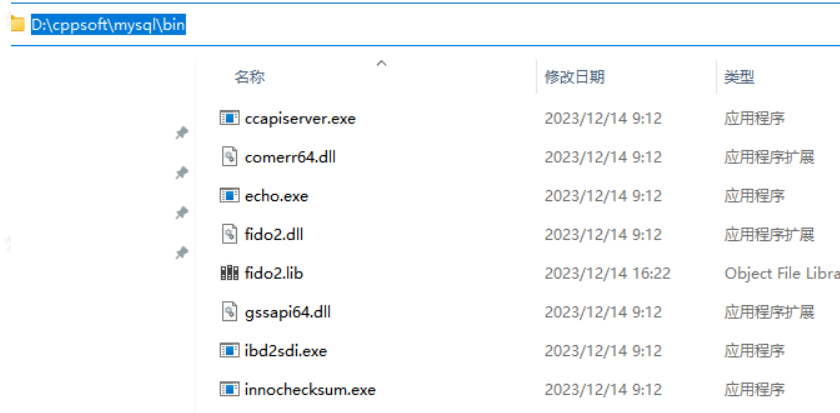
依次执行命令
第一个命令为:
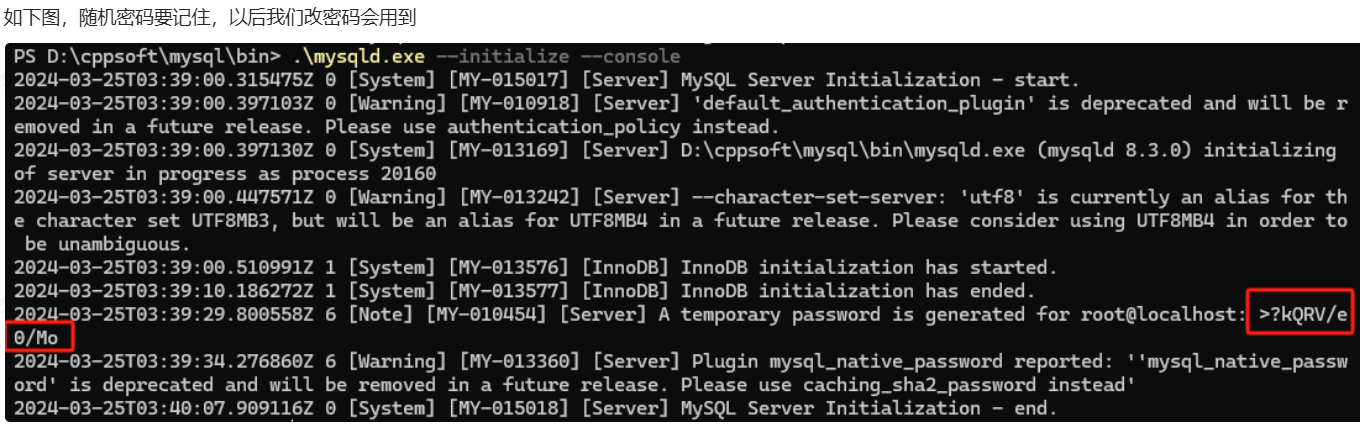
//安装mysql 安装完成后Mysql会有一个随机密码
.\mysqld.exe --initialize --console
如下图,随机密码要记住,以后我们改密码会用到接下来在cmd执行第二条命令
接下来在cmd执行第二条命令
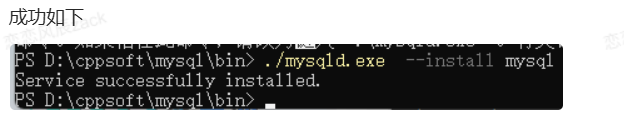
//安装mysql服务并启动
.\mysqld.exe --install mysql
修改Mysql密码
1 在本机启动mysql服务:
搜索计算机管理,右键选择管理进去:
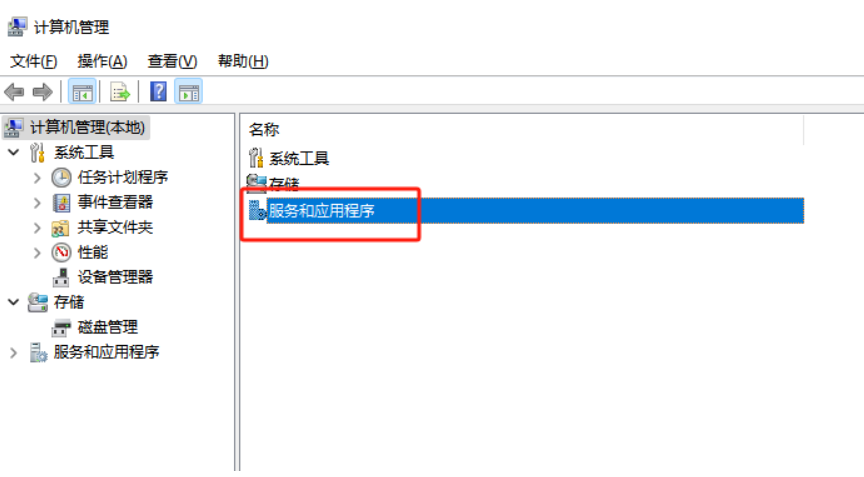
点击后选择服务
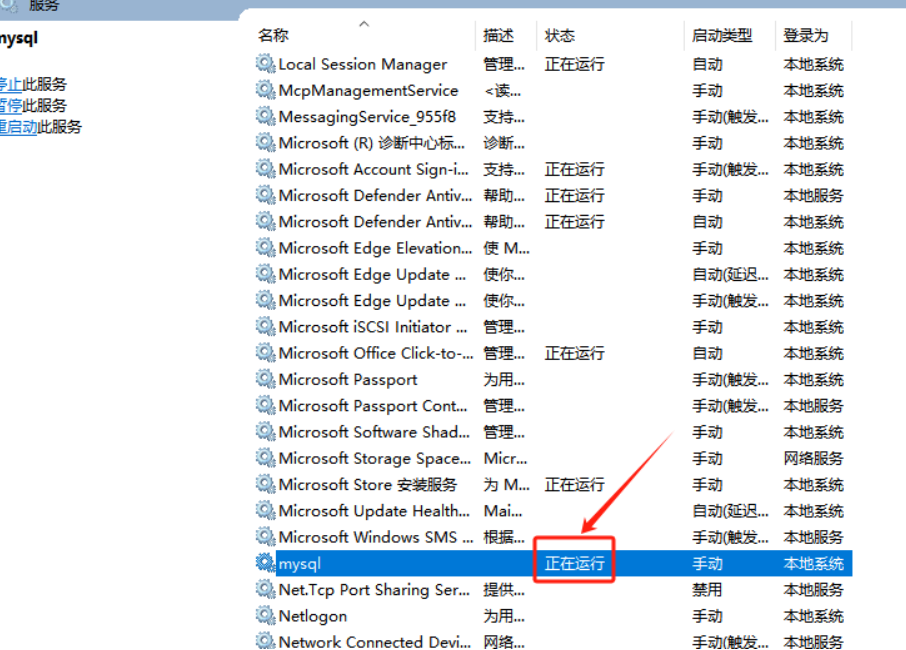
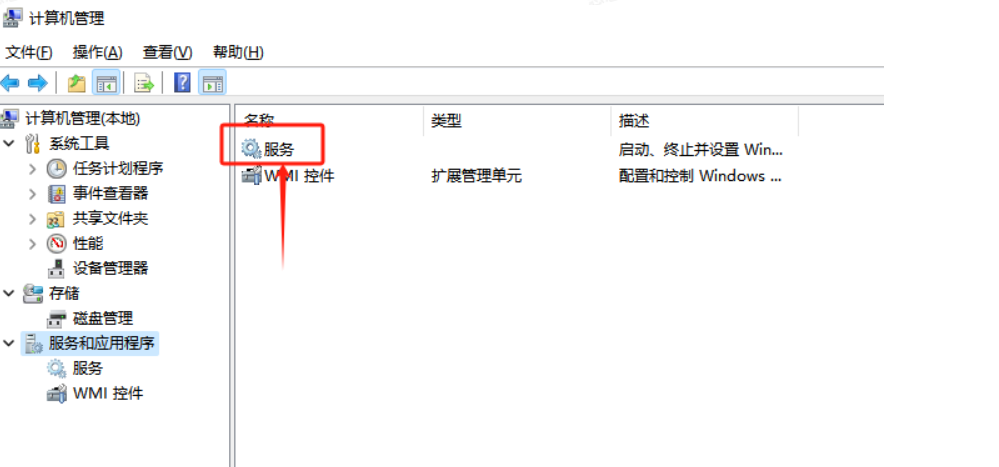 点击服务后可查看当前计算机启动的所有服务,找到mysql,然后右键点击设为启动,同时也可设置其为自动启动和手动启动
继续在cmd上执行以下命令
mysql -uroot -p
回车后输入上面安装时保存的初始密码,进入mysql里面:
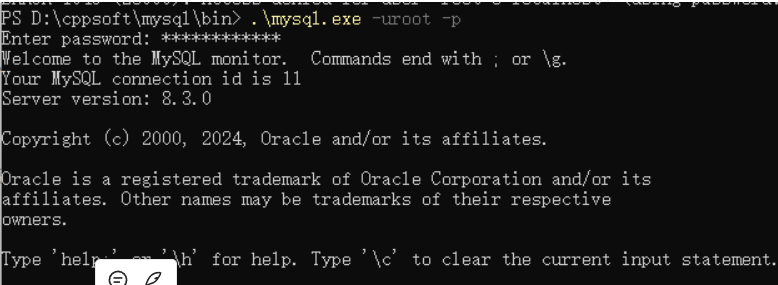
在mysql里面继续执行以下命令:
//修改密码为123mysql
ALTER USER 'root'@'localhost' IDENTIFIED BY '123456';
回车按照指引执行完后,代表密码修改成功,再输入exit;退出即可
配置环境变量:
为了方便使用mysql命令,可以将mysql目录配置在环境变量里
新建系统变量:
变量名:MYSQL_HOME
变量值:msql目录
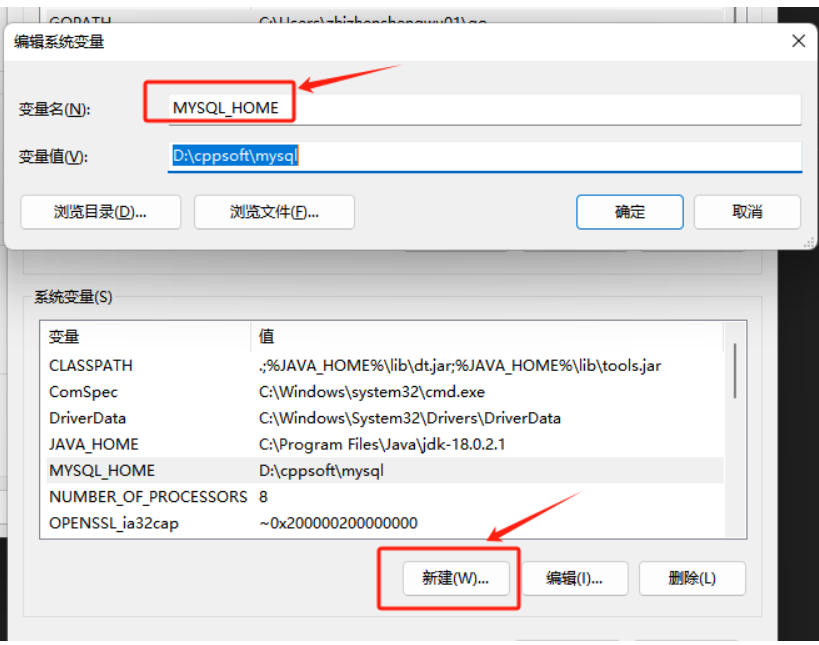
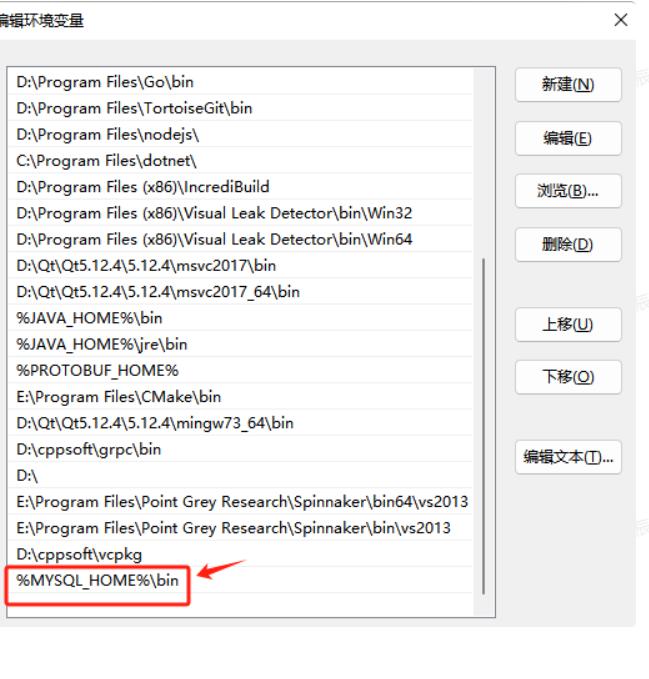
修改系统的path变量
编辑path,进去后添加 %MYSQL_HOME%\bin
2.8服务器配置七:Mysql Connector C++
https://pan.baidu.com/s/1XAVhPAAzZpZahsyITua2oQ?pwd=9c1w
提取码:9c1w
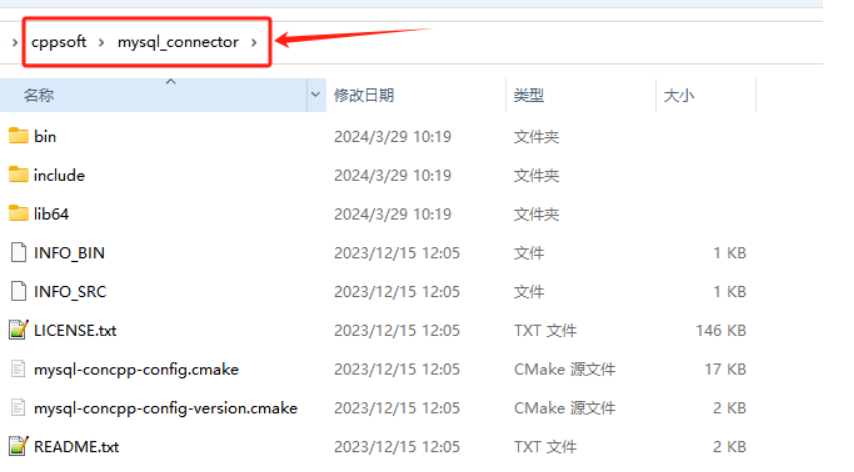
下载后将文件夹解压放在一个自己常用的目录,我放在D:\cppsoft\mysql_connector
接下来去visual studio中配置项目
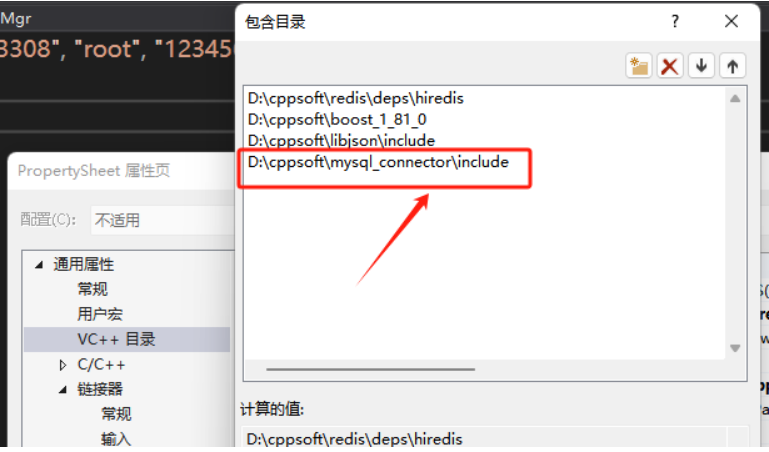
VC++ 包含目录添加D:\cppsoft\mysql_connector\include、
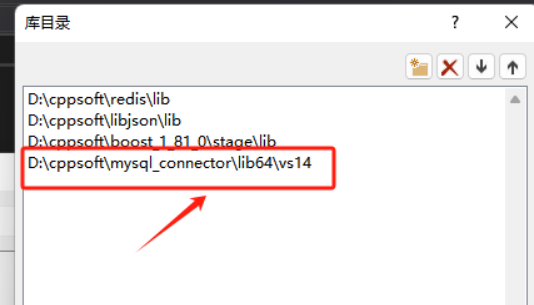
库目录包含D:\cppsoft\mysql_connector\lib64\vs14
为了让项目自动将dll拷贝到运行目录,可以在生成事件->生成后事件中添加xcopy命令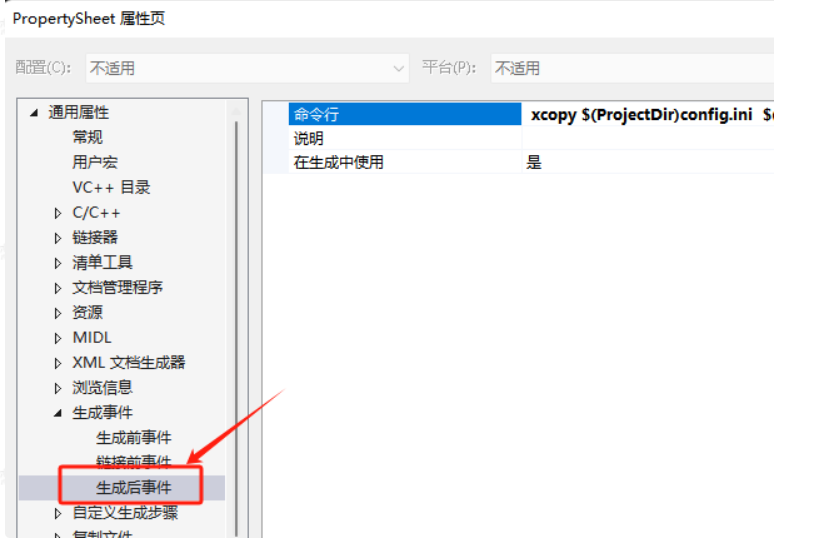
xcopy $(ProjectDir)config.ini $(SolutionDir)$(Platform)\$(Configuration)\ /y
xcopy $(ProjectDir)*.dll $(SolutionDir)$(Platform)\$(Configuration)\ /y
以上全部配置完就能启动GateServer与ChatServer,但是VerifyServe我这里是没有教配置的,我不知道你们下载后能不能直接运行的。
如果还是运行不了,可以私信我 陡音(79162025576)。

中国智能体开发者社区,聚焦智能体与大模型开发,提供前沿资讯、实用工具链、开源项目及行业案例。通过技术沙龙、开发者大赛等活动,促进经验交流与协作,助力开发者快速构建创新智能应用。
更多推荐
 19
19 0
0- 0


 已为社区贡献4条内容

所有评论(0)