如何使用SD制作无线缩放gif
无限缩放艺术是一种视觉艺术技术,可在图像上创建无限放大或缩小的错觉。您可以轻松地使用 AI 艺术生成器 Stable Diffusion 来创建一个。您将学习如何制作无限缩放艺术,如下所示:We will cover 我们将涵盖Table of Contents 目录稳定的扩散软件一个简单的第一个例子Infinite Zoom 是如何工作的?无限变焦的分步指南Tips 技巧。
How to make an infinite zoom art with Stable Diffusion 如何使用 Stable Diffusion 制作无限缩放艺术

An infinite zoom art is a visual art technique that creates an illusion of an infinite zoom-in or zoom-out on an image. You can easily use Stable Diffusion, an AI art generator, to create one.
无限缩放艺术是一种视觉艺术技术,可在图像上创建无限放大或缩小的错觉。您可以轻松地使用 AI 艺术生成器 Stable Diffusion 来创建一个。
You will learn how to make an infinite zoom art like this:
您将学习如何制作无限缩放艺术,如下所示:
We will cover 我们将涵盖
- Software setup 软件设置
- A step-by-step guide to creating your first infinite zoom
创建您的第一个无限变焦的分步指南 - Guide for generating good results
产生良好结果的指南 - Advanced options 高级选项
Table of Contents 目录
-
Stable Diffusion Software
稳定的扩散软件 -
- Installing Infinite Zoom on Google Colab
在 Google Colab 上安装 Infinite Zoom - Installing Infinite Zoom on Windows or Mac
在 Windows 或 Mac 上安装 Infinite Zoom
- Installing Infinite Zoom on Google Colab
-
A simple first example
一个简单的第一个例子 -
- Step 1: Download an inpainting model
第 1 步:下载修复模型 - Step 2: Select the inpainting model
第 2 步:选择修复模型 - Step 3: Review settings and press generate
第 3 步:查看设置并按生成
- Step 1: Download an inpainting model
-
How does Infinite Zoom work?
Infinite Zoom 是如何工作的? -
Step-by-step guide for Infinite Zoom
无限变焦的分步指南 -
- Main tab “主”选项卡
- Outpainting tab Outpainting 选项卡
- Step 1: Generate the initial image
第 1 步:生成初始映像 - Step 2: Enter Infinite Zoom settings
第 2 步:输入无限缩放设置 - Step 3: Generate Infinite Zoom video
第 3 步:生成无限缩放视频 - Step 4: Convert to animated GIF (Optional)
第 4 步:转换为动画 GIF(可选)
-
Tips 技巧
-
- Inpainting models 修复模型
- Zoom settings 缩放设置
- Color correction setting
色彩校正设置
这份完整版的学习资料已经上传CSDN,朋友们如果需要可以微信扫描下方CSDN官方认证二维码免费领取【保证100%免费】

Stable Diffusion Software 稳定的扩散软件
We will use AUTOMATIC1111 Stable Diffusion WebUI to create infinite zoom videos. It is a popular and free open-source software. You can use this GUI on Windows, Mac, or Google Colab.
我们将使用 AUTOMATIC1111 Stable Diffusion WebUI 来创建无限缩放视频。它是一种流行的免费开源软件。您可以在 Windows、Mac 或 Google Colab 上使用此 GUI。
Check out the Quick Start Guide if you are new to Stable Diffusion.
如果您不熟悉 Stable Diffusion,请查看快速入门指南。
Check out the AUTOMATIC1111 Guide if you are new to AUTOMATIC1111.
如果您不熟悉 AUTOMATIC1111,请查看AUTOMATIC1111指南。
You will need to install the infinite zoom extension in AUTOMATIC1111.
您需要在AUTOMATIC1111中安装无限缩放扩展。
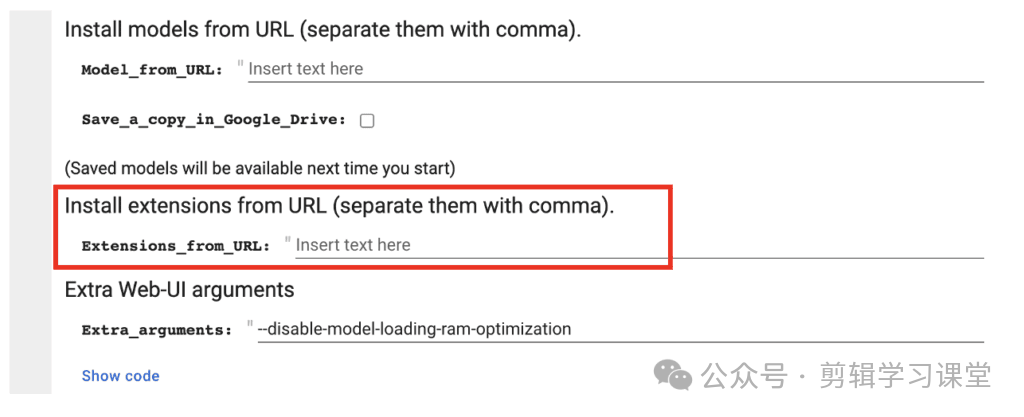
Installing Infinite Zoom on Google Colab 在 Google Colab 上安装 Infinite Zoom
If you use our Colab Notebook, enter the following URL in the Extensions_from_URL field.
如果您使用我们的 Colab Notebook,请在Extensions_from_URL字段中输入以下 URL。
https://github.com/v8hid/infinite-zoom-automatic1111-webui
Installing Infinite Zoom on Windows or Mac 在 Windows 或 Mac 上安装 Infinite Zoom
- Start AUTOMATIC1111 Web-UI normally.
正常启动AUTOMATIC1111 Web-UI。
\2. Navigate to the Extension Page.
\2. 导航到扩展页面。
\3. Click the Install from URL tab.
\3. 单击“从 URL 安装”选项卡。
\4. Enter the following URL in the URL for extension’s git repository field.
\4. 在扩展的 git 存储库字段的 URL 中输入以下 URL。
https://github.com/v8hid/infinite-zoom-automatic1111-webui
\5. Wait for the confirmation message that the installation is complete.
\5. 等待安装完成的确认消息。
\6. Restart AUTOMATIC1111.
\6. 重新启动AUTOMATIC1111。
A simple first example 一个简单的第一个例子
You can use this quick example to test your setup and ensure everything works correctly.
您可以使用此快速示例来测试您的设置并确保一切正常。
Step 1: Download an inpainting model 第 1 步:下载修复模型
You should use an inpainting model for a reasonable result. Let’s use the Dreamshaper Inpainting model. Download the model file and put it in the folder:
您应该使用修复模型以获得合理的结果。让我们使用 Dreamshaper Inpainting 模型。下载模型文件并将其放入文件夹中:
stable-diffusion-webui\models\Stable-diffusion
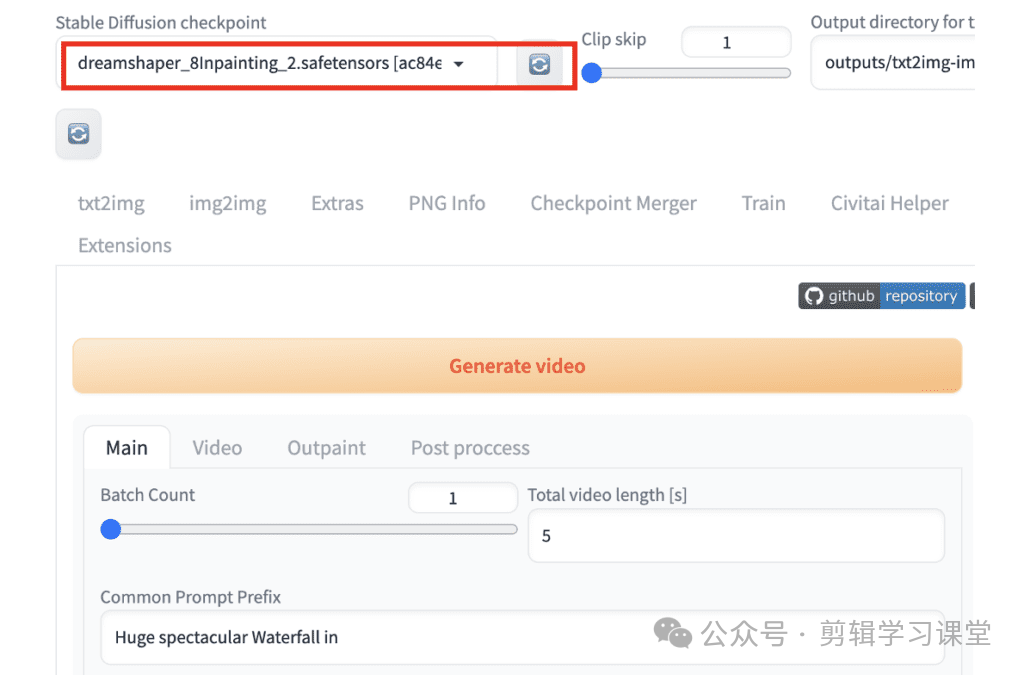
Step 2: Select the inpainting model
第 2 步:选择修复模型
Select the inpainting model in the Stable Diffusion checkpoint dropdown menu.
在 Stable Diffusion 检查点下拉菜单中选择修复模型。
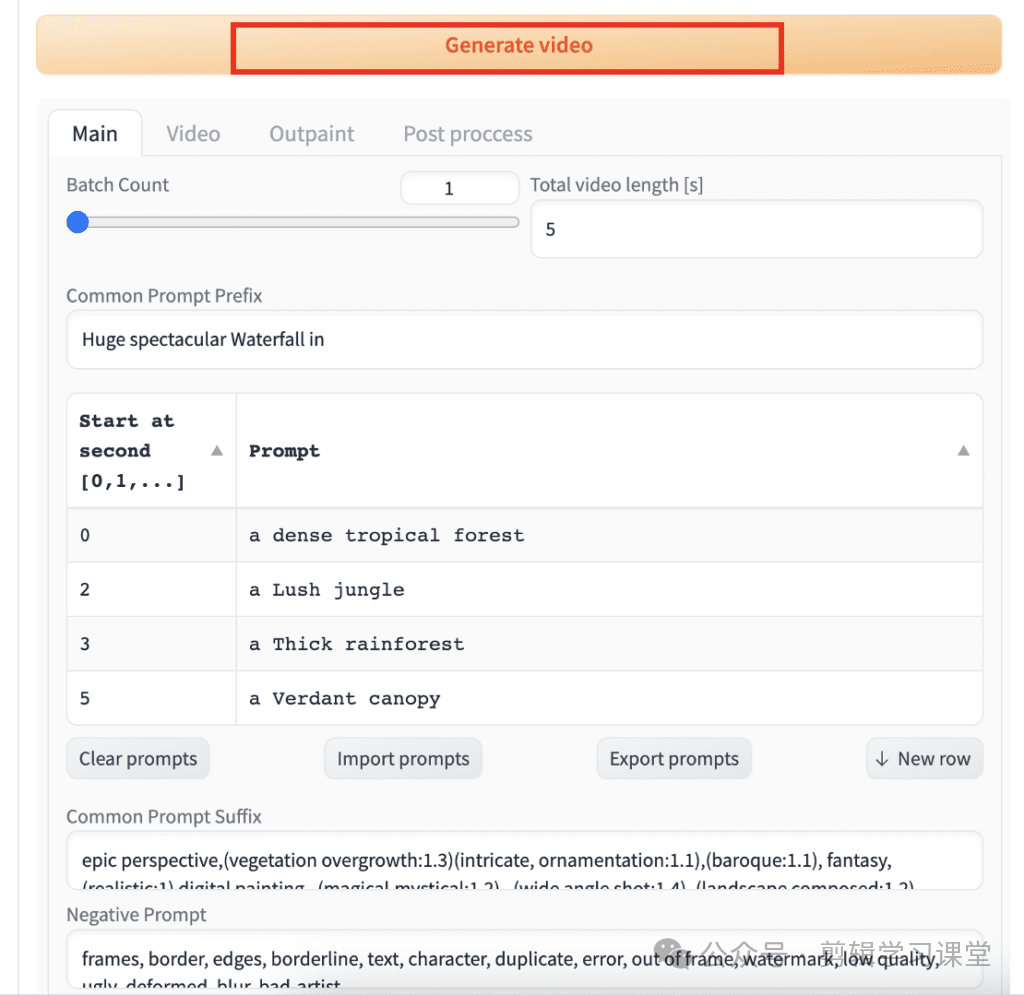
Step 3: Review settings and press generate 第 3 步:查看设置并按生成
You should see the Common Prompt Prefix, the Prompt Start at second, the Common Prompt Suffix, and the Negative Prompt populated with the default values. We will explain them later, but the Prompt Start at second is the prompt that is switched to at that time.
您应该会看到“通用提示前缀”、“提示从秒开始”、“通用提示后缀”和“否定提示”填充了默认值。我们稍后会解释它们,但秒开始提示是当时切换到的提示。
Press Generate. 按生成。
After a brief wait, you should get a video like this.
经过短暂的等待,您应该会得到这样的视频。
How does Infinite Zoom work? Infinite Zoom 是如何工作的?
Now, it’s a good time to pause and understand what happened.
现在,是时候停下来了解发生了什么。
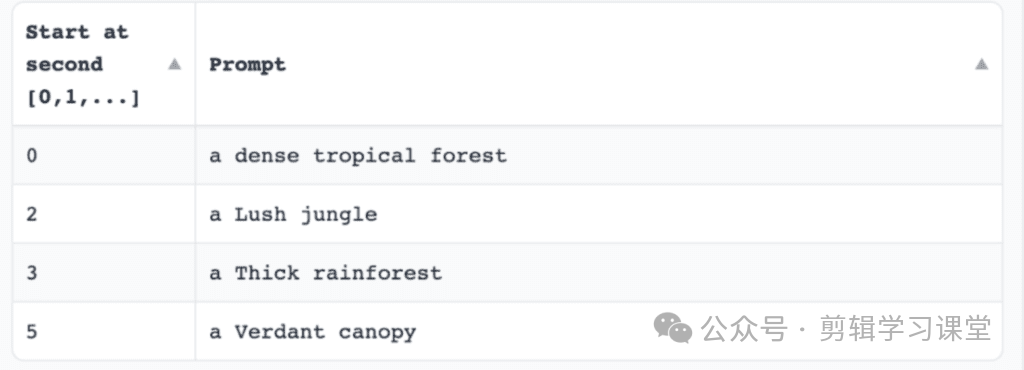
The prompt of the initial image is a combination of the common prefix, prompt, and the common suffix. The subject is written in the prompt and has changed at 2 sec, 3 sec, and 5 sec.
初始图像的提示是通用前缀、提示和通用后缀的组合。主题写在提示中,并在 2 秒、3 秒和 5 秒时发生了变化。
So, the initial image is generated with the prompt at time 0 using the inpainting model.
因此,使用修复模型在时间 0 处通过提示生成初始图像。
In the next frame, the initial image is shrunk slightly to create the illusion of zooming out. Now, you have created a small frame of empty space around the shrunk image. The extension inpaints the empty space using the same prompt.
在下一帧中,初始图像略微缩小以产生缩小的错觉。现在,您已经在缩小的图像周围创建了一个空白空间的小框架。该扩展使用相同的提示来绘制空白区域。
The process repeats itself until you reach 2 sec, where you switch to the next prompt. Now, you use the new prompt for inpainting.
该过程会重复进行,直到您达到 2 秒,然后切换到下一个提示。现在,您可以使用新的提示进行修复。
And you get the idea.
你明白了。
Step-by-step guide for Infinite Zoom 无限变焦的分步指南
Now you have verified that your setup is working, let’s go through a slightly more advanced example.
现在您已经验证了您的设置是否正常工作,让我们看一个稍微高级的示例。
We used the inpainting model in the previous example to generate the initial image. It is not the best because an inpainting model is trained to fill in a missing part of an image, not directly creating one.
我们在上一个示例中使用了修复模型来生成初始图像。它不是最好的,因为修复模型被训练来填充图像的缺失部分,而不是直接创建一个。
You should use a pairing model to generate the first image for the best result. For example, use the DreamShaper 8 model to create the initial image and the DreamShape 8 inpainting model to create the infinite zoom video.
您应该使用配对模型来生成第一个图像以获得最佳结果。例如,使用 DreamShaper 8 模型创建初始图像,使用 DreamShape 8 修复模型创建无限缩放视频。
Step 1: Generate the initial image 第 1 步:生成初始映像
Go to the txt2img page in AUTOMATIC1111.
转到 AUTOMATIC1111 中的 txt2img 页面。
-
Stable Diffusion checkpoint: DreamShaper 8 Model
稳定扩散检查点:DreamShaper 8 模型 -
Prompt and Negative Prompt:
提示和否定提示:
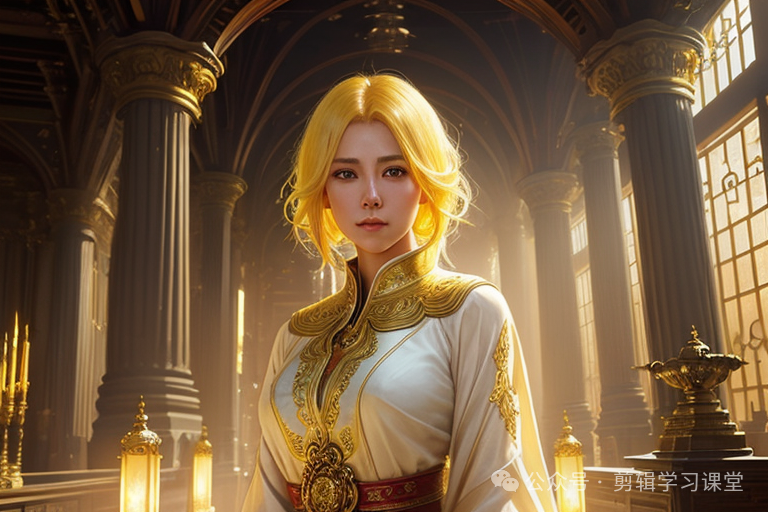
beautiful woman, yellow hair, in temple, magical scene, shining eyes, dazzling glow, 8k, intricate, elegant, highly detailed, majestic, digital photography, art by artgerm and ruan jia and greg rutkowski, hdr
美丽的女人,黄头发,在寺庙里,神奇的场景,闪亮的眼睛,耀眼的光芒,8k,错综复杂,优雅,高度细节,雄伟,数码摄影,Artgerm和Ruan Jia和Greg Rutkowski的艺术,HDR
BadDream 噩梦
(Note: BadDream is a negative embedding for DreamShaper.)
(注意:BadDream 是 DreamShaper 的否定嵌入。
- Sampling Method: DPM++ 2M Karras
采样方法:DPM++ 2M Karras - Sampling steps: 20 采样步骤:20
- Width: 768 宽度:768
- Height: 512 高度:512
Press Generate. We get the initial image.
按生成。我们得到初始图像。
Step 2: Enter Infinite Zoom settings 第 2 步:输入无限缩放设置
Go to the Infinite Zoom page in AUTOMATIC1111.
转到 AUTOMATIC1111 中的 Infinite Zoom 页面。
Main tab “主”选项卡
Select the Main tab. 选择“主要”选项卡。
Batch Count is the number of videos you are going to make each time you press the Generate button. Keep it as 1.
批量计数是每次按下“生成”按钮时要制作的视频数量。将其保留为 1。
Total video length [s] is the total length of the video. Enter 12 sec for this video.
视频总长度 [s] 是视频的总长度。输入此视频的 12 秒。
This extension breaks the prompt into 3 parts:
此扩展将提示分为 3 个部分:
- Common Prompt Prefix: Beginning part of the prompt. This is common to all frames of the video.
通用提示前缀:提示的开头部分。这对于视频的所有帧都是通用的。 - Prompt: Middle part of the prompt. This can be changed at any different time in the video.
提示:提示的中间部分。这可以在视频中的任何不同时间进行更改。 - Common Prompt Suffix: Ending part of the prompt. Similar to the prefix, all frames use the same prompt suffix.
常用提示后缀:提示的结束部分。与前缀类似,所有帧都使用相同的提示后缀。
Now you know you can have a fixed and variable part in the prompt. Let’s break the prompt of the initial image into two parts:
现在您知道您可以在提示符中拥有固定和可变的部分。让我们将初始图像的提示分为两部分:
- Subject: the variable part. This can be changed at any time point, defined in the table.
主题:变量部分。这可以在表中定义的任何时间点进行更改。 - Style: the fixed part. We keep the same style throughout the video.
风格:固定部分。我们在整个视频中保持相同的风格。
The subject part of the initial prompt is
初始提示的主题部分是
beautiful woman, yellow hair, in temple
美丽的女人,黄头发,在寺庙里The style part of the initial prompt is
初始提示的样式部分是
magical scene, shining eyes, dazzling glow, 8k, intricate, elegant, highly detailed, majestic, digital photography, art by artgerm and ruan jia and greg rutkowski, hdr
神奇的场景,闪亮的眼睛,耀眼的光芒,8k,错综复杂,优雅,高度细节,雄伟,数码摄影,Artgerm和Ruan Jia和Greg Rutkowski的艺术作品,HDRWe will use the subject in the middle, variable part of the prompt. We will use the style in the common part of the prompt.
我们将在提示的中间变量部分使用主语。我们将在提示的公共部分使用样式。
In the table, enter:
在表格中,输入:
Common Prompt Prefix: (leave empty)
通用提示前缀:(留空)
Enter the following prompts for different time points in the table.
在表中输入不同时间点的以下提示。
| Start at second 从秒开始 | Prompt |
|---|---|
| 0 | beautiful woman, shining eyes, yellow hair, in temple 美丽的女人,闪亮的眼睛,黄色的头发,在寺庙里 |
| 2 | temple in waterfall 瀑布中的寺庙 |
| 6 | close up of giant waterfall in jungle 丛林中巨型瀑布的特写 |
Variable part of the prompt.
提示的变量部分。
I found it produces better results when you have a gradual transition of the subject
我发现当你逐渐过渡主题时,它会产生更好的结果
- 0 second: woman, temple
0 秒:女人,寺庙 - 2 second: temple, waterfall
2秒:寺庙、瀑布 - 6 second: waterfall, jungle
6秒:瀑布,丛林
Common prompt suffix: 常用提示后缀:
magical scene, dazzling glow, 8k, intricate, elegant, highly detailed, majestic, digital photography, art by artgerm and ruan jia and greg rutkowski, hdr
神奇的场景,耀眼的光芒,8k,错综复杂,优雅,细节丰富,雄伟,数码摄影,Artgerm和Ruan Jia和Greg Rutkowski的艺术作品,HDRNegative Prompt: 否定提示:
BadDream 噩梦
Output width: 768 输出宽度:768
Output height: 512 输出高度:512
Sampling Steps for each outpaint: 20
每次涂料的采样步骤:20
Outpainting tab Outpainting 选项卡
Switch to the outpainting tab.
切换到“outpainting”选项卡。
Set the Mask Blur all the way up to 64. The Mask Blur is the amount of blurring near the edge of the newly created empty space. A higher value helps to increase the consistency of inpainting.
将蒙版模糊一直设置为 64。蒙版模糊是新创建的空白空间边缘附近的模糊量。较高的值有助于提高修复的一致性。
Step 3: Generate Infinite Zoom video 第 3 步:生成无限缩放视频
We will keep the rest of the parameters as default. Press Generate to create the video.
我们将保留其余参数作为默认值。按 Generate 创建视频。
Step 4: Convert to animated GIF (Optional) 第 4 步:转换为动画 GIF(可选)
You can use this free service to convert the MP4 video to an animated GIF:
您可以使用此免费服务将 MP4 视频转换为动画 GIF:
https://ezgif.com/video-to-gif
Here’s one result. 这是一个结果。
Here’s another one. 这是另一个。
Tips 技巧
Inpainting models 修复模型
DreamShaper is not the only model/inpainting model you can use. Here’s an extended list
DreamShaper 并不是您可以使用的唯一模型/修复模型。这是一个扩展列表
- DreamShaper 8 / DreamShaper 8 inpainting — Realistic painting style
DreamShaper 8 / DreamShaper 8 inpainting — 写实的绘画风格 - Realistic Vision 5/ Realistic Vision 5 inpainting — Realistic photo style
Realistic Vision 5/ Realistic Vision 5 inpainting — 逼真的照片风格 - Deliberate v3/ Deliberate v3 inpainting — Painting style
Deliberate v3/ Deliberate v3 inpainting — 绘画风格
Zoom settings 缩放设置
Set zoom in or out in Video > Zoom mode.
在视频>缩放模式下设置放大或缩小。
Set zoom speed in Video > Zoom speed
在“视频”>“变焦速度”中设置变焦速度
Color correction setting 色彩校正设置
Uncheck Settings > Img2img > Apply color correction to img2img results to match original colors.
取消选中 img2img >设置>对 img2img 结果应用颜色校正以匹配原始颜色。
这份完整版的学习资料已经上传CSDN,朋友们如果需要可以微信扫描下方CSDN官方认证二维码免费领取【保证100%免费】

火山引擎开发者社区是火山引擎打造的AI技术生态平台,聚焦Agent与大模型开发,提供豆包系列模型(图像/视频/视觉)、智能分析与会话工具,并配套评测集、动手实验室及行业案例库。社区通过技术沙龙、挑战赛等活动促进开发者成长,新用户可领50万Tokens权益,助力构建智能应用。
更多推荐
 25
25 0
0- 0


 已为社区贡献211条内容

所有评论(0)