奖励模型POLAR微调教程
复现验证了 POLAR 论文中的设计思路和方法。
一、技术背景
随着大语言模型(LLM)的浪潮席卷全球,如何让模型更好地与人类的价值观和偏好对齐,成为了业界的核心议题。在这其中,奖励模型(Reward Model, RM)扮演着至关重要的“品味裁判”角色。最近,一篇名为《预训练的策略甄别器可作为通用奖励模型》(Pre-Trained Policy Discriminators are General Reward Models)的论文及其开源项目 POLAR,为奖励模型领域带来了全新的思路。本文记录了我从理解 POLAR 思想,到动手验证其能力,再到最终成功微调出符合自己独特偏好的奖励模型的全过程。
在让大模型变得更“有用”、“无害”且“诚实”的众多技术中,基于人类反馈的强化学习(Reinforcement Learning from Human Feedback, RLHF)无疑是目前最主流的范式。
RLHF 的核心流程可以简化为三步:
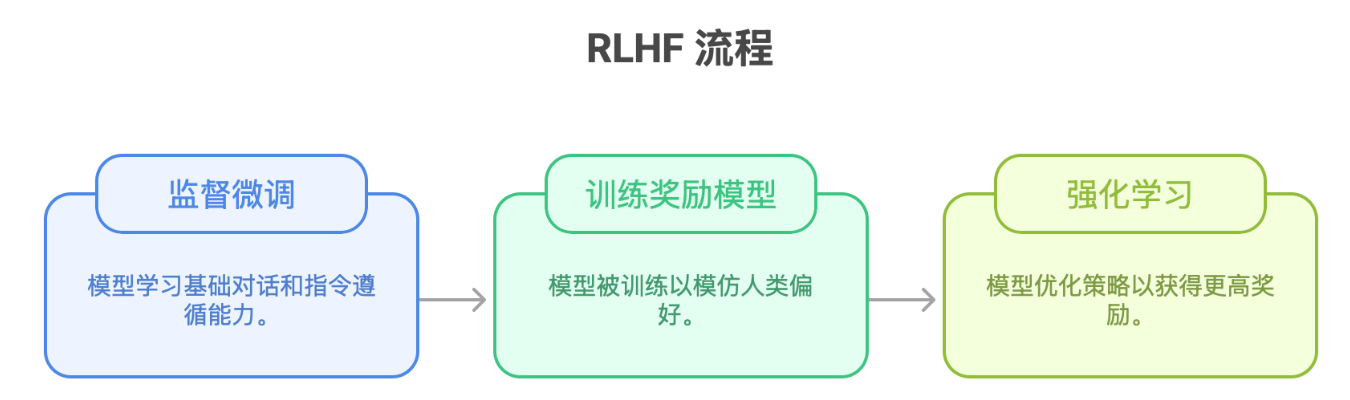
然而,这个流程中的判定——奖励模型,正面临着严峻的挑战:
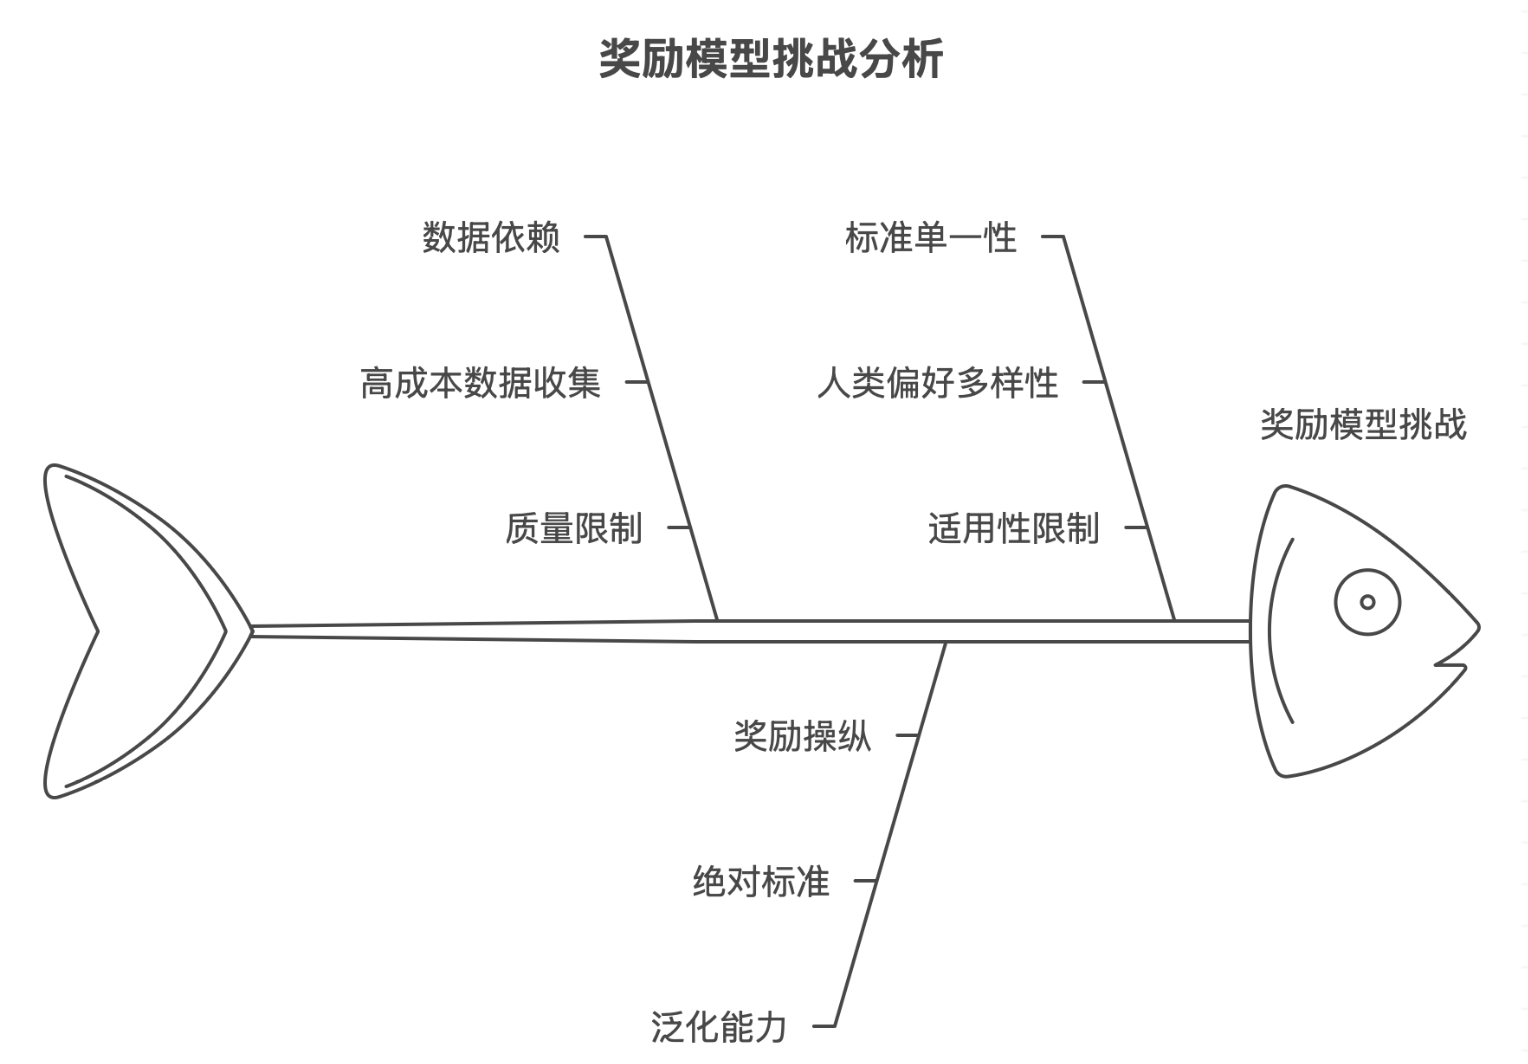
正是在这样的背景下,POLAR 提出了一种颠覆性的解决方案。
二、奖励模型POLAR介绍
POLAR 的核心思想,是将奖励模型(RM)的角色进行一次彻底的转变:它不应该是一个对单个回答打出绝对分数的“裁判”,而应该是一个能够量化和甄别不同语言模型(即“策略”)之间差异的“甄别器”。
简单来说,POLAR 不再问“这个回答好不好?”,而是问“这两个回答,哪个更接近我想要的那个‘黄金标准’答案?”。为了实现这一点,POLAR 设计了一个创新的两阶段训练范式:
阶段一:与标准无关的无监督预训练
这是 POLAR 的精髓所在。它的目标是让奖励模型在不依赖任何人类偏好的情况下,学会通用的“策略甄别”能力。
-
做法:收集大量不同的语言模型(构成一个“策略池”),让它们对同样的问题生成回答。然后,训练奖励模型去分辨:这两个回答是来自同一个模型,还是来自两个不同的模型?
-
效果:通过海量的对比学习,奖励模型掌握了一种与具体评价标准无关的、底层的、通用的分辨能力。它学会了理解不同模型在风格、逻辑、内容组织上的本质差异。
阶段二:与人类标准对齐的有监督微调
在模型具备了通用的甄别能力后,此阶段的目标是将其“校准”到我们需要的具体标准上。
-
做法:使用少量的人类偏好数据(例如,对同一个模型生成的三个回答进行排序),对预训练好的奖励模型进行微调。
-
效果:这个过程就像是告诉一个懂音乐的“鉴赏家”(预训练好的模型),我现在只喜欢“古典乐”(我们的自定义偏好)。模型可以利用它强大的底层分辨能力,快速将自己对齐到这个新的、具体的要求上。
这种“先通用,后专用”的范式,使得 POLAR 奖励模型不仅性能卓越、泛化能力强,而且极大地降低了对昂贵人工标注数据的依赖,为我们普通开发者定制自己的奖励模型打开了大门。
三、POLAR实战实验
3.1 基础环境
## 基础环境配置
source /opt/conda/bin/activate
conda create -n llm python=3.10 -y
conda activate llm

## 或者
echo 'source /opt/conda/bin/activate' >> ~/.bashrc
echo 'conda activate llm' >> ~/.bashrc
source ~/.bashrc

pip config set global.index-url https://mirrors.aliyun.com/pypi/simple/
pip config set install.trusted-host mirrors.aliyun.com
pip install protobuf modelscope
pip install datasets peft
pip install 'xtuner[deepspeed]'==0.2.0
pip install "triton==3.1.0"
3.2 实验测试示例
test_reward.py
import torch
from transformers import AutoTokenizer, AutoModelForSequenceClassification
import operator

# 官方推荐使用 xtuner 的辅助工具来处理数据格式,我们在此引入
# 请确保您已经安装了 xtuner: pip install xtuner
try:
    from xtuner.utils import RewardModelClient
except ImportError:
    print("错误: xtuner 未安装。请执行 'pip install xtuner' 来安装。")
    exit()

# --- 1. 模型加载 ---
# 定义模型路径
model_path = '/home/mw/input/models4325'
# 检查是否有可用的GPU
device = 'cuda' if torch.cuda.is_available() else 'cpu'
print(f"正在使用设备: {device}")

# 加载分词器
tokenizer = AutoTokenizer.from_pretrained(model_path, trust_remote_code=True)

# 加载模型
# 我们使用 AutoModelForSequenceClassification,这是HuggingFace处理此类任务的标准类。
# 它会正确加载模型并返回一个带 .logits 属性的结构化输出,代码更清晰。
model = AutoModelForSequenceClassification.from_pretrained(
    model_path,
    trust_remote_code=True,
    torch_dtype=torch.bfloat16,
    device_map="auto"
)
model.eval()

print("模型加载成功!")

# --- 2. 使用官方推荐的 RewardModelClient ---
# 实例化客户端,它会帮助我们处理所有复杂的输入格式问题
# 注意:RewardModelClient 内部需要 tokenizer 来获取特殊 token 的 ID
client = RewardModelClient(tokenizer)

# --- 3. 测试案例定义 ---
# 测试案例保持不变
test_cases = [
    {
        "name": "测试案例 1: 事实正确性",
        "prompt": "中国的首都是哪里?",
        "reference": "中国的首都是北京。",
        "candidates": [
            "中国的首都是北京。",
            "北京是中国的首都。",
            "中国的首都是上海。",
            "我不知道中国的首都是哪里。",
        ]
    },
    {
        "name": "测试案例 2: 遵循指令 (用五个字总结)",
        "prompt": "请用五个字总结一下“人工智能”这个概念。",
        "reference": "机器模拟智能",
        "candidates": [
            "机器模拟智能",
            "模拟人类智能",
            "人工智能是让机器像人一样思考和学习的技术。",
            "五个字太难了",
        ]
    }
]

# --- 4. 奖励计算与结果展示 (使用Client) ---

for case in test_cases:
    print("\n" + "="*50)
    print(f"{case['name']}")
    print("="*50)
    print(f"问题 (Prompt): {case['prompt']}")
    print(f"参考回答 (Reference): {case['reference']}")
    print("-"*50)

    # *** 优化核心: 使用 RewardModelClient 来准备数据 ***
    # 1. 准备一个结构化的数据列表
    data_for_client = []
    for cand in case['candidates']:
        data_for_client.append({
            'prompt': case['prompt'],
            'reference': case['reference'],
            'candidate': cand
        })

    # 2. 使用 client.encode 方法将结构化数据转换为模型所需的格式化文本列表
    batch_input_texts = client.encode(data_for_client)

    # 3. 对整个批次进行分词
    inputs = tokenizer(
        batch_input_texts,
        return_tensors="pt",
        padding=True,
        truncation=True,
        max_length=1024
    ).to(device)

    with torch.no_grad():
        # 4. 模型一次性处理整个批次
        outputs = model(**inputs)
        reward_scores = outputs.logits.squeeze().tolist()

    # 将候选回答和其对应的分数关联起来
    results = {cand: score for cand, score in zip(case['candidates'], reward_scores)}

    # 对结果按照奖励分数从高到低排序
    sorted_results = sorted(results.items(), key=operator.itemgetter(1), reverse=True)

    print("评估结果 (按奖励分数从高到低排序):")
    for i, (cand, score) in enumerate(sorted_results):
        print(f"  排名 {i+1}:")
        print(f"    候选回答: {cand}")
        print(f"    奖励分数: {score:.4f}")

print("\n" + "="*50)
print("所有测试案例执行完毕。")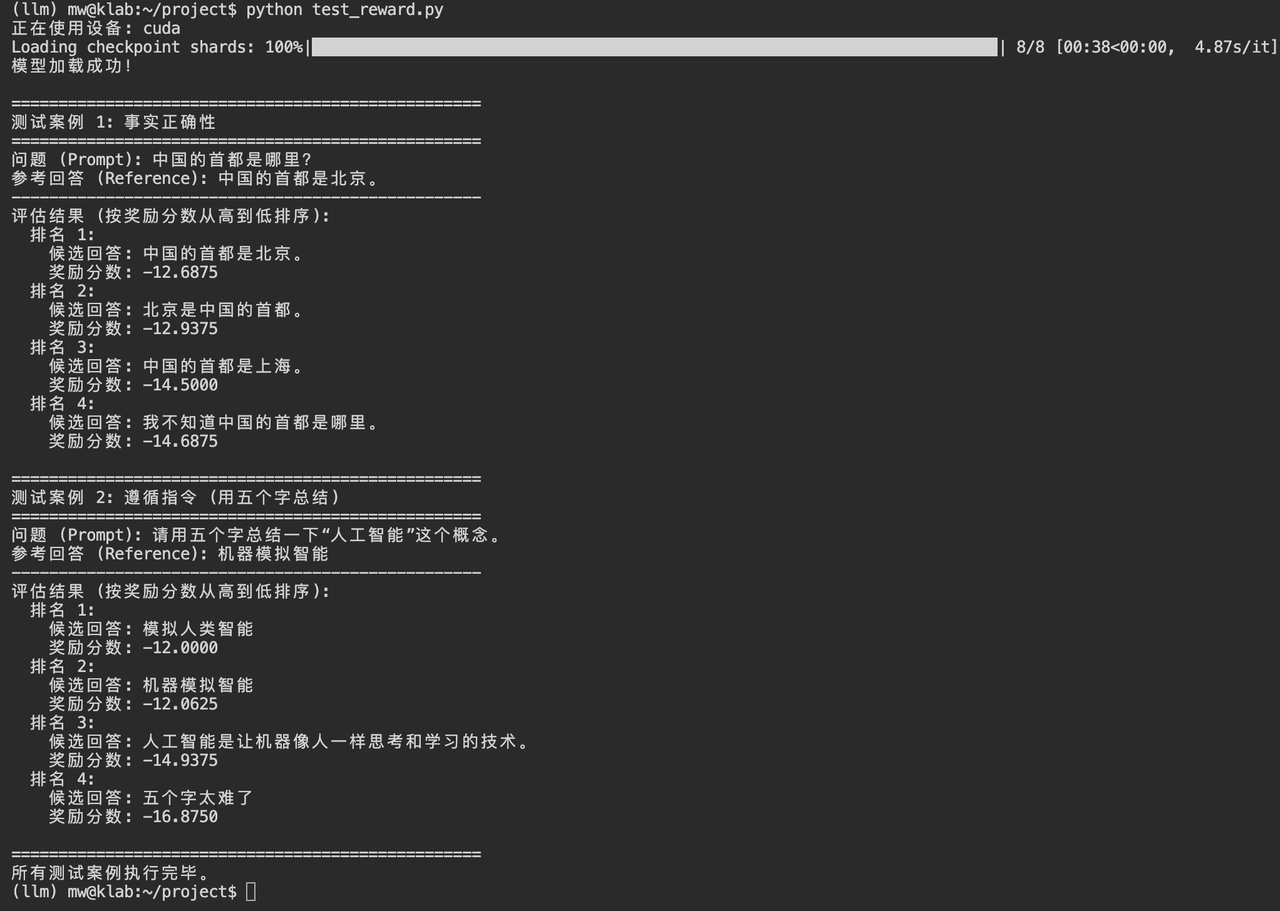
3.3 模型微调
finetune_rm.py
import torch
import os
from datasets import Dataset
from transformers import (
    AutoTokenizer,
    AutoModel,
    TrainingArguments,
    Trainer,
    DataCollatorWithPadding
)
from peft import (
    get_peft_model,
    LoraConfig,
    TaskType
)
import operator

# --- 1. 定义自定义偏好与数据集 ---
# 我们的偏好是:回答要极度简洁,直奔主题
print("步骤 1: 定义自定义偏好与数据集")
custom_preference_dataset = [
    {
        "prompt": "请问今天天气怎么样?",
        "responses": [
            "晴天,25度。",
            "今天天气晴朗,温度大约是25摄氏度。",
            "您好!很高兴为您查询天气。根据最新数据,今天天气状况良好,是晴天,预计最高温度为25摄氏度。祝您有愉快的一天!"
        ]
    },
    {
        "prompt": "这台笔记本电脑的电池能用多久?",
        "responses": [
            "大约8小时。",
            "这台电脑的电池续航时间大约是8小时。",
            "关于您提到的这台笔记本电脑的电池续航问题,根据官方技术规格,它的典型使用时间可以达到8小时左右,但具体时长会因使用场景而异。"
        ]
    },
    {
        "prompt": "解释一下什么是量子计算。",
        "responses": [
            "利用量子力学原理进行计算。",
            "量子计算是一种遵循量子力学规律调控量子信息单元进行计算的新型计算模式。",
            "量子计算是一个非常前沿和复杂的领域。简单来说,它不像传统计算机使用0和1,而是利用量子比特的叠加和纠缠等特性来进行并行计算,从而在处理特定问题时拥有远超传统计算机的算力。"
        ]
    },
    {
        "prompt": "如何学习Python编程?",
        "responses": [
            "找个教程,开始写代码。",
            "学习Python首先要安装环境,然后通过在线教程或书籍开始练习编写代码。",
            "学习Python编程是一个循序渐进的过程。我建议您首先从安装Python环境开始,然后选择一本广受好评的入门书籍或者一个在线交互式教程,比如Codecademy或Coursera。最重要的是,要坚持每天编写代码,哪怕只是小程序,实践是最好的老师。"
        ]
    }
]

# --- 2. 数据预处理 ---
# 将我们的数据集转换为模型训练需要的格式
# 对于每个 A > B > C 的三元组,我们创建两个训练对:(A, B) 和 (A, C)
# 这样模型就能学会,A比B好,A也比C好。
print("步骤 2: 数据预处理")
processed_data = []
for item in custom_preference_dataset:
    prompt = item['prompt']
    # 回答列表已经从最好到最差排序
    best_response = item['responses'][0]
    better_response = item['responses'][1]
    worst_response = item['responses'][2]

    # 构建模型输入文本
    # chosen_input: "更好的"组合
    # rejected_input: "更差的"组合
    # 这里的参考答案(reference)我们始终用最优回答
    chosen_input = f"{prompt}{best_response}<|split|>{prompt}{better_response}<|reward|>"
    rejected_input = f"{prompt}{best_response}<|split|>{prompt}{worst_response}<|reward|>"

    processed_data.append({'chosen': chosen_input, 'rejected': rejected_input})

# 使用Hugging Face的datasets库来管理数据
dataset = Dataset.from_list(processed_data)

# --- 3. 加载模型和分词器 ---
print("步骤 3: 加载模型和分词器")
# 我们使用Base模型,因为它没有经过通用偏好微调,是一张白纸
model_path = '/home/mw/input/models4325'
device = 'cuda' if torch.cuda.is_available() else 'cpu'

tokenizer = AutoTokenizer.from_pretrained(model_path, trust_remote_code=True)
# 为批处理设置填充token
if tokenizer.pad_token is None:
    tokenizer.pad_token = tokenizer.eos_token

# 加载基础模型
model = AutoModel.from_pretrained(
    model_path,
    trust_remote_code=True,
    torch_dtype=torch.bfloat16,
    device_map="auto"
)

# --- 4. 配置LoRA ---
print("步骤 4: 配置LoRA")
# LoRA配置,我们只训练模型中很少一部分参数
lora_config = LoraConfig(
    task_type=TaskType.SEQ_CLS, # 任务类型是序列分类/回归
    target_modules=["wqkv", "o_proj", "gate_up_proj"], # 选择要应用LoRA的模块
    r=8, # LoRA的秩,一个关键超参数
    lora_alpha=16, # LoRA的alpha
    lora_dropout=0.05,
)

# 将LoRA应用到模型上
model = get_peft_model(model, lora_config)
model.print_trainable_parameters() # 打印可训练参数的数量

# --- 5. 定义自定义训练逻辑 ---
print("步骤 5: 定义自定义训练逻辑")
# 数据预处理函数,将文本转换为token ID
def preprocess_function(examples):
    # 对"chosen"和"rejected"两列文本进行分词
    tokenized_chosen = tokenizer(examples["chosen"], truncation=True, max_length=1024)
    tokenized_rejected = tokenizer(examples["rejected"], truncation=True, max_length=1024)

    # 返回模型需要的格式
    return {
        "chosen_input_ids": tokenized_chosen["input_ids"],
        "chosen_attention_mask": tokenized_chosen["attention_mask"],
        "rejected_input_ids": tokenized_rejected["input_ids"],
        "rejected_attention_mask": tokenized_rejected["attention_mask"],
    }

# 对整个数据集应用预处理
tokenized_dataset = dataset.map(preprocess_function, batched=True, remove_columns=['chosen', 'rejected'])

# 自定义数据整理器
# 它会将 "chosen" 和 "rejected" 的数据分别整理并合并成一个大批次
class PairwiseDataCollator(DataCollatorWithPadding):
    def __call__(self, features):
        # 将chosen和rejected的特征分开
        chosen_features = []
        rejected_features = []
        for feature in features:
            chosen_features.append({
                "input_ids": feature["chosen_input_ids"],
                "attention_mask": feature["chosen_attention_mask"]
            })
            rejected_features.append({
                "input_ids": feature["rejected_input_ids"],
                "attention_mask": feature["rejected_attention_mask"]
            })

        # 分别对它们进行填充和批处理
        batch_chosen = super().__call__(chosen_features)
        batch_rejected = super().__call__(rejected_features)

        # 合并成一个字典返回
        return {
            "chosen_input_ids": batch_chosen["input_ids"],
            "chosen_attention_mask": batch_chosen["attention_mask"],
            "rejected_input_ids": batch_rejected["input_ids"],
            "rejected_attention_mask": batch_rejected["attention_mask"],
        }

# 自定义Trainer,以实现我们需要的Ranking Loss
class RewardTrainer(Trainer):
    def compute_loss(self, model, inputs, return_outputs=False,**kwargs):
        # 分别获取chosen和rejected的输入
        chosen_inputs = {
            "input_ids": inputs["chosen_input_ids"],
            "attention_mask": inputs["chosen_attention_mask"]
        }
        rejected_inputs = {
            "input_ids": inputs["rejected_input_ids"],
            "attention_mask": inputs["rejected_attention_mask"]
        }

        # 分别计算得分
        chosen_outputs = model(**chosen_inputs)
        rejected_outputs = model(**rejected_inputs)

        # POLAR模型的奖励分数在输出的第一个元素
        chosen_rewards = chosen_outputs[0]
        rejected_rewards = rejected_outputs[0]

        # 计算Ranking Loss: log(sigmoid(chosen_reward - rejected_reward))
        # 我们希望 chosen_reward 远大于 rejected_reward
        loss = -torch.nn.functional.logsigmoid(chosen_rewards - rejected_rewards).mean()

        if return_outputs:
            return loss, {"chosen": chosen_rewards, "rejected": rejected_rewards}
        return loss

# --- 6. 开始训练 ---
print("步骤 6: 开始训练")
output_dir = "/home/mw/input/polar_finetuned_concise" # 模型保存路径

training_args = TrainingArguments(
    output_dir=output_dir,
    per_device_train_batch_size=1, # 由于数据量小,batch size设为1
    gradient_accumulation_steps=4, # 梯度累积
    num_train_epochs=20, # 训练20个轮次以在小数据集上充分学习
    learning_rate=2e-4,
    logging_steps=1,
    save_strategy="epoch",
    report_to="none", # 关闭wandb等报告
    remove_unused_columns=False,
)

trainer = RewardTrainer(
    model=model,
    args=training_args,
    train_dataset=tokenized_dataset,
    data_collator=PairwiseDataCollator(tokenizer=tokenizer),
)

trainer.train()

# --- 7. 保存模型 ---
print("步骤 7: 保存最终的适配器模型")
final_model_path = os.path.join(output_dir, "final")
trainer.save_model(final_model_path)
print(f"微调完成!LoRA适配器已保存至: {final_model_path}")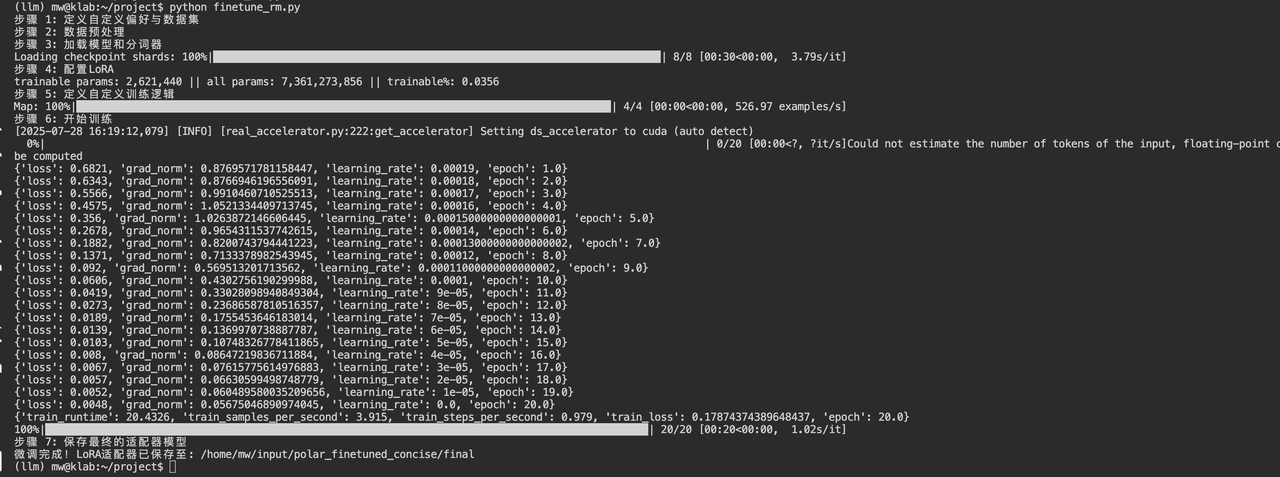
3.4 微调模型测试
import torch
from transformers import AutoTokenizer, AutoModel
from peft import PeftModel
import operator
import os

# --- 1. 定义模型路径 ---
# 您在微调和验证时使用的核心模型路径
# 这个模型将作为对比基线,同时也是应用LoRA适配器的基础
base_model_path = '/home/mw/input/models4325'
# 我们训练好的LoRA适配器所在的路径
lora_adapter_path = '/home/mw/input/polar_finetuned_concise/final'
device = 'cuda' if torch.cuda.is_available() else 'cpu'

print("步骤 1: 加载所有模型和分词器")
print(f"正在使用设备: {device}")

# --- 2. 加载分词器和所有模型 ---
# 加载分词器
tokenizer = AutoTokenizer.from_pretrained(base_model_path, trust_remote_code=True)
if tokenizer.pad_token is None:
    tokenizer.pad_token = tokenizer.eos_token

# 加载官方模型 (对比基线)
# 我们将这个对象作为未经过您自定义微调的参照物
print("正在加载官方模型 (Official Model) 作为对比基线...")
official_model = AutoModel.from_pretrained(
    base_model_path,
    trust_remote_code=True,
    torch_dtype=torch.bfloat16,
    device_map="auto"
)
official_model.eval()

# 加载我们微调后的模型 (实验组)
print("正在加载我们微调后的模型 (Finetuned Model)...")
# 首先,再次加载您微调时所用的基础模型
# 注意:这里需要创建一个新的模型对象,以应用LoRA适配器
finetuned_model_base = AutoModel.from_pretrained(
    base_model_path,
    trust_remote_code=True,
    torch_dtype=torch.bfloat16,
    device_map="auto"
)
# 然后,将我们的LoRA适配器加载并合并到这个基础模型上
finetuned_model = PeftModel.from_pretrained(finetuned_model_base, lora_adapter_path)
# 调用 merge_and_unload() 将LoRA权重永久合并到模型中,并返回一个独立的、完整的模型
finetuned_model = finetuned_model.merge_and_unload()
finetuned_model.eval()

print("\n所有模型加载成功!")


# --- 3. 定义验证用的测试案例 ---
# 注意:这些案例应该与训练集不同,以检验模型的泛化能力
# 我们的偏好是 "简洁"
verification_cases = [
    {
        "name": "验证案例 1: 询问功能",
        "prompt": "这个软件有什么功能?",
        "reference": "图片编辑和视频剪辑。",
        "candidates": [
            "图片编辑和视频剪辑。", # 最简洁,应该得分最高
            "它主要有两个核心功能:图片编辑和视频剪辑。", # 其次
            "您好!这款软件的功能非常强大和丰富,主要的核心模块包括了对静态图像进行专业级编辑处理,以及对动态视频进行剪辑、特效添加和导出的功能。" # 最啰嗦
        ]
    },
    {
        "name": "验证案例 2: 寻求建议",
        "prompt": "我应该买哪款手机?",
        "reference": "看预算和需求。",
        "candidates": [
            "看预算和需求。", # 最简洁
            "这取决于你的预算和主要使用需求。", # 其次
            "选择购买哪款手机是一个需要综合考虑多方面因素的决定。首先,您需要明确您的预算范围;其次,您需要思考您最看重手机的哪些方面,是拍照、游戏性能还是续航能力。根据这些信息才能为您做出更合适的推荐。" # 最啰嗦
        ]
    }
]

# --- 4. 编写评估函数 ---
def evaluate_model(model, tokenizer, test_case):
    """使用指定模型对一个测试案例进行评估,并返回排序后的结果"""
    batch_input_texts = []
    for cand in test_case['candidates']:
        input_text = f"{test_case['prompt']}{test_case['reference']}<|split|>{test_case['prompt']}{cand}<|reward|>"
        batch_input_texts.append(input_text)

    inputs = tokenizer(
        batch_input_texts,
        return_tensors="pt",
        padding=True,
        truncation=True,
        max_length=1024
    ).to(model.device)

    with torch.no_grad():
        outputs = model(**inputs)
        reward_scores = outputs[0].squeeze().tolist()

    results = {cand: score for cand, score in zip(test_case['candidates'], reward_scores)}
    sorted_results = sorted(results.items(), key=operator.itemgetter(1), reverse=True)
    return sorted_results

# --- 5. 执行对比验证 ---
print("\n" + "="*60)
print("开始执行对比验证...")
print("="*60)

for case in verification_cases:
    print(f"\n--- {case['name']} ---")
    print(f"问题 (Prompt): {case['prompt']}")
    print(f"参考回答 (Reference): {case['reference']}")
    print("-" * 40)

    # 获取两个模型的评估结果
    official_model_results = evaluate_model(official_model, tokenizer, case)
    finetuned_model_results = evaluate_model(finetuned_model, tokenizer, case)

    # 打印对比表格
    print(f"{'候选回答':<60} | {'官方模型得分':<15} | {'微调后得分':<15}")
    print("-" * 95)

    # 为了方便对比,我们以候选回答为基准来打印分数
    all_scores = {}
    for cand in case['candidates']:
        all_scores[cand] = {}

    for cand, score in official_model_results: all_scores[cand]['official'] = score
    for cand, score in finetuned_model_results: all_scores[cand]['finetuned'] = score

    for cand, scores in all_scores.items():
        cand_short = cand[:55] + '...' if len(cand) > 58 else cand
        print(f"{cand_short:<60} | {scores.get('official', 0):<15.4f} | {scores.get('finetuned', 0):<15.4f}")

print("\n" + "="*60)
print("所有验证案例执行完毕。")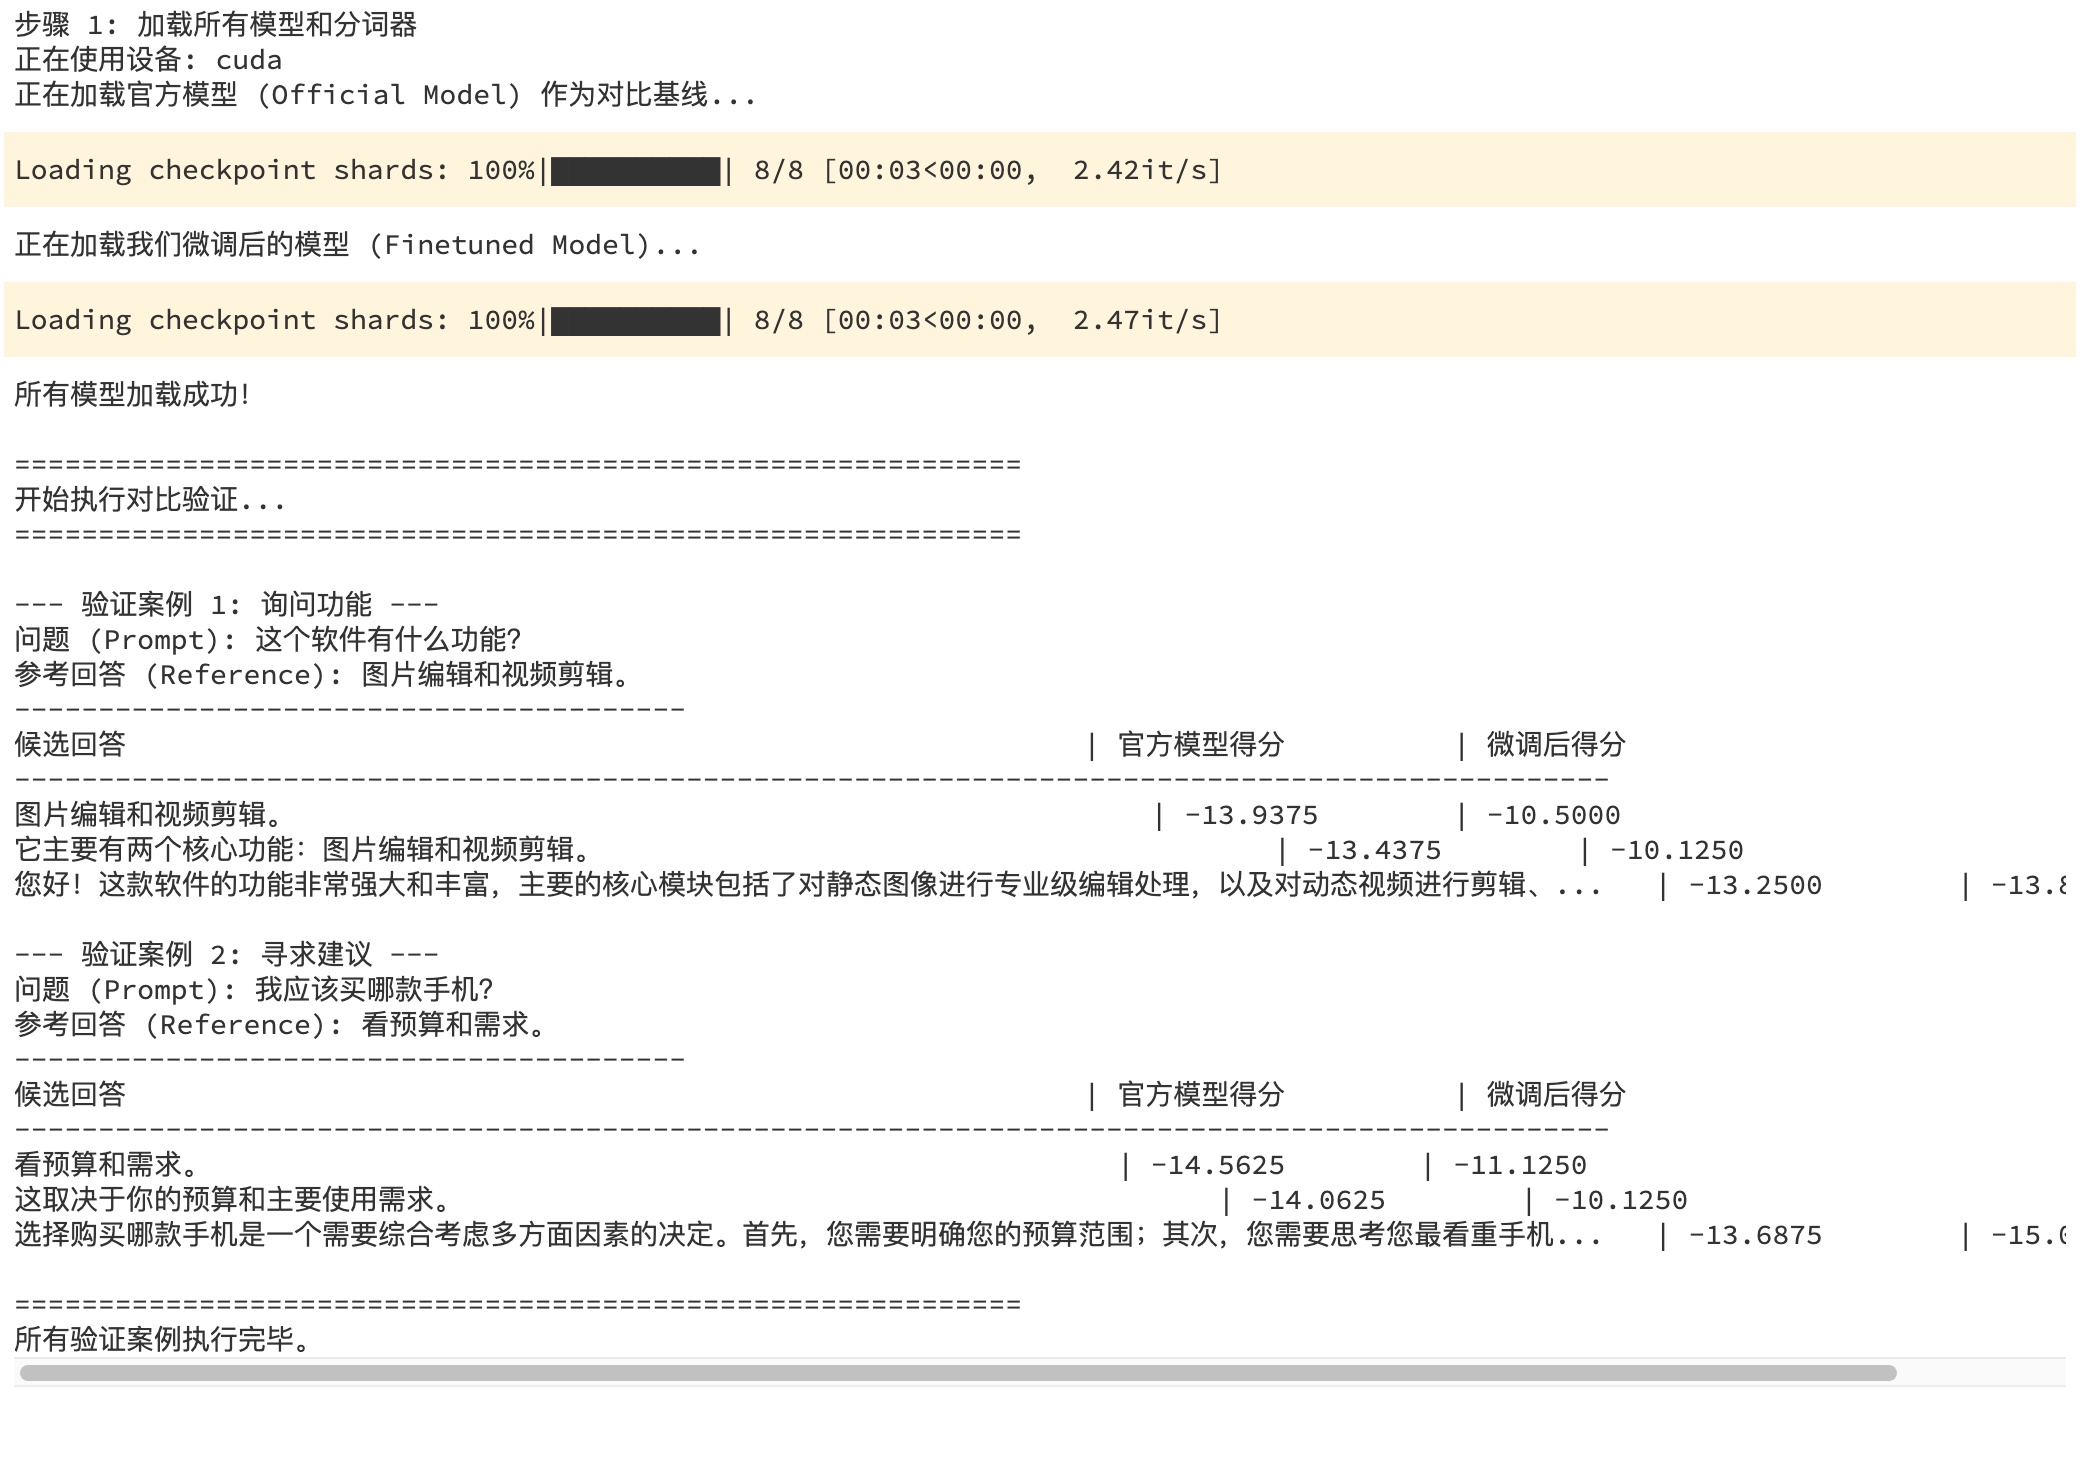
四、小结
这次实验不仅验证了 POLAR 论文核心思想的有效性,更揭示了未来大模型对齐的一种可能性:社区驱动、高度定制化的奖励模型生态。开发者和组织可以根据自身的需求,快速、低成本地微调出专用的奖励模型,用于代码生成、创意写作、特定领域的知识问答等场景,从而让大模型在各自的领域内发挥出最大的价值。
参考:
论文链接:https://arxiv.org/pdf/2507.05197
项目链接:https://github.com/InternLM/POLAR
模型链接:https://huggingface.co/internlm/POLAR-7B

火山引擎开发者社区是火山引擎打造的AI技术生态平台,聚焦Agent与大模型开发,提供豆包系列模型(图像/视频/视觉)、智能分析与会话工具,并配套评测集、动手实验室及行业案例库。社区通过技术沙龙、挑战赛等活动促进开发者成长,新用户可领50万Tokens权益,助力构建智能应用。
更多推荐
 9
9 0
0- 0


 已为社区贡献15条内容

所有评论(0)