Spring AI系列之使用 MongoDB 和 Spring AI 构建 RAG 应用
在现代开发中,掌握 AI 技术的使用正逐渐成为一项关键技能。本文将构建一个RAG 应用程序,它能够基于存储的文档回答用户的问题。我们将使用SpringAI,将应用程序与MongoDB向量数据库和大语言模型(LLM) 进行集成。
1. 概述
在现代开发中,掌握 AI 技术的使用正逐渐成为一项关键技能。本文将构建一个 RAG 应用程序,它能够基于存储的文档回答用户的问题。
我们将使用SpringAI,将应用程序与MongoDB向量数据库和大语言模型(LLM) 进行集成。
2. RAG 应用程序
当自然语言生成(NLG)需要依赖上下文数据时,我们会使用RAG(检索增强生成) 应用程序。
RAG应用程序的一个关键组件是向量数据库,它在高效管理和检索数据方面起着至关重要的作用:
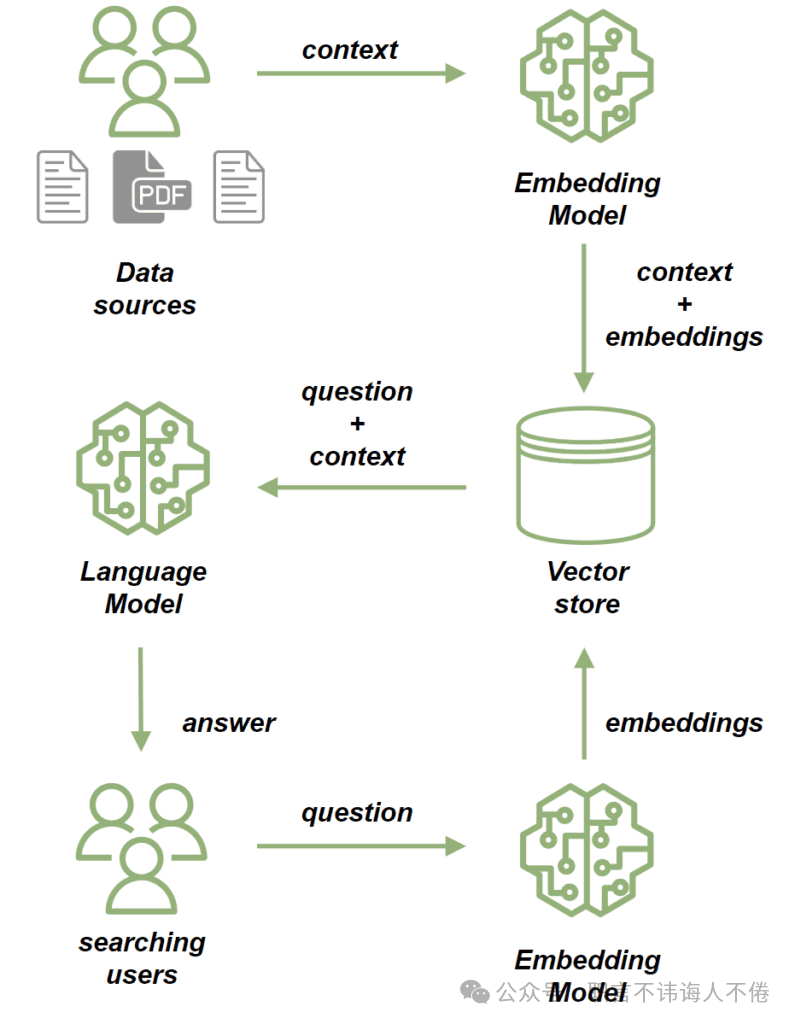
我们使用嵌入模型(embedding model) 来处理源文档。嵌入模型会将文档中的文本转换为高维向量。这些向量捕捉了文本的语义含义,使我们能够基于上下文语义而不仅仅是关键词匹配来比较和检索相似内容。随后,我们将这些文档存储到 向量存储(vector store) 中。
一旦文档被保存,我们就可以通过以下方式基于这些文档发送提示(prompt):
-
首先,使用嵌入模型处理问题,将其转换为一个捕捉语义含义的向量;
-
接着执行相似度搜索(similarity search),将问题的向量与向量存储中已有文档的向量进行比较;
-
从最相关的文档中构建出问题的上下文;
-
最后,将问题和其上下文一并发送给大语言模型(LLM),由其生成一个与查询相关、并融合上下文信息的回答。
3. MongoDB Atlas 向量搜索
在本教程中,我们将使用 MongoDB Atlas Search 作为向量存储。它提供了满足本项目需求的向量搜索能力。
为了测试,我们将使用 mongodb-atlas-local Docker 容器来搭建本地 MongoDB Atlas Search 实例。接下来,我们来创建一个 docker-compose.yml 文件:
version: '3.1'

services:
  my-mongodb:
    image: mongodb/mongodb-atlas-local:7.0.9
    container_name: my-mongodb
    environment:
      - MONGODB_INITDB_ROOT_USERNAME=wikiuser
      - MONGODB_INITDB_ROOT_PASSWORD=password
    ports:
      - 27017:27017
4. 依赖与配置
我们从添加必要的依赖项开始。由于我们的应用程序将提供一个HTTP API,因此需要引入 spring-boot-starter-web 依赖项:
<dependency>
    <groupId>org.springframework.boot</groupId>
    <artifactId>spring-boot-starter-web</artifactId>
    <version>LATEST_VERSION</version>
</dependency>
此外,我们还将使用 OpenAI API 客户端来连接到大语言模型(LLM),因此也需要添加其依赖项:
<dependency>
    <groupId>org.springframework.ai</groupId>
    <artifactId>spring-ai-openai-spring-boot-starter</artifactId>
    <version>LATEST_VERSION</version>
</dependency>
最后,我们还需要添加MongoDB Atlas Store的依赖项:
<dependency>
    <groupId>org.springframework.ai</groupId>
    <artifactId>spring-ai-mongodb-atlas-store-spring-boot-starter</artifactId>
    <version>LATEST_VERSION</version>
</dependency>
现在,让我们为应用程序添加配置属性:
spring:
  data:
    mongodb:
      uri: mongodb://wikiuser:password@localhost:27017/admin
      database: wiki
  ai:
    vectorstore:
      mongodb:
        collection-name: vector_store
        initialize-schema: true
        path-name: embedding
        indexName: vector_index
    openai:
      api-key: ${OPENAI_API_KEY}
      chat:
        options:
model: gpt-3.5-turbo我们已经指定了MongoDB的URL和数据库,同时通过设置集合名称(collection name)、嵌入字段名称(embedding field name)和向量索引名称(vector index name)来配置我们的向量存储。
得益于 initialize-schema 属性,这些内容将在 Spring AI 框架的帮助下自动创建。最后,我们还添加了 OpenAI API 密钥 和 模型版本。
5. 将文档保存到向量存储中
接下来,我们要实现将数据保存到向量存储的流程。我们的应用程序将基于已有文档为用户的问题提供答案——本质上相当于一个类似Wiki的功能。
我们先添加一个模型类,用于存储文件的内容以及文件路径:
public class WikiDocument {
    private String filePath;
    private String content;

    // standard getters and setters
}
下一步,我们将添加WikiDocumentsRepository。在这个仓储层中,我们将封装所有持久化逻辑:
import org.springframework.ai.document.Document;
import org.springframework.ai.transformer.splitter.TokenTextSplitter;

@Component
public class WikiDocumentsRepository {
    private final VectorStore vectorStore;

    public WikiDocumentsRepository(VectorStore vectorStore) {
        this.vectorStore = vectorStore;
    }

    public void saveWikiDocument(WikiDocument wikiDocument) {

        Map<String, Object> metadata = new HashMap<>();
        metadata.put("filePath", wikiDocument.getFilePath());
        Document document = new Document(wikiDocument.getContent(), metadata);
        List<Document> documents = new TokenTextSplitter().apply(List.of(document));

        vectorStore.add(documents);
    }
}在这里,我们注入了VectorStore接口的Bean,该接口由spring-ai-mongodb-atlas-store-spring-boot-starter提供的 MongoDBAtlasVectorStore 实现。在 saveWikiDocument 方法中,我们创建了一个Document实例,并填充了其内容和元数据。
然后,我们使用 TokenTextSplitter 将文档拆分为更小的片段,并将它们保存到我们的向量存储中。接下来,让我们创建一个 WikiDocumentsServiceImpl 类:
@Service
public class WikiDocumentsServiceImpl {
    private final WikiDocumentsRepository wikiDocumentsRepository;

    // constructors

    public void saveWikiDocument(String filePath) {
        try {
            String content = Files.readString(Path.of(filePath));
            WikiDocument wikiDocument = new WikiDocument();
            wikiDocument.setFilePath(filePath);
            wikiDocument.setContent(content);

            wikiDocumentsRepository.saveWikiDocument(wikiDocument);
        } catch (IOException e) {
            throw new RuntimeException(e);
        }
    }
}
在 服务层(service layer),我们读取文件内容,创建 WikiDocument 实例,并将其发送到 仓储层(repository) 以实现持久化。
在 控制器(controller) 中,我们只需将文件路径传递给服务层,如果文档保存成功,则返回 201 状态码:
@RestController
@RequestMapping("wiki")
public class WikiDocumentsController {
    private final WikiDocumentsServiceImpl wikiDocumentsService;

    // constructors

    @PostMapping
    public ResponseEntity<Void> saveDocument(@RequestParam String filePath) {
        wikiDocumentsService.saveWikiDocument(filePath);

        return ResponseEntity.status(201).build();
    }
}我们应当关注此接口的安全性问题。存在一个潜在的漏洞:用户可能通过该接口上传意外的文件,例如配置文件或系统文件。
为了解决这个问题,我们可以限制只能从特定目录上传文件。
现在,让我们启动应用程序并查看整个流程的运行效果。
接下来,添加 Spring Boot 测试依赖项,这样我们就可以构建一个用于测试的 Web 上下文环境:
<dependency>
    <groupId>org.springframework.boot</groupId>
    <artifactId>spring-boot-starter-test</artifactId>
    <version>LATEST_VERSION</version>
</dependency>
现在,我们将启动测试应用实例,并调用该 POST 接口来上传两个文档:
@AutoConfigureMockMvc
@ExtendWith(SpringExtension.class)
@SpringBootTest
class RAGMongoDBApplicationManualTest {

    @Autowired
    private MockMvc mockMvc;

    @Test
    void givenMongoDBVectorStore_whenCallingPostDocumentEndpoint_thenExpectedResponseCodeShouldBeReturned() throws Exception {
        mockMvc.perform(post("/wiki?filePath={filePath}",
          "src/test/resources/documentation/owl-documentation.md"))
          .andExpect(status().isCreated());

        mockMvc.perform(post("/wiki?filePath={filePath}",
          "src/test/resources/documentation/rag-documentation.md"))
          .andExpect(status().isCreated());
    }
}这两次调用都应返回201状态码,说明文档已成功添加。我们可以使用 MongoDB Compass 来确认这些文档是否已成功保存到向量存储中:
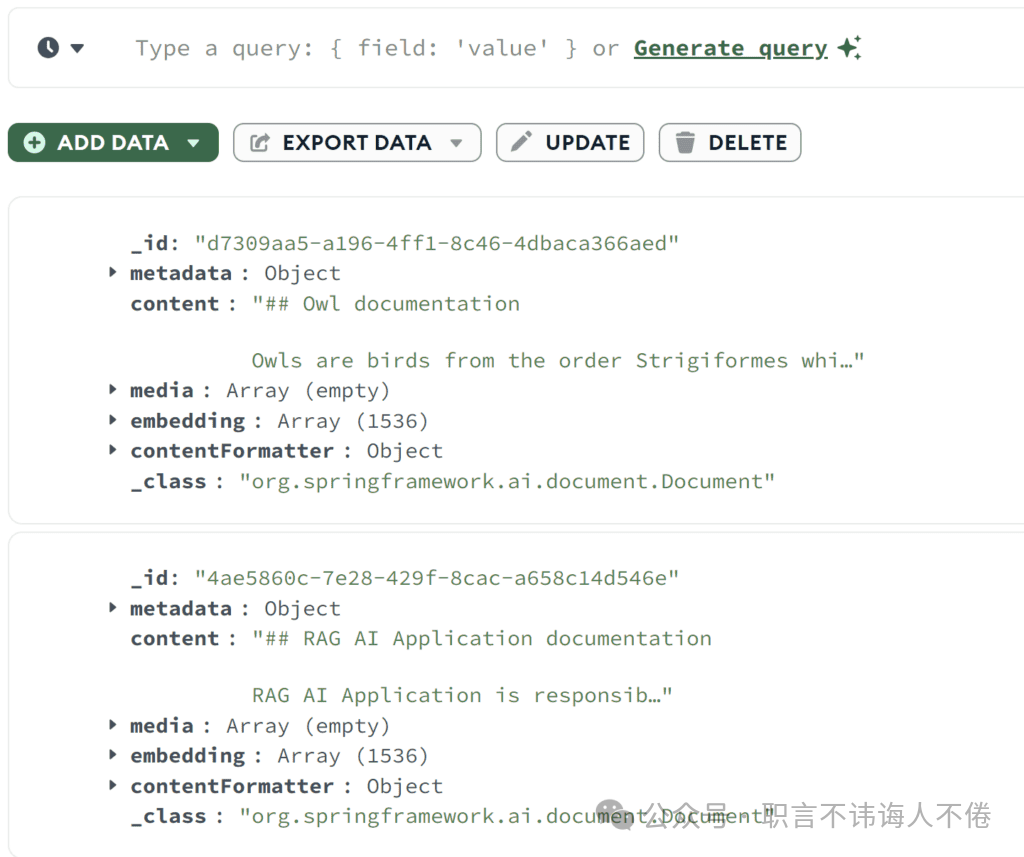
正如我们所看到的两个文档都已成功保存。我们可以查看到原始内容以及对应的嵌入向量数组(embedding array)。
6. 相似度搜索(Similarity Search)
现在我们来添加相似度搜索功能。我们将在仓储层中添加一个 findSimilarDocuments 方法:
@Component
public class WikiDocumentsRepository {
    private final VectorStore vectorStore;

    public List<WikiDocument> findSimilarDocuments(String searchText) {

        return vectorStore
          .similaritySearch(SearchRequest
            .query(searchText)
            .withSimilarityThreshold(0.87)
            .withTopK(10))
          .stream()
          .map(document -> {
              WikiDocument wikiDocument = new WikiDocument();
              wikiDocument.setFilePath((String) document.getMetadata().get("filePath"));
              wikiDocument.setContent(document.getContent());

              return wikiDocument;
          })
          .toList();
    }
}
我们调用了VectorStore 的similaritySearch 方法。除了搜索文本外,还指定了结果数量限制和相似度阈值参数。相似度阈值参数让我们可以控制文档内容与搜索文本的匹配程度要求有多高。在服务层调用仓储代码:
public List<WikiDocument> findSimilarDocuments(String searchText) {
    return wikiDocumentsRepository.findSimilarDocuments(searchText);
}
在控制器中,我们添加一个 GET 接口,该接口接收搜索文本作为参数,并将其传递给服务层:
@RestController
@RequestMapping("/wiki")
public class WikiDocumentsController {
    @GetMapping
    public List<WikiDocument> get(@RequestParam("searchText") String searchText) {
        return wikiDocumentsService.findSimilarDocuments(searchText);
    }
}
现在,让我们调用新添加的接口,看看相似度搜索的效果如何:
@Test
void givenMongoDBVectorStoreWithDocuments_whenMakingSimilaritySearch_thenExpectedDocumentShouldBePresent() throws Exception {
    String responseContent = mockMvc.perform(get("/wiki?searchText={searchText}", "RAG Application"))
      .andExpect(status().isOk())
      .andReturn()
      .getResponse()
      .getContentAsString();

    assertThat(responseContent)
      .contains("RAG AI Application is responsible for storing the documentation");
}
我们调用了接口,使用的搜索文本并非文档中的完全匹配项。
不过,我们依然检索到了内容相似的文档,并确认它包含了我们存储在 rag-documentation.md 文件中的文本。
7. 提示(Prompt)接口
接下来,让我们开始构建提示流程,这也是我们应用的核心功能。我们将从AdvisorConfiguration 开始:
@Configuration
public class AdvisorConfiguration {

    @Bean
    public QuestionAnswerAdvisor questionAnswerAdvisor(VectorStore vectorStore) {
        return new QuestionAnswerAdvisor(vectorStore, SearchRequest.defaults());
    }
}
我们创建了一个QuestionAnswerAdvisor Bean,负责构建prompt请求,其中包含初始问题。此外,它还会将向量存储的相似度搜索结果作为问题的上下文附加进去。
现在,让我们为 API 添加搜索提示的接口:
@RestController
@RequestMapping("/wiki")
public class WikiDocumentsController {
    private final WikiDocumentsServiceImpl wikiDocumentsService;
    private final ChatClient chatClient;
    private final QuestionAnswerAdvisor questionAnswerAdvisor;

    public WikiDocumentsController(WikiDocumentsServiceImpl wikiDocumentsService,
                                   @Qualifier("openAiChatModel") ChatModel chatModel,
                                   QuestionAnswerAdvisor questionAnswerAdvisor) {
        this.wikiDocumentsService = wikiDocumentsService;
        this.questionAnswerAdvisor = questionAnswerAdvisor;
        this.chatClient = ChatClient.builder(chatModel).build();
    }

    @GetMapping("/search")
    public String getWikiAnswer(@RequestParam("question") String question) {
        return chatClient.prompt()
          .user(question)
          .advisors(questionAnswerAdvisor)
          .call()
          .content();
    }
}
在这里,我们通过将用户输入添加到提示中,并附加我们的 QuestionAnswerAdvisor,构建了一个提示请求。最后,让我们调用这个接口,看看它对 RAG 应用程序会给出怎样的回答:
@Test
void givenMongoDBVectorStoreWithDocumentsAndLLMClient_whenAskQuestionAboutRAG_thenExpectedResponseShouldBeReturned() throws Exception {
    String responseContent = mockMvc.perform(get("/wiki/search?question={question}", "Explain the RAG Applications"))
      .andExpect(status().isOk())
      .andReturn()
      .getResponse()
      .getContentAsString();

    logger.atInfo().log(responseContent);

    assertThat(responseContent).isNotEmpty();
}
我们向接口发送了问题“解释一下 RAG 应用程序”,并记录了 API 的响应结果:
b.s.r.m.RAGMongoDBApplicationManualTest : Based on the context provided, the RAG AI Application is a tool
used for storing documentation and enabling users to search for specific information efficiently...
正如我们所见,接口根据之前保存到向量数据库中的文档文件,返回了关于 RAG 应用程序的信息。现在,让我们尝试问一些我们知识库中肯定没有的信息:
@Test
void givenMongoDBVectorStoreWithDocumentsAndLLMClient_whenAskUnknownQuestion_thenExpectedResponseShouldBeReturned() throws Exception {
    String responseContent = mockMvc.perform(get("/wiki/search?question={question}", "Explain the Economic theory"))
      .andExpect(status().isOk())
      .andReturn()
      .getResponse()
      .getContentAsString();

    logger.atInfo().log(responseContent);

    assertThat(responseContent).isNotEmpty();
}
现在我们询问了经济理论,以下是得到的回答:
b.s.r.m.RAGMongoDBApplicationManualTest : I'm sorry, but the economic theory is not directly related to the information provided about owls and the RAG AI Application.
If you have a specific question about economic theory, please feel free to ask.
这次,我们的应用没有找到任何相关文档,也没有使用其他来源来提供答案。
8. 结论
在本文中,我们成功地使用SpringAI框架实现了一个RAG应用程序。Spring AI 是集成多种 AI 技术的优秀工具。
此外,MongoDB 也被证明是处理向量存储的强大选择。借助这套强大的组合,我们能够构建各种现代AI应用程序,包括聊天机器人、自动化 Wiki 系统和搜索引擎等。
|
现在添加小助手微信,立刻免费获取大厂总监1v1的免费咨询名额[职场转型、管理提升、人际关系、面试指导等各类职场问题]。 |

火山引擎开发者社区是火山引擎打造的AI技术生态平台,聚焦Agent与大模型开发,提供豆包系列模型(图像/视频/视觉)、智能分析与会话工具,并配套评测集、动手实验室及行业案例库。社区通过技术沙龙、挑战赛等活动促进开发者成长,新用户可领50万Tokens权益,助力构建智能应用。
更多推荐
 10
10 0
0- 0


 已为社区贡献5条内容

所有评论(0)