Android)
Android入门
概述与发展
两个工具包:
- SDK:Software Development Kit,软件开发工具包
- NDK:Native Development Kit,Android原生工具开发包
系统结构: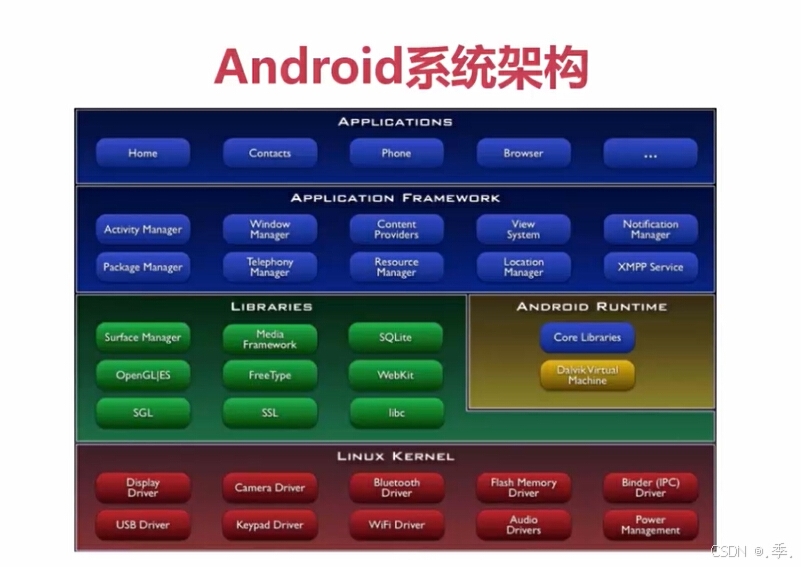
As使用指南
Android Studio环境搭建与配置(难点)
- 下载地址:地址:www.androiddevtools.cn/
- 切记:别用迅雷
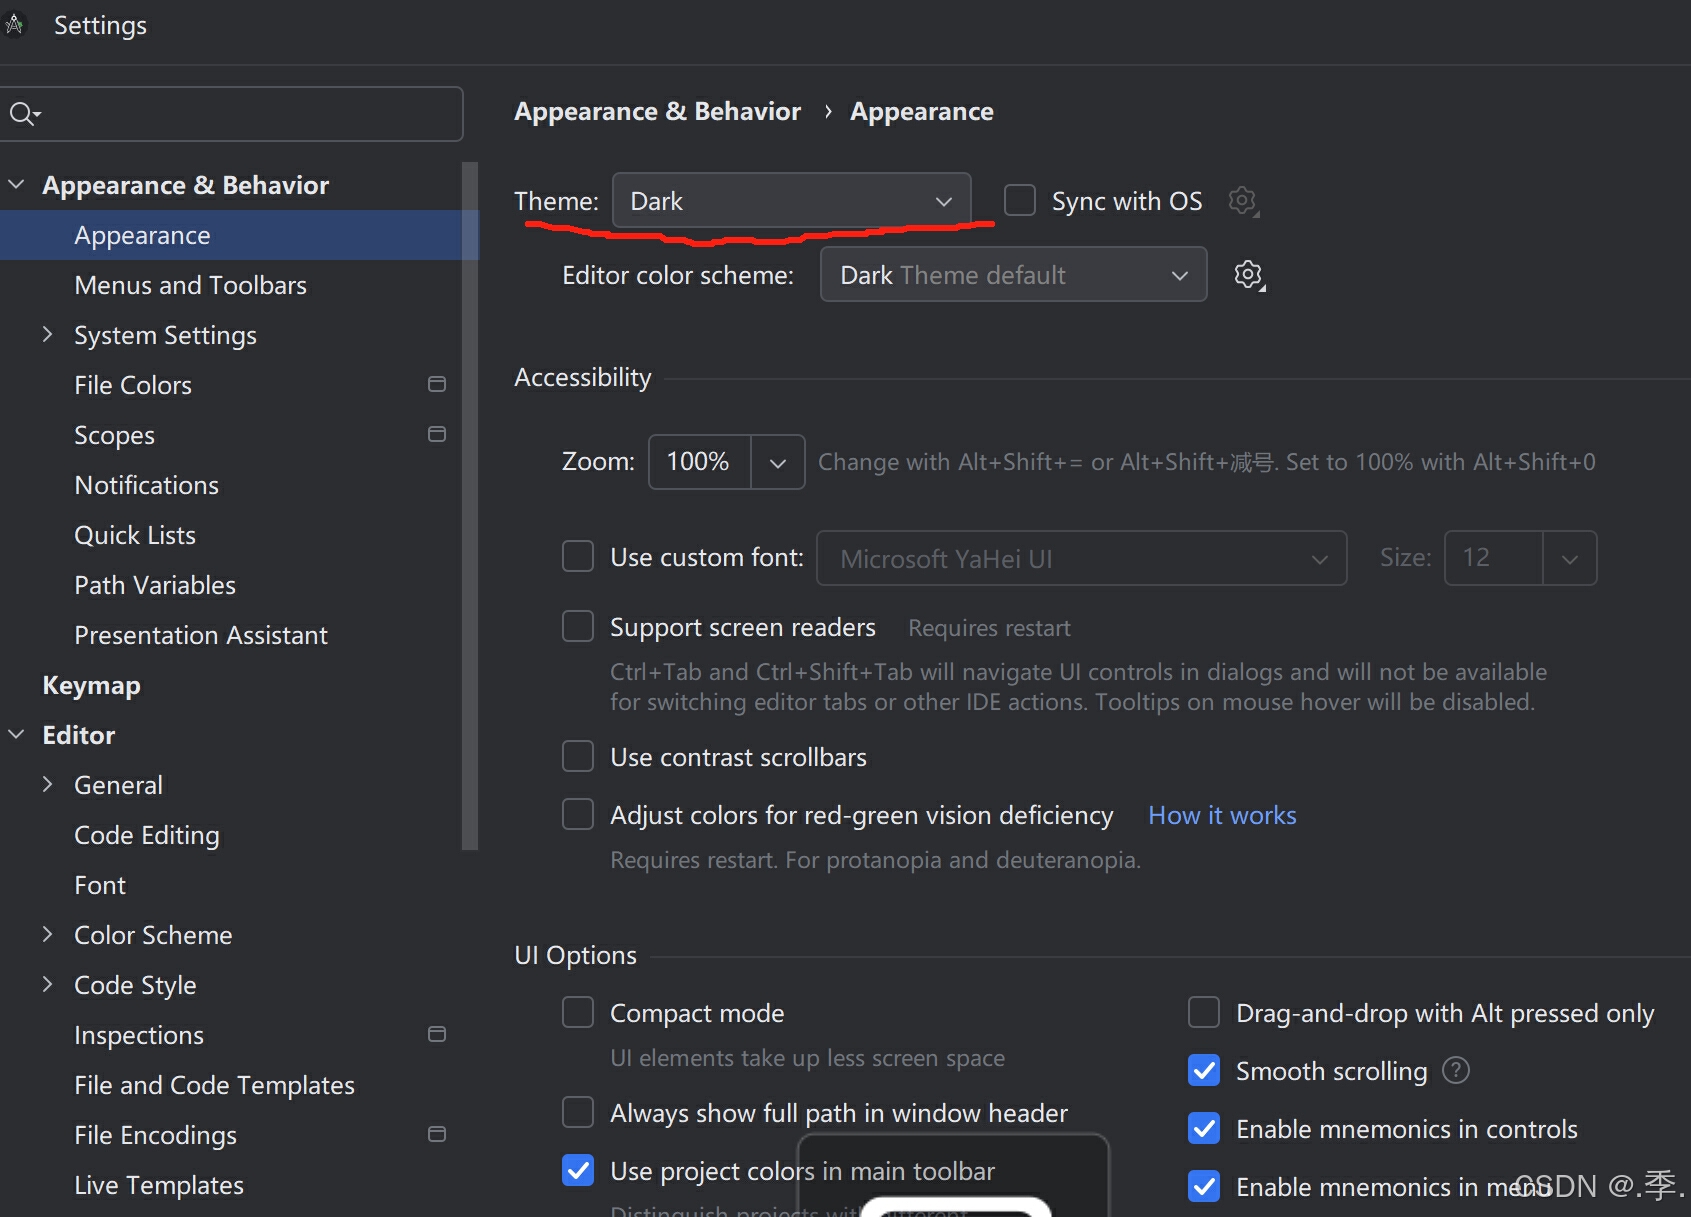
思考:如何设置主题字体等功能呢???
- 找到工具-----settings---左边将会出现选项----打开Appearance可以设置相关的主题----
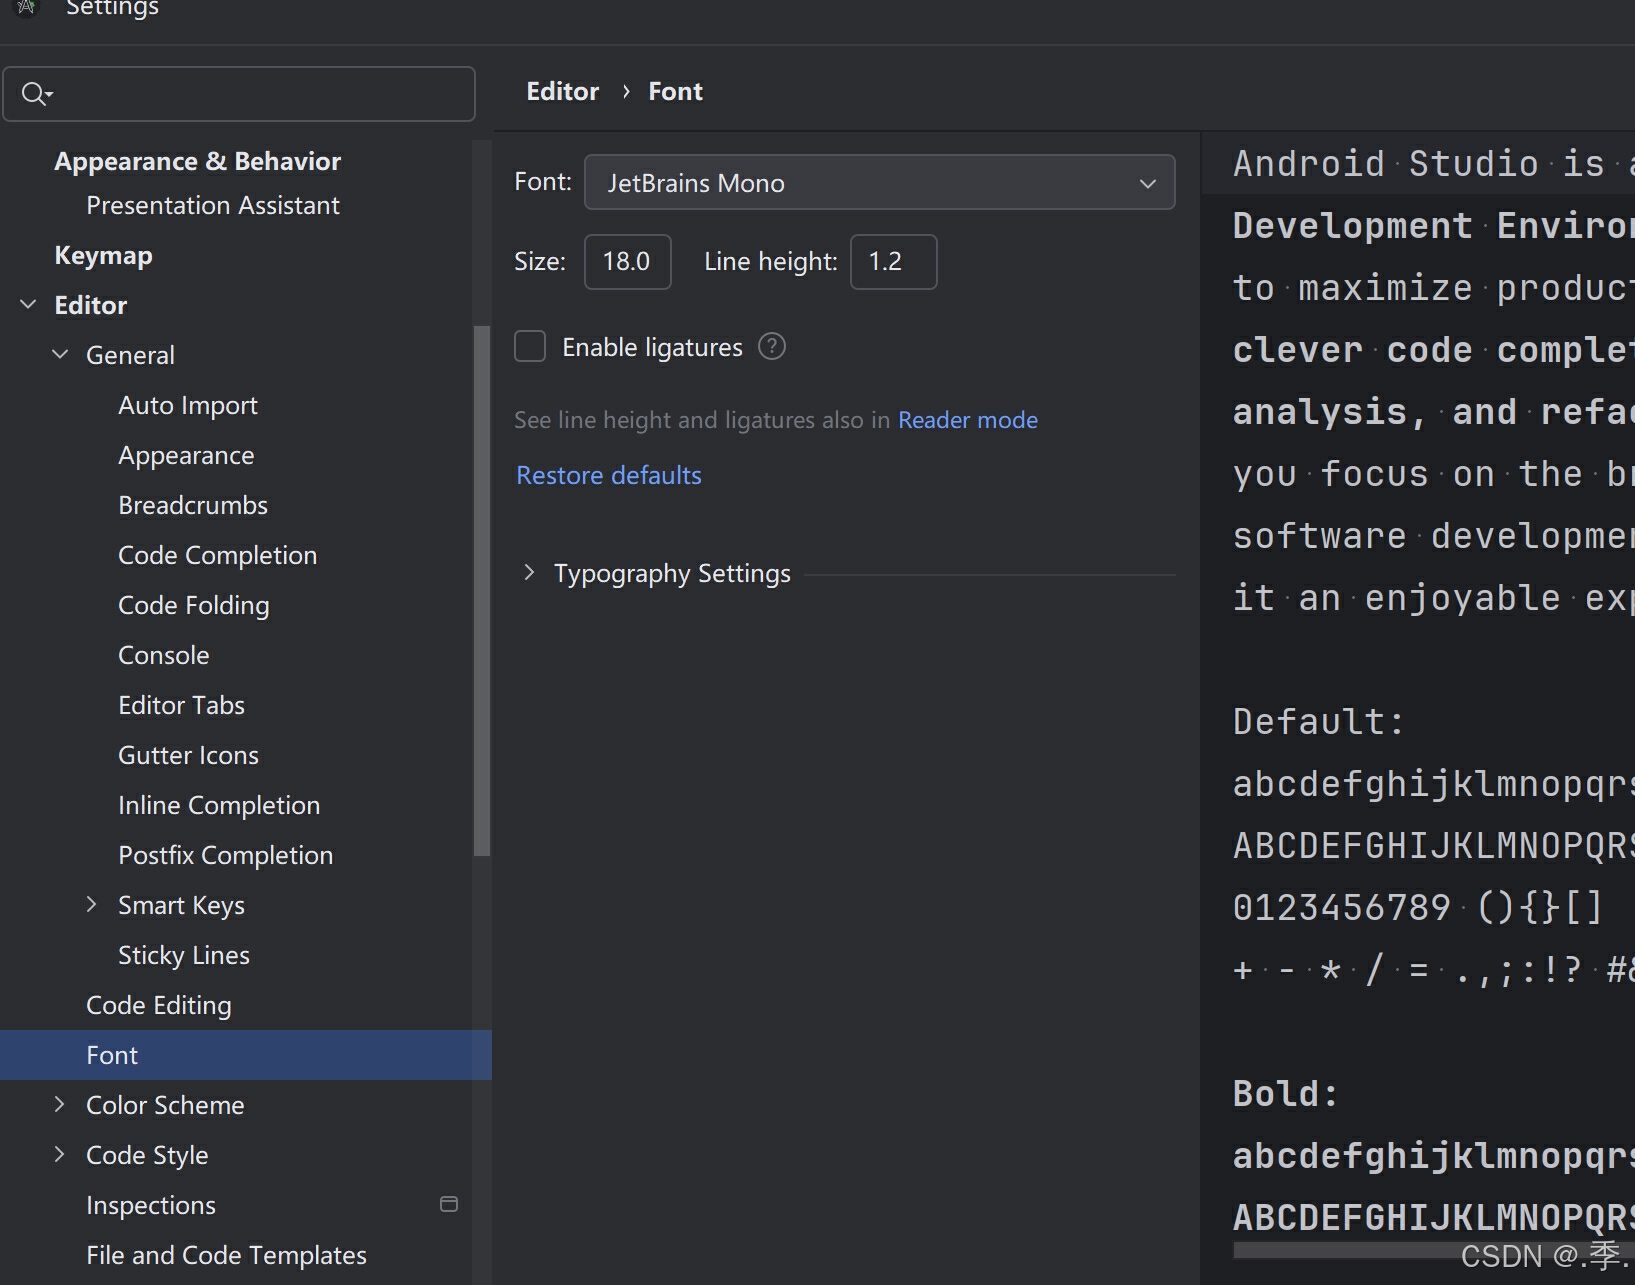
- 打开Editor---可以设置字体及大小
- 其他的设置需要大家慢慢去探索以下为图例:
Android Studio的基本使用(重点)
工程创建与目录结构
project与module
通俗易懂一点来讲,project指的是工程,而module则指的是一个模块,注意:不管对于模块还是工程已经创建的路径来说,命名方式都不能为中文的形式!!!
创建Android工程(一)
- 第一次:Start a new Android Studio Project
- 以后:New Project.....
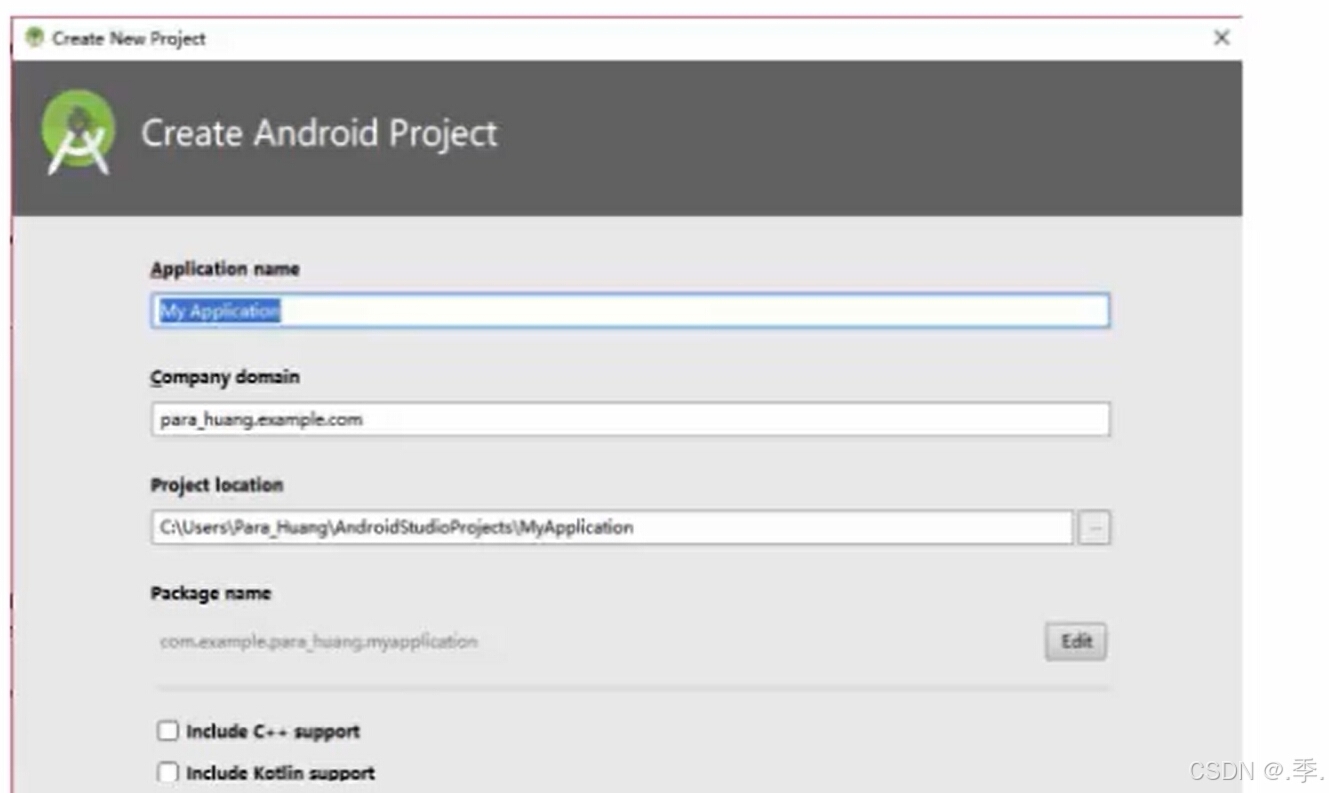
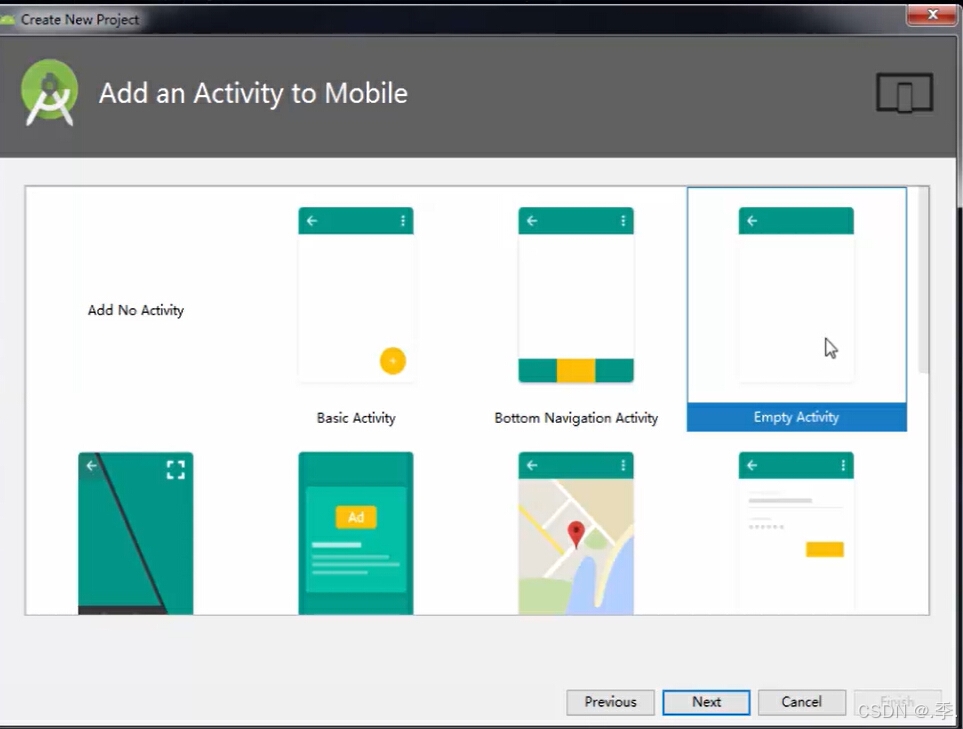
创建Android工程(二)
- sdk的选择(图一:Application工程名;Project localtion路径名)必须全英文!填写完则点击next进入图二;
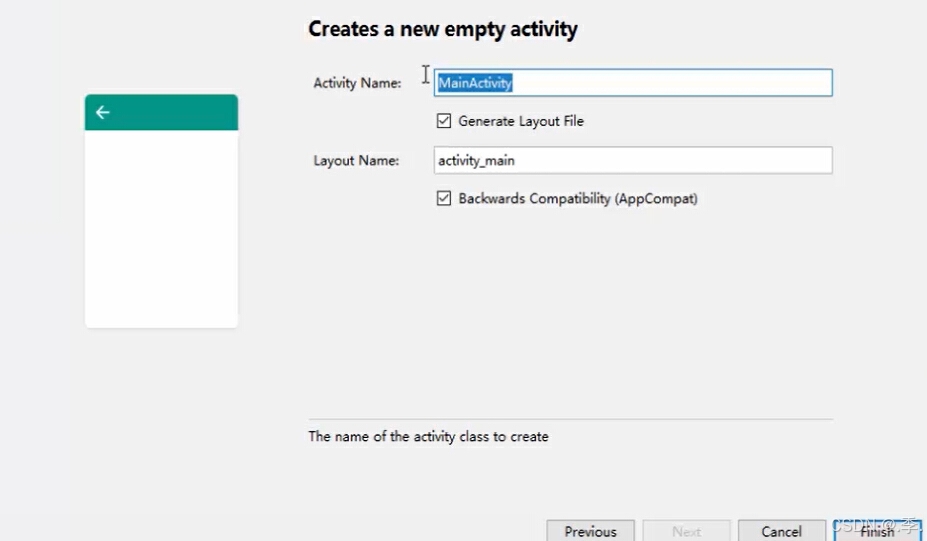
- Activity、layout的创建
---先根据需求创建一个Empty Activity见图二点击确定进入图三
---见图三:Activity Name :取名方式多以Activity为命名后缀,前面根据功能来定义
---Layout Name:这是给布局文件去名字,以.xml为文件类型存在,必须用小写取名
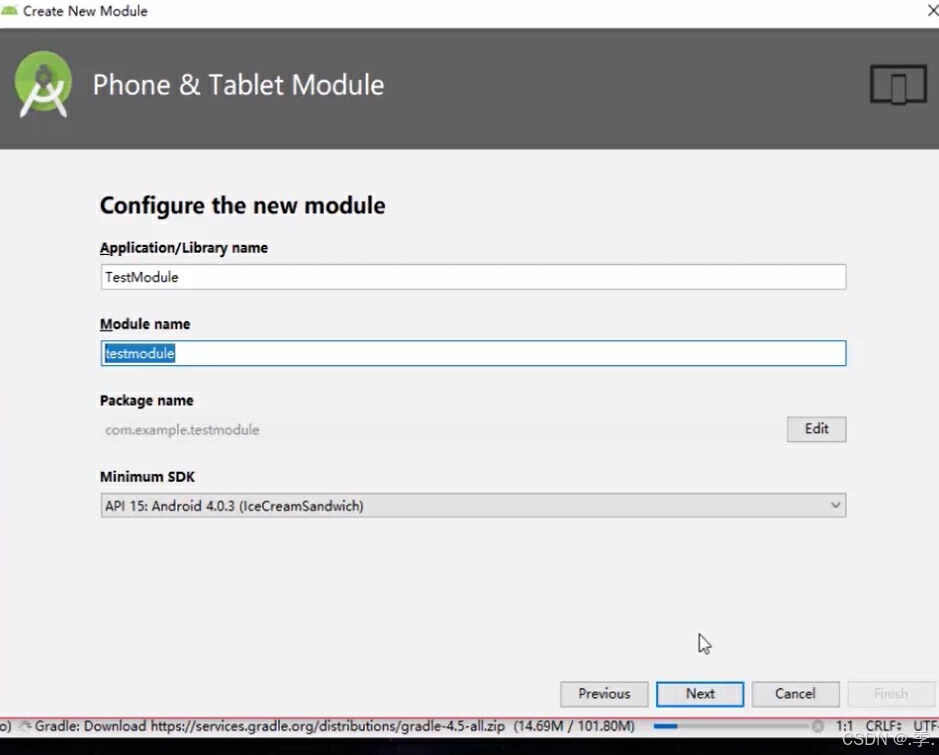
创建module
点击左上角file---new---New Module(多以module为后缀取名见下图)
创建完之后,可以看见左上角还会有不同的模式
- Android模式:会根据不同文件进行分类比较常用
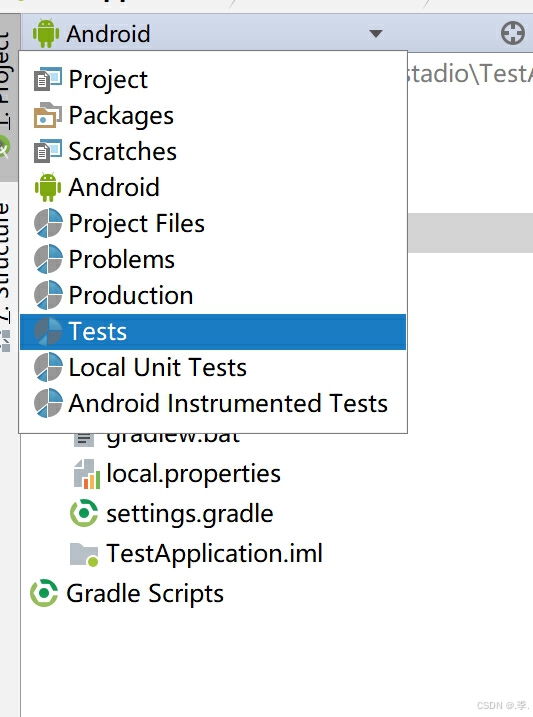
- 不同的目录放不同的文件:mainifests---放配置文件;java----java文件;res---资源目录
Andriod Studio常用技巧
1.快捷键的设置
setting---keymap-----class name completion
2.常用快捷键
撤销 ctrl+z ,反撤销 ctrl+shift+z,
提示代码:ctrl+alt空格; 代码自动修正 :alt+enter
显示文档说明:ctrl+q; 查找 : ctrl+f
按关键字进行全局搜索:ctrl+shift+f
格式化:ctrl+alt+l
3.调试技巧
写日志;打断点
Andriod studio常见问题
解决项目版本兼容问题
gradle更新问题
- Error:Unable to tunnel through proxy. Proxy returns"HTTP/1.1 400 Bad Reques
解决方法:
方法1:setting---gradle----use local gradle wrapper---gradle home 选择本地路径
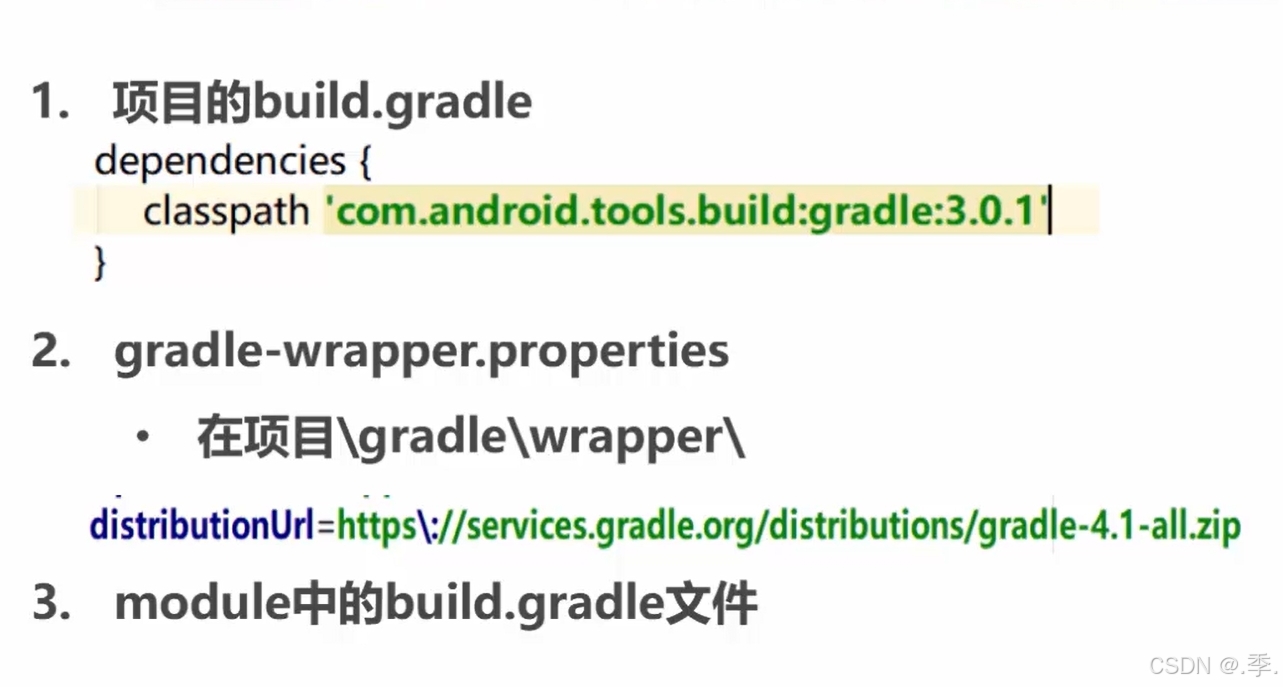
方法2:打开项目下面的gradle----选则gradle-warpper.properties----在里面更改distributionUrl
方法3:打开bulid.gradle---修改classpath,将后面的版本号改成自己下载andriod-studio里面gradle的版本号
- gradle-直处于更新状态
- Gradle project sync failed......
解决方法:修改sdk和下面的compile版本号
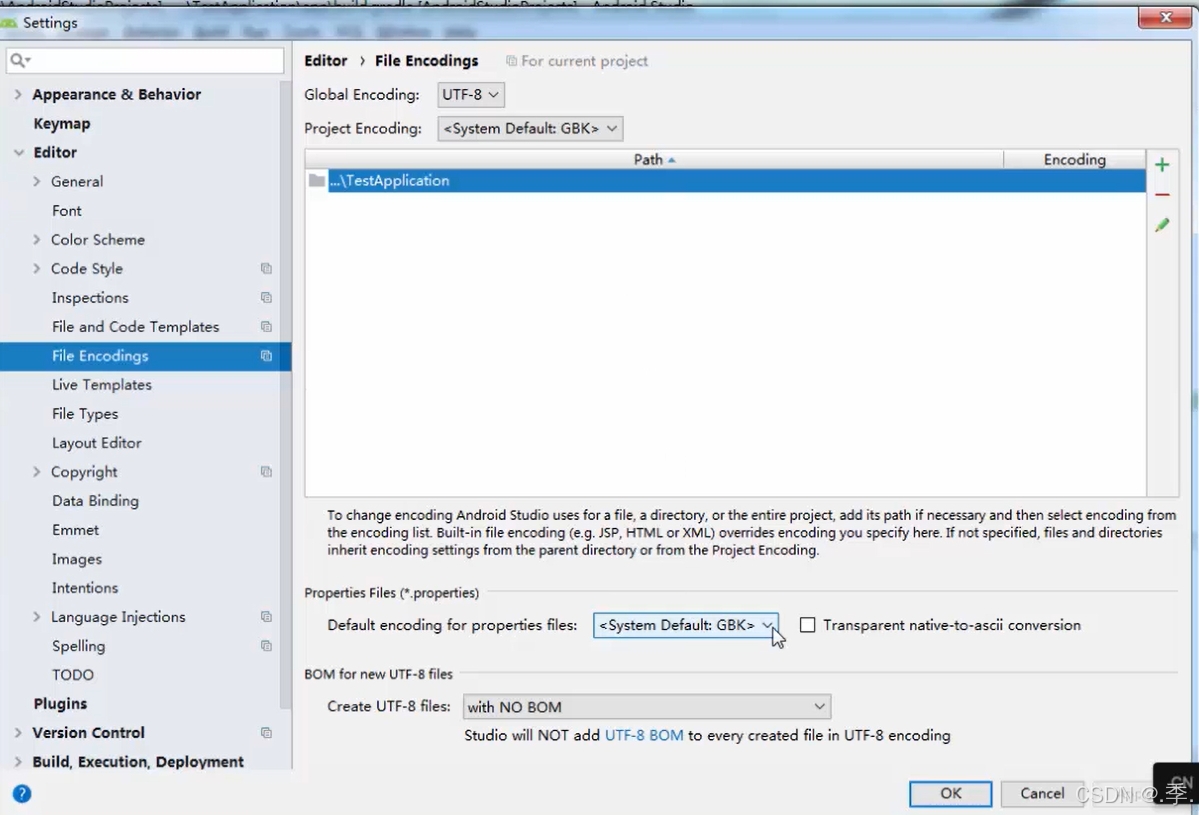
解决项目导入产生中乱码问题
解决方法:
1.settings->File Encodings
- IDE Encoding
- Project Encoding
- File or Director Encoding和Property File Encoding
2.单个java右键File Encoding
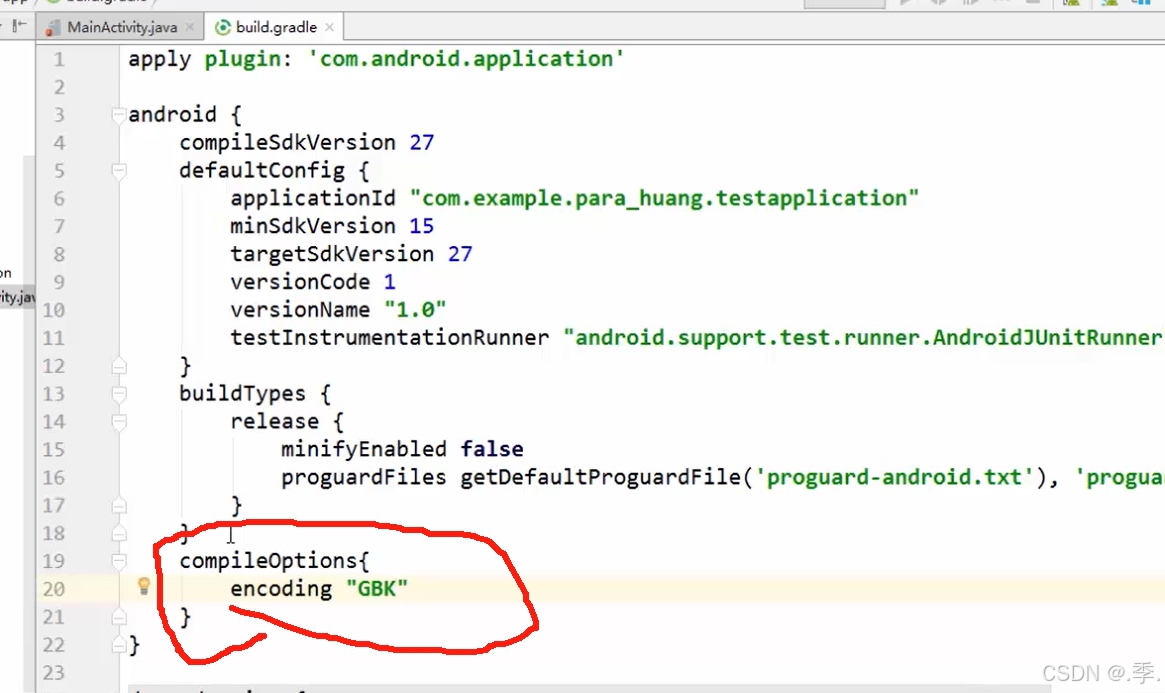
3.Module的gradle中添加:
- compileOption.encoding="GBK"
Android线性和相对布局
详解hello world
1.Activity
--MainActivity
Activity:可视化的界面
public class XxxActivity extends Activity{}
public class XxxFrame extendsJFrame{}
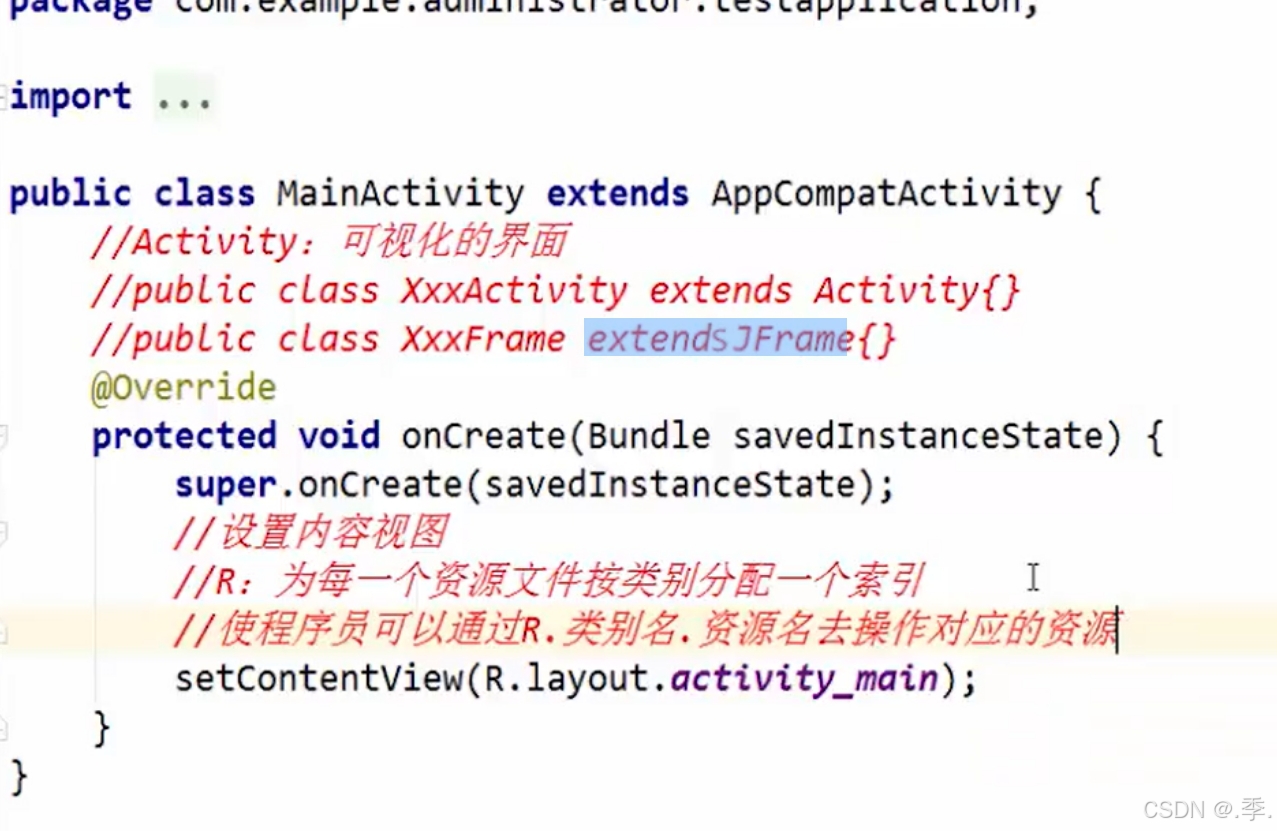
--onCreate()
--setContentView()
2.布局文件
--design
--code
3.清单文件
manifests下的文件
布局基础
1.布局的作用
布局是指对界面结构的全面规划和安排,通过api中提供的各种布局能够快速的完成对界面的设计
2.布局的种类
- 表格布局(TableLayout)
- 网格布局(GridLayout)
- 约束布局(ConstraintLayout)
3.添加布局的方式
- 利用xml文件设计
- 使用java代码添加
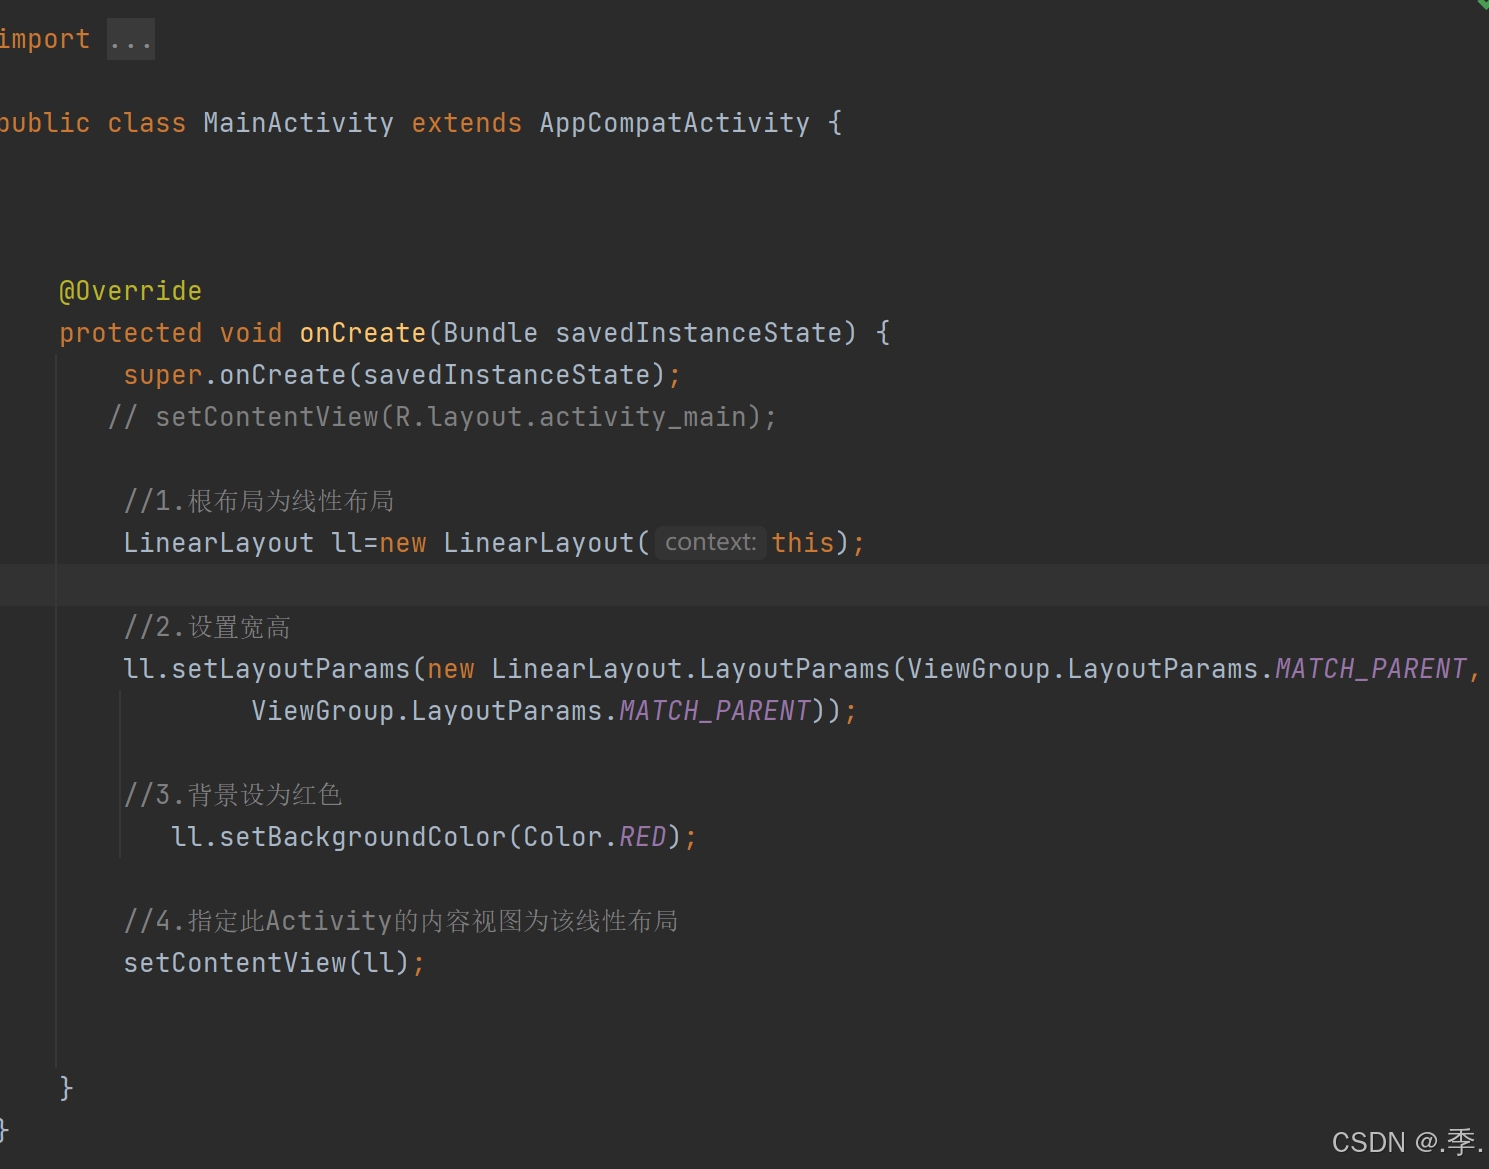
线性布局(重点)
1.线性布局的作用
线性布局案例--聊天窗口
2.线性布局的使用
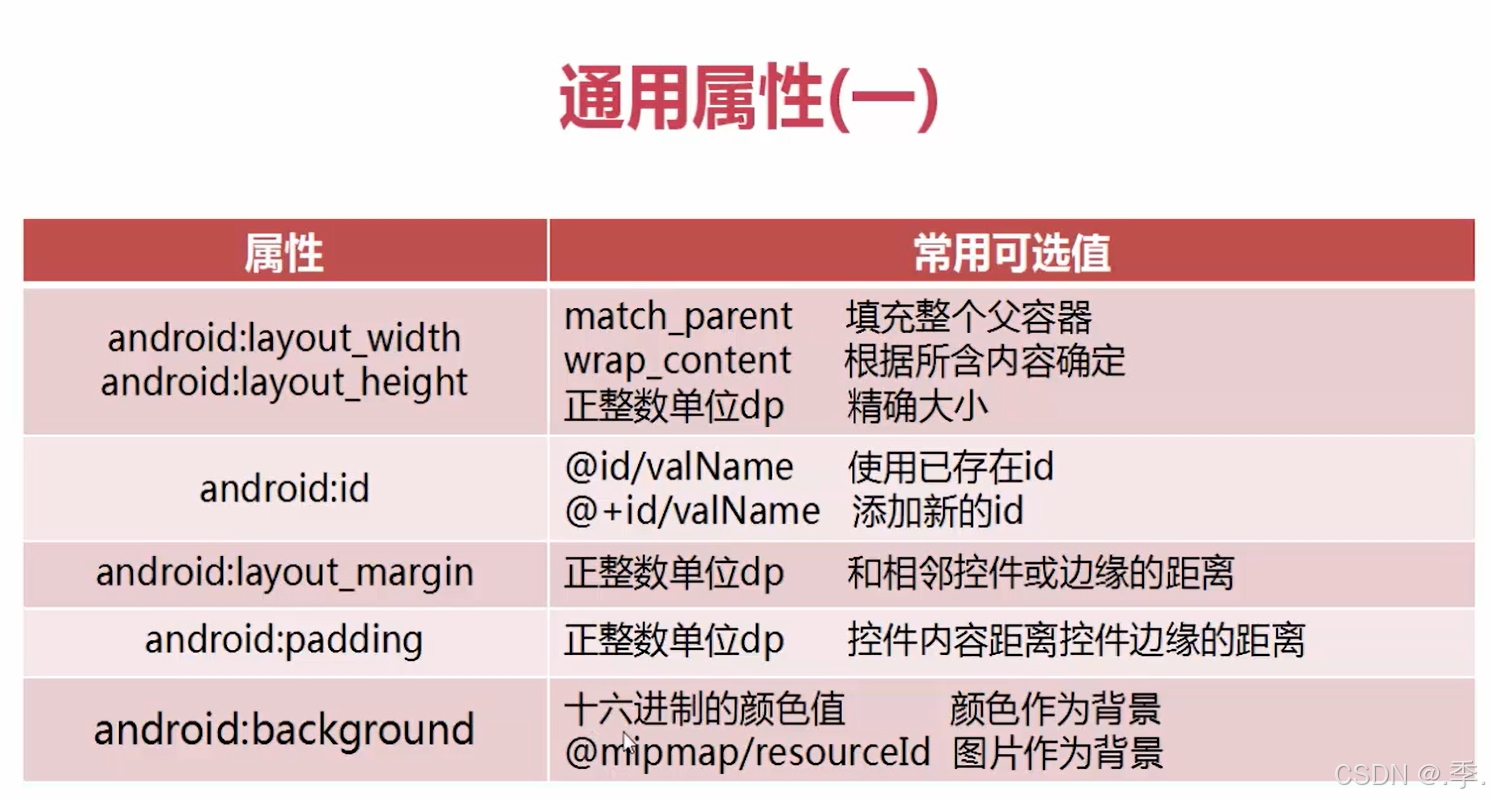
所有布局都具有的属性:
android:layout_width 宽度
android:layout_height 高度
android:layout_padding 内边距
android:layout_margin 外边距
线性布局重要属性:
android:orientation 方向
- vertical:垂直的
- horizontal:水平的
andriod:layout_weight 权重(内部空间占的百分比)
andriod:layout_gravity 重力(内部空间相当于父容器的摆放位置)
3.线性布局案例演示
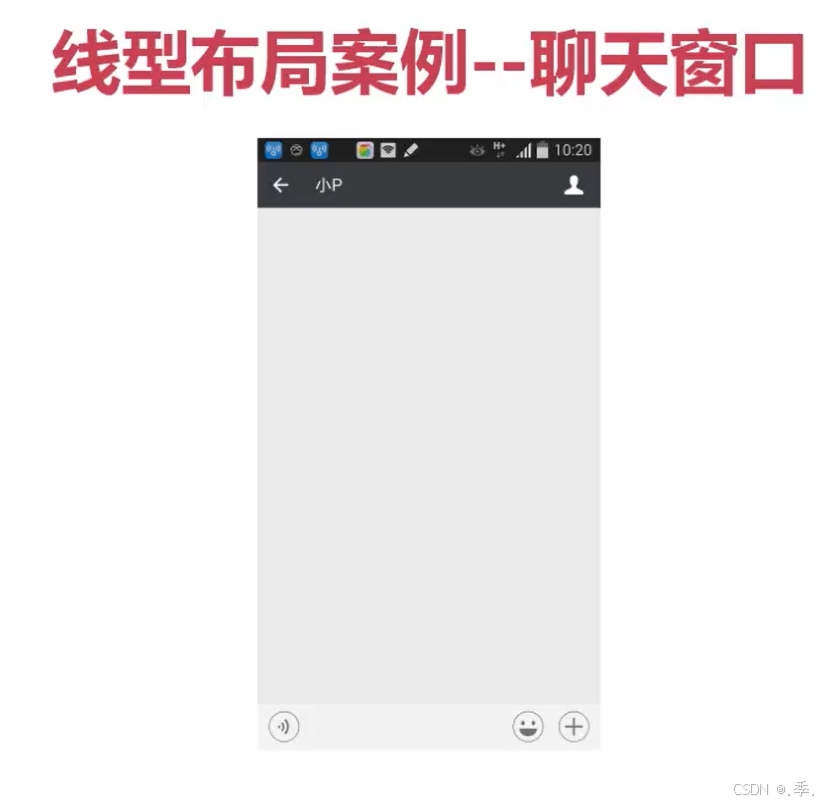
案例:实现以上聊天窗口
相对布局(重点)
相对布局的重要属性
-
相对于父容器(取值:true/false),如:android:layout alignParentRight
android:layout_centerInParent父容器屏幕居中
android:layout_alignInParentLeft
android:layout_alignInParentRight
android:layout_alignInParentTop
android:layout_alignInParentBottom
android:layout_centerHorizontal垂直居中
android:layout_centerVertical水平居中
-
相对于其他控件(取值:其他控件id),如:android:layout toRightOf
在誰的那個方向:根据id来挪动
1.在参照物的哪一边
android:layout_toLeftOf 在谁的左边
android:layout_toRightOf 在谁的右边
android:layout_above 在谁的上面
android:layout_below 在谁的下面
2.和参照物的某边线对齐
android:layout_alignTop
android:layout_alignBottom
android:layout_alignLeft
android:layout_alignRight
相对布局案例:格瓦拉

实现代码·如下:
<LinearLayout
        android:layout_width="match_parent"
        android:layout_height="0dp"
        android:orientation="horizontal"
        android:background="#ff0000"
        android:layout_weight="2">

        <RelativeLayout
            android:layout_width="0dp"
            android:layout_height="match_parent"
            android:layout_weight="2"
            android:background="#ff00ff"></RelativeLayout>
        <LinearLayout
            android:layout_width="0dp"
            android:layout_height="match_parent"
            android:layout_weight="1"
            android:orientation="vertical">

            <RelativeLayout
                android:layout_width="match_parent"
                android:layout_height="0dp"
                android:layout_weight="1"
                android:background="#ffff00"></RelativeLayout>
            <RelativeLayout
                android:layout_width="match_parent"
                android:layout_height="0dp"
                android:layout_weight="1"
                android:background="#ff0000"></RelativeLayout>
        </LinearLayout>

    </LinearLayout>

    <LinearLayout
        android:layout_width="match_parent"
        android:layout_height="0dp"
        android:orientation="horizontal"
        android:background="#00ff00"
        android:layout_weight="1">


        <RelativeLayout

            android:layout_width="0dp"
            android:layout_height="match_parent"
            android:layout_weight="1"
            android:background="#0000ff"
            ></RelativeLayout>
        <RelativeLayout

            android:layout_width="0dp"
            android:layout_height="match_parent"
            android:layout_weight="1"
            android:background="#00ff00"
            ></RelativeLayout>
        <RelativeLayout

            android:layout_width="0dp"
            android:layout_height="match_parent"
            android:layout_weight="1"
            android:background="#00ffff"
            ></RelativeLayout>
</LinearLayout>
UI基础控件
课程介绍
View
- 处理文本内容的View(TextView)
- 被点击的View(Button)
- 处理图片内容的View(ImageView)
- 接收用户信息输入的View(EditText)
- 进度条类的View(ProgressBar)
布局及控件的组成
案例:
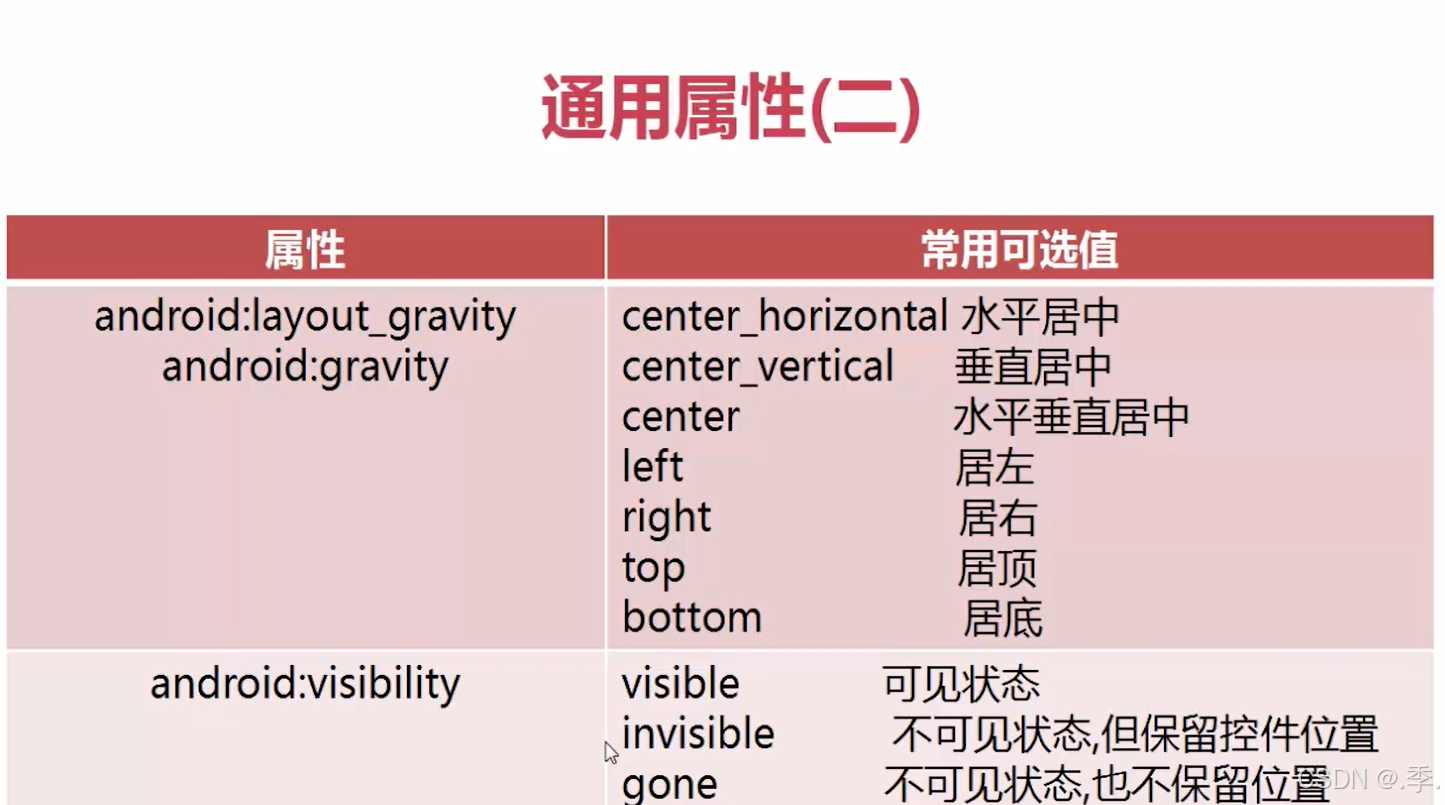
通用属性概括
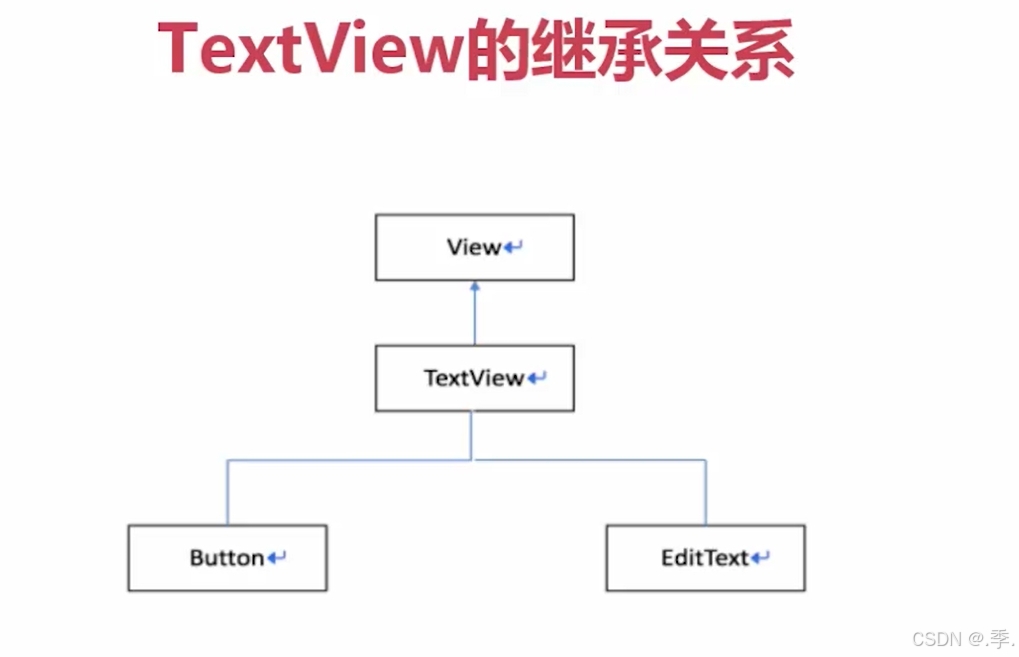
TextView
继承关系
能完成的效果
-
对长文本进行显示处理
如果文本太长,可以在values下面string里面书写;
书写格式:<string name="自己取名字">所要书写的文本内容</string>;
在xml里面引用文本时,用@/string/所取的名字
-
支持HTML代码
-
内容有样式,链接效果
部分属性
android:textSize="22sp"设置字体大小
android:textColor="#00ffff"设置字体颜色
android:lineSpacingMultiplier="2"倍距
android:singleLine="true"  设置单行
android:ellipsize="marquee"  设置省略号位置
android:focusable="true"   设置可以获取焦点
android:focusableInTouchMode="true"   设置触摸时可以获取焦点
android:marqueeRepeatLimit="marquee_forever"  设置跑马灯的重复此时
如果超出不显示可以设置滚动条ScrollView(注意:设置完滚动条之后里面只能有一个textview这样的控件否则会报错,但是可以使用布局将控件包裹起来,这样才能正常·运行)
EditText
- android:inputType 输入框类型
android:inputType  输入类型
textPassword 密码
number  只能有正整数
numberSigned  整数
numberDecimal 小数
- android:hint 输入框提示
- android:maxLength 输入框长度
事件监听处理(重点)
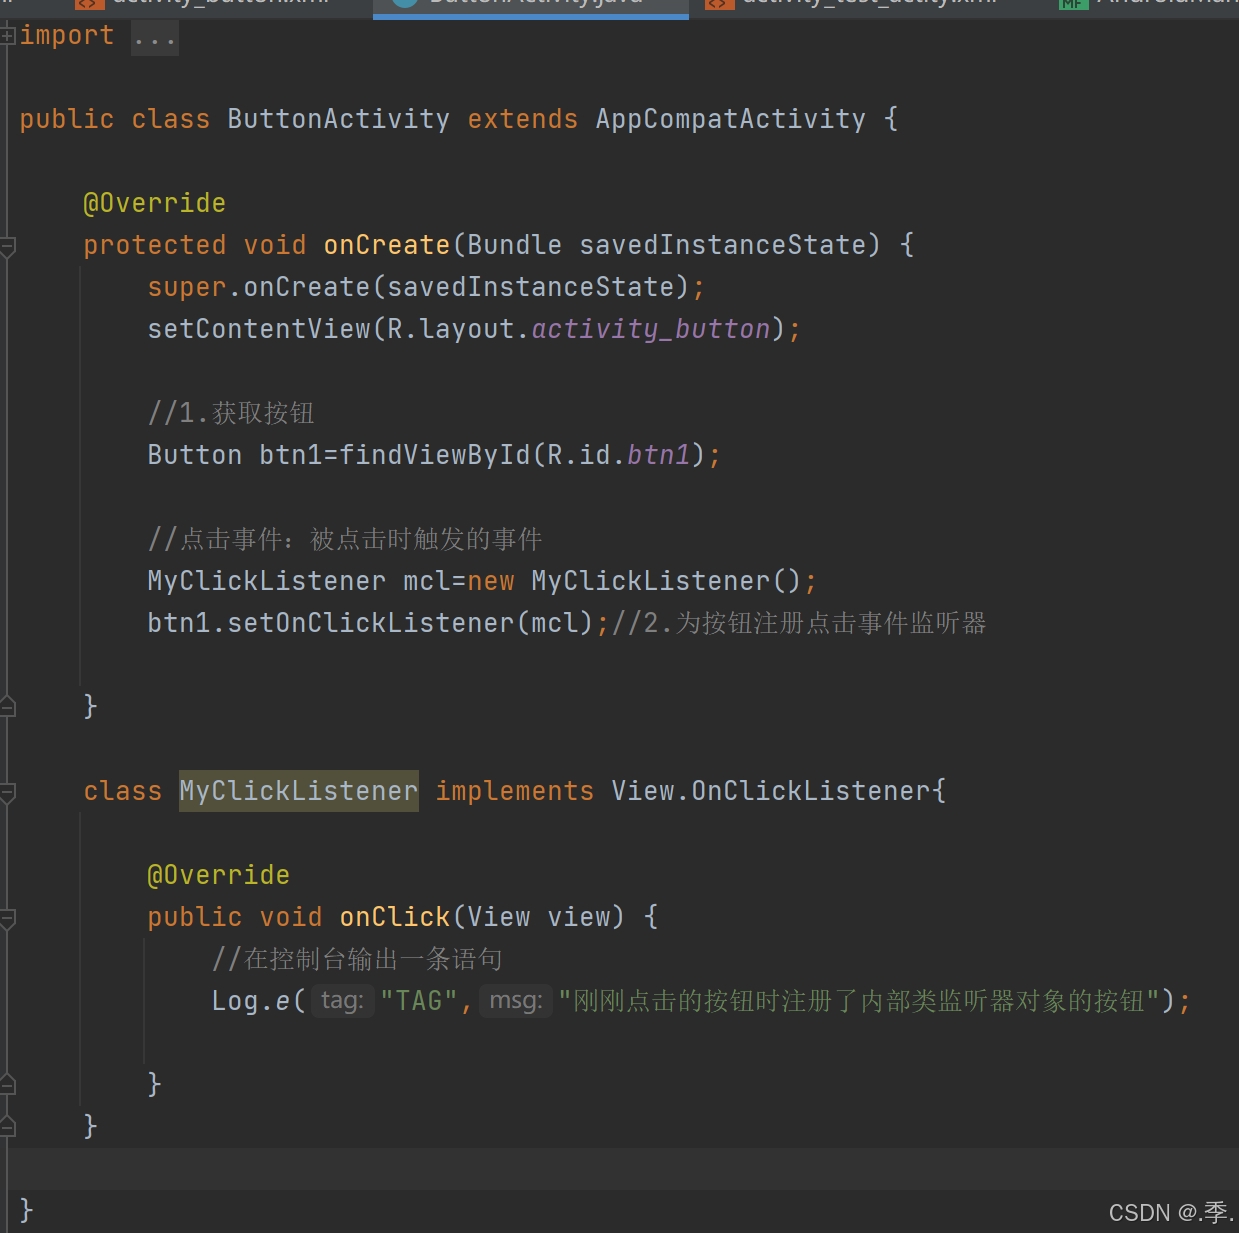
Button注册点击事件的方法
setOnClickListener()装监听器
- 自定义内部类
java文件里面:
xml文件里面:
 <Button
        android:id="@+id/btn1"
        android:layout_width="match_parent"
        android:layout_height="wrap_content"
android:text="通过自定义内部类实现点击事件"></Button>- 匿名内部类
java里面:
  //匿名内部类适用于有唯一操作的按钮
        Button btn2=findViewById(R.id.btn2);
        btn2.setOnClickListener(new View.OnClickListener() {
            @Override
            public void onClick(View view) {
                //在控制台输出
                Log.e("TAG","=======匿名内部类========");
            }
        });


    }
xml里面:
<Button
        android:id="@+id/btn2"
        android:layout_width="match_parent"
        android:layout_height="wrap_content"
android:text="通过匿名内部类实现点击事件"></Button>- 当前Activity去实现事件接口
- 在布局文件中添加点击事件属性
java里面:
 //参数:被点击的控件对象
    public void myClick(View v){
        switch (v.getId()){
            case R.id.btn4:
                Log.e("TAG","通过xml绑定的点击事件");
                break;
        }
xml里面:
<Button
android:id="@+id/btn4"
android:layout_width="match_parent"
android:layout_height="wrap_content"
android:text="在xml文件中绑定"
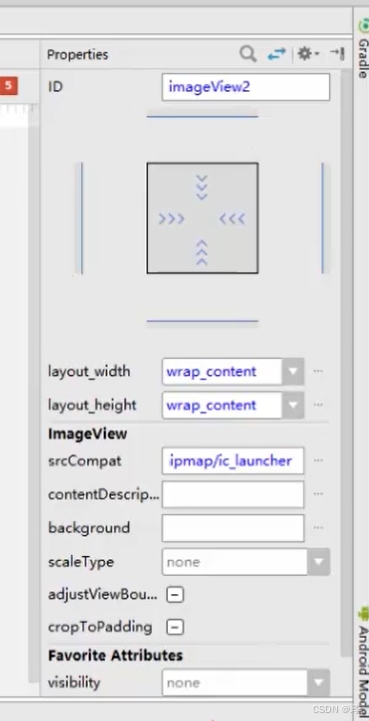
android:onClick="myClick"></Button>ImageView
用来显示和控制图像的控件,可以对它进行放大,缩小,旋转等操作;
图片在mipmap文件夹里面,引用方式:@mimap/...
命名要求:英文字母(小写),数字(不能开头),下划线
常用属性:
- android:src 指定前景图片资源
- android:background 设置背景
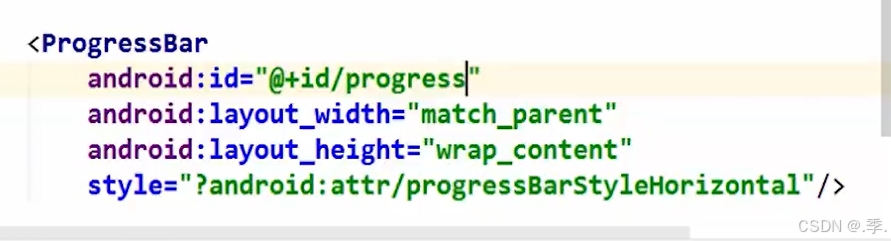
ProgressBar进度条
进度条,默认情况下是圆形,没有刻度,只是一个不断旋转的动画效果。通过设置style,可以显示传统的水平带刻度进度条
在andriod中,4.0以后是不能直接在线程中操作控件的,进度条是个特例
进度条:默认样式是转圈。修改样式需设置风格
如何修改进度条样式
style 设置风格
progressBarstyleHorizontal(水平进度条)
android:progress=""设置进度
android:max="”设置最大值默认100
android:indeterminate="true"设置进度条一直滚动
实现进度条持续缓慢滚动到100
xml里面:
java里面:
案例完善
实现:判断输入框之间内容是否为空,若为空则弹出提示,若都不为空则进度条加载100%
java里面:
package com.example.layoutdemo;
import androidx.appcompat.app.AppCompatActivity;
import android.os.Bundle;
import android.view.View;
import android.widget.EditText;
import android.widget.ProgressBar;
import android.widget.Toast;
public class MainActivity extends AppCompatActivity {
@Override
protected void onCreate(Bundle savedInstanceState) {
super.onCreate(savedInstanceState);
setContentView(R.layout.kongjian);
}
//kongjian的
public void register(View v){
//1.判断姓名,密码是否为空
EditText nameEdt=findViewById(R.id.name);
EditText pwdEdt=findViewById(R.id.pwd);
ProgressBar proBar=findViewById(R.id.pro_bar);
String name=nameEdt.getText().toString();
String pwd=pwdEdt.getText().toString();
if (name.equals("")||pwd.equals("")){
//2.如果为空,则提示
//无焦点提示
//参数1:环境上下文 参数2:提示性文本 参数三:提示持续时间
Toast.makeText(this,"姓名或密码不能为空",Toast.LENGTH_SHORT).show();
}else {
//3.都不为空,则出现进度条
proBar.setVisibility(View.VISIBLE);
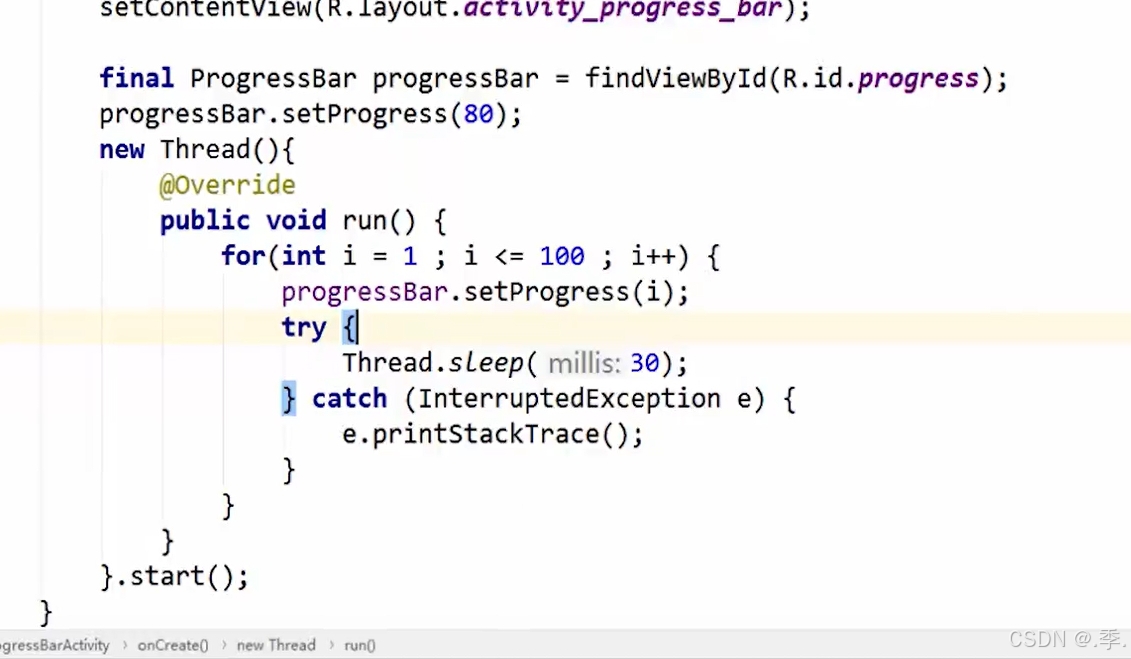
new Thread(){
public void run(){
for (int i=0;i<=100;i++){
proBar.setProgress(i);
try {
Thread.sleep(30);
}catch (InterruptedException e){
e.printStackTrace();
}
}
}
}.start();
}
}
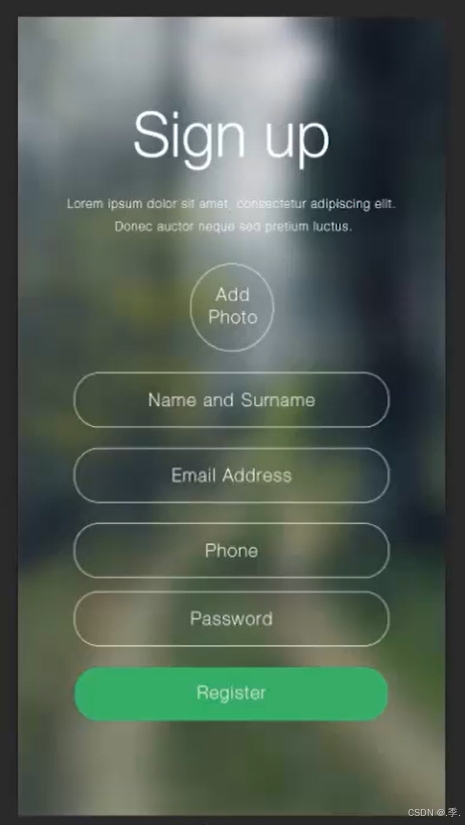
}xml里面:
<?xml version="1.0" encoding="utf-8"?>
<LinearLayout xmlns:android="http://schemas.android.com/apk/res/android"
    android:orientation="vertical"
    android:layout_width="match_parent"
    android:layout_height="match_parent"
    android:gravity="center_horizontal"
    android:background="#ffff00"
    >

    <!--

     android:inputType  输入类型
     textPassword 密码
     number  只能有正整数
     numberSigned  整数
     numberDecimal 小数


    -->

    <TextView
        android:layout_width="wrap_content"
        android:layout_height="wrap_content"
        android:text="Sign Up"
        android:layout_marginTop="70dp"
        ></TextView>

    <TextView
        android:layout_width="wrap_content"
        android:layout_height="wrap_content"
        android:text="Imooc Imooc Imooc Imooc Imooc ImoocImooc"
        android:layout_margin="20dp"
        android:gravity="center_horizontal"
        ></TextView>

    <!--图片-->
    <ImageView
        android:layout_width="wrap_content"
        android:layout_height="wrap_content"
        android:src="@mipmap/ic_launcher"
        android:layout_margin="10dp"
        ></ImageView>

    <ProgressBar
        android:id="@+id/pro_bar"
        android:layout_width="match_parent"
        android:layout_height="wrap_content"
        style="@style/ShapeAppearance.MaterialComponents.Tooltip"
        android:visibility="invisible"
        android:layout_margin="10dp"></ProgressBar>

    <!--输入框-->
    <EditText
        android:id="@+id/name"
        android:layout_width="match_parent"
        android:layout_height="wrap_content"
        android:layout_marginLeft="30dp"
        android:layout_marginRight="30dp"
        android:layout_marginTop="20dp"
        android:hint="Name and Surname"
        android:gravity="center_horizontal"
        android:maxLength="12"
        ></EditText>
    <EditText
        android:id="@+id/pwd"
        android:layout_width="match_parent"
        android:layout_height="wrap_content"
        android:layout_marginLeft="30dp"
        android:layout_marginRight="30dp"
        android:layout_marginTop="20dp"
        android:inputType="textPassword"
        android:hint="PassWord"
        android:gravity="center_horizontal"

        ></EditText>
    <EditText
        android:layout_width="match_parent"
        android:layout_height="wrap_content"
        android:layout_marginLeft="30dp"
        android:layout_marginRight="30dp"
        android:layout_marginTop="20dp"
        android:inputType="phone"
        android:hint="phone"
        android:gravity="center_horizontal"


        ></EditText>

    <!--按钮-->
    <Button
        android:layout_width="match_parent"
        android:layout_height="wrap_content"
        android:layout_marginLeft="30dp"
        android:layout_marginRight="30dp"
        android:layout_marginTop="40dp"
        android:text="Register"
        android:onClick="register"
        ></Button>

</LinearLayout>
约束布局
andriod基本布局
线性布局,相对布局(重点)
- 线性布局:
重要属性:android:orientation(方向);andriod:layout_weight(权重)
- 相对布局:依靠参照物定位的布局,最灵活的布局
重要属性:
andriod:layout_alignParentRight是否在父容器的。。。位置,通常只有true和false选择
andriod:layout_centerHorizontal是否在父容器的。。。居中
andriod:layout_toLeftOf 以其他控件作为参照物,在谁的左边,要和id一起用
andriod:layout_toRightOf 以其他控件作为参照物,在谁的右边,要和id一起用
帧布局(FrameLayout)
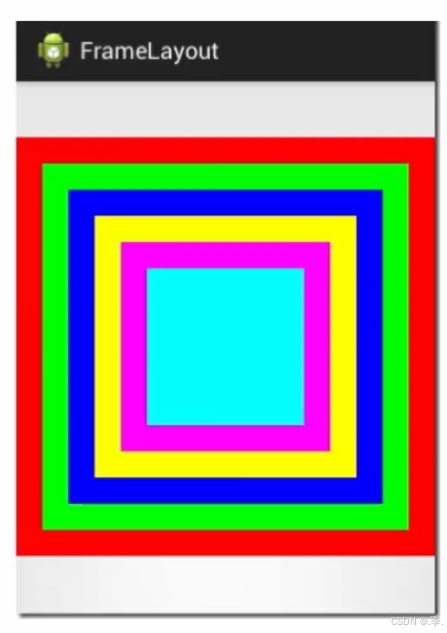
重要属性:
android:layout_gravity(控件重力)
android:foreground(前景),通常和前景重力一起使用
android:foregroundGravity(前景重力)
表格布局(TableLayout)
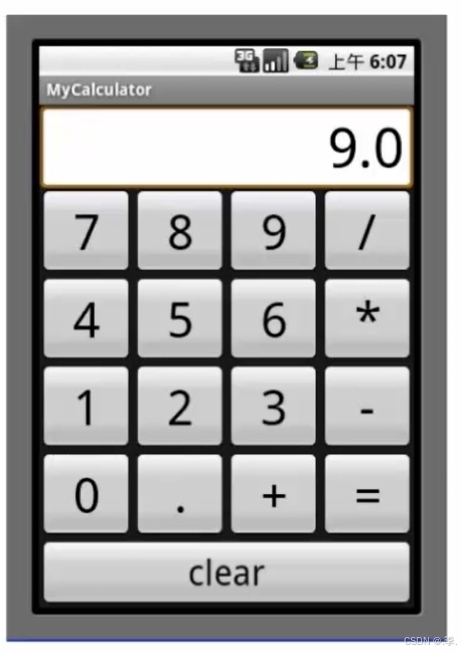
重要属性:
android:stretchColumns
ndroid:stretchColumns 设置可伸展的列, 后面传入索引参数可以使所传参数的按钮变宽比如:
android:stretchColumns="*"是让所有按钮变宽;android:stretchColumns="0,1"是让第一个和第二个按钮变宽
android:shrinkColumns
android:shrinkColumns 后面传入参数使索引某一列可以收缩,设置可收缩的列
android:collapseColumns
andriod:collapseColumns 设置可以隐藏的列
案例:计算机
<?xml version="1.0" encoding="utf-8"?>
<TableLayout xmlns:android="http://schemas.android.com/apk/res/android"
    android:layout_width="match_parent"
    android:layout_height="match_parent"
    android:stretchColumns="*"
    android:shrinkColumns="1">


<!--
android:stretchColumns 设置可伸展的列, 后面传入索引参数可以使所传参数的按钮变宽比如:
android:stretchColumns="*"是让所有按钮变宽;android:stretchColumns="0,1"是让第一个和第二个按钮变宽

 android:shrinkColumns  后面传入参数使索引某一列可以收缩,设置可收缩的列

andriod:collapseColumns  设置可以隐藏的列

如果直接在TableLayout中添加控件,那么和父容器等宽
如果想让控件出现在同一行,那么这些控件的外层一定要加一对<TableRow>
在TableRow中的控件,宽度都是默认warp_content

-->

<TableRow>
    <Button
       android:text="7"
        ></Button>
    <Button
        android:text="7"
        ></Button>
    <Button
        android:text="7"
        ></Button>
    <Button
        android:text="7"
        ></Button>
</TableRow>

    <TableRow>

        <Button  android:text="4"/>
        <Button  android:text="4"/>
        <Button  android:text="4"/>
        <Button  android:text="4"/>

    </TableRow>
    <TableRow>

        <Button  android:text="4"/>
        <Button  android:text="4"/>
        <Button  android:text="4"/>
        <Button  android:text="4"/>

    </TableRow>
    <TableRow>

        <Button  android:text="4"/>
        <Button  android:text="4"/>
        <Button  android:text="4"/>
        <Button  android:text="4"/>

    </TableRow>

        <Button  android:text="enter"/>


</TableLayout>
网格布局(GridLayout)
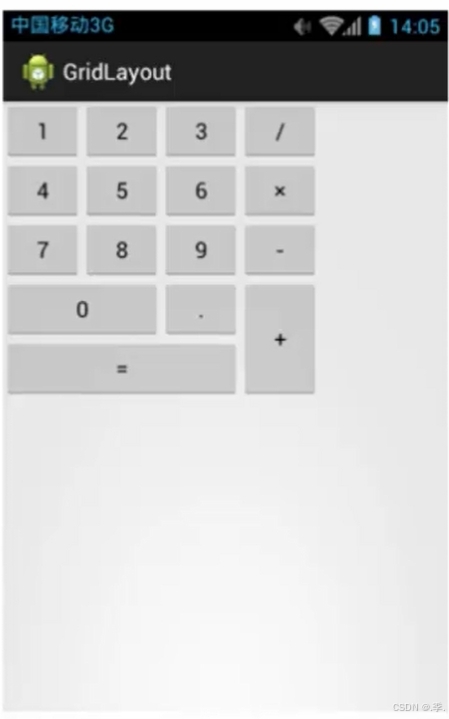
重要属性:
android:rowCount(行数量)
android:columnCount(列数量)
android:layout row(位于第几行)
android:layout rowSpan(跨几行)
注意跨列和跨行需要搭配
android:layout_gravity="fill"来使用!!!使他填充满
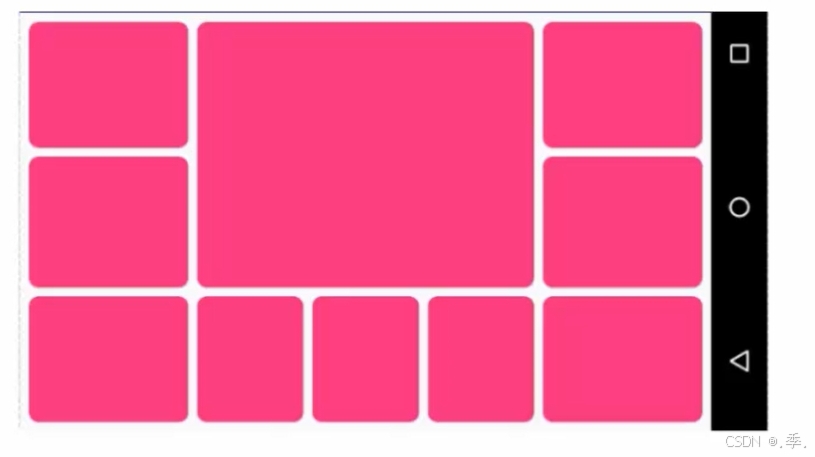
案例实现代码:
<?xml version="1.0" encoding="utf-8"?>
<GridLayout xmlns:android="http://schemas.android.com/apk/res/android"
    android:layout_width="wrap_content"
    android:layout_height="wrap_content"
    android:rowCount="5"
    android:columnCount="4"
    android:orientation="horizontal"
    >

    <Button android:text="1"/>
    <Button android:text="2"/>
    <Button android:text="3"/>
    <Button android:text="|"/>
    <Button android:text="4"/>
    <Button android:text="5"/>
    <Button android:text="6"/>
    <Button android:text="*"/>
    <Button android:text="7"/>
    <Button android:text="8"/>
    <Button android:text="9"/>
    <Button android:text="-"/>
    <Button android:text="0"
        android:layout_columnSpan="2"
        android:layout_gravity="fill"/>
    <Button android:text="."/>
    <Button android:text="+"
        android:layout_rowSpan="2"
        android:layout_gravity="fill"/>
    <Button android:text="="
        android:layout_columnSpan="3"
        android:layout_gravity="fill"/>


</GridLayout>
约束布局(重点)
约束布局简介
可以解决页面过多嵌套的问题
重要属性:app:layout_constrainBottom_toBottomOf(约束当前view的底部位置,两个bottom的属性是可以换成别的)
约束布局基本使用
点击切换蓝图随便拖入一个控件,会发现周围有四个点,可以拖动四个点为其添加约束
app:layout_constraintHorizontal_bias="" 水平偏移量,取值为0-1,
设置他之后可以不用设置margin-left和magrin-right;默认0.5
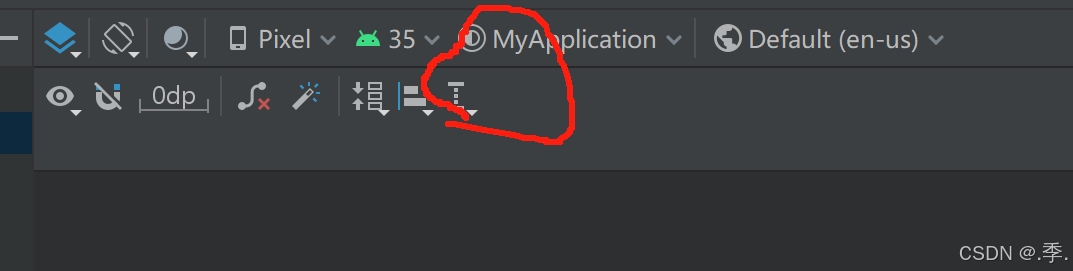
Inspector的认识
自动添加约束
点击像磁铁一样的图标
Guidelines的使用
重要属性:
andriod:orientation= “”方向
app:layout_constraintGuide_percent=""百分比
效果实现
UI常用组件
Activity入门
Activity基础(重点)
初始Activity
Activity与Layout的关系
----1.初始化启动页面:打开manifests下面的AndroidManifest.xml文件
----2.创建声明activity
 <activity android:name=".TestActivity"
            android:label="test"
            android:exported="true">
        </activity>
----3.若想启动当前的activity 需要在其中添加主入口
    <!--   主入口   -->
            <intent-filter>
                <action android:name="android.intent.action.MAIN" />
                <category android:name="android.intent.category.LAUNCHER" />
            </intent-filter>
可以通过andriod:label属性来设置标题
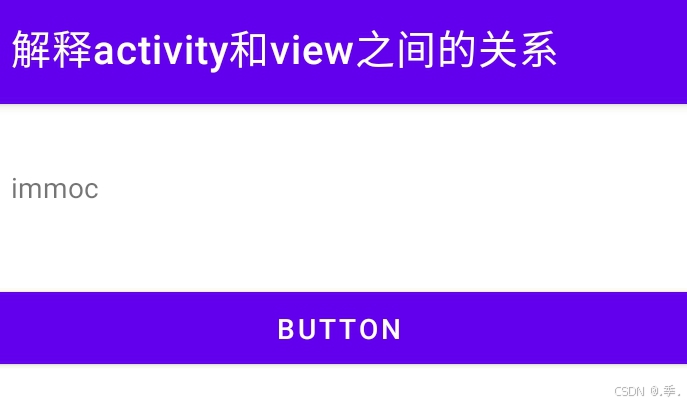
Activity与View的关系
案例:
点击按钮文本会发生改变
属性:
findViewById(R.id.id名字) 找到属性名
属性.setText(getString(R.string.string里面的名字)) 用来更改文本
java代码如下:
public class TestActivity extends AppCompatActivity {

    @Override
    protected void onCreate(Bundle savedInstanceState) {
        super.onCreate(savedInstanceState);


        //activity和layout进行了关联
        setContentView(R.layout.test);

        //通过findViewById将layout中的控件找出来,并转化成View
        TextView textView=findViewById(R.id.titletextView);


        //找到button这个view
        Button button=findViewById(R.id.button1);

        //设置点击事件,当点击按钮文本内容会改变
        button.setOnClickListener(new View.OnClickListener() {
            @Override
            public void onClick(View v) {
                //为textview动态设置文本
                textView.setText(getString(R.string.app_name));
            }
        });

    }
}
xml代码如下:
 <TextView
        android:id="@+id/titletextView"
        android:layout_width="wrap_content"
        android:layout_height="wrap_content"
        android:layout_marginStart="16dp"
        android:layout_marginTop="32dp"
        android:text="TextView"
        app:layout_constraintStart_toStartOf="parent"
        app:layout_constraintTop_toTopOf="parent" />

    <Button
        android:id="@+id/button1"
        android:layout_width="match_parent"
        android:layout_height="wrap_content"
        android:layout_marginTop="88dp"
        android:text="Button"
        app:layout_constraintTop_toTopOf="parent"
        tools:layout_editor_absoluteX="0dp" />

    <ImageView
        android:id="@+id/imageView5"
        android:layout_width="wrap_content"
        android:layout_height="wrap_content"
        android:layout_marginStart="148dp"
        android:layout_marginTop="56dp"
        app:layout_constraintStart_toStartOf="parent"
        app:layout_constraintTop_toBottomOf="@+id/button1"
        app:srcCompat="@drawable/ic_launcher_foreground" />
Activity间的跳转
属性:Intent
----1. Intent intent=new Intent(当前这个activity.this,新的那个activity.class);
----2.startActivity(intent);
//设置点击事件,当点击按钮文本内容会改变
button.setOnClickListener(new View.OnClickListener() {
@Override
public void onClick(View v) {
//为textview动态设置文本
textView.setText(getString(R.string.app_name));
//跳转到一个新的activity
Intent intent=new Intent(TestActivity.this,KongjianActivity.class);
startActivity(intent);
}
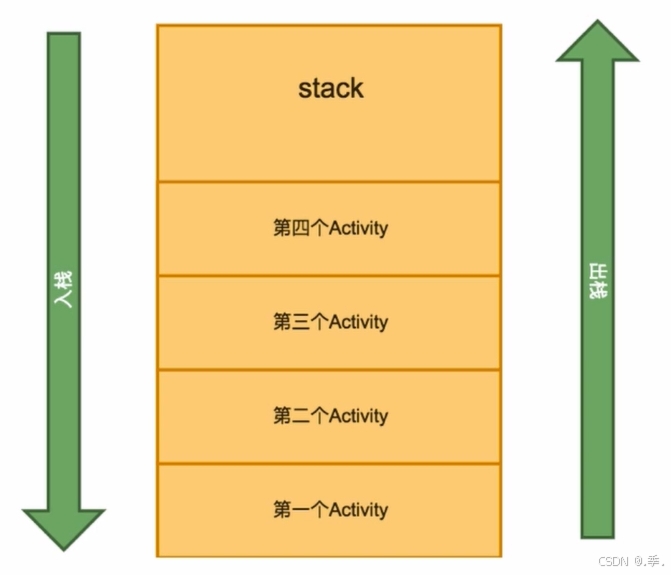
});Activity的四种启动模式(难点)
用来写模式的属性:andriod:launchMode;写在andriodManifest.xml文件里面
四种启动模式_理论(重点)
standard标准启动模式
singleTop顶部启动模式
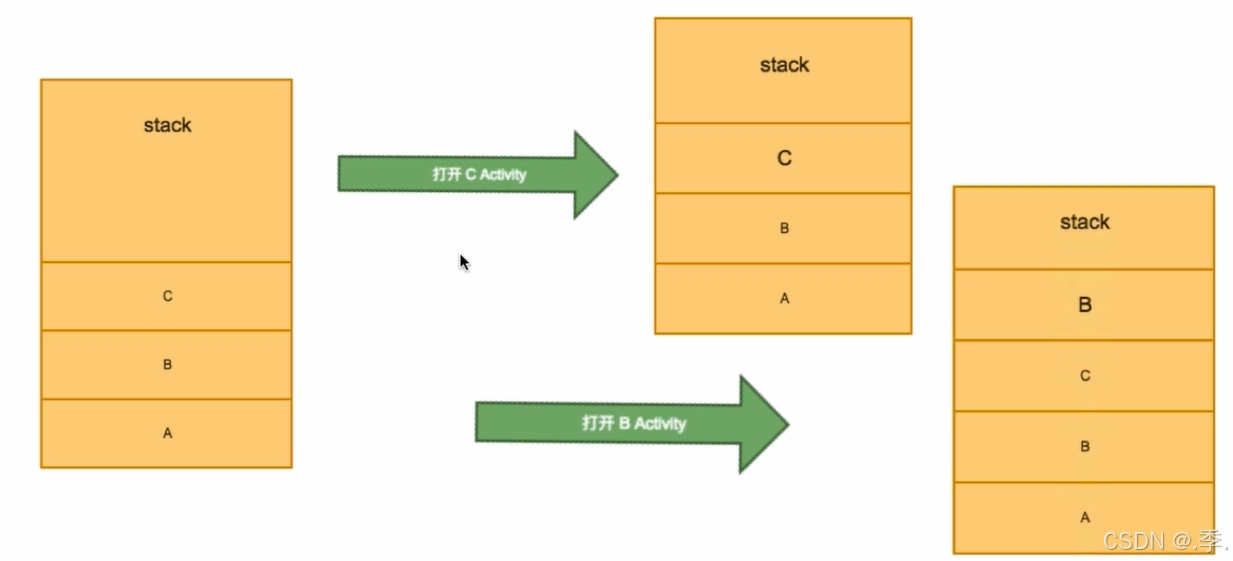
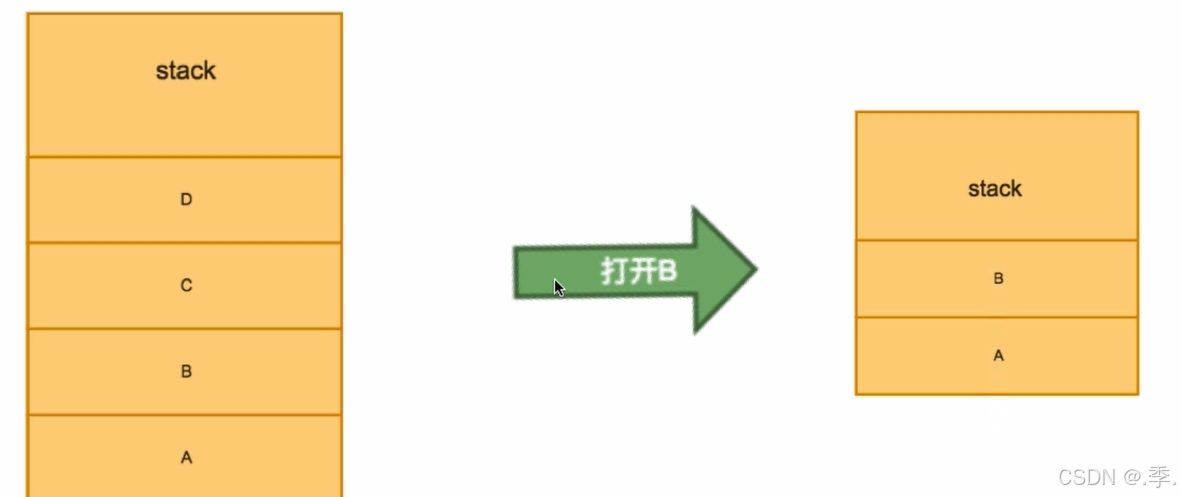
singleTask
一旦发现底部有他,打开的时候将会把他顶部的清除掉,就比如我要在左图打开b那么得到有图a-b
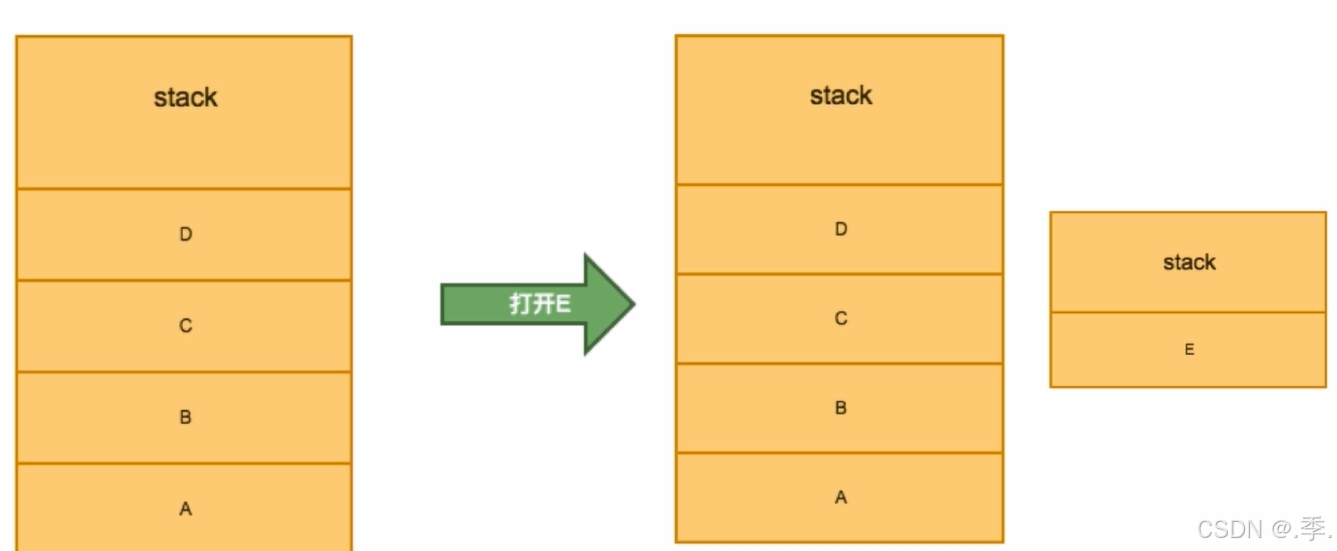
singleInstance
调用时会新起一个载就比如我想要打开下图中的E,那么我将会新起一个载只有e
四种启动模式_应用(难点)
属性:intent.addFlags(Intent.FLAG_ACTIVITY_NEWW_TASK)
Andriod菜单创建和使用
Menu概述
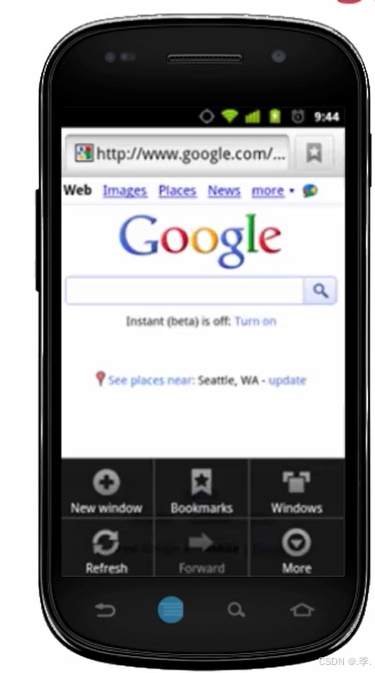
Android3.0之前的Menu
在Android3.0,当用户按“菜单”按钮时,选项菜单的内容会出现在屏幕底部,如图所示,可包含多达 6 个菜单项,超出部分则以“更多”来显示。
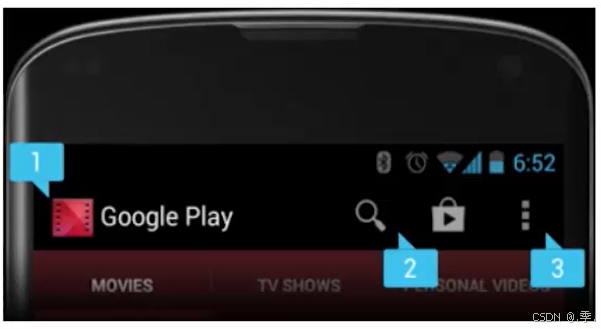
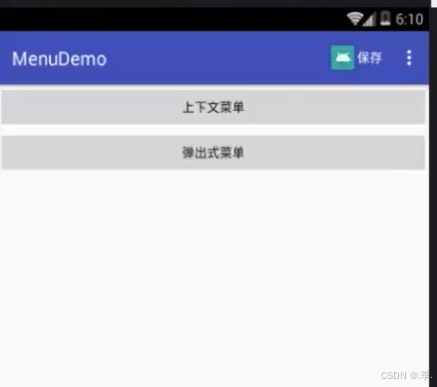
Android3.0之后的Menu
在Android3.0及更高版本的系统中,选项菜单中的项目将出现在操作栏中,用户可以使用操作栏右侧的图标或者按设备的菜单键显示操作溢出菜单。
menu的分类
选项菜单(OptionMenu)
上下文菜单(ContextMenu)
弹出菜单(PopupMenu)
Menu的使用(重点)
1.先建一个menu文件夹,右键res选择资源目录,类型选择menu点击ok完成创建;
2.右键目录选择新建菜单文件,输入名称点击完成
3.在java文件里面加载菜单
@Override
public void onCreateContextMenu(ContextMenu menu, View v, ContextMenu.ContextMenuInfo menuInfo) {
    getMenuInflater().inflate(R.menu.菜单的名字,menu);
}
菜单标签属性
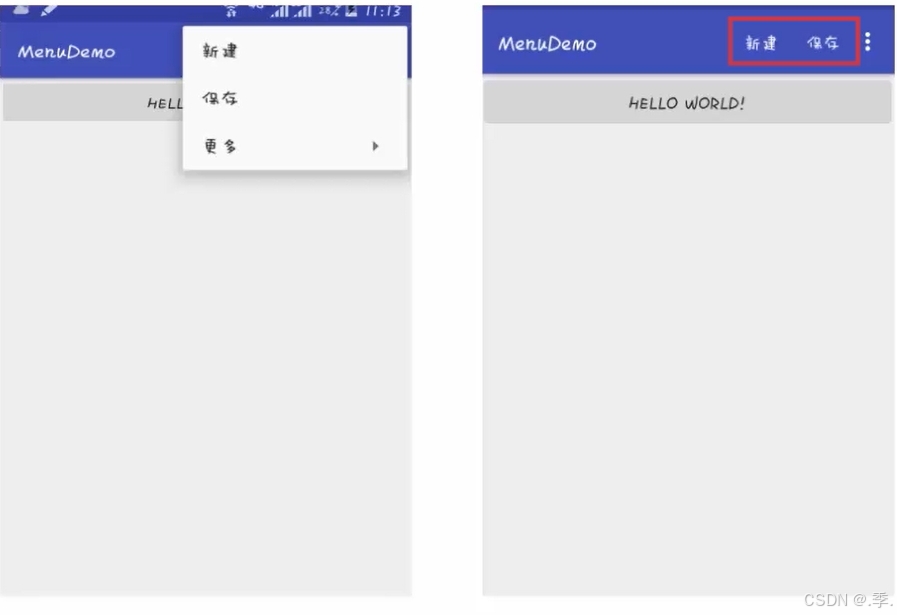
item标签:<item android:title="保存"/>,效果将会出现在右上角
OptionMenu选项菜单
选项菜单是一个应用的主菜单项,用于放置对应用产生全局影响的操作
可以写代码可以在蓝图里面直接拖动并且双击进行修改,注意:item外面要有menu所包裹,若需要添加子菜单需要在下面再次添加menu,然后在继续添加menu item标签
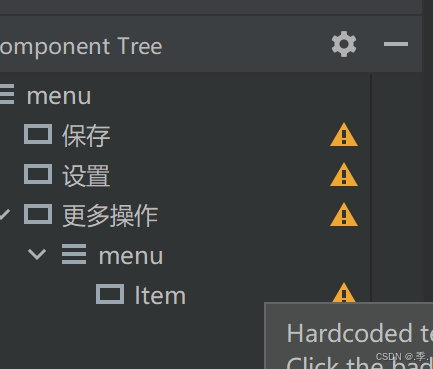
对应结构代码:
 <item  android:title="保存"/>
    <item  android:title="设置"/>
    <item android:title="更多操作" >
        <menu >
            <item android:title="子菜单1" />
            <item android:title="子菜单2" />
            <item android:title="子菜单3" />
        </menu>
    </item>
将菜单添加到页面当中去:
方法:onCreateOptionsMenu;属性:getMenuInflater().inflate(R.menu.activity名字,menu)
使用onCreateOptionsMenu 方法,在方法里面加载菜单,
java代码实现如下:
 //创建OptionMenu
    @Override
    public boolean onCreateOptionsMenu(Menu menu) {
        //加载菜单
        getMenuInflater().inflate(R.menu.option,menu);
        return true;
    }
菜单里面的属性: app:showAsAction: always当设置成always时将会把设置always的菜单常驻显示在外面, 其他的需要点击三个点显示更多,而当图标和菜单同时书写时,设置此属性只会显示图标,若想要同时显示需要设置always|withText
<item  android:title="保存"
        android:icon="@mipmap/ic_launcher"
        app:showAsAction="always|withText"/>
    <item  android:title="设置"/>
    <item android:title="更多操作" >
        <menu >
            <item android:title="子菜单1" />
            <item android:title="子菜单2" />
            <item android:title="子菜单3" />
        </menu>
    </item>
实现效果图如下:
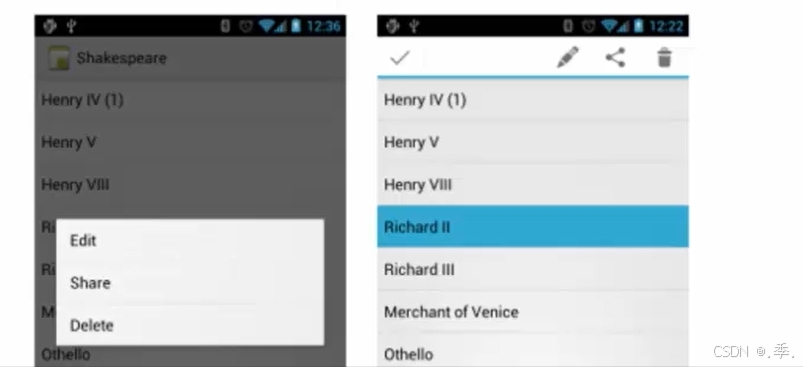
ContextMenu上下文菜单
长按某个view不放,就会在屏幕中间弹出ContextMenu
完成步骤:
1.注册:registerForContextMenu(findViewById(R.id.ctx_btn));
2.创建覆盖:onCreateContextMenu
3.菜单项的操作:onContextItemSelected
实现代码:
java里面
public class Xuanxaingcaidan extends AppCompatActivity {

    @Override
    protected void onCreate(Bundle savedInstanceState) {
        super.onCreate(savedInstanceState);
        setContentView(R.layout.xuanxaingcaidan);


        //ctx_btn:演示ContextMenu
        //1.注册
        registerForContextMenu(findViewById(R.id.ctx_btn));
        //2.创建 覆盖   onCreateContextMenu
        //3.菜单项的操作  onContextItemSelected
    }


    @Override
    public void onCreateContextMenu(ContextMenu menu, View v, ContextMenu.ContextMenuInfo menuInfo) {
        getMenuInflater().inflate(R.menu.context,menu);
    }


    @Override
    public boolean onContextItemSelected(MenuItem item) {
        switch (item.getItemId()){
            case R.id.delete:
                //使操作信息展现出来
                Toast.makeText(this,"删除",Toast.LENGTH_SHORT).show();
                break;
            case R.id.opera1:
                Toast.makeText(this,"操作1",Toast.LENGTH_SHORT).show();
                break;
            case R.id.opera2:
                Toast.makeText(this,"操作2",Toast.LENGTH_SHORT).show();
                break;
        }

        return super.onContextItemSelected(item);
    }


}
xml里面:
 <item
        android:id="@+id/delete"
        android:title="删除" />
    <item android:title="重命名" >
        <menu >
            <item
                android:id="@+id/opera1"
                android:title="操作一" />
            <item
                android:id="@+id/opera2"
                android:title="操作二" />
        </menu>
    </item>
若为按钮设置上下文操作模式 1.实现ActionMode CallBack 2.在view的长按事件中去启动上下文操作模式
实现代码:
java:
public class Xuanxaingcaidan extends AppCompatActivity {

    @Override
    protected void onCreate(Bundle savedInstanceState) {
        super.onCreate(savedInstanceState);
        setContentView(R.layout.xuanxaingcaidan);


        //ctx_btn:演示ContextMenu
        //1.注册
        registerForContextMenu(findViewById(R.id.ctx_btn));
        //2.创建 覆盖   onCreateContextMenu
        //3.菜单项的操作  onContextItemSelected
        //4.为按钮设置上下文操作模式
        //----4.1实现ActionMode CallBack
        //----4.2在view的长按事件中去启动上下文操作模式

       findViewById(R.id.ctx_btn).setOnLongClickListener(new View.OnLongClickListener(){

           @Override
           public boolean onLongClick(View view) {
               startActionMode(cb);
               return false;
           }
       });


    }

    ActionMode.Callback cb=new ActionMode.Callback() {
        //创建,在启动上下文操作模式(startActionMode(Callback))时调用
        @Override
        public boolean onCreateActionMode(ActionMode mode, Menu menu) {
            Log.e("TAG","创建");
            getMenuInflater().inflate(R.menu.context,menu);
            return true;
        }

        //在创建方法后调用
        @Override
        public boolean onPrepareActionMode(ActionMode mode, Menu menu) {
            Log.e("TAG","准备");
            return false;
        }

        @Override
        public boolean onActionItemClicked(ActionMode mode, MenuItem item) {
           Log.e("TAG","点击");
            switch (item.getItemId()){
                case R.id.delete:
                    //使操作信息展现出来
                    Toast.makeText(Xuanxaingcaidan.this,"删除",Toast.LENGTH_SHORT).show();
                    break;
                case R.id.opera1:
                    Toast.makeText(Xuanxaingcaidan.this,"操作1",Toast.LENGTH_SHORT).show();
                    break;
                case R.id.opera2:
                    Toast.makeText(Xuanxaingcaidan.this,"操作2",Toast.LENGTH_SHORT).show();
                    break;
            }
            return true;
        }

        //在上下文操作模式结束时被调用
        @Override
        public void onDestroyActionMode(ActionMode mode) {

            Log.e("TAG","结束");
        }
    };

    //创建OptionMenu
    @Override
    public boolean onCreateOptionsMenu(Menu menu) {
        //加载菜单
        getMenuInflater().inflate(R.menu.option,menu);
        return true;
    }

}
xml代码同上;
PopupMenu(弹出菜单)
一个模态形式展示的弹出风格的菜单,绑在某个View上,一般出现在被绑定的View的下方
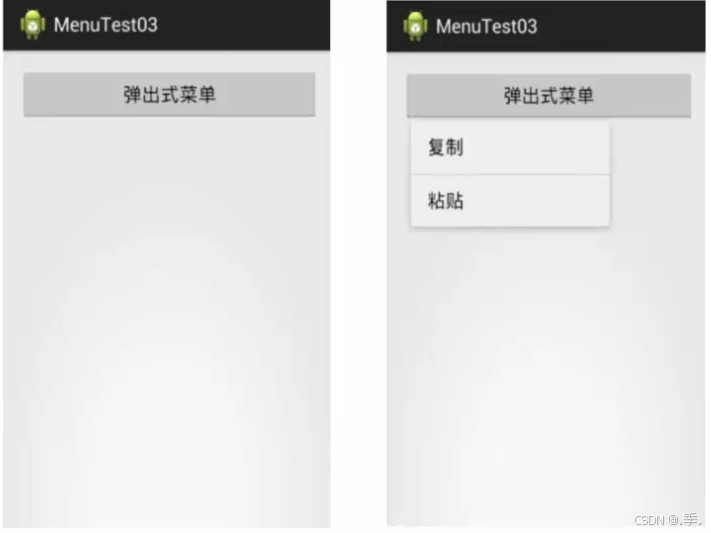
popup_btn演示PopupMenu 弹出菜单:实现步骤
1.实例化PopupMenu对象 参数2:被锚定的view
2.加载菜单资源:利用MenuInflater将menu菜单资源加载到PopupMenu.getMenu()所返回的Menu对象中
3.为PopupMenu设置点击监听器
4.千万不要忘记这一步
实现java代码:
 Button popupBtn = findViewById(R.id.popup_btn);
        popupBtn.setOnClickListener(new View.OnClickListener() {
            @Override
            public void onClick(View view) {
                //1.实例化PopupMenu对象  参数2:被锚定的view
                PopupMenu menu = new PopupMenu(Xuanxaingcaidan.this, popupBtn);
                //2.加载菜单资源:利用MenuInflater将menu菜单资源加载到PopupMenu.getMenu()所返回的Menu对象中
                //将R.menu.xx对于的菜单资源加载到弹出式菜单中
                menu.getMenuInflater().inflate(R.menu.popup,menu.getMenu());
                //3.为PopupMenu设置点击监听器
                menu.setOnMenuItemClickListener(new PopupMenu.OnMenuItemClickListener() {
                    @Override
                    public boolean onMenuItemClick(MenuItem menuItem) {
                        switch (menuItem.getItemId()){
                            case R.id.copy:
                                Toast.makeText(Xuanxaingcaidan.this,"复制",Toast.LENGTH_SHORT).show();
                                break;
                            case R.id.paste:
                                Toast.makeText(Xuanxaingcaidan.this,"粘贴",Toast.LENGTH_SHORT).show();
                                break;
                        }
                        return false;
                    }
                });
                //4.千万不要忘记这一步
                menu.show();
            }
        });
菜单xml里面:
<?xml version="1.0" encoding="utf-8"?>
<menu xmlns:android="http://schemas.android.com/apk/res/android">

    <item android:title="复制" android:id="@+id/copy"/>
    <item android:title="粘贴" android:id="@+id/paste"/>
</menu>
常见问题与经验分享
xml定义menu的优势
- 清晰菜单的结构
- 将菜单内容与应用的逻辑代码分离
- 资源适配更容易
Menu的创建方式
- 通过xml定义
- 通过java定义
用Java书写菜单
 //创建OptionMenu
    @Override
    public boolean onCreateOptionsMenu(Menu menu) {
        //加载菜单

        //纯java代码设计menu
        /*
        * 设置
        * 更多
        *     添加
        *     删除
        *
        * */
        //Menu
        //参数1:组id  参数2:菜单项id  参数3:序号  参数4:设置
        menu.add(1,1,1,"设置");
        SubMenu sub= menu.addSubMenu(1,2,2,"更多");

        //SubMenu如果有子菜单就可以使用
        sub.add(2,3,1,"添加");
        sub.add(2,4,2,"删除");


        return true;
    }
@Override
public boolean onActionItemClicked(ActionMode mode, MenuItem item) {
Log.e("TAG", "点击");
switch (item.getItemId()) {
//利用java代码书写
case 1:
Toast.makeText(Xuanxaingcaidan.this, "设置", Toast.LENGTH_SHORT).show();
break;
case 2:
Toast.makeText(Xuanxaingcaidan.this, "更多", Toast.LENGTH_SHORT).show();
break;
case 3:
Toast.makeText(Xuanxaingcaidan.this, "设置", Toast.LENGTH_SHORT).show();
break;
case 4:
Toast.makeText(Xuanxaingcaidan.this, "", Toast.LENGTH_SHORT).show();
break;
}
return true;
}xml定义的menu不显示
Menu显示
- onCreateOptionsMenu()方法必须返回true
- onOptionsItemSelected()方法返回true
- 调用父类的默认实现 super.onOptionsItemSelected(item);
Andriod对话框处理
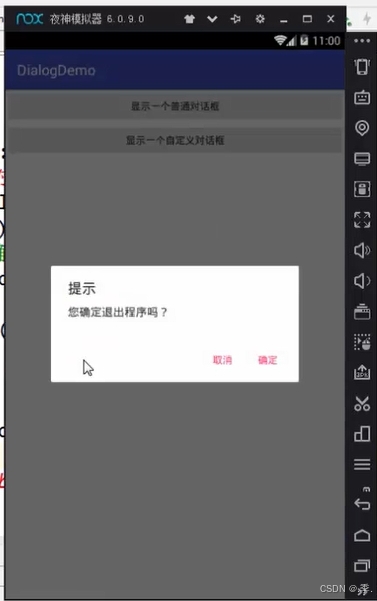
提示对话框
alertdialog
消息提示机制,常用于向用户传递信息、提示或警告用户的行为。通常的方法有:
- setTitle 标题
- setMessage 主要提示信息
- create 创建
- show 显示
实现下图效果:
java代码第一种方式:
  //第一种方式
    public void myClick(View view){
        switch (view.getId()){
            case R.id.normal_dialog_btn:
                //1/实例化一个对象
                //AlertDialog的构造方法时protected
                AlertDialog.Builder builder=new AlertDialog.Builder(this);
                builder.setTitle("提示");//标题
                builder.setMessage("您确定退出程序吗?");//提示语句
                builder.setPositiveButton("确定", new DialogInterface.OnClickListener() {
                    @Override
                    public void onClick(DialogInterface dialogInterface, int i) {
                        finish();
                    }
                });
                //设置按钮  第一个参数传按钮文本内容,第二个参数传点击事件
                builder.setNegativeButton("取消",null);
                //3.展示
                builder.show();
                /*builder.show();就相当于AlertDialog  dialog=builder.create();  dialog.show;*/
                break;
            case R.id.diy_dialog_btn:

                break;
        }
    }
第二种实现方式:不建议使用
 //第二种方法,将先创建对话框前置
    public void showNormalDialog(){
        AlertDialog dialog=new AlertDialog.Builder(this).create();
        dialog.setTitle("提示");
        dialog.setMessage("您确定退出程序吗?");
        dialog.setButton(DialogInterface.BUTTON_POSITIVE, "确定", new DialogInterface.OnClickListener() {
            @Override
            public void onClick(DialogInterface dialogInterface, int i) {

            }
        });
        dialog.show();
    }
自定义对话框(重点)
自定义对话框
1.设置布局
2.设置style
打开values里面的thems文件,用style双标签设置风格
<item name="windowNoTitle">true</item>设置没有标题
<item name="android:windowBackground">@android:color/transparent</item>设置透明色
3.自定义Dialog
4.显示
实现步骤:
自己创建一个xml文件和acticity用来放自己定义出的对话框的样式
java代码如下:
//设计对话框样式---》dialog_layout.xml
//2.设计style  (去标题去背景)
//3.将第一步的布局应用到当前自定义对话框
//4.实例化对话框(参数1:环境上下文  参数2:第二步创建的style   R。style。mydialog)并展示show()

public class MyDialog extends Dialog {
//选择有两个参数的构造方法,第二个参数用来覆盖前面的主题
    public MyDialog(@NonNull Context context, int themeResId) {
        super(context, themeResId);
        //为对话框设置布局
        setContentView(R.layout.zidingyi);

        findViewById(R.id.yes_btn).setOnClickListener(new View.OnClickListener(){

            @Override
            public void onClick(View view) {
                System.exit(0);
            }
        });
        findViewById(R.id.no_btn).setOnClickListener(new View.OnClickListener() {
            @Override
            public void onClick(View view) {
                dismiss();
            }
        });

    }
}
xml文件如下:
<?xml version="1.0" encoding="utf-8"?>
<LinearLayout xmlns:android="http://schemas.android.com/apk/res/android"
    android:orientation="vertical"
    android:layout_width="match_parent"
    android:layout_height="match_parent"
    android:gravity="center"
    android:background="@mipmap/ic_launcher">


    <TextView
        android:layout_width="wrap_content"
        android:layout_height="wrap_content"
        android:text="你确定要退出吗?"
        android:textSize="34sp"
        android:textColor="#e61414"
        android:textStyle="bold"
        android:layout_marginTop="25dp"/>
    <LinearLayout
        android:layout_width="wrap_content"
        android:layout_height="wrap_content"
        android:orientation="horizontal"
        android:layout_margin="25dp">
        <Button
            android:id="@+id/yes_btn"
            android:layout_width="120dp"
            android:layout_height="50dp"
            android:background="@mipmap/ic_launcher"/>
        <Button
            android:id="@+id/no_btn"
            android:layout_width="120dp"
            android:layout_height="50dp"
            android:background="@mipmap/ic_launcher"
            android:layout_marginLeft="20dp"/>
    </LinearLayout>
</LinearLayout>
自定义的样式如下:
<style name="mydialog" parent="android:style/Theme.Dialog">

        <item name="windowNoTitle">true</item>
        <item name="android:windowBackground">@android:color/transparent</item>
    </style>
popupwindow(重点)
弹窗

基础配置
实现步骤:
1.创建PopupWindow对象实例
2.设置背景,注册事件监听器和添加动画
3.显示PopupWindow
实现代码:
java代码:
//设置popupwindow
    private void showPopupWindow(View view) {
        //准备弹窗所需要的视图对象
        View v= LayoutInflater.from(this).inflate(R.layout.popup,null);
         //1.实例化对象
        //参数1:用在弹窗中的view
        //参数2,3:弹窗的宽高
        //参数4(focusable):能否获取焦点
        PopupWindow window=new PopupWindow(v,400,70,true);
       // 2.设置(背景,动画)
        //3.显示
        //参数1(anchor):锚
        window.showAsDropDown(view);
    }
xml代码:
 <TextView
        android:layout_width="60dp"
        android:layout_height="30dp"
        android:text="选择"
        android:textColor="#ffffff"
        android:gravity="center"
        android:background="#000000"/>
    <TextView
        android:layout_width="60dp"
        android:layout_height="30dp"
        android:text="全选"
        android:textColor="#ffffff"
        android:gravity="center"
        android:background="#000000"/>
    <TextView
        android:layout_width="60dp"
        android:layout_height="30dp"
        android:text="复制"
        android:textColor="#ffffff"
        android:gravity="center"
        android:background="#000000"/>
设置样式
window.showAsDropDown(view,100,50);
---参数1(anchor):锚
---参数2、3:相对于锚在x,y方向上的偏移量
//设置背景
        window.setBackgroundDrawable(new ColorDrawable(Color.TRANSPARENT));
        //设置能响应外部的点击事件
        window.setOutsideTouchable(true);
        //设置能响应的点击事件
        window.setTouchable(true);
事件响应
window.dismiss();使鼠标点击完之后消失
//为弹窗中的文本添加点击事件
        v.findViewById(R.id.choose).setOnClickListener(new View.OnClickListener() {
            @Override
            public void onClick(View view) {
                Toast.makeText(dialogDemo.this,"您点击了选择",Toast.LENGTH_SHORT).show();
               //使点击完之后消失
                window.dismiss();
            }
        });

        v.findViewById(R.id.choose_all).setOnClickListener(new View.OnClickListener() {
            @Override
            public void onClick(View view) {
                Toast.makeText(dialogDemo.this,"您点击了全选",Toast.LENGTH_SHORT).show();
                window.dismiss();
            }
        });

        v.findViewById(R.id.copy).setOnClickListener(new View.OnClickListener() {
            @Override
            public void onClick(View view) {
                Toast.makeText(dialogDemo.this,"您点击了复制",Toast.LENGTH_SHORT).show();
                window.dismiss();
            }
        });
设置动画
1.右键res点击new一个andriod resource directory;values选择aim;
2.右键aim新建一个资源文件animation resource file叫做translate;
3.在translate里面设置动画的属性
<translate
    android:fromXDelta="0"
    android:toXDelta="0"
    android:fromYDelta="300"
    android:toYDelta="0"
    android:duration="2000"
    ></translate>
4.在thems里面引入样式
<style name="translate_anim">
        <item name="android:windowEnterAnimation">@anim/translate</item>
    </style>
5.再在java文件里面书写:
// 2.设置(背景,动画)
        //设置背景
        window.setBackgroundDrawable(new ColorDrawable(Color.TRANSPARENT));
        //设置能响应外部的点击事件
        window.setOutsideTouchable(true);
        //设置能响应的点击事件
        window.setTouchable(true);
        //@1创建动画资源   @2创建一个style应用动画资源  @对当前弹窗的动画风格设置为第二部的资源索引
        window.setAnimationStyle(R.style.translate_anim);
Arrayadapter
数组适配器,只用来显示单一的文本,构造方法:
ArrayAdapter(Context context,int resource,int textviewed,List<L> objects))
数据适配器对话框
若想要更改文本样式,你必须确保你的根元素是textview
ArrAdapter adapter=new ArrayAdapter()传入三个参数
参数1:环境
参数2:布局资源索引,指的是每一项数据所呈现的样式android.R.layout.xxx
参数3:数据源
activity声明周期详解
生命周期详解(重点)
activity第一条生命线周期
- onCreate创建
- onStart开始
- onResume 界面开始交互
- onPause 暂停
- onDestroy 死亡
- onRestart 重新开始
轨迹:
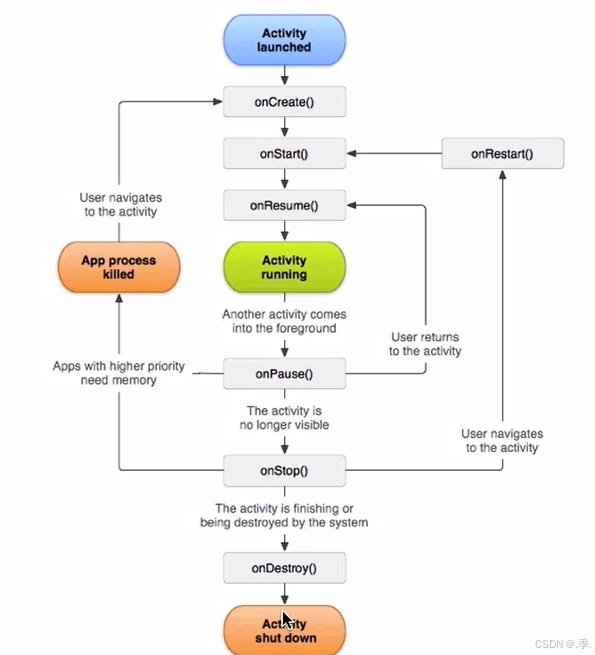
activity生命周期的其他分支
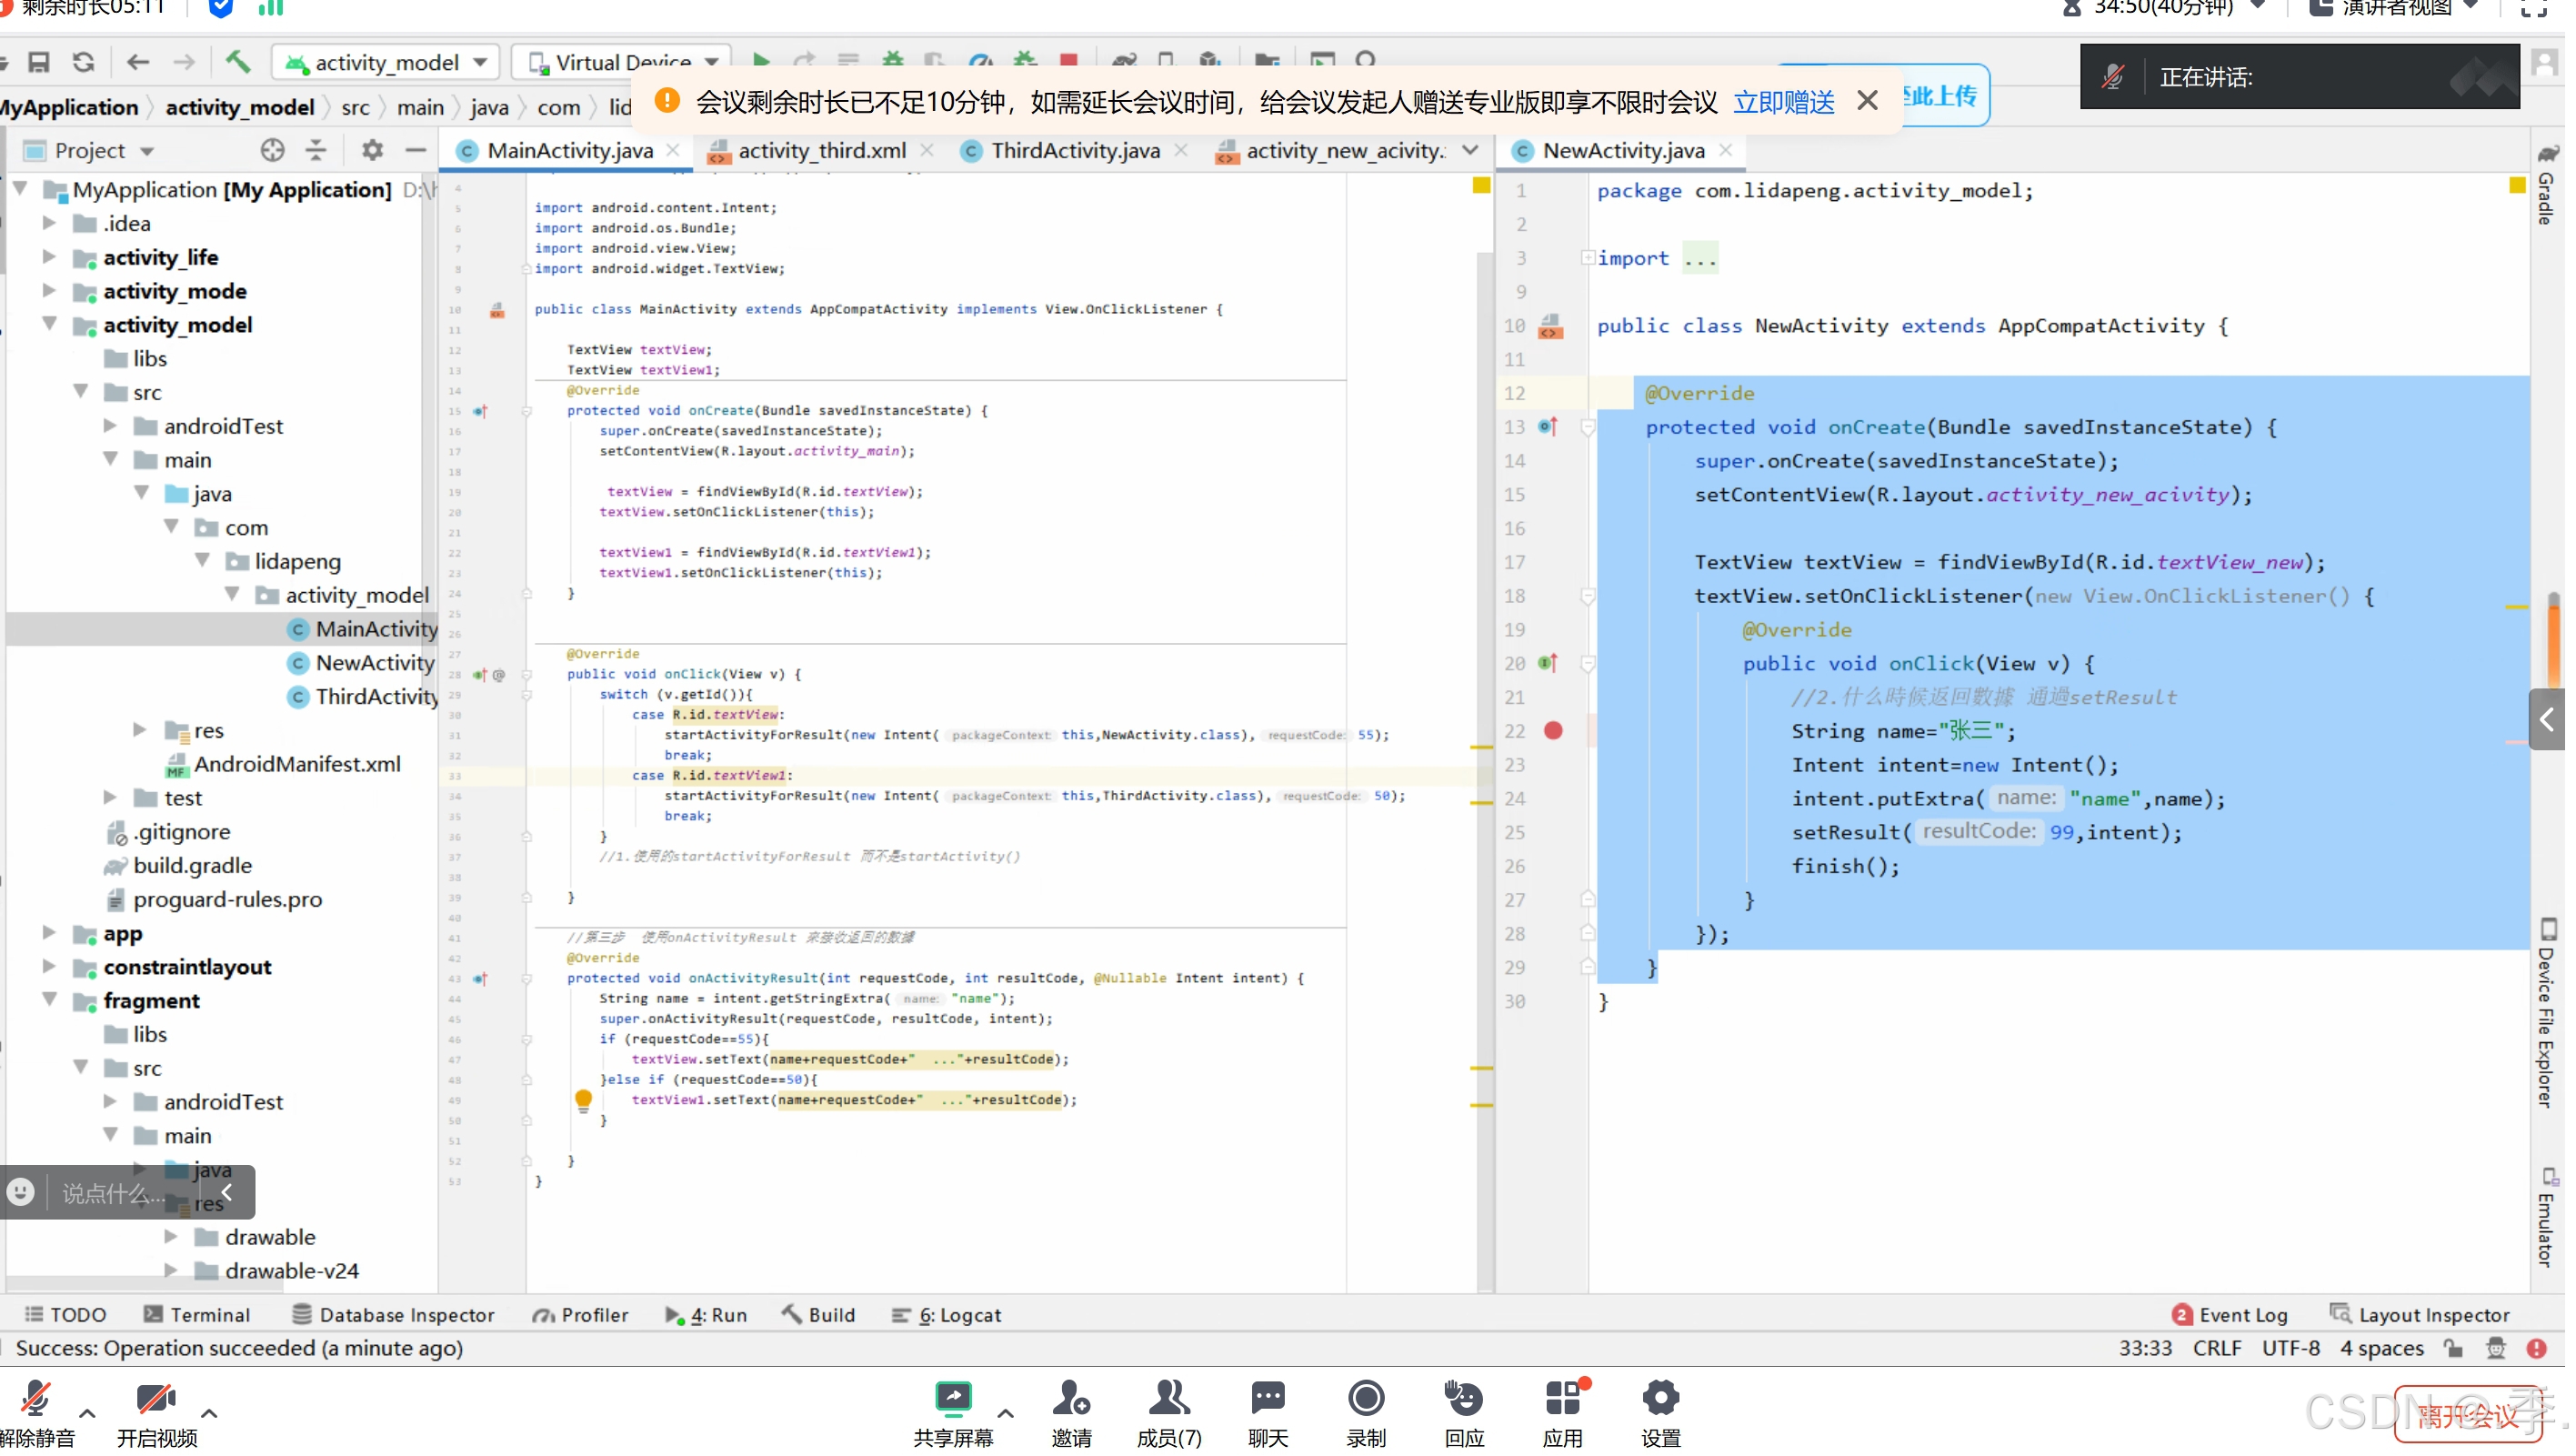
两个activity之间的数据传递(难点)
putExtra()
新建一个java文件
序列化,实现Serialzable接口
当1给2,2给3,3再给1的时候用 startActivityForResult(inent,请求码999)
Fragment创建及使用
Frragment介绍
理论基础
---用来解决不同分辨率
Fragment VS Activity
- Fragment是到Android3.0+以后
- 一个Activity可以运行多个 Fragment
- Fragment不能脱离Activity而存在
- Activity是屏幕的主体,而Fragment是Activity的一个组成元素
fragment和activity的区别:
下图为Fragment 和 Activity的生命周期的区别:(左边为fragment;右边为activity)
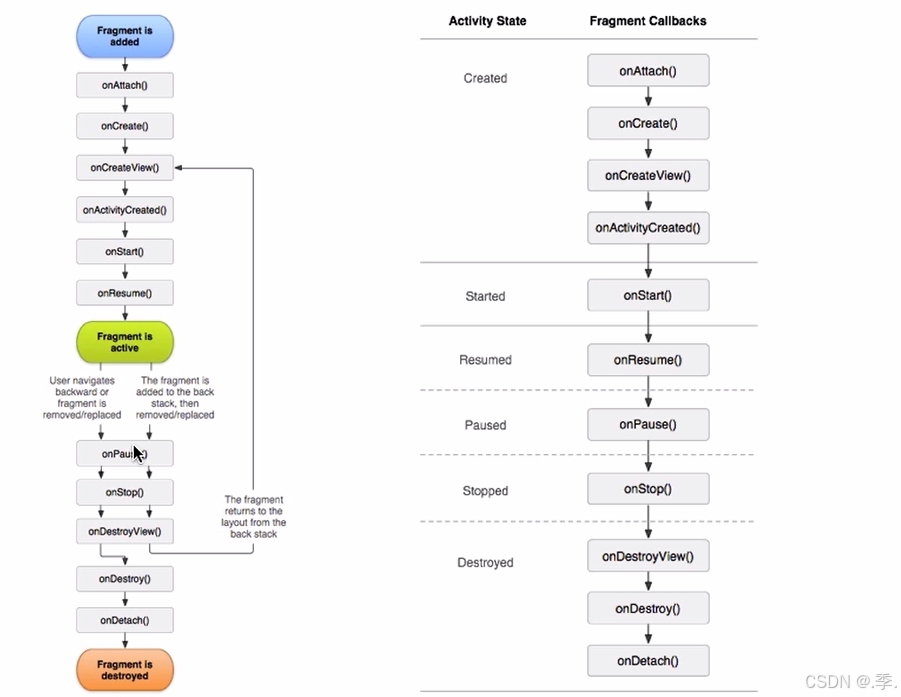
onAttach() 在Fragment 和 Activity 建立关联是调用(Activity 传递到此方法内)
onCreate()创建
onCreateView() 当Fragment 创建视图时调用
onActivityCreated() 在相关联的 Activity 的 onCreate() 方法已返回时调用。
onStart()
onResume()
onPause()暂停
onStop()停止
onDestroyView() 当Fragment中的视图被移除时调用
onDestroy()消亡
onDetach() 当Fragment 和 Activity 取消关联时调用。
静态加载 VS 动态加载
静态加载:在xml文件里面去处理
动态加载:java code
初识fragment
创建视图:onCreateView
inflater.inflate()将xml布局文件转成view视图
Fragment的加载(重点)
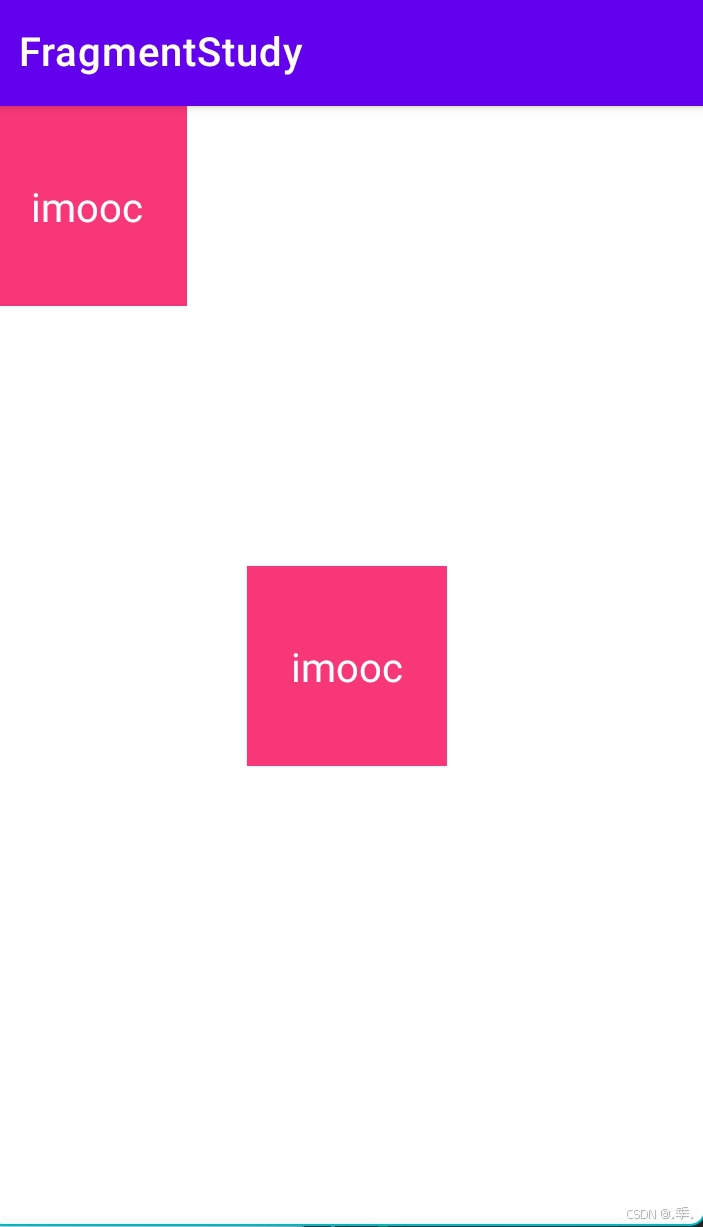
静态加载的应用(难点)
       为fragment命名
        android:name="com.example.fragmentstudy.ListFragment"其实就是fragment的路径
        静态加载写在布局里面,并且这个布局直接指向listfragment
简单步骤:1.创建一个fragment类继承fragment,在这个类里面重写创建视图的oncreateview方法,将这个类和fragment的布局文件绑定关联;2.在fragment的布局文件里面写一些控件;3.在activity类里面重写创建视图的onCreate方法,调用setcontentview方法来关联布局文件;4,。在activity的布局文件里面用fragment的标签声明fragment,一定要设置name和id。
--1.先创建一个视图,加载一个布局文件fragment_list
 //创建视图
    @Nullable
    @Override
    public View onCreateView(@NonNull LayoutInflater inflater, @Nullable ViewGroup container, @Nullable Bundle savedInstanceState) {
        //new view

        //第一个参数:传入的布局文件;第二个参数:当前的fragment所在的viewGroup;第三个参数:是不是绑定在当前的根布局
        View view = inflater.inflate(R.layout.fragment_list, container, false);

        //在fragment里面必须根据视图去找id
        TextView textView=view.findViewById(R.id.textView);
        //找到了之后修改文本
        textView.setText("imooc");
        return view;
    }
---2.鼠标悬浮至fragment——list上面,创建这个布局文件,里面放一个文本控件
<?xml version="1.0" encoding="utf-8"?>
<RelativeLayout xmlns:android="http://schemas.android.com/apk/res/android"
    android:orientation="vertical"
    android:layout_width="match_parent"
    android:layout_height="match_parent"
    android:background="#F73777">

    <TextView
        android:id="@+id/textView"
        android:layout_width="wrap_content"
        android:layout_height="wrap_content"
        android:layout_centerInParent="true"
        android:textColor="#ffffff"
        android:textSize="20sp"
        android:text="TextView" />
---3.ListFragment放在一个单独的类里面,点击refactor-----move,使他变成一个单独的类
package com.example.fragmentstudy;

import android.content.Context;
import android.os.Bundle;
import android.view.LayoutInflater;
import android.view.View;
import android.view.ViewGroup;
import android.widget.TextView;

import androidx.annotation.NonNull;
import androidx.annotation.Nullable;
import androidx.fragment.app.Fragment;

//    创建一个fragment   列表fragment
public class ListFragment extends Fragment {
    @Override
    public void onAttach(@NonNull Context context) {
        super.onAttach(context);
    }

    @Override
    public void onCreate(@Nullable Bundle savedInstanceState) {
        super.onCreate(savedInstanceState);
    }

    //创建视图
    @Nullable
    @Override
    public View onCreateView(@NonNull LayoutInflater inflater, @Nullable ViewGroup container, @Nullable Bundle savedInstanceState) {
        //new view

        //第一个参数:传入的布局文件;第二个参数:当前的fragment所在的viewGroup;第三个参数:是不是绑定在当前的根布局
        View view = inflater.inflate(R.layout.fragment_list, container, false);

        //在fragment里面必须根据视图去找id
        TextView textView=view.findViewById(R.id.textView);
        //找到了之后修改文本
        textView.setText("imooc");
        return view;
    }

    @Override
    public void onActivityCreated(@Nullable Bundle savedInstanceState) {
        super.onActivityCreated(savedInstanceState);
    }

    @Override
    public void onStart() {
        super.onStart();
    }

    @Override
    public void onPause() {
        super.onPause();
    }

    @Override
    public void onDestroyView() {
        super.onDestroyView();
    }

    @Override
    public void onDestroy() {
        super.onDestroy();
    }
}
---4.在mainactivity里面设置一个点击事件,点击文本后会静态加载到staticloadfragmentActivity页面里面
public class MainActivity extends AppCompatActivity {

    @Override
    protected void onCreate(Bundle savedInstanceState) {
        super.onCreate(savedInstanceState);
        setContentView(R.layout.activity_main);

//     find views on onclick event
        findViewById(R.id.textView).setOnClickListener(new View.OnClickListener() {
            @Override
            public void onClick(View v) {
                //static load fragment
            startActivity(new Intent(MainActivity.this,StaticLoadFragment.class));

            }
        });
    }


}
---5.鼠标悬浮上面创建一个StaticloadActivity的java类,使类继承于AppCompatActivity,创建他的onCreate方法,同时为他创建一个布局activity_static_load_fragment文件
<?xml version="1.0" encoding="utf-8"?>
<RelativeLayout xmlns:android="http://schemas.android.com/apk/res/android"
    xmlns:app="http://schemas.android.com/apk/res-auto"
    xmlns:tools="http://schemas.android.com/tools"
    android:layout_width="match_parent"
    android:layout_height="match_parent"
    tools:context=".MainActivity"
    android:orientation="vertical">


<!--    为fragment命名
        android:name="com.example.fragmentstudy.ListFragment"其实就是fragment的路径
        静态加载写在布局里面,并且这个布局直接指向listfragment

        fragment优势: 模块化,可重用,可适配
-->
    <!--声明需要加载的fragment-->
    <fragment
        android:id="@+id/listFragment"
        android:name="com.example.fragmentstudy.ListFragment"
        android:layout_width="100dp"
        android:layout_height="100dp"
       />
    <fragment
        android:id="@+id/detailFragment"
        android:name="com.example.fragmentstudy.ListFragment"
        android:layout_centerInParent="true"
        android:layout_width="100dp"
        android:layout_height="100dp"
        />

</RelativeLayout>
---6copy fragmentDemo1到activity_static_load_fragment文件里面
---7.运行主页面,点击文本将会跳转
动态加载(重点)
创建一个container容器-----创建fragment-----再将fragment添加到容器里面
方法:
beginTransaction()返回一个fragment对象
add()将fragment放进来
commit()提交
实现步骤
1.在main_activity里面创建一个线性布局,在线性布局里面再建两个线性布局容器,分别添加id
LinearLayout
        android:layout_width="match_parent"
        android:layout_height="match_parent"
        android:orientation="horizontal">
        <LinearLayout
            android:id="@+id/listContainer"
            android:layout_width="150dp"
            android:layout_height="match_parent"
            android:layout_margin="1dp"/>
        <LinearLayout
            android:id="@+id/detailContainer"
            android:layout_width="200dp"
            android:layout_margin="1dp"
            android:layout_height="match_parent"/>

    </LinearLayout>
2.在mainactivity方法里面把创建的fragment放入容器里面
//1.有container  2.创建fragment   3.将fragment放入container

        //因为前面已经有fragment了,所以我们直接实例化使用
        ListFragment fragment=new ListFragment();
        /*
        * getSupportFragmentManager用来管理fragment的方法,因为类继承了appcompatactivity而appcompatactivity又继承了fragmentactivity
        * 所以此方法可以直接使用
        * */
        getSupportFragmentManager()
                //beginTransaction()方法用来返回一个fragment对象
                .beginTransaction()
                // 用add方法将fragment放进来
                .add(R.id.listContainer,fragment)
                //.commit()提交
                .commit();

        getSupportFragmentManager()
                .beginTransaction()
                .add(R.id.detailContainer,new ListFragment())
                .commit();
Fragment传值(难点)
activity向fragment传值
步骤概括:
1.在 Fragment 类中定义参数常量
在 Fragment 类里,定义用于存储传递参数的常量,通常使用 private static final 修饰,方便后续引用和管理。
2.提供 newInstance 静态方法
创建一个静态的 newInstance 方法,在该方法中创建 Fragment 实例,将需要传递的参数存入 Bundle 中,再使用 setArguments 方法将 Bundle 与 Fragment 关联起来。
3.在 onCreate 方法中获取参数
在 Fragment 的 onCreate 方法里,通过 getArguments 方法获取之前传递的 Bundle,然后从中提取出所需的参数。
4.在 Activity 中创建并传递参数给 Fragment
在 Activity 中,调用 Fragment 的 newInstance 方法创建 Fragment 实例,同时传入需要传递的参数。接着,使用 FragmentManager 和 FragmentTransaction 将 Fragment 添加到 Activity 布局中。
5.布局文件配置
确保 Activity 的布局文件(如 activity_main.xml)中包含一个用于容纳 Fragment 的容器,例如 FrameLayout。
方法:setArguments()
实现步骤:1.在listfragment方法里面
public static ListFragment newInstance(String title){
        ListFragment fragment=new ListFragment();
        Bundle bundle=new Bundle();
        bundle.putString(BUNDLE_TITLE,title);
        fragment.setArguments(bundle);
        return fragment;
    }
2.在onCreate方法里面
 @Override
    public void onCreate(@Nullable Bundle savedInstanceState) {
        super.onCreate(savedInstanceState);
        if (getArguments()!=null){
           mtitle = getArguments().getString(BUNDLE_TITLE);
        }
3.在onCreateView方法里面
先将mtitle声明成一个常量再使用,快捷键fied
 //创建视图
    @Nullable
    @Override
    public View onCreateView(@NonNull LayoutInflater inflater, @Nullable ViewGroup container, @Nullable Bundle savedInstanceState) {
        //new view

        //第一个参数:传入的布局文件;第二个参数:当前的fragment所在的viewGroup;第三个参数:是不是绑定在当前的根布局
        View view = inflater.inflate(R.layout.fragment_list, container, false);

        //在fragment里面必须根据视图去找id
        TextView textView=view.findViewById(R.id.textView);
        //找到了之后修改文本
        textView.setText(mtitle);
        return view;
    }
4.在mainactivity里面进行activity像fragment传值
 //activity向fragment传值
        getSupportFragmentManager()
                //beginTransaction()方法用来返回一个fragment对象
                .beginTransaction()
                // 用add方法将fragment放进来
                .add(R.id.listContainer,ListFragment.newInstance("list"))
                //.commit()提交
                .commit();

        getSupportFragmentManager()
                .beginTransaction()
                .add(R.id.detailContainer,ListFragment.newInstance("detail"))
                .commit();
fragment向activity传值
需要用到回调函数
步骤:
- 定义接口:在 Fragment 类中定义一个接口,接口中包含传值的方法。
- Activity 实现接口:让 Activity 实现该接口,并实现接口中的方法。
- 设置监听器:在 Fragment 中设置 Activity 为监听器,当需要传值时调用接口方法。
1.fragment传值需要接口,在Listfragment里面
//设置接口的方法
    public void setmOnTitleClickListener(OnTitleClickListener mOnTitleClickListener) {
        this.mOnTitleClickListener = mOnTitleClickListener;
    }

    OnTitleClickListener mOnTitleClickListener;
    /*fragment向activity里面传值,需要做一个接口*/
    //定义接口
    public interface OnTitleClickListener{
        void onClick(String title);
    }
ViewPager实现导航效果
Viewpager 应用场景:引导界面、相册多图片预览;多tab页面、app导航;广告播放展示
应用背景:andriod.support.v4.view.ViewPager
support包简介
什么是support包
viewpager的实现(重难点)
实现最简单viewpager
1.先建一个activity类叫ImgeViewPagerAdapter
package com.example.viewpagerstudy;

import androidx.annotation.NonNull;
import androidx.appcompat.app.AppCompatActivity;
import androidx.viewpager.widget.PagerAdapter;
import androidx.viewpager.widget.ViewPager;

import android.os.Bundle;
import android.view.View;
import android.view.ViewGroup;

import java.util.ArrayList;
import java.util.List;

public class ImgeViewPagerAdapter extends AppCompatActivity {
    private List<View> mViews;
    private ViewPager mViewPager;
    private int[] mlayoutIDs={
            R.layout.view_first,
            R.layout.view_second,
            R.layout.view_thrid,


    };


    @Override
    protected void onCreate(Bundle savedInstanceState) {
        super.onCreate(savedInstanceState);
        setContentView(R.layout.activity_image_view_adapter);

        //找到viewpager
        mViewPager=(ViewPager) findViewById(R.id.view_pager);

        //初始化数据
        mViews= new ArrayList<>();
        for (int index = 0; index <mlayoutIDs.length ; index++) {
          final   View view=getLayoutInflater().inflate(mlayoutIDs[index],null);
           mViews.add(view);


        }

        //设置adapter
        mViewPager.setAdapter(mPagerAdapter);
    }

    PagerAdapter mPagerAdapter=new PagerAdapter() {
        //数量
        @Override
        public int getCount() {
            return mlayoutIDs.length;
        }

        @Override
        public boolean isViewFromObject(@NonNull View view, @NonNull Object object) {
            return view==object;
        }

        //把每一次的视图添加进去
        @NonNull
        @Override
        public Object instantiateItem(@NonNull ViewGroup container, int position) {
            View child=mViews.get(position);
            container.addView(child);
            return child;
        }

        @Override
        public void destroyItem(@NonNull ViewGroup container, int position, @NonNull Object object) {
            container.removeView(mViews.get(position));

        }
    };

}
2.在对应的布局文件(activity_image_view_adapter)里面导包
<?xml version="1.0" encoding="utf-8"?>
<RelativeLayout xmlns:android="http://schemas.android.com/apk/res/android"
    xmlns:app="http://schemas.android.com/apk/res-auto"
    xmlns:tools="http://schemas.android.com/tools"
    android:layout_width="match_parent"
    android:layout_height="match_parent"
    tools:context=".ImgeViewPagerAdapter">

    <!--导包-->
<androidx.viewpager.widget.ViewPager
    android:id="@+id/view_pager"
    android:layout_width="wrap_content"
    android:layout_height="wrap_content"

></androidx.viewpager.widget.ViewPager>


</RelativeLayout>
3.建三个可滑动的布局页面first second third
<?xml version="1.0" encoding="utf-8"?>
<RelativeLayout xmlns:android="http://schemas.android.com/apk/res/android"
    android:orientation="vertical"
    android:layout_width="match_parent"
    android:layout_height="match_parent">

    <TextView
        android:layout_width="match_parent"
        android:layout_height="match_parent"
        android:text="first"
        android:textSize="40sp"/>
</RelativeLayout>
使用viewpager实现app引导页
package com.example.viewpagerstudy;

import androidx.annotation.NonNull;
import androidx.appcompat.app.AppCompatActivity;
import androidx.viewpager.widget.PagerAdapter;
import androidx.viewpager.widget.ViewPager;

import android.os.Bundle;
import android.view.View;
import android.view.ViewGroup;
import android.widget.ImageView;
import android.widget.LinearLayout;

import java.util.ArrayList;
import java.util.List;

public class ImgeViewPagerAdapter extends AppCompatActivity {
    private static final int INIT_POSITION =1;
    private List<View> mViews;
    private ViewPager mViewPager;
    private int[] mlayoutIDs={
            R.layout.view_first,
            R.layout.view_second,
            R.layout.view_thrid,


    };

    //添加点翻页效果
    private ViewGroup mDotViewGroup;
    private List<ImageView> mDotViews=new ArrayList<>();

    @Override
    protected void onCreate(Bundle savedInstanceState) {
        super.onCreate(savedInstanceState);
        setContentView(R.layout.activity_image_view_adapter);

        //找到viewpager
        mViewPager=(ViewPager) findViewById(R.id.view_pager);
        mDotViewGroup=(ViewGroup) findViewById(R.id.dot_layout);

        //初始化数据
        mViews= new ArrayList<>();
        for (int index = 0; index <mlayoutIDs.length ; index++) {
            ImageView imageView=new ImageView(this);
            imageView.setImageResource(R.mipmap.ic_launcher);
            mViews.add(imageView);

            //翻页点
            ImageView dot=new ImageView(this);
            dot.setImageResource(R.mipmap.ic_launcher);
            dot.setMaxWidth(100);
            dot.setMaxHeight(100);

            LinearLayout.LayoutParams layoutParams=new LinearLayout.LayoutParams(80,80);
            layoutParams.leftMargin=20;
            dot.setLayoutParams(layoutParams);
            dot.setEnabled(false);

            mDotViewGroup.addView(dot);
            mDotViews.add(dot);
        }

        //设置adapter
        mViewPager.setAdapter(mPagerAdapter);
        mViewPager.setOffscreenPageLimit(4);
        mViewPager.setCurrentItem(INIT_POSITION);
        setDotviews(INIT_POSITION);

        //怎样知道滑动到第几个了呢
        mViewPager.addOnPageChangeListener(new ViewPager.OnPageChangeListener() {
            @Override
            public void onPageScrolled(int position, float positionOffset, int positionOffsetPixels) {

            }

            @Override
            public void onPageSelected(int position) {

                setDotviews(position);
            }

            @Override
            public void onPageScrollStateChanged(int state) {

            }
        });
    }

    private void setDotviews(int position) {
        for (int index = 0; index < mDotViews.size(); index++) {
            mDotViews.get(index).setImageResource(position == index ? R.mipmap.a1:R.mipmap.ic_launcher);
        }
    }

    PagerAdapter mPagerAdapter=new PagerAdapter() {
        //数量
        @Override
        public int getCount() {
            return mlayoutIDs.length;
        }

        @Override
        public boolean isViewFromObject(@NonNull View view, @NonNull Object object) {
            return view==object;
        }

        //把每一次的视图添加进去
        @NonNull
        @Override
        public Object instantiateItem(@NonNull ViewGroup container, int position) {
            View child=mViews.get(position);
            container.addView(child);
            return child;
        }

        @Override
        public void destroyItem(@NonNull ViewGroup container, int position, @NonNull Object object) {
            container.removeView(mViews.get(position));

        }
    };

}
fragment配合viewpager
1.建一个TestFragment类关联fragment布局文件(fragment_test)
TestFragment里面:
package com.example.viewpagerstudy;

import android.os.Bundle;
import android.view.LayoutInflater;
import android.view.View;
import android.view.ViewGroup;
import android.widget.TextView;

import androidx.annotation.NonNull;
import androidx.annotation.Nullable;
import androidx.fragment.app.Fragment;

public class TestFragment  extends Fragment {

    public static  final String POSITION="position";
    private String mposition;

    //    传参数
    public  static TestFragment newInstance(int position){
        TestFragment fragment=new TestFragment();
        Bundle bundle=new Bundle();
        bundle.putInt(POSITION,position);
        fragment.setArguments(bundle);
        return fragment;
    }

    @Override
    public void onCreate(@Nullable Bundle savedInstanceState) {
        super.onCreate(savedInstanceState);
        if (getArguments() !=null){
            mposition= String.valueOf(getArguments().getInt(POSITION));
        }
    }

    @Nullable
    @Override
    public View onCreateView(@NonNull LayoutInflater inflater, @Nullable ViewGroup container, @Nullable Bundle savedInstanceState) {
        View view=inflater.inflate(R.layout.fragment_test,null);
        TextView textView=(TextView) view.findViewById(R.id.text_view);
        textView.setText(mposition);
        return view;
    }
}
相对应的布局文件里面:
package com.example.viewpagerstudy;

import android.os.Bundle;
import android.view.LayoutInflater;
import android.view.View;
import android.view.ViewGroup;
import android.widget.TextView;

import androidx.annotation.NonNull;
import androidx.annotation.Nullable;
import androidx.fragment.app.Fragment;

public class TestFragment  extends Fragment {

    public static  final String POSITION="position";
    private String mposition;

    //    传参数
    public  static TestFragment newInstance(int position){
        TestFragment fragment=new TestFragment();
        Bundle bundle=new Bundle();
        bundle.putInt(POSITION,position);
        fragment.setArguments(bundle);
        return fragment;
    }

    @Override
    public void onCreate(@Nullable Bundle savedInstanceState) {
        super.onCreate(savedInstanceState);
        if (getArguments() !=null){
            mposition= String.valueOf(getArguments().getInt(POSITION));
        }
    }

    @Nullable
    @Override
    public View onCreateView(@NonNull LayoutInflater inflater, @Nullable ViewGroup container, @Nullable Bundle savedInstanceState) {
        View view=inflater.inflate(R.layout.fragment_test,null);
        TextView textView=(TextView) view.findViewById(R.id.text_view);
        textView.setText(mposition);
        return view;
    }
}
2.建一个TabViewPagerActivity和他所关联的局部文件activity_tab_view_pager_activity
package com.example.viewpagerstudy;

import android.os.Bundle;
import android.view.LayoutInflater;
import android.view.View;
import android.view.ViewGroup;
import android.widget.TextView;

import androidx.annotation.NonNull;
import androidx.annotation.Nullable;
import androidx.fragment.app.Fragment;

public class TestFragment  extends Fragment {

    public static  final String POSITION="position";
    private String mposition;

    //    传参数
    public  static TestFragment newInstance(int position){
        TestFragment fragment=new TestFragment();
        Bundle bundle=new Bundle();
        bundle.putInt(POSITION,position);
        fragment.setArguments(bundle);
        return fragment;
    }

    @Override
    public void onCreate(@Nullable Bundle savedInstanceState) {
        super.onCreate(savedInstanceState);
        if (getArguments() !=null){
            mposition= String.valueOf(getArguments().getInt(POSITION));
        }
    }

    @Nullable
    @Override
    public View onCreateView(@NonNull LayoutInflater inflater, @Nullable ViewGroup container, @Nullable Bundle savedInstanceState) {
        View view=inflater.inflate(R.layout.fragment_test,null);
        TextView textView=(TextView) view.findViewById(R.id.text_view);
        textView.setText(mposition);
        return view;
    }
}
activity_tab_view_pager_activity里面:
<?xml version="1.0" encoding="utf-8"?>
<LinearLayout xmlns:android="http://schemas.android.com/apk/res/android"
    xmlns:app="http://schemas.android.com/apk/res-auto"
    xmlns:tools="http://schemas.android.com/tools"
    android:layout_width="match_parent"
    android:layout_height="match_parent"
    tools:context=".TabViewPagerActivity">

    <androidx.viewpager.widget.ViewPager
        android:id="@+id/view_pager"
        android:layout_width="match_parent"
        android:layout_height="match_parent">

    </androidx.viewpager.widget.ViewPager>

</LinearLayout>
实现底部导航-布局
TabHost
<?xml version="1.0" encoding="utf-8"?>
<TabHost xmlns:android="http://schemas.android.com/apk/res/android"
    xmlns:app="http://schemas.android.com/apk/res-auto"
    xmlns:tools="http://schemas.android.com/tools"
    android:layout_width="match_parent"
    android:layout_height="match_parent"
    tools:context=".TabViewPagerActivity">


   <!--底部导航布局-->

    <RelativeLayout
        android:layout_width="match_parent"
        android:layout_height="match_parent">

        <androidx.viewpager.widget.ViewPager
            android:id="@+id/view_pager"
            android:layout_width="match_parent"
            android:layout_height="match_parent"
            android:layout_above="@+id/tab_divider"/>

        <FrameLayout
            android:id="@android:id/tabcontent"
            android:layout_width="match_parent"
            android:layout_height="match_parent"
            android:visibility="gone"
            android:layout_above="@+id/tab_divider"
            ></FrameLayout>

        <View
            android:id="@+id/tab_divider"
            android:layout_width="match_parent"
            android:layout_height="1dp"
            android:background="#dfdfdf"
            android:layout_above="@android:id/tabs"/>

        <TabWidget
            android:id="@android:id/tabs"
            android:layout_width="match_parent"
            android:layout_height="60dp"
            android:layout_alignParentBottom="true">

        </TabWidget>


    </RelativeLayout>


</TabHost>
实现底部导航-图标
实现导航事件联动
综合案例:模淘旅游
详细代码请见该文章顶部绑定资源
闪屏页实现
闪屏页实现
主页面实现(重难点)
主页面实现功能菜单
主页面实现功能内容
我的页面实现
我的实现-头部
我的实现-登录
我的实现-滚动列表
首页实现
首页实现-头部搜索框
首页实现-头部广告业
首页实现-主菜单实现
首页实现-特价区域实现
首页实现-旅游直播
作业
项目总结
总结

中国智能体开发者社区,聚焦智能体与大模型开发,提供前沿资讯、实用工具链、开源项目及行业案例。通过技术沙龙、开发者大赛等活动,促进经验交流与协作,助力开发者快速构建创新智能应用。
更多推荐
 8
8 0
0- 0


 已为社区贡献1条内容

所有评论(0)