FFmpeg 核心 API 快速入门
前面学习了音视频的基础理论,现在是时候动手写代码了!这一篇带你快速掌握 FFmpeg 的核心 API,用 50 行代码实现一个简单的视频解码器,为后续开发打下坚实基础。
FFmpeg 核心 API 快速入门
专栏导读:前面学习了音视频的基础理论,现在是时候动手写代码了!这一篇带你快速掌握 FFmpeg 的核心 API,用 50 行代码实现一个简单的视频解码器,为后续开发打下坚实基础。
🧰 开场:FFmpeg 是什么?
FFmpeg = Fast Forward MPEG,是音视频处理的"瑞士军刀"。
三种形态:
1. 命令行工具 (ffmpeg / ffprobe / ffplay)
   → 快速转换、分析、播放视频

2. C 语言库 (libavformat / libavcodec / ...)
   → 集成到自己的应用程序 ⭐

3. 开源社区 (github.com/FFmpeg/FFmpeg)
   → 2000+ 编码器、100+ 容器格式支持
我们关注第 2 种:如何用 FFmpeg 的 C 库开发播放器?
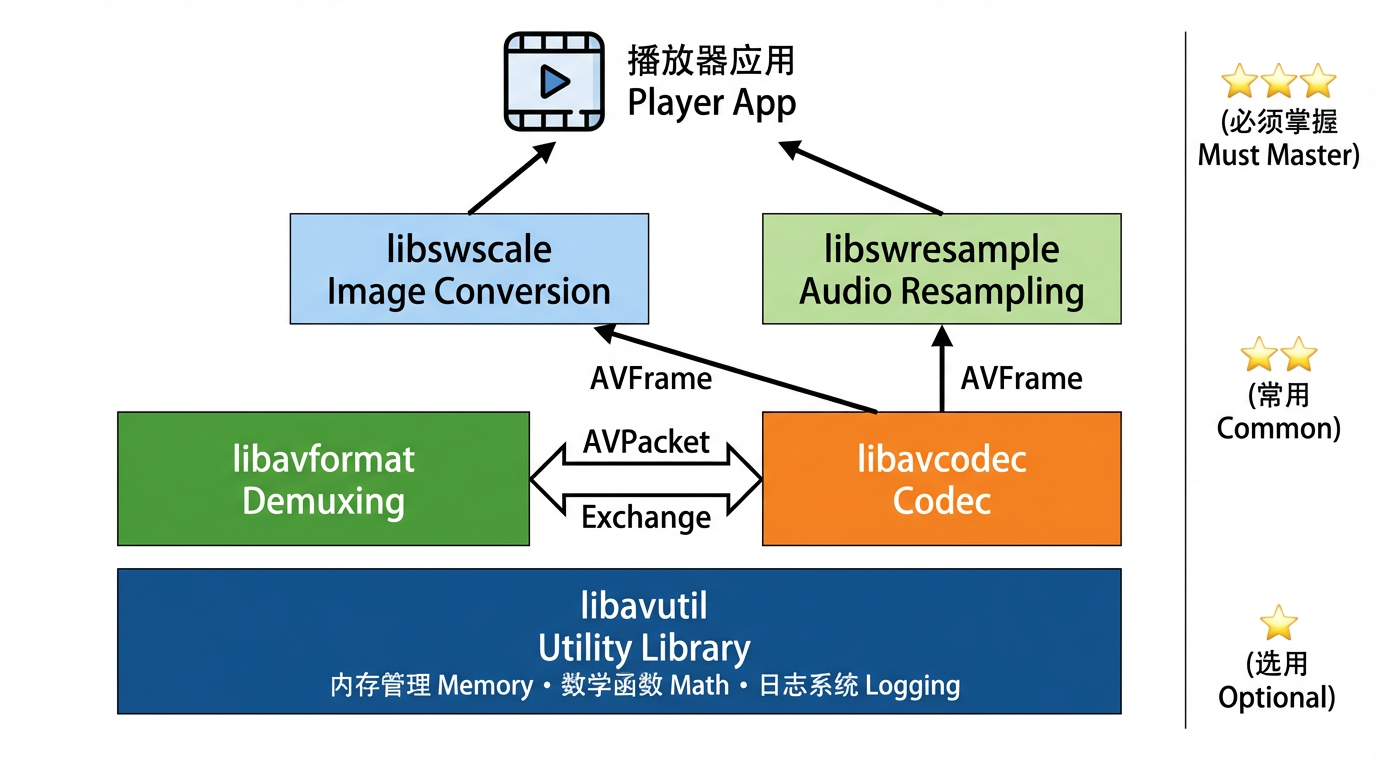
📚 FFmpeg 库架构
FFmpeg 由 8 个核心库 组成:
| 库名 | 作用 | 关键数据结构 | 使用频率 |
|---|---|---|---|
| libavformat | 解封装/封装 | AVFormatContext |
⭐⭐⭐ |
| libavcodec | 编解码 | AVCodecContext, AVPacket, AVFrame |
⭐⭐⭐ |
| libavutil | 工具函数 | AVRational, AVDictionary, 内存分配 |
⭐⭐⭐ |
| libswscale | 图像缩放/格式转换 | SwsContext |
⭐⭐ |
| libswresample | 音频重采样 | SwrContext |
⭐⭐ |
| libavfilter | 音视频滤镜 | AVFilterGraph |
⭐ |
| libavdevice | 设备输入/输出 | 摄像头、屏幕录制 | ⭐ |
| libpostproc | 后处理(去块/去噪) | - | (较少使用) |
🗂️ 核心数据结构
1. AVFormatContext - 容器上下文
作用:代表一个打开的视频文件,管理所有流(视频/音频/字幕)。
typedef struct AVFormatContext {
    // 输入/输出格式(自动检测)
    struct AVInputFormat *iformat;   // 输入格式(MP4/MKV)
    struct AVOutputFormat *oformat;  // 输出格式(用于封装)

    // 流信息
    unsigned int nb_streams;         // 流的数量(通常 2-3 个)
    AVStream **streams;              // 流数组(streams[0] = 视频,streams[1] = 音频)

    // 文件元数据
    char filename[1024];             // 文件路径
    int64_t duration;                // 总时长(微秒,需除以 AV_TIME_BASE)
    int64_t bit_rate;                // 总比特率
    AVDictionary *metadata;          // 元数据(标题、作者等)

    // 私有数据
    void *priv_data;                 // 容器特定的私有数据(如 MP4Demuxer)
} AVFormatContext;
关键 API:
AVFormatContext *fmt_ctx = NULL;

// 1. 打开文件
avformat_open_input(&fmt_ctx, "movie.mp4", NULL, NULL);

// 2. 读取流信息
avformat_find_stream_info(fmt_ctx, NULL);

// 3. 读取数据包
AVPacket *packet = av_packet_alloc();
while (av_read_frame(fmt_ctx, packet) >= 0) {
    // 处理 packet
    av_packet_unref(packet);
}

// 4. 关闭文件
avformat_close_input(&fmt_ctx);
2. AVCodecContext - 编解码器上下文
作用:代表一个解码器或编码器的实例,管理编解码参数。
typedef struct AVCodecContext {
    // 编解码器信息
    const struct AVCodec *codec;     // 解码器指针(libx264/libx265)
    enum AVMediaType codec_type;     // 类型(AVMEDIA_TYPE_VIDEO/AUDIO)
    enum AVCodecID codec_id;         // 编码 ID(AV_CODEC_ID_H264)

    // 视频参数
    int width, height;               // 分辨率
    enum AVPixelFormat pix_fmt;      // 像素格式(AV_PIX_FMT_YUV420P)
    AVRational time_base;            // 时间基(1/90000)
    AVRational framerate;            // 帧率(30/1)

    // 音频参数
    int sample_rate;                 // 采样率(44100)
    AVChannelLayout ch_layout;       // 声道布局(立体声)
    enum AVSampleFormat sample_fmt;  // 采样格式(AV_SAMPLE_FMT_FLTP)

    // 性能参数
    int thread_count;                // 解码线程数(0 = 自动)
    int thread_type;                 // 线程类型(帧级/片级并行)

    // 私有数据
    void *priv_data;                 // 编解码器特定数据
} AVCodecContext;
关键 API:
// 1. 查找解码器
const AVCodec *codec = avcodec_find_decoder(AV_CODEC_ID_H264);

// 2. 创建解码器上下文
AVCodecContext *codec_ctx = avcodec_alloc_context3(codec);

// 3. 从流复制参数
avcodec_parameters_to_context(codec_ctx, stream->codecpar);

// 4. 打开解码器
avcodec_open2(codec_ctx, codec, NULL);

// 5. 发送数据包
avcodec_send_packet(codec_ctx, packet);

// 6. 接收解码帧
AVFrame *frame = av_frame_alloc();
while (avcodec_receive_frame(codec_ctx, frame) == 0) {
    // 处理 frame
    av_frame_unref(frame);
}

// 7. 关闭解码器
avcodec_free_context(&codec_ctx);
3. AVPacket - 压缩数据包
作用:代表一帧压缩的视频或音频数据(未解码)。
typedef struct AVPacket {
    // 数据
    uint8_t *data;                   // 指向压缩数据的指针
    int size;                        // 数据大小(字节)

    // 时间戳
    int64_t pts;                     // 显示时间戳
    int64_t dts;                     // 解码时间戳
    int64_t duration;                // 持续时间(时间基单位)

    // 流信息
    int stream_index;                // 所属流的索引(0=视频,1=音频)

    // 标志
    int flags;                       // AV_PKT_FLAG_KEY(关键帧标志)

    // 内存管理
    AVBufferRef *buf;                // 引用计数的缓冲区
} AVPacket;
关键 API:
// 1. 分配 Packet
AVPacket *packet = av_packet_alloc();

// 2. 读取数据包(由 avformat 填充)
av_read_frame(fmt_ctx, packet);

// 3. 检查是否为关键帧
if (packet->flags & AV_PKT_FLAG_KEY) {
    printf("This is a keyframe\n");
}

// 4. 释放引用(不释放 packet 本身)
av_packet_unref(packet);

// 5. 释放 Packet
av_packet_free(&packet);
内存管理:
// AVPacket 使用引用计数
AVPacket *pkt1 = av_packet_alloc();
av_read_frame(fmt_ctx, pkt1);        // pkt1 持有数据

AVPacket *pkt2 = av_packet_alloc();
av_packet_ref(pkt2, pkt1);           // pkt2 引用 pkt1 的数据(引用计数 +1)

av_packet_unref(pkt1);               // 引用计数 -1(数据仍存在)
av_packet_unref(pkt2);               // 引用计数 -1 → 0,释放数据 ✅
4. AVFrame - 原始帧数据
作用:代表一帧解码后的原始数据(视频 = YUV,音频 = PCM)。
typedef struct AVFrame {
    // 数据平面(视频最多 4 个,音频最多 8 个)
    uint8_t *data[AV_NUM_DATA_POINTERS];  // 数据指针(data[0]=Y, data[1]=U, data[2]=V)
    int linesize[AV_NUM_DATA_POINTERS];   // 每行字节数(可能有填充)

    // 视频参数
    int width, height;                    // 分辨率
    enum AVPixelFormat format;            // 像素格式(AV_PIX_FMT_YUV420P)
    int key_frame;                        // 是否为关键帧
    enum AVPictureType pict_type;         // 帧类型(AV_PICTURE_TYPE_I/P/B)

    // 音频参数
    int nb_samples;                       // 样本数(一帧通常 1024 个样本)
    int sample_rate;                      // 采样率
    AVChannelLayout ch_layout;            // 声道布局

    // 时间戳
    int64_t pts;                          // 显示时间戳
    int64_t pkt_dts;                      // 数据包的 DTS
    int64_t best_effort_timestamp;        // FFmpeg 估算的最佳时间戳

    // 内存管理
    AVBufferRef *buf[AV_NUM_DATA_POINTERS]; // 引用计数的缓冲区
} AVFrame;
关键 API:
// 1. 分配 Frame
AVFrame *frame = av_frame_alloc();

// 2. 解码数据包到帧(由 avcodec 填充)
avcodec_receive_frame(codec_ctx, frame);

// 3. 访问视频数据(YUV420P)
uint8_t *y_plane = frame->data[0];       // Y 平面
uint8_t *u_plane = frame->data[1];       // U 平面
uint8_t *v_plane = frame->data[2];       // V 平面

int y_stride = frame->linesize[0];       // Y 平面每行字节数
int uv_stride = frame->linesize[1];      // UV 平面每行字节数

// 4. 访问音频数据(Planar 格式)
float *left_channel = (float*)frame->data[0];   // 左声道
float *right_channel = (float*)frame->data[1];  // 右声道

// 5. 释放引用
av_frame_unref(frame);

// 6. 释放 Frame
av_frame_free(&frame);
Planar vs Packed:
// Planar (AV_SAMPLE_FMT_FLTP): 每个声道独立存储
data[0]: L L L L L L ...  (左声道)
data[1]: R R R R R R ...  (右声道)

// Packed (AV_SAMPLE_FMT_S16): 声道交错存储
data[0]: L R L R L R ...  (交错)
🔄 数据结构关系
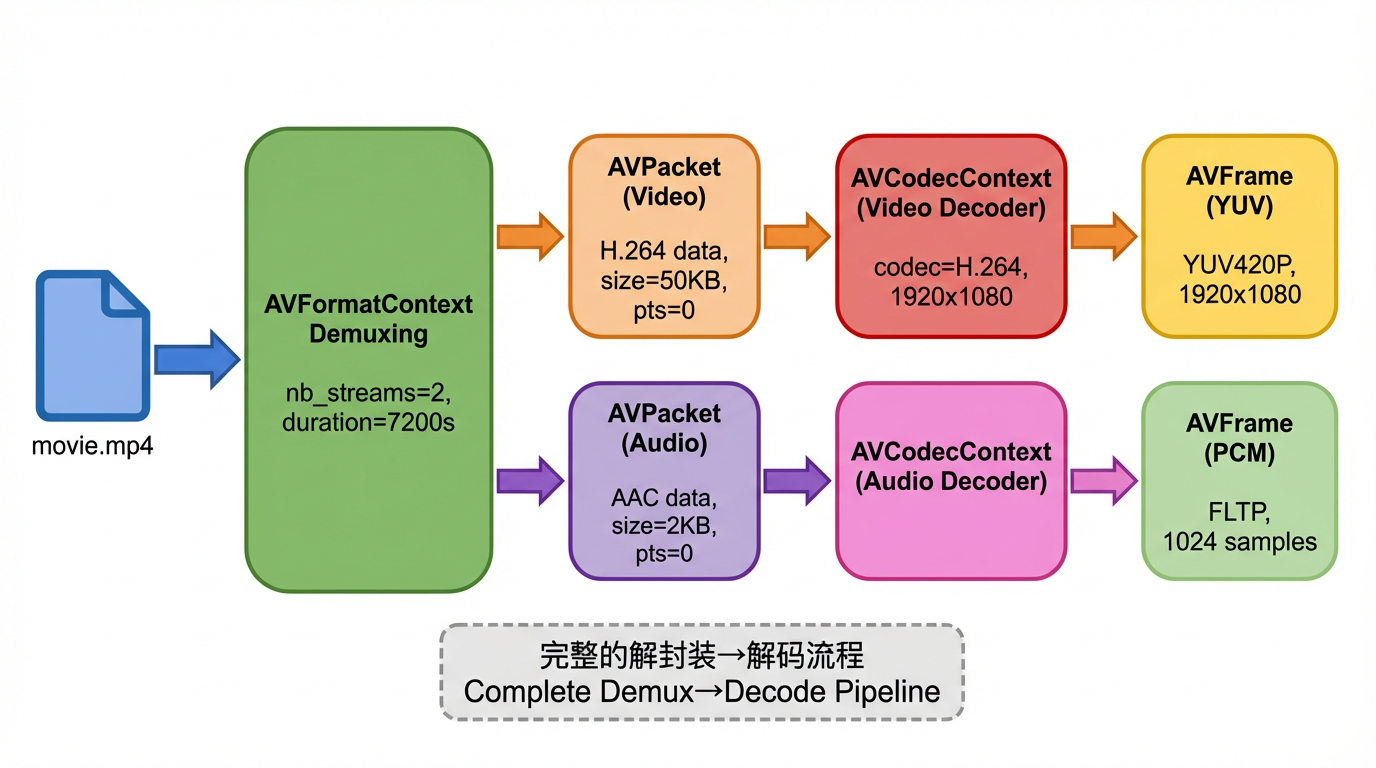
🎯 完整 API 流程
视频解码完整流程
💻 实战:50 行解码 Demo
目标
解码视频文件的第一帧,保存为 YUV 文件。
完整代码
#include <stdio.h>
#include <libavformat/avformat.h>
#include <libavcodec/avcodec.h>

int main(int argc, char *argv[]) {
    if (argc < 2) {
        fprintf(stderr, "Usage: %s <input_file>\n", argv[0]);
        return 1;
    }

    const char *input_file = argv[1];

    // 1. 打开输入文件
    AVFormatContext *fmt_ctx = NULL;
    if (avformat_open_input(&fmt_ctx, input_file, NULL, NULL) < 0) {
        fprintf(stderr, "Could not open file: %s\n", input_file);
        return 1;
    }

    // 2. 读取流信息
    if (avformat_find_stream_info(fmt_ctx, NULL) < 0) {
        fprintf(stderr, "Could not find stream info\n");
        return 1;
    }

    // 3. 查找视频流
    int video_stream_index = av_find_best_stream(fmt_ctx, AVMEDIA_TYPE_VIDEO, -1, -1, NULL, 0);
    if (video_stream_index < 0) {
        fprintf(stderr, "Could not find video stream\n");
        return 1;
    }

    AVStream *video_stream = fmt_ctx->streams[video_stream_index];

    // 4. 查找并打开解码器
    const AVCodec *codec = avcodec_find_decoder(video_stream->codecpar->codec_id);
    AVCodecContext *codec_ctx = avcodec_alloc_context3(codec);
    avcodec_parameters_to_context(codec_ctx, video_stream->codecpar);

    if (avcodec_open2(codec_ctx, codec, NULL) < 0) {
        fprintf(stderr, "Could not open codec\n");
        return 1;
    }

    printf("Video: %s, %dx%d, %d fps\n",
           avcodec_get_name(codec_ctx->codec_id),
           codec_ctx->width, codec_ctx->height,
           video_stream->avg_frame_rate.num / video_stream->avg_frame_rate.den);

    // 5. 分配 Packet 和 Frame
    AVPacket *packet = av_packet_alloc();
    AVFrame *frame = av_frame_alloc();

    // 6. 读取第一个视频包并解码
    while (av_read_frame(fmt_ctx, packet) >= 0) {
        if (packet->stream_index == video_stream_index) {
            // 发送数据包到解码器
            if (avcodec_send_packet(codec_ctx, packet) >= 0) {
                // 接收解码帧
                if (avcodec_receive_frame(codec_ctx, frame) >= 0) {
                    printf("Decoded frame: PTS=%ld, Type=%c, Size=%dx%d\n",
                           frame->pts,
                           av_get_picture_type_char(frame->pict_type),
                           frame->width, frame->height);

                    // 保存 YUV 数据到文件
                    FILE *yuv_file = fopen("output.yuv", "wb");
                    if (yuv_file) {
                        // 写入 Y 平面
                        for (int y = 0; y < frame->height; y++) {
                            fwrite(frame->data[0] + y * frame->linesize[0], 1, frame->width, yuv_file);
                        }
                        // 写入 U 平面
                        for (int y = 0; y < frame->height / 2; y++) {
                            fwrite(frame->data[1] + y * frame->linesize[1], 1, frame->width / 2, yuv_file);
                        }
                        // 写入 V 平面
                        for (int y = 0; y < frame->height / 2; y++) {
                            fwrite(frame->data[2] + y * frame->linesize[2], 1, frame->width / 2, yuv_file);
                        }
                        fclose(yuv_file);
                        printf("Saved to output.yuv\n");
                    }

                    av_frame_unref(frame);
                    av_packet_unref(packet);
                    break;  // 只解码第一帧
                }
            }
        }
        av_packet_unref(packet);
    }

    // 7. 清理资源
    av_frame_free(&frame);
    av_packet_free(&packet);
    avcodec_free_context(&codec_ctx);
    avformat_close_input(&fmt_ctx);

    return 0;
}
编译运行
# Linux/macOS
gcc -o decode_demo decode_demo.c \
    -lavformat -lavcodec -lavutil

# 运行
./decode_demo movie.mp4

# 查看输出的 YUV 文件(需要 ffplay)
ffplay -f rawvideo -pixel_format yuv420p -video_size 1920x1080 output.yuv
Windows (MSVC):
cl decode_demo.c /I"C:\ffmpeg\include" /link /LIBPATH:"C:\ffmpeg\lib" avformat.lib avcodec.lib avutil.lib
🔧 常见问题与解决
问题 1:avcodec_decode_video2 已弃用
旧 API(FFmpeg < 3.0):
int got_frame;
avcodec_decode_video2(codec_ctx, frame, &got_frame, packet);
新 API(FFmpeg ≥ 3.1):
avcodec_send_packet(codec_ctx, packet);
avcodec_receive_frame(codec_ctx, frame);
为什么改?
- 旧 API:同步模式,每次处理一个 Packet
- 新 API:异步模式,支持缓冲,性能更好
问题 2:avcodec_receive_frame 返回 AVERROR(EAGAIN)
含义:解码器需要更多数据,当前没有完整的帧。
正确处理:
while (av_read_frame(fmt_ctx, packet) >= 0) {
    if (packet->stream_index == video_stream_index) {
        if (avcodec_send_packet(codec_ctx, packet) >= 0) {
            while (1) {
                int ret = avcodec_receive_frame(codec_ctx, frame);
                if (ret == AVERROR(EAGAIN) || ret == AVERROR_EOF) {
                    break;  // 需要更多数据或已结束
                } else if (ret >= 0) {
                    // 处理 frame
                    av_frame_unref(frame);
                }
            }
        }
    }
    av_packet_unref(packet);
}

// 冲刷解码器(获取缓冲的最后几帧)
avcodec_send_packet(codec_ctx, NULL);
while (avcodec_receive_frame(codec_ctx, frame) >= 0) {
    // 处理最后的 frame
    av_frame_unref(frame);
}
🧪 实战实验
实验 1:不同编码格式对比
# 准备测试文件
ffmpeg -i source.mp4 -c:v libx264 -crf 23 test_h264.mp4
ffmpeg -i source.mp4 -c:v libx265 -crf 28 test_h265.mp4
ffmpeg -i source.mp4 -c:v libaom-av1 -crf 30 test_av1.mp4

# 解码测试
time ./decode_demo test_h264.mp4
time ./decode_demo test_h265.mp4
time ./decode_demo test_av1.mp4
预期结果:
H.264: 10 秒(快)
H.265: 25 秒(中等)
AV1:   60 秒(慢,但文件最小)
🧠 思考题
Q1:为什么 avcodec_send_packet() 和 avcodec_receive_frame() 要分开调用,而不是一次性完成?
原因 1:B 帧的延迟
输入顺序 (DTS):
  Packet 0: I₀ (DTS=0)
  Packet 1: P₃ (DTS=100)
  Packet 2: B₁ (DTS=33)
  Packet 3: B₂ (DTS=67)

解码行为:
  send_packet(I₀) → receive_frame() → 立即得到 I₀ ✅
  send_packet(P₃) → receive_frame() → EAGAIN(需要等 B 帧)❌
  send_packet(B₁) → receive_frame() → 得到 B₁ ✅
  send_packet(B₂) → receive_frame() → 得到 B₂ ✅
                  → receive_frame() → 得到 P₃ ✅(延迟输出)
原因 2:硬件解码器的异步性
GPU 解码流程:
  send_packet(pkt1) → GPU 开始解码(异步)
  send_packet(pkt2) → GPU 队列中
  send_packet(pkt3) → GPU 队列中

  receive_frame() → 等待 GPU 完成,获取 frame1
  receive_frame() → 立即获取 frame2(已在队列)
  receive_frame() → 立即获取 frame3
原因 3:支持批量处理
// 可以先发送多个 Packet(批量提交)
for (int i = 0; i < 10; i++) {
    av_read_frame(fmt_ctx, packet);
    avcodec_send_packet(codec_ctx, packet);
    av_packet_unref(packet);
}

// 再批量接收(减少函数调用开销)
for (int i = 0; i < 10; i++) {
    if (avcodec_receive_frame(codec_ctx, frame) >= 0) {
        // 处理 frame
        av_frame_unref(frame);
    }
}
对比旧 API:
// 旧 API(同步,低效)
avcodec_decode_video2(codec_ctx, frame, &got_frame, packet);
// 每次调用都阻塞等待解码完成
Q2:如何判断一个视频文件是否损坏?
点击查看答案方法 1:使用 FFmpeg API
AVFormatContext *fmt_ctx = NULL;

// 尝试打开文件
int ret = avformat_open_input(&fmt_ctx, "video.mp4", NULL, NULL);
if (ret < 0) {
    printf("文件损坏或格式错误: %s\n", av_err2str(ret));
    return -1;
}

// 尝试读取流信息
ret = avformat_find_stream_info(fmt_ctx, NULL);
if (ret < 0) {
    printf("无法解析流信息(可能损坏): %s\n", av_err2str(ret));
    return -1;
}

// 检查时长是否合理
if (fmt_ctx->duration <= 0 || fmt_ctx->duration == AV_NOPTS_VALUE) {
    printf("警告:时长信息缺失(可能损坏)\n");
}

// 尝试解码前 100 帧
AVPacket *packet = av_packet_alloc();
int error_count = 0;

for (int i = 0; i < 100; i++) {
    ret = av_read_frame(fmt_ctx, packet);
    if (ret < 0) {
        if (ret == AVERROR_EOF) {
            break;  // 正常结束
        } else {
            error_count++;
            printf("读取错误 #%d: %s\n", error_count, av_err2str(ret));
        }
    }
    av_packet_unref(packet);
}

if (error_count > 10) {
    printf("文件严重损坏(错误过多)\n");
}

av_packet_free(&packet);
avformat_close_input(&fmt_ctx);
方法 2:使用 ffmpeg 命令行
# 快速检查(只读取元数据)
ffprobe video.mp4 2>&1 | grep -i error

# 完整校验(解码所有帧)
ffmpeg -v error -i video.mp4 -f null - 2>&1 | tee check.log

# 分析日志
if [ -s check.log ]; then
    echo "发现错误,文件可能损坏"
    cat check.log
else
    echo "文件完好"
fi
常见损坏类型:
-
容器头损坏
错误信息: "moov atom not found" 原因: MP4 的 moov Box 缺失或损坏 修复: ffmpeg -i broken.mp4 -c copy fixed.mp4 -
索引表损坏
症状: 无法 Seek,Duration 显示 N/A 修复: ffmpeg -i broken.mp4 -c copy -movflags +faststart fixed.mp4 -
数据包损坏
错误信息: "error while decoding MB 53 20, bytestream -7" 影响: 部分帧解码失败,画面花屏 无法完全修复,但可以继续播放 -
时间戳错误
错误信息: "Non-monotonous DTS in output stream"
影响: 音画不同步
修复: ffmpeg -i broken.mp4 -c copy -fflags +genpts fixed.mp4
📚 下一篇预告
下一篇《解封装实战:从 MP4 提取音视频流》,我们将深入探讨:
- ZenPlay 项目中的
Demuxer类详解
敬请期待!📦
🔗 相关资源
- FFmpeg 官方文档:https://ffmpeg.org/doxygen/trunk/
- FFmpeg 示例代码:https://github.com/FFmpeg/FFmpeg/tree/master/doc/examples
- 推荐教程:
- 雷霄骅的 FFmpeg 博客(中文)
- “FFmpeg Libav Tutorial” by leandromoreira(英文)
- API 参考:
libavformat: https://ffmpeg.org/doxygen/trunk/group__lavf.htmllibavcodec: https://ffmpeg.org/doxygen/trunk/group__lavc.html

火山引擎开发者社区是火山引擎打造的AI技术生态平台,聚焦Agent与大模型开发,提供豆包系列模型(图像/视频/视觉)、智能分析与会话工具,并配套评测集、动手实验室及行业案例库。社区通过技术沙龙、挑战赛等活动促进开发者成长,新用户可领50万Tokens权益,助力构建智能应用。
更多推荐
 36
36 0
0- 0


 已为社区贡献4条内容

所有评论(0)