手把手教学Kimi 的API 接入技术指南
为了让各位方便:交流、交友、技术视频、资源分享、接私活 等等,可以扫下面二维码(wx:xzzs730),备注 “ 技术 ” 就可以通过审核。官方文档:https://platform.moonshot.cn/docs/introduction。API 端点:https://api.moonshot.cn/v1/chat/completions。登录 Moonshot 控制台:https://pla

通知
文章底部有【技术社群&福利】,不定更新活动、源码,欢迎来撩~~~。

今日主题:
1、Kimi API 使用技术指南:PHP 实现智能对话应用;
2、写作不易、点个赞再走吧~~~;
1、kimi API 概述
Kimi 是由月之暗面(Moonshot)推出的先进大语言模型,提供强大的文本生成能力。其 API 允许开发者将智能对话功能集成到各类应用中。本文重点介绍 Chat Completions API 的使用方法。
核心文档地址:
-
官方文档:https://platform.moonshot.cn/docs/introduction
-
API 端点:https://api.moonshot.cn/v1/chat/completions
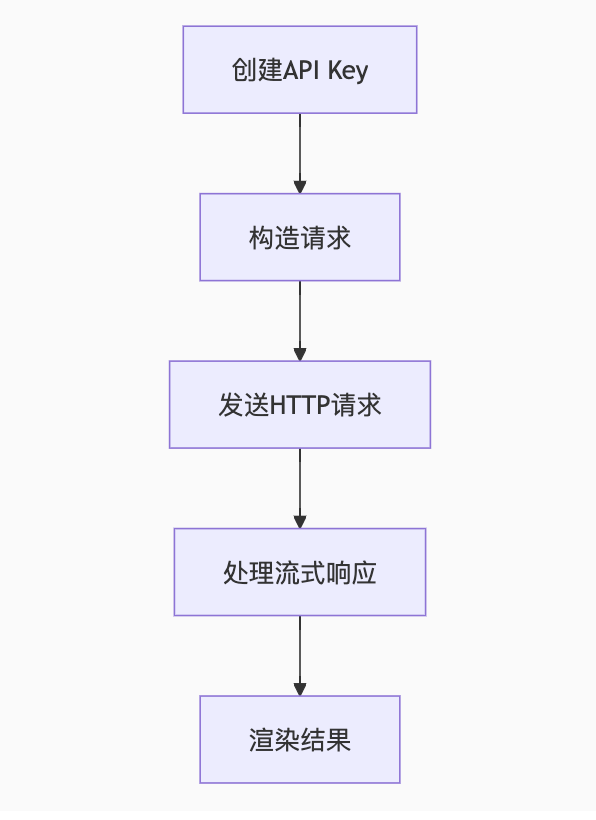
2、API核心功能与调用流程
3、PHP 完整实现代码
1. 文件结构
解释:我这里只是做的拆分、具体代码细节可以嵌套项目
├── index.php # 主界面├── api_handler.php # API请求处理器├── stream_handler.php # 流式响应处理器├── config.php # 配置文件└── assets ├── style.css # 样式文件 └── script.js # 前端交互2. 配置文件 (config.php)
解释:这里kimi API 相关配置
<?phpdefine('API_KEY', 'sk-your-api-key-here'); // 替换为实际API Key
define('API_URL', 'https://api.moonshot.cn/v1/chat/completions');// 模型API
define('MODEL', 'moonshot-v1-8k'); // 可用模型:moonshot-v1-8k/moonshot-v1-32k
3. API请求处理器 (api_handler.php)
解释:后端demo案例哈!!!简易处理
<?phprequire 'config.php';header('Content-Type: application/json');$input = json_decode(file_get_contents('php://input'), true);$messages = $input['messages'] ?? [];$data = [ 'model' => MODEL, 'messages' => $messages, 'temperature' => 0.7, 'stream' => true // 启用流式传输];$ch = curl_init(API_URL);curl_setopt_array($ch, [ CURLOPT_HTTPHEADER => [ 'Content-Type: application/json', 'Authorization: Bearer ' . API_KEY ], CURLOPT_POST => true, CURLOPT_POSTFIELDS => json_encode($data), CURLOPT_RETURNTRANSFER => true, CURLOPT_WRITEFUNCTION => function($ch, $data) { echo $data; flush(); return strlen($data); }]);curl_exec($ch);curl_close($ch);4. 流式响应处理器 (前端实现)
解释:前端代码、粘贴复制即可
<!-- index.php --><script>async function sendMessage() { const input = document.getElementById('user-input').value; if (!input) return; const chatBox = document.getElementById('chat-box'); chatBox.innerHTML += `<div class="user-msg">${input}</div>`; const responseDiv = document.createElement('div'); responseDiv.className = 'ai-msg'; chatBox.appendChild(responseDiv); try { const response = await fetch('api_handler.php', { method: 'POST', headers: { 'Content-Type': 'application/json' }, body: JSON.stringify({ messages: [{ role: 'user', content: input }] }) }); // 前端处理 Server-Sent Events (SSE) const reader = response.body.getReader(); const decoder = new TextDecoder(); let result = ''; while (true) { const { value, done } = await reader.read(); if (done) break; const chunk = decoder.decode(value); const lines = chunk.split('\n').filter(line => line.startsWith('data: ')); for (const line of lines) { try { const data = JSON.parse(line.substring(6)); const content = data.choices[0]?.delta?.content || ''; result += content; // 实时更新DOM responseDiv.innerHTML = marked.parse(result); } catch (e) {} } } } catch (error) { responseDiv.innerHTML = `<span class="error">请求失败: ${error.message}</span>`; }}</script>5. 前端界面 (index.php)
解释:前端代码、粘贴复制即可
<!DOCTYPE html><html lang="zh-CN"><head> <meta charset="UTF-8"> <title>Kimi API 对话演示</title> <link rel="stylesheet" href="assets/style.css"> <script src="https://cdn.jsdelivr.net/npm/marked/marked.min.js"></script></head><body> <div class="container"> <h1>Kimi 智能对话演示</h1> <div id="chat-box" class="chat-container"></div> <div class="input-area"> <textarea id="user-input" placeholder="输入您的问题..."></textarea> <button onclick="sendMessage()">发送</button> </div> <div class="stats"> <span id="token-count">0 tokens</span> <span id="cost">花费: ¥0.00</span> </div> </div> <script src="assets/script.js"></script></body></html>6. 样式文件 (assets/style.css)
解释:前端代码、粘贴复制即可
body { font-family: 'PingFang SC', 'Microsoft YaHei', sans-serif; background: #f5f7fa; color: #333;}.container { max-width: 800px; margin: 20px auto; padding: 20px; background: white; border-radius: 12px; box-shadow: 0 4px 20px rgba(0,0,0,0.08);}.chat-container { height: 500px; overflow-y: auto; border: 1px solid #e1e4e8; border-radius: 8px; padding: 15px; margin-bottom: 20px; background: #fafbfc;}.user-msg, .ai-msg { padding: 12px 16px; margin: 10px 0; border-radius: 18px; line-height: 1.6;}.user-msg { background: #e6f7ff; align-self: flex-end; margin-left: 20%;}.ai-msg { background: #f6f8fa; margin-right: 20%;}.input-area { display: flex; gap: 10px;}textarea { flex: 1; height: 80px; padding: 12px; border: 1px solid #d1d5da; border-radius: 8px; resize: vertical; font-size: 16px;}button { padding: 10px 24px; background: #1677ff; color: white; border: none; border-radius: 8px; cursor: pointer; font-size: 16px; transition: background 0.3s;}button:hover { background: #0e63eb;}.stats { margin-top: 15px; text-align: right; color: #666; font-size: 14px;}4、关键功能实现详解
1. 创建 API Key
-
登录 Moonshot 控制台:https://platform.moonshot.cn
-
进入「API 密钥」管理页面
-
点击「创建新密钥」生成 API Key
-
复制并妥善保存(仅显示一次)
2. 流式响应处理技术
-
第三模块-第四步 就是具体处理
3. Token 计算与成本控制
// 计算Token数量(示例)function countTokens($text) { // 简单估算:中文1token≈2字符,英文1token≈4字符 $chineseChars = preg_match_all("/\p{Han}/u", $text); $otherChars = strlen($text) - $chineseChars; return ceil($chineseChars * 0.5 + $otherChars * 0.25);}// 成本计算(2024年定价)function calculateCost($inputTokens, $outputTokens) { $inputCost = $inputTokens / 1000000 * 0.12; // ¥0.12/百万tokens $outputCost = $outputTokens / 1000000 * 0.24; // ¥0.24/百万tokens return round($inputCost + $outputCost, 4);}4. 用户体验优化策略
-
响应速度优化:
-
使用流式传输实现逐字输出效果
-
添加打字机动画提升等待体验
-
对话连续性:
-
// 保持对话上下文$conversationHistory = [];function addToHistory($role, $content) { global $conversationHistory; $conversationHistory[] = ['role' => $role, 'content' => $content]; // 控制历史记录长度(防止超出token限制) if (count($conversationHistory) > 10) { array_shift($conversationHistory); }}3.错误处理机制:
try { // API调用代码} catch (error) { // 显示友好错误提示 showNotification(`请求失败: ${error.message || '服务不可用'}`); // 重试机制 if (error.type === 'timeout') { setTimeout(retryRequest, 2000); }}5、部署
1. 系统要求
-
PHP 7.4+ 开启 cURL 扩展
-
HTTPS 环境(现代浏览器要求安全连接)
2.安装步骤
-
进入项目,安装前端依赖(npm install marked)
6、总结
上述也是一个demo案例,跟着步骤走几乎问题不大,在遇到问题直接问AI应该都能解开!
如果觉得这个demo还是有些麻烦,那么直接模拟curl 请求API ,然后不要任何js +css 页面效果以及流式。
最佳实践建议:
-
重要业务场景添加人工审核环节
-
敏感操作要求二次确认
-
定期更新模型版本(关注 moonshot-v2 发布)
-
使用
max_tokens参数控制响应长度 -
实施 AB 测试优化提示词工程
分割线
为了让各位方便:交流、交友、技术视频、资源分享、接私活 等等,可以扫下面二维码(wx:xzzs730),备注 “ 技术 ” 就可以通过审核。
进群的小伙伴请加右侧私人微信(备注:技术)
-

火山引擎开发者社区是火山引擎打造的AI技术生态平台,聚焦Agent与大模型开发,提供豆包系列模型(图像/视频/视觉)、智能分析与会话工具,并配套评测集、动手实验室及行业案例库。社区通过技术沙龙、挑战赛等活动促进开发者成长,新用户可领50万Tokens权益,助力构建智能应用。
更多推荐
 21
21 0
0- 0


 已为社区贡献2条内容

所有评论(0)