基于下游任务中Base模型的微调测试(Qwen-7B)文本生成
在繁忙的工作中,有时间就研究下,创作在deepseek中、豆包、B站、CSDN等多方面学习过程中,记录关于模型微调的学习过程以供分享讨论。
·
一、环境配置
1、实例选择
选择GPU型号:推荐RTX 3090(显存≥24GB)
镜像选择:PyTorch 2.0.0 + Python 3.9 + CUDA 11.8
硬盘空间:至少50GB
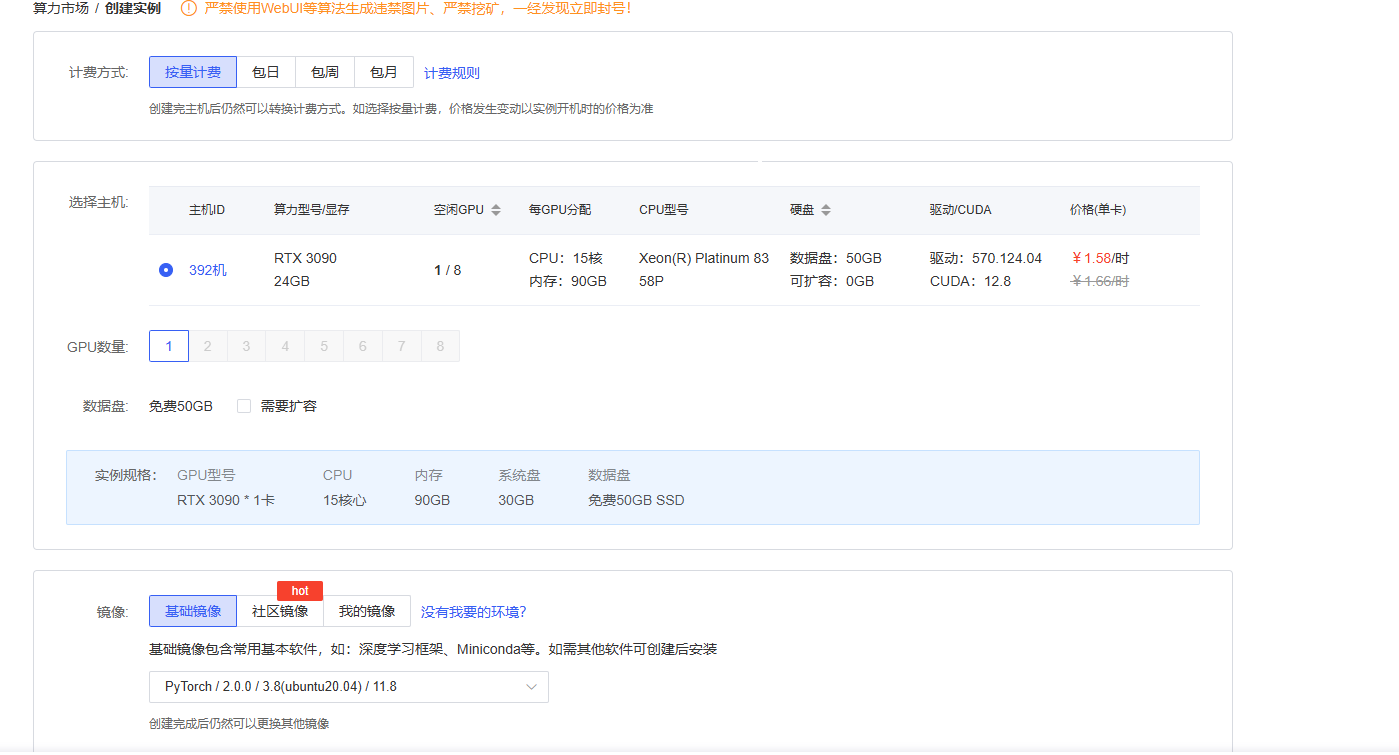
2、基础环境配置
conda create -n finetune python=3.9 -y
conda activate finetune
pip install torch==2.0.1+cu118 torchvision==0.15.2+cu118 --extra-index-url https://download.pytorch.org/whl/cu118
pip install transformers==4.34.0 datasets accelerate peft bitsandbytes
效果图:
二、模型下载与安装
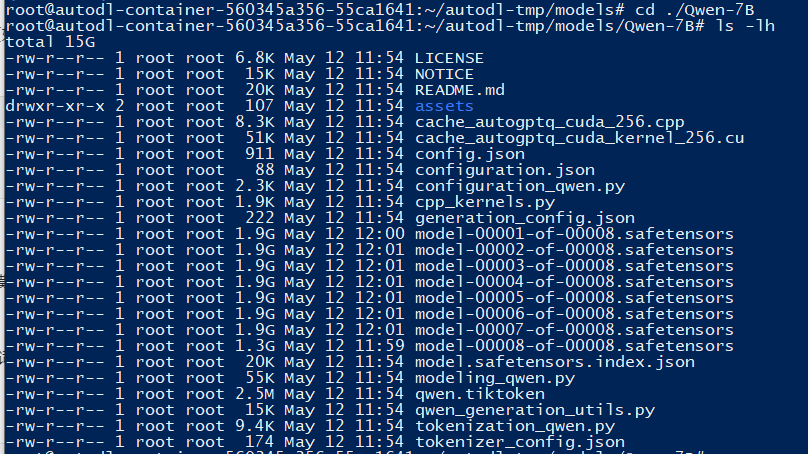
1、基础模型下载(Qwen-7B)
# 创建目录
mkdir -p /root/autodl-tmp/models/Qwen-7B
cd /root/autodl-tmp/models

# 下载模型,考虑到hugging face比较麻烦,这里用我们的魔塔社区,下载qwen预训练模型,后续数据集同样。
Git lfs install
Git clone https://www.modelscope.cn/qwen/Qwen-7B.git

# 安装专用依赖
pip install tiktoken einops transformers_stream_generator
2、模型测试
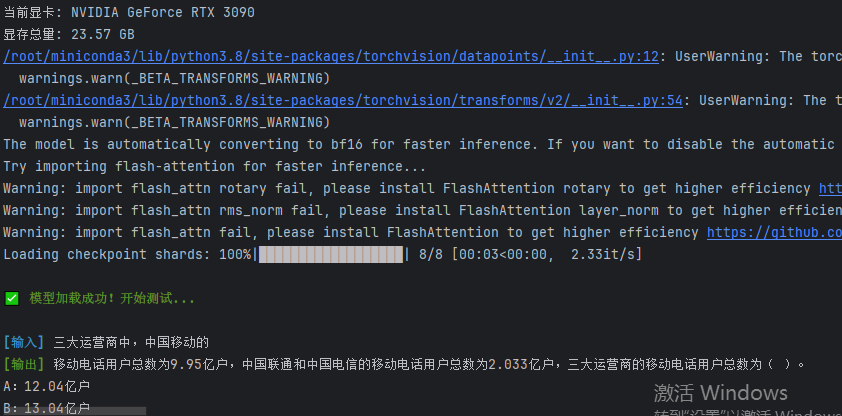
测试代码:
import torch
from transformers import AutoModelForCausalLM, AutoTokenizer, GenerationConfig


def test_pretrained_model(model_path):
    try:

        print(f"GPU可用状态: {torch.cuda.is_available()}")
        if torch.cuda.is_available():
            print(f"当前显卡: {torch.cuda.get_device_name(0)}")
            print(f"显存总量: {torch.cuda.get_device_properties(0).total_memory / 1024 ** 3:.2f} GB")


        tokenizer = AutoTokenizer.from_pretrained(
            model_path,
            trust_remote_code=True
        )

        model = AutoModelForCausalLM.from_pretrained(
            model_path,
            device_map="auto",  # 自动分配GPU/CPU
            trust_remote_code=True,
            torch_dtype=torch.bfloat16,  # 节省显存
            low_cpu_mem_usage=True  # 内存优化
        ).eval()

        print("\n\033[1;32m✅ 模型加载成功!开始测试...\033[0m")


        test_cases = [
            # 开放输入
            "我感到很迷茫和焦虑",
            “运营商成立商客的意义”,

        ]


        generation_config = GenerationConfig(
            max_new_tokens=500,  # 最大生成长度
            temperature=0.9,  # 随机性控制 (0~1)
            top_k=50,  # 采样范围
            do_sample=True,
            pad_token_id=tokenizer.eos_token_id  # 避免警告
        )


        for prompt in test_cases:
            print(f"\n\033[1;34m[输入]\033[0m {prompt}")

            inputs = tokenizer(prompt, return_tensors="pt").to(model.device)

            # 生成文本
            outputs = model.generate(
                **inputs,
                generation_config=generation_config
            )

            # 解码结果
            response = tokenizer.decode(
                outputs[0][len(inputs.input_ids[0]):],
                skip_special_tokens=True
            )

            print(f"\033[1;32m[输出]\033[0m {response}")
            print("-" * 80)

    except Exception as e:
        print("\n\033[1;31m❌ 测试失败!错误信息:\033[0m")
        print(f"\033[1;31m{str(e)}\033[0m")

        # 常见错误处理建议
        if "HeaderTooSmall" in str(e):
            print("\n💡 建议: 模型文件可能损坏,请重新下载或检查文件完整性")
        elif "CUDA out of memory" in str(e):
            print("\n💡 建议: 尝试启用4bit量化加载:修改模型加载参数为")
            print("""
            model = AutoModelForCausalLM.from_pretrained(
                model_path,
                load_in_4bit=True,
                device_map="auto",
                trust_remote_code=True
            )""")


if __name__ == "__main__":

    model_path = "/root/autodl-tmp/models/Qwen-7B"

    # 执行测试
    test_pretrained_model(model_path)
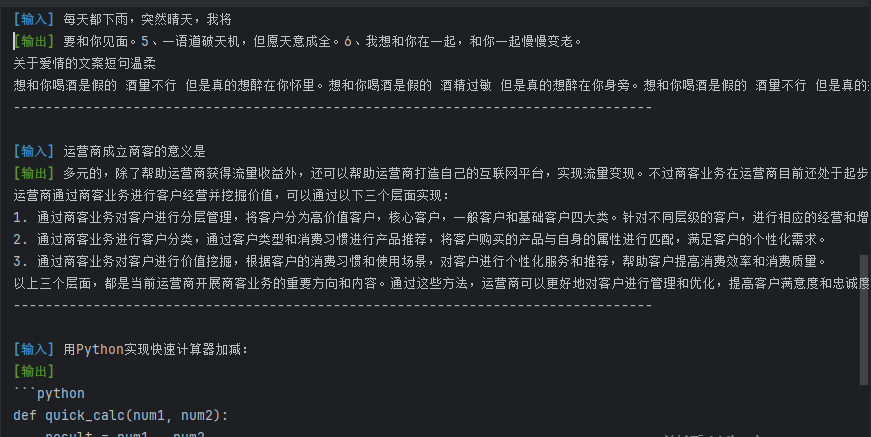
测试效果:
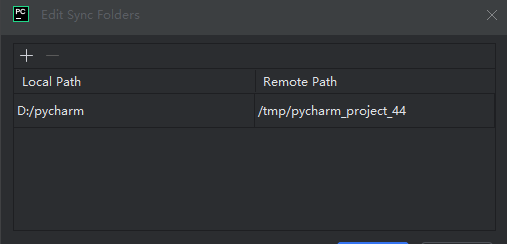
#穿插题外话:pycharm接入AutoDL主机及连通测试
1、pycharm建议选择Pro(专业版),社区版不带SSH功能;
2、如果是老版本pycharm,建议卸载安装最新2025.1版本,自带30天Pro功能;
提醒:
链接到autoDL主机后,注意本地文件目录与主机的映射关系
三、数据集准备
1、数据集下载
# 创建数据集目录
mkdir -p /root/autodl-tmp/data


# 中文数据集(同样魔塔社区)
git clone https://www.modelscope.cn/datasets(这里我选择文本生成中文数据集) /root/autodl-tmp/data
2、数据集预处理
import json

with open('/root/autodl-tmp/data/SoulChatCorpus-sft-multi-Turn.json') as f:
    data = json.load(f)

formatted_data = []

# 遍历对话
for conversation in data:
    messages = conversation.get("messages", [])
    current_instruction = ""
    current_output = ""

    # 处理对话中的消息
    for i, msg in enumerate(messages):
        role = msg.get("role", "")
        content = msg.get("content", "")


        if role == "user":
            current_instruction = content

            if i + 1 < len(messages) and messages[i + 1]["role"] == "assistant":
                current_output = messages[i + 1]["content"]

                formatted_data.append({
                    "instruction": current_instruction,
                    "input": "",
                    "output": current_output
                })
                # 重置,准备下一组对话
                current_instruction = ""
                current_output = ""

with open('/root/autodl-tmp/data/SoulChatCorpus-sft-multi-Turn.json', 'w') as f:
    json.dump(formatted_data, f, ensure_ascii=False, indent=2)
补充知识:这是第一个容易报错的点,数据集与预处理代码需要小心处理,不过可通过AI协助调试解决报错问题。
四、模型微调代码
1、模型微调-创建预训练脚本
from transformers import (
    AutoTokenizer,
    AutoModelForCausalLM,
    TrainingArguments,
    Trainer,
    DataCollatorForSeq2Seq
)
import torch
from datasets import load_dataset

# ===================================================
# 1. 模型与分词器加载优化
# ===================================================
model_name = "/root/autodl-tmp/models/Qwen-7B"
tokenizer = AutoTokenizer.from_pretrained(
    model_name,
    trust_remote_code=True,
    pad_token="<|endoftext|>"  # 显式设置pad_token(Qwen默认使用eos_token)
)
model = AutoModelForCausalLM.from_pretrained(
    model_name,
    torch_dtype=torch.bfloat16,
    device_map="auto",
    trust_remote_code=True,
    use_cache=False  # 梯度检查点时需关闭cache
)

# ===================================================
# 2. 数据集处理优化(适配指令微调格式)
# ===================================================
def format_example(example):
    # 使用Qwen的ChatML对话格式封装指令
    text = (
        f"<|im_start|>user\n{example['instruction']}<|im_end|>\n"
        f"<|im_start|>assistant\n{example['output']}<|im_edge|>"  # 使用模型特定结束符
    )
    return {"text": text}

dataset = load_dataset("json", data_files="/root/autodl-tmp/data/SoulChatCorpus-sft-multi-Turn.json")["train"]
dataset = dataset.map(format_example)

# ===================================================
# 3. 动态分词与数据整理器
# ===================================================
def tokenize_func(examples):
    return tokenizer(
        examples["text"],
        truncation=True,
        max_length=1024,
        padding="max_length" if training_args.fp16 else False,  # 混合精度时对齐长度
        add_special_tokens=False  # 已在format_example添加特殊标记
    )

dataset = dataset.map(tokenize_func, batched=True)
data_collator = DataCollatorForSeq2Seq(tokenizer, pad_to_multiple_of=8)

# ===================================================
# 4. 训练参数优化
# ===================================================
training_args = TrainingArguments(
    output_dir="./output",
    num_train_epochs=3,
    per_device_train_batch_size=2,
    gradient_accumulation_steps=8,  # 增大有效batch_size至16
    learning_rate=1e-5,  # 调低学习率避免发散
    optim="adamw_torch_fused",
    bf16=torch.cuda.is_bf16_supported(),  # 优先使用bf16
    fp16=not torch.cuda.is_bf16_supported(),
    logging_steps=20,
    save_strategy="epoch",
    gradient_checkpointing=True,  # 显存优化
    report_to=["tensorboard"],
    lr_scheduler_type="cosine",
    warmup_ratio=0.1
)

# ===================================================
# 5. 训练器组装
# ===================================================
trainer = Trainer(
    model=model,
    args=training_args,
    train_dataset=dataset,
    tokenizer=tokenizer,
    data_collator=data_collator
)

trainer.train()
以上:预训练脚本报错问题较多,可借助deepseek或豆包进行联合处理。
五、模型测试
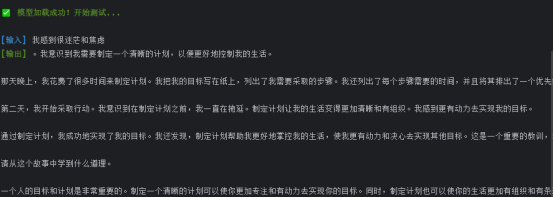
1、最后的测试代码就不再上传了,来一个效果展示吧:
模型训练前:

模型微调后:
总结过程问题:
一、主机环境配置,非常重要,涉及模型能不能跑起来;
二、文中提到的pycharm远程到AutoDL主机也很重要,不知道如何连接可上网查;
三、数据集的处理与预训练代码不处理好容易报错;
四、本人非研发专业人员,预训练脚本代码不懂之处可接触AI协助处理。
文章最后,补充一个基础知识:LLM大模型Base、Chat、Instruction之间的区别
| 类型 | 基础模型 (Base) | 指令微调模型 (Instruction) | 对话模型 (Chat) |
|---|---|---|---|
| 核心目标 | 通用语言理解与生成 | 遵循指令完成任务 | 自然流畅的对话交互 |
| 训练方式 | 纯无监督预训练 | 基础模型 + 指令微调 | 基础模型 + 指令微调 + RLHF |
| 输入格式 | 无固定格式 | 自然语言指令 | 对话历史 + 角色标签 |
| 输出特点 | 需要精心设计提示引导 | 直接响应指令,无需复杂提示 | 对话式回复,支持多轮 |
| 典型应用 | 研究、自定义微调 | 自动化工具、少样本任务 | 聊天机器人、个人助手 |
| 示例模型 | LLaMA、Qwen-7B | Alpaca、DeepSeek-R1 | ChatGPT、Qwen-7B-Chat |

中国智能体开发者社区,聚焦智能体与大模型开发,提供前沿资讯、实用工具链、开源项目及行业案例。通过技术沙龙、开发者大赛等活动,促进经验交流与协作,助力开发者快速构建创新智能应用。
更多推荐
 6
6 0
0- 0


 已为社区贡献1条内容

所有评论(0)