PiscCode使用 Mediapipe 实时人脸表情识别与可视化
基于Mediapipe FaceLandmarker实现实时人脸表情识别的方案。项目通过摄像头捕捉人脸,利用Mediapipe检测面部关键点并计算表情概率,最终在画面上绘制人脸网格轮廓和识别出的显著表情(如Happy/Neutral)。核心功能包括:1)加载预训练模型检测人脸关键点;2)绘制面部三角网格、轮廓和虹膜;3)分析blendshapes数据获取最显著表情;4)实时显示处理结果。该项目依赖
在人机交互(HCI)、虚拟主播(VTuber)、情绪计算(Affective Computing)等应用场景中,实时识别人脸表情 是一个非常重要且实用的功能。它不仅能够增强用户体验,还能作为交互逻辑的输入信号。例如:
-
在 智能客服系统 中,实时捕捉用户的情绪状态,可以帮助系统判断用户是否满意,从而动态调整应答策略。
-
在 虚拟主播或虚拟形象驱动 中,通过人脸表情识别将主播的面部动作实时映射到虚拟角色上,可以实现更加自然的表情同步,让角色“活”起来。
-
在 心理学与情绪分析 领域,自动检测微表情与显著表情能够为研究者提供客观数据,辅助情绪识别与行为分析。
实现这类功能的核心在于 人脸关键点检测与表情分析。传统方法通常依赖复杂的深度学习模型,开发门槛高、部署难度大。而 Google 开源的 MediaPipe 框架 提供了高效、跨平台的解决方案。
本文将演示如何基于 Mediapipe FaceLandmarker 模型,快速搭建一个实时人脸表情识别系统,主要功能包括:
-
人脸关键点检测:在视频流中检测单张或多张人脸,获取数百个高精度面部关键点。
-
表情分析:利用 MediaPipe 提供的 Face Blendshapes 输出,计算并提取显著表情。
-
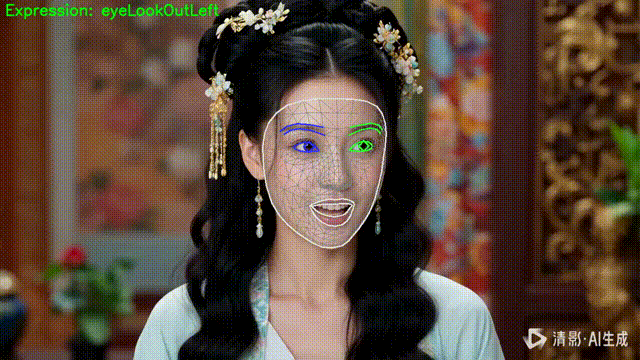
可视化展示:在摄像头画面上叠加人脸网格(面部结构线、轮廓线、虹膜)以及文字标签,实时显示当前识别到的显著表情。
最终效果是:用户只需对着摄像头做出不同的表情(如微笑、惊讶、皱眉等),系统便能自动捕捉并在屏幕上显示对应的表情类别,实现一种轻量级的 实时表情驱动 功能。

1. 项目概述
本项目实现了以下功能:
-
人脸检测:检测视频帧中的人脸。
-
关键点绘制:绘制人脸网格、轮廓和虹膜。
-
表情识别:根据
face_blendshapes输出最显著的表情。 -
实时可视化:在视频帧上显示人脸网格和表情文字。
核心依赖:
-
mediapipe:用于人脸关键点检测和表情计算。 -
opencv-python:摄像头读取和图像显示。 -
numpy:数组和坐标计算。
2. 环境依赖
pip install mediapipe opencv-python numpy
注意:Mediapipe Tasks API 在 Python 3.9+ 上效果最佳。
3. 核心类:FaceExperssion
3.1 初始化 FaceLandmarker
class FaceExperssion:
    def __init__(self, model_path="face_landmarker.task"):
        base_options = python.BaseOptions(model_asset_path=model_path)
        options = vision.FaceLandmarkerOptions(
            base_options=base_options,
            output_face_blendshapes=True,
            output_facial_transformation_matrixes=True,
            num_faces=1
        )
        self.detector = vision.FaceLandmarker.create_from_options(options)
我们使用 Mediapipe 的 Tasks API 加载 face_landmarker.task 模型,并启用 blendshapes 输出,这样可以获取面部表情评分。
3.2 绘制人脸网格
def _draw_landmarks_on_image(self, rgb_image, detection_result):
    annotated_image = np.copy(rgb_image)
    for face_landmarks in detection_result.face_landmarks:
        face_landmarks_proto = landmark_pb2.NormalizedLandmarkList()
        face_landmarks_proto.landmark.extend([landmark_pb2.NormalizedLandmark(x=lm.x, y=lm.y, z=lm.z) for lm in face_landmarks])

        # 绘制网格、轮廓、虹膜
        solutions.drawing_utils.draw_landmarks(
            image=annotated_image,
            landmark_list=face_landmarks_proto,
            connections=mp.solutions.face_mesh.FACEMESH_TESSELATION,
            landmark_drawing_spec=None,
            connection_drawing_spec=mp.solutions.drawing_styles.get_default_face_mesh_tesselation_style()
        )
        solutions.drawing_utils.draw_landmarks(
            image=annotated_image,
            landmark_list=face_landmarks_proto,
            connections=mp.solutions.face_mesh.FACEMESH_CONTOURS,
            landmark_drawing_spec=None,
            connection_drawing_spec=mp.solutions.drawing_styles.get_default_face_mesh_contours_style()
        )
        solutions.drawing_utils.draw_landmarks(
            image=annotated_image,
            landmark_list=face_landmarks_proto,
            connections=mp.solutions.face_mesh.FACEMESH_IRISES,
            landmark_drawing_spec=None,
            connection_drawing_spec=mp.solutions.drawing_styles.get_default_face_mesh_iris_connections_style()
        )
    return annotated_image
这里分别绘制:
-
FACEMESH_TESSELATION:人脸三角网格
-
FACEMESH_CONTOURS:面部轮廓
-
FACEMESH_IRISES:虹膜
3.3 获取显著表情
Mediapipe 的 face_blendshapes 提供每个表情的概率,我们取 分数最高的表情 作为当前表情。
def _get_dominant_expression(self, detection_result):
    if not detection_result.face_blendshapes:
        return "Neutral"
    max_val = 0
    expression = "Neutral"
    for blendshape_list in detection_result.face_blendshapes:
        for category_score in blendshape_list:
            if category_score.score > max_val:
                max_val = category_score.score
                expression = category_score.category_name
    return expression
3.4 处理单帧图像
def do(self, frame, device=None):
    if frame is None: return None
    mp_image = mp.Image(image_format=mp.ImageFormat.SRGB, data=cv2.cvtColor(frame, cv2.COLOR_BGR2RGB))
    detection_result = self.detector.detect(mp_image)
    annotated = self._draw_landmarks_on_image(mp_image.numpy_view(), detection_result)
    expression = self._get_dominant_expression(detection_result)
    cv2.putText(annotated, f"Expression: {expression}", (10, 30),
                cv2.FONT_HERSHEY_SIMPLEX, 1, (0, 255, 0), 2, cv2.LINE_AA)
    return cv2.cvtColor(annotated, cv2.COLOR_RGB2BGR)
do 方法将返回绘制了人脸网格和表情文字的帧,可直接用于显示或进一步处理。
4. 快速体验
import cv2

import numpy as np

import mediapipe as mp

from mediapipe import solutions

from mediapipe.framework.formats import landmark_pb2

from mediapipe.tasks import python

from mediapipe.tasks.python import vision


class FaceExperssion:

    def __init__(self, model_path="文件地址/face_landmarker.task"):

        """初始化 Mediapipe FaceLandmarker"""

        base_options = python.BaseOptions(model_asset_path=model_path)

        options = vision.FaceLandmarkerOptions(

            base_options=base_options,

            output_face_blendshapes=True,

            output_facial_transformation_matrixes=True,

            num_faces=1

        )

        self.detector = vision.FaceLandmarker.create_from_options(options)


    def _draw_landmarks_on_image(self, rgb_image, detection_result):

        """在图像上绘制人脸网格、轮廓和虹膜"""

        face_landmarks_list = detection_result.face_landmarks

        annotated_image = np.copy(rgb_image)


        for face_landmarks in face_landmarks_list:

            face_landmarks_proto = landmark_pb2.NormalizedLandmarkList()

            face_landmarks_proto.landmark.extend([

                landmark_pb2.NormalizedLandmark(x=lm.x, y=lm.y, z=lm.z)

                for lm in face_landmarks

            ])


            # 绘制三类连接

            solutions.drawing_utils.draw_landmarks(

                image=annotated_image,

                landmark_list=face_landmarks_proto,

                connections=mp.solutions.face_mesh.FACEMESH_TESSELATION,

                landmark_drawing_spec=None,

                connection_drawing_spec=mp.solutions.drawing_styles.get_default_face_mesh_tesselation_style())

            solutions.drawing_utils.draw_landmarks(

                image=annotated_image,

                landmark_list=face_landmarks_proto,

                connections=mp.solutions.face_mesh.FACEMESH_CONTOURS,

                landmark_drawing_spec=None,

                connection_drawing_spec=mp.solutions.drawing_styles.get_default_face_mesh_contours_style())

            solutions.drawing_utils.draw_landmarks(

                image=annotated_image,

                landmark_list=face_landmarks_proto,

                connections=mp.solutions.face_mesh.FACEMESH_IRISES,

                landmark_drawing_spec=None,

                connection_drawing_spec=mp.solutions.drawing_styles.get_default_face_mesh_iris_connections_style())


        return annotated_image


    def _get_dominant_expression(self, detection_result):

        """根据 blendshapes 返回最显著的表情"""

        if not detection_result.face_blendshapes:

            return "Neutral"


        max_val = 0

        expression = "Neutral"


        # detection_result.face_blendshapes 是 List[List[CategoryScore]]

        for blendshape_list in detection_result.face_blendshapes:

            for category_score in blendshape_list:  # 直接遍历 CategoryScore

                if category_score.score > max_val:

                    max_val = category_score.score

                    expression = category_score.category_name


        return expression


    def do(self, frame, device=None):

        """处理单帧图像,返回绘制人脸网格和表情文字后的帧"""

        if frame is None:

            return None


        # 转为 Mediapipe Image

        mp_image = mp.Image(

            image_format=mp.ImageFormat.SRGB,

            data=cv2.cvtColor(frame, cv2.COLOR_BGR2RGB)

        )


        # 检测人脸

        detection_result = self.detector.detect(mp_image)


        # 绘制人脸网格

        annotated = self._draw_landmarks_on_image(mp_image.numpy_view(), detection_result)


        # 获取显著表情

        expression = self._get_dominant_expression(detection_result)


        # 在左上角绘制文字

        cv2.putText(

            annotated,

            f"Expression: {expression}",

            (10, 30),

            cv2.FONT_HERSHEY_SIMPLEX,

            1,

            (0, 255, 0),

            2,

            cv2.LINE_AA

        )


        return cv2.cvtColor(annotated, cv2.COLOR_RGB2BGR)
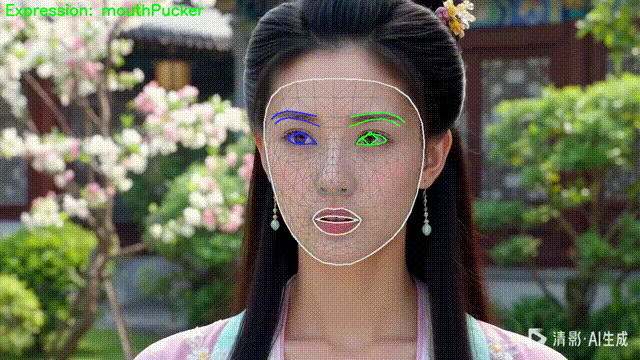
运行后,你可以在摄像头画面上看到:
-
实时人脸网格
-
面部轮廓和虹膜
-
左上角的表情文字(如
Happy,Neutral,Surprised等)
对 PiscTrace or PiscCode感兴趣?更多精彩内容请移步官网看看~🔗 PiscTrace

火山引擎开发者社区是火山引擎打造的AI技术生态平台,聚焦Agent与大模型开发,提供豆包系列模型(图像/视频/视觉)、智能分析与会话工具,并配套评测集、动手实验室及行业案例库。社区通过技术沙龙、挑战赛等活动促进开发者成长,新用户可领50万Tokens权益,助力构建智能应用。
更多推荐
 5
5 0
0- 0


 已为社区贡献26条内容

所有评论(0)