【超详细不踩坑】Hugging face模型调用指南
本文详细介绍了如何正确调用Hugging Face平台上的大语言模型。首先强调测试前需检查本地GPU配置,不足时建议使用云平台。核心流程包括:1)获取模型API调用权限;2)安装必要库并配置量化参数;3)通过API登录并加载模型;4)构建Prompt获取响应。文中特别指出常见错误:硬件配置不足、模型选择错误、混淆测试代码与调用代码,以及盲目相信AI建议的方案。最后提醒模型调用需注意作者授权要求,不
放在开头:如果接下来要进行测试工作请先检查电脑CPU\GPU算力配置是否足够
在本地输入:nvidia-smi
自查电脑配置
否则请先行移步至线上平台:Colab/kaggle/算力云/恒源云
一、正确调用流程
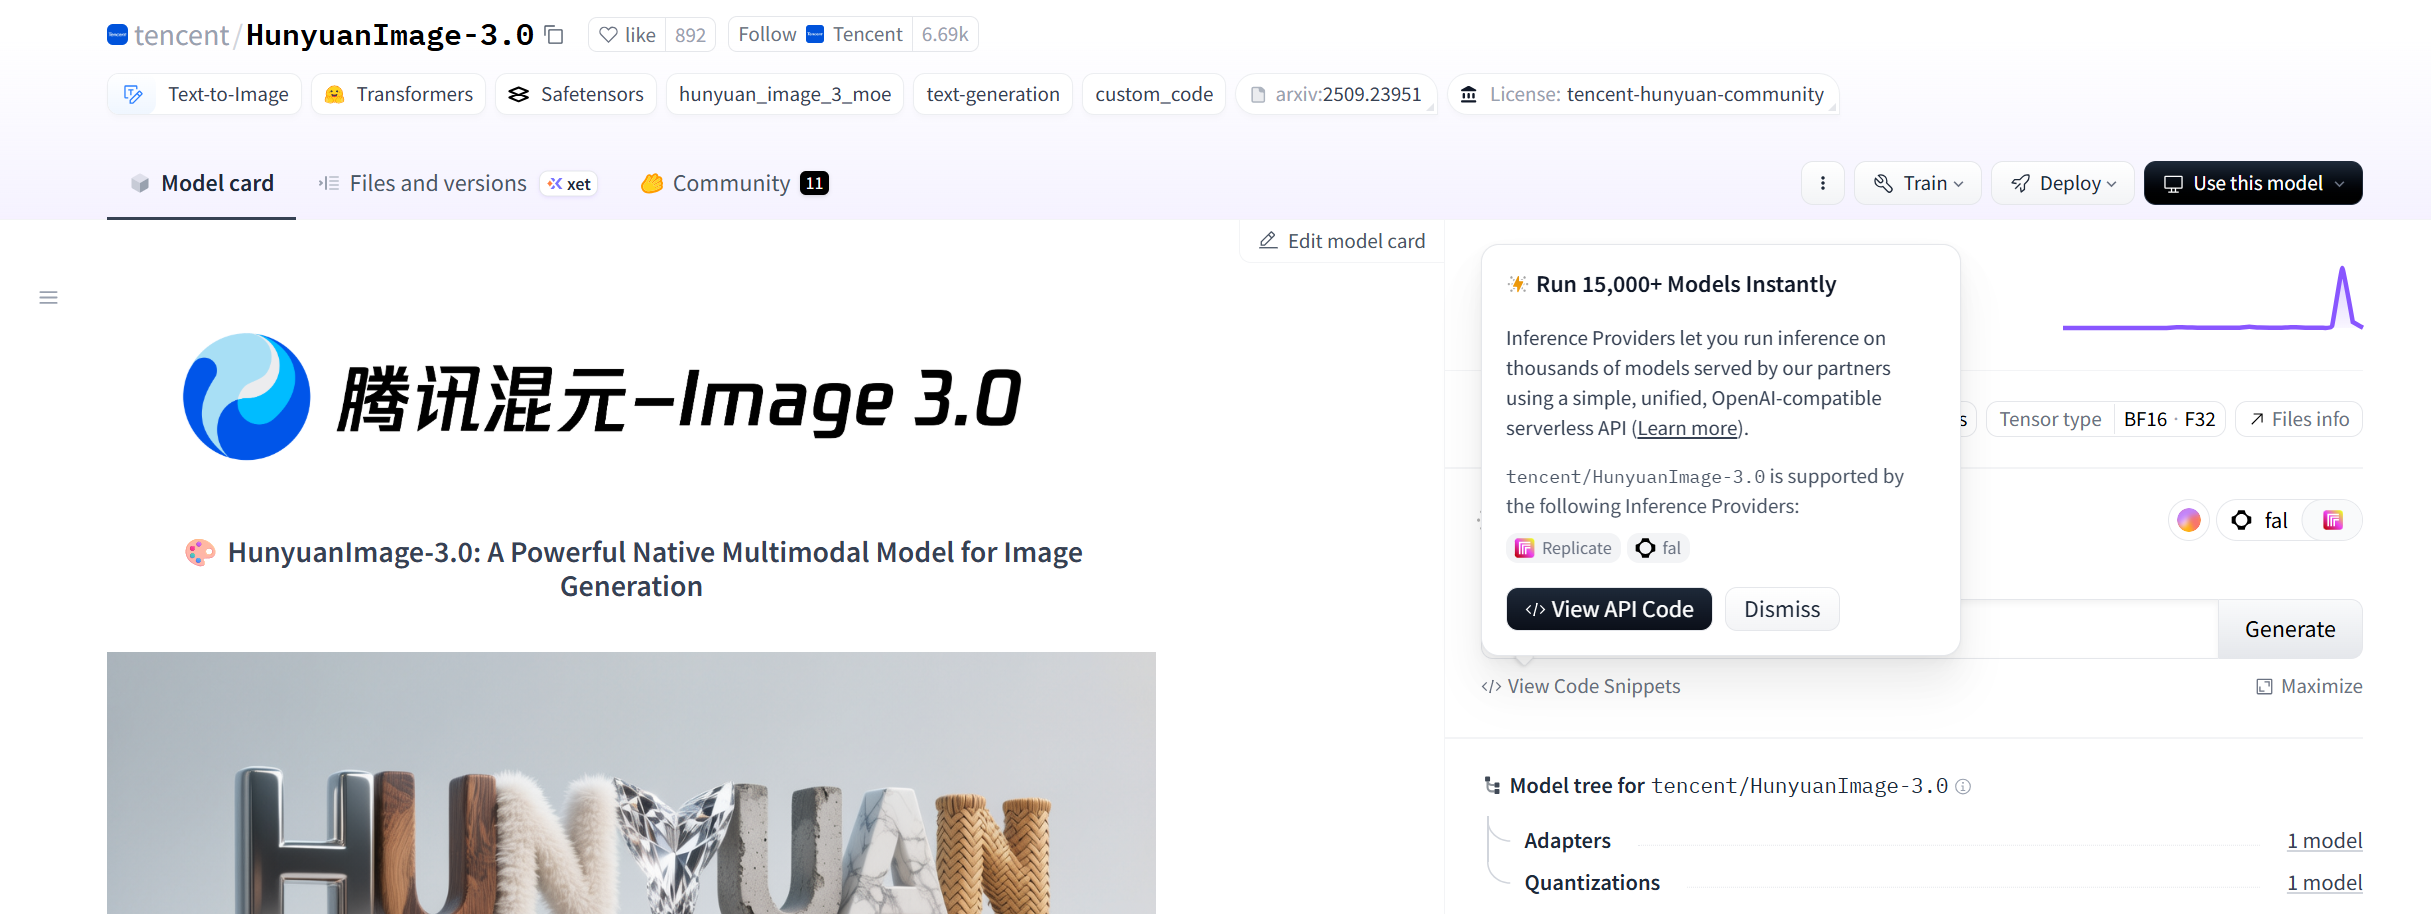
以Mistral-7B-Instruct-v0.2为例
1.官网搜索大模型:
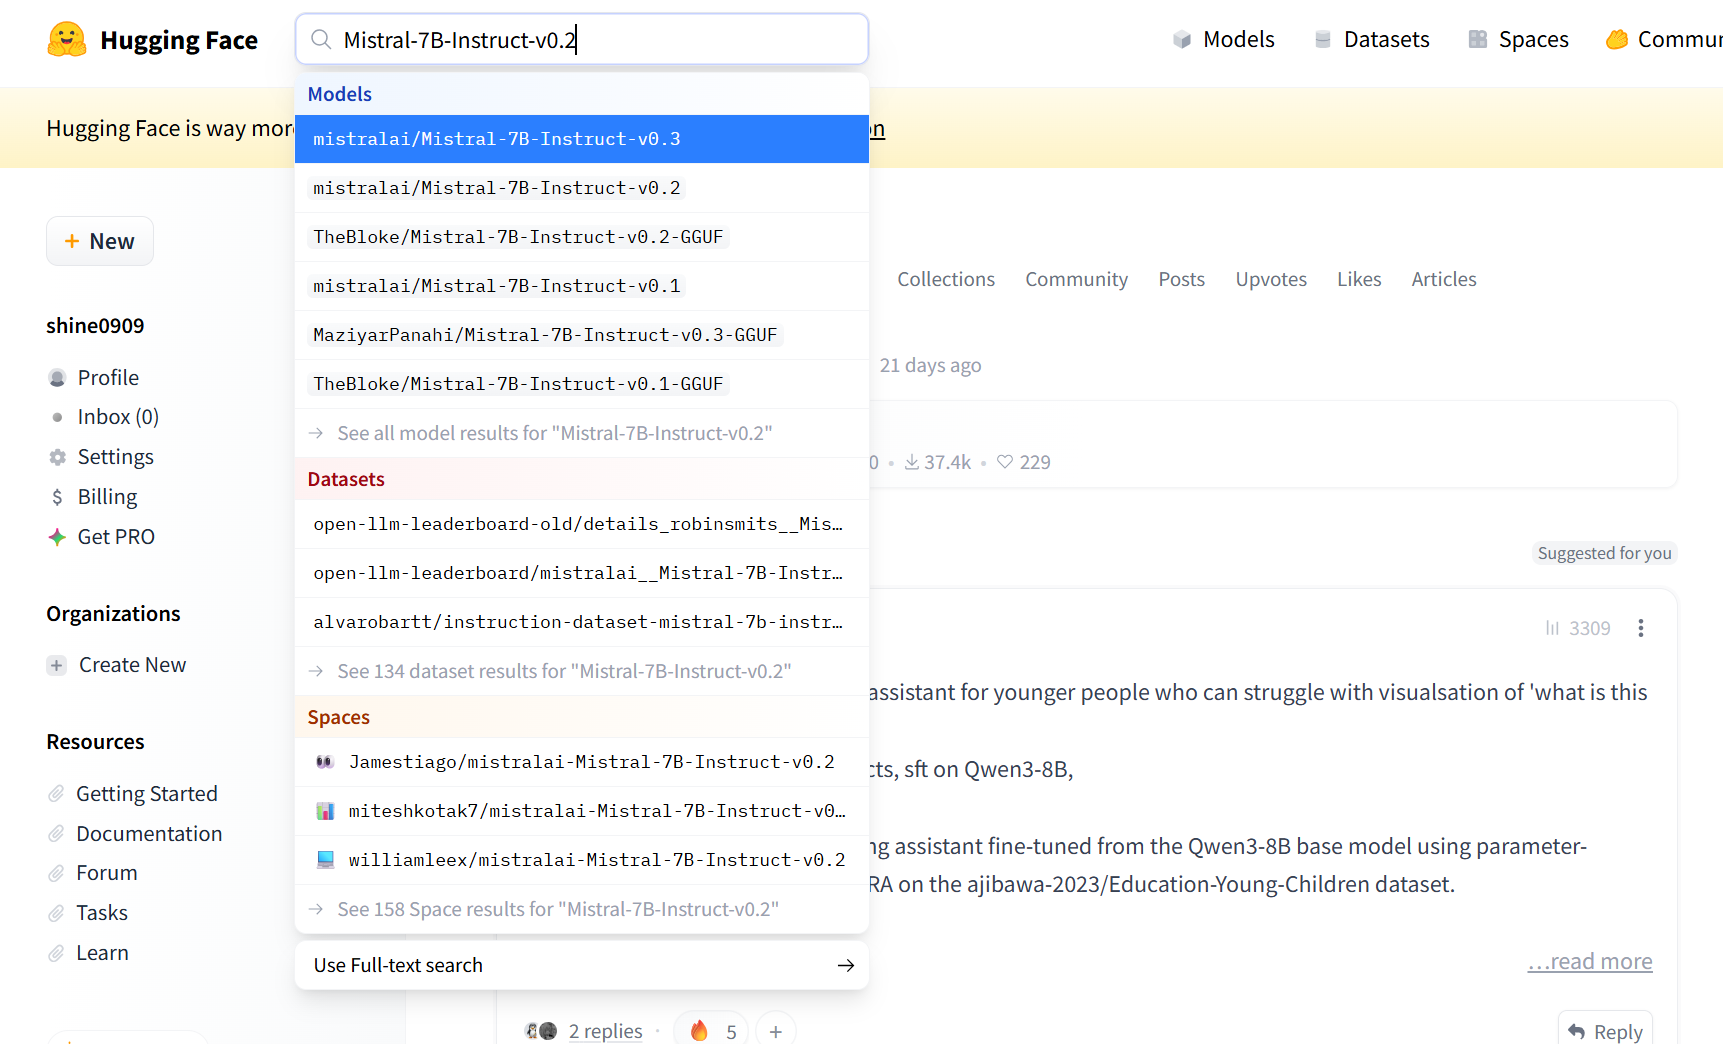
2.进入模型介绍主界面:
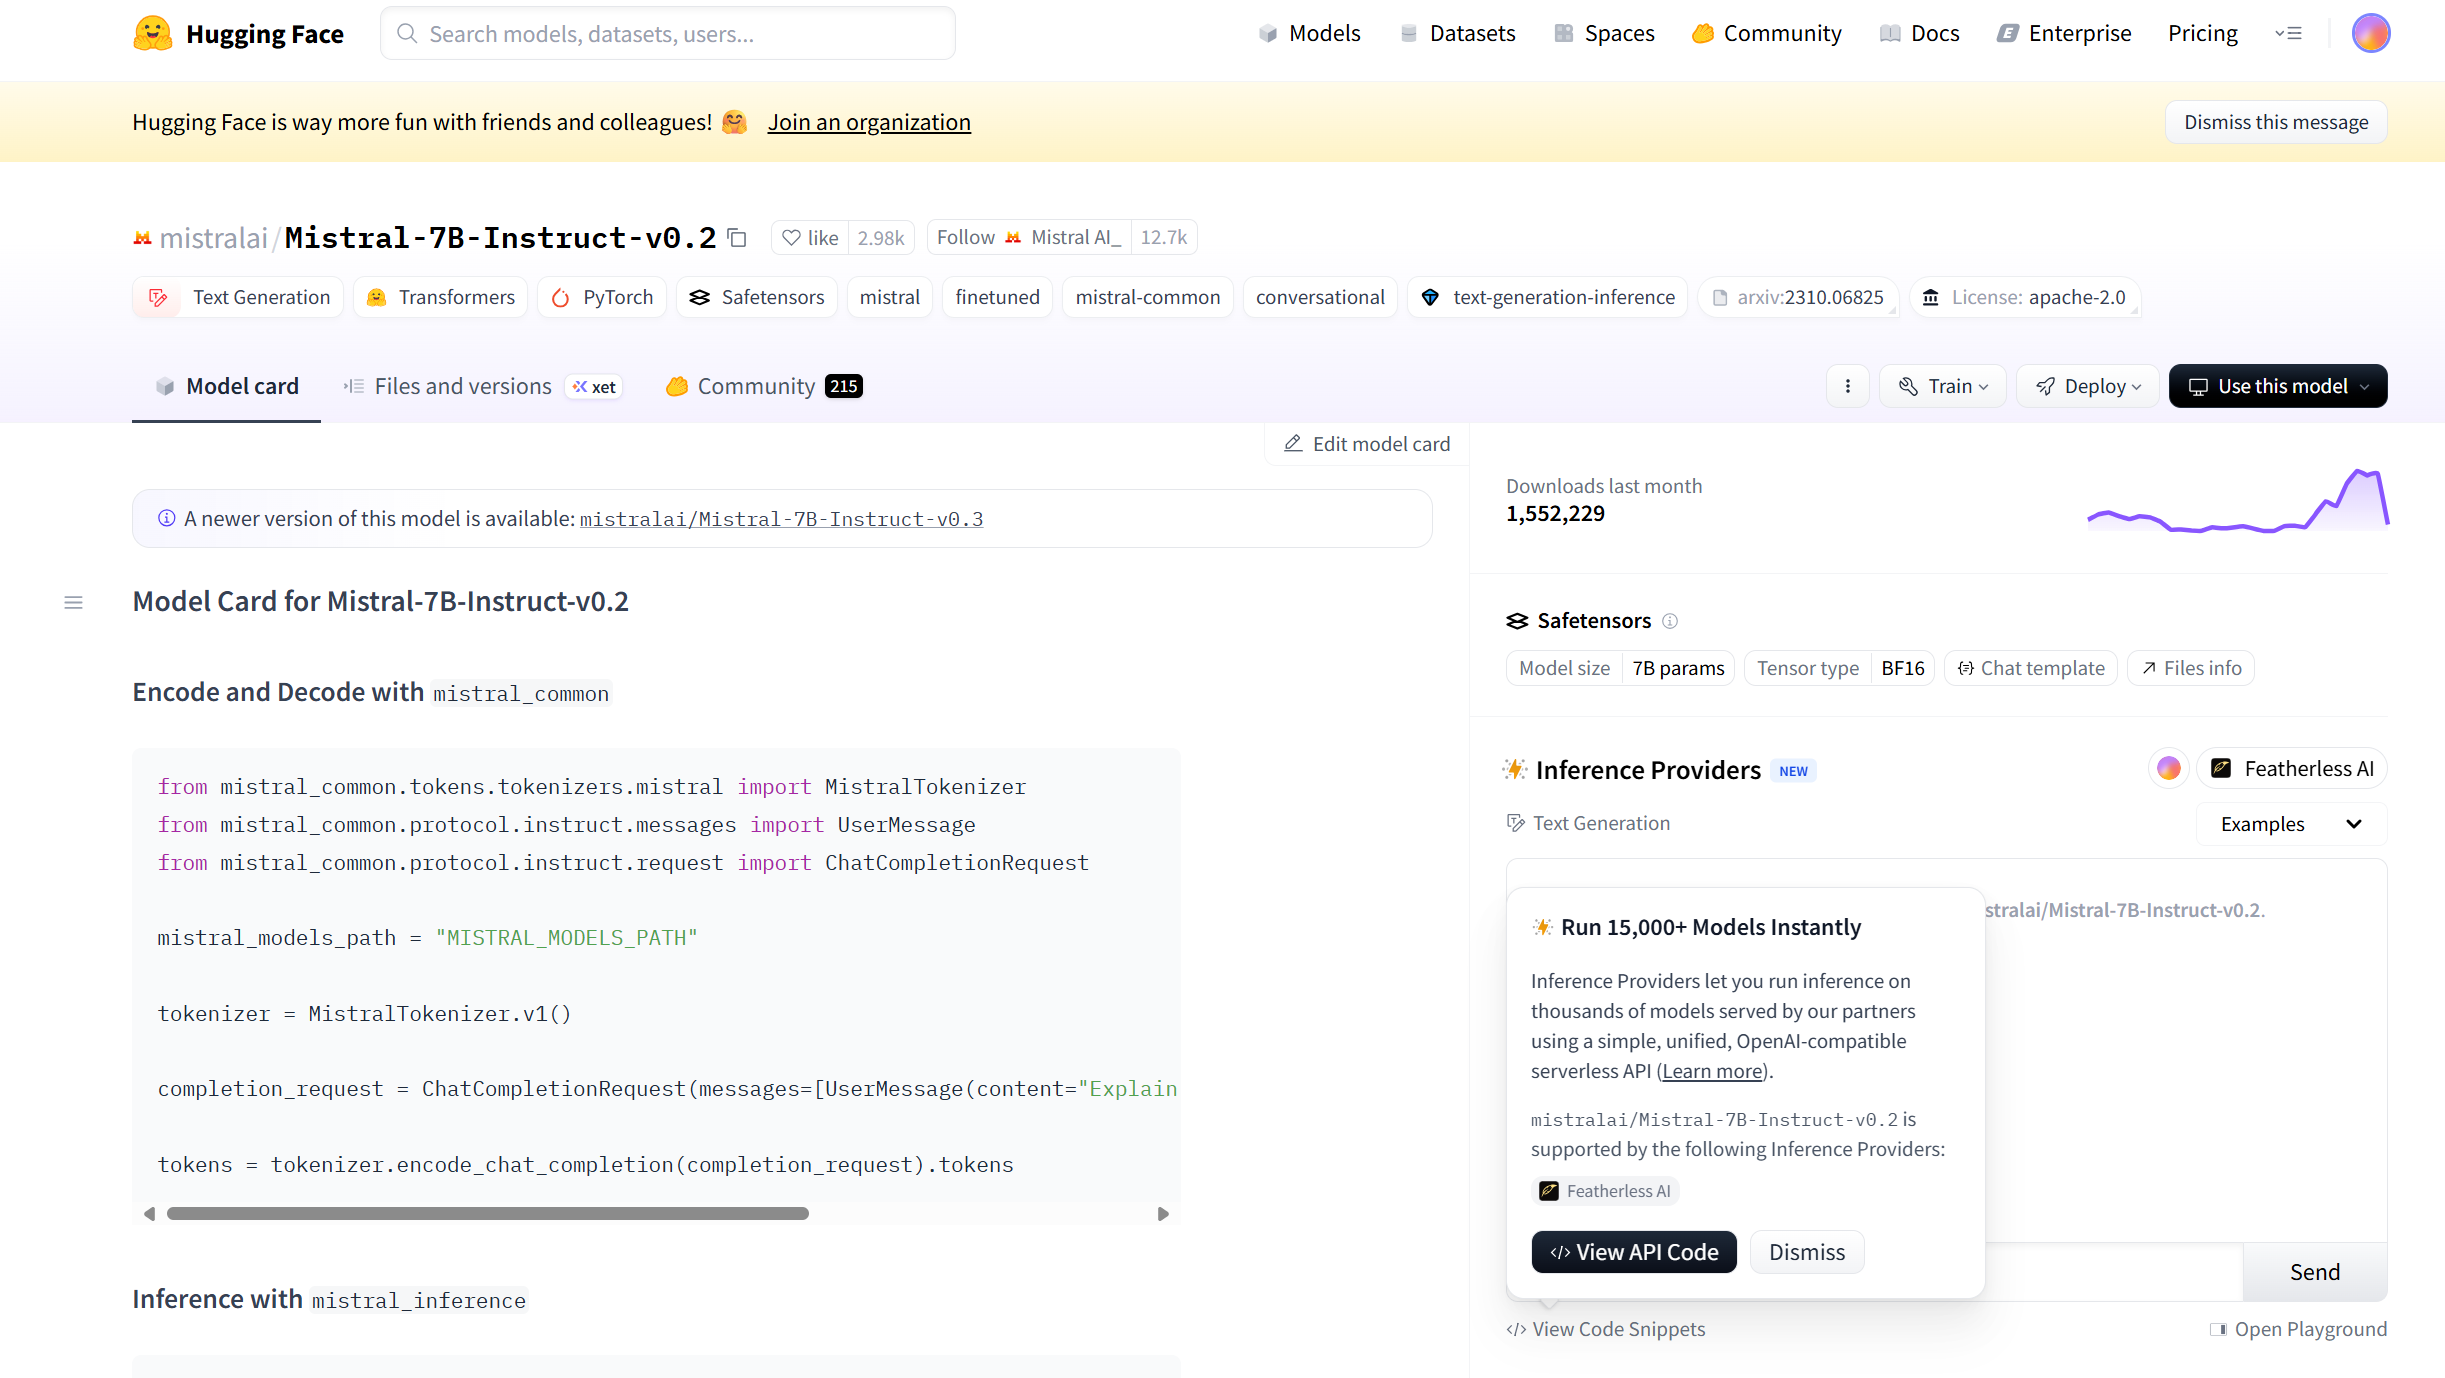
3.寻找调用代码的两种方法:
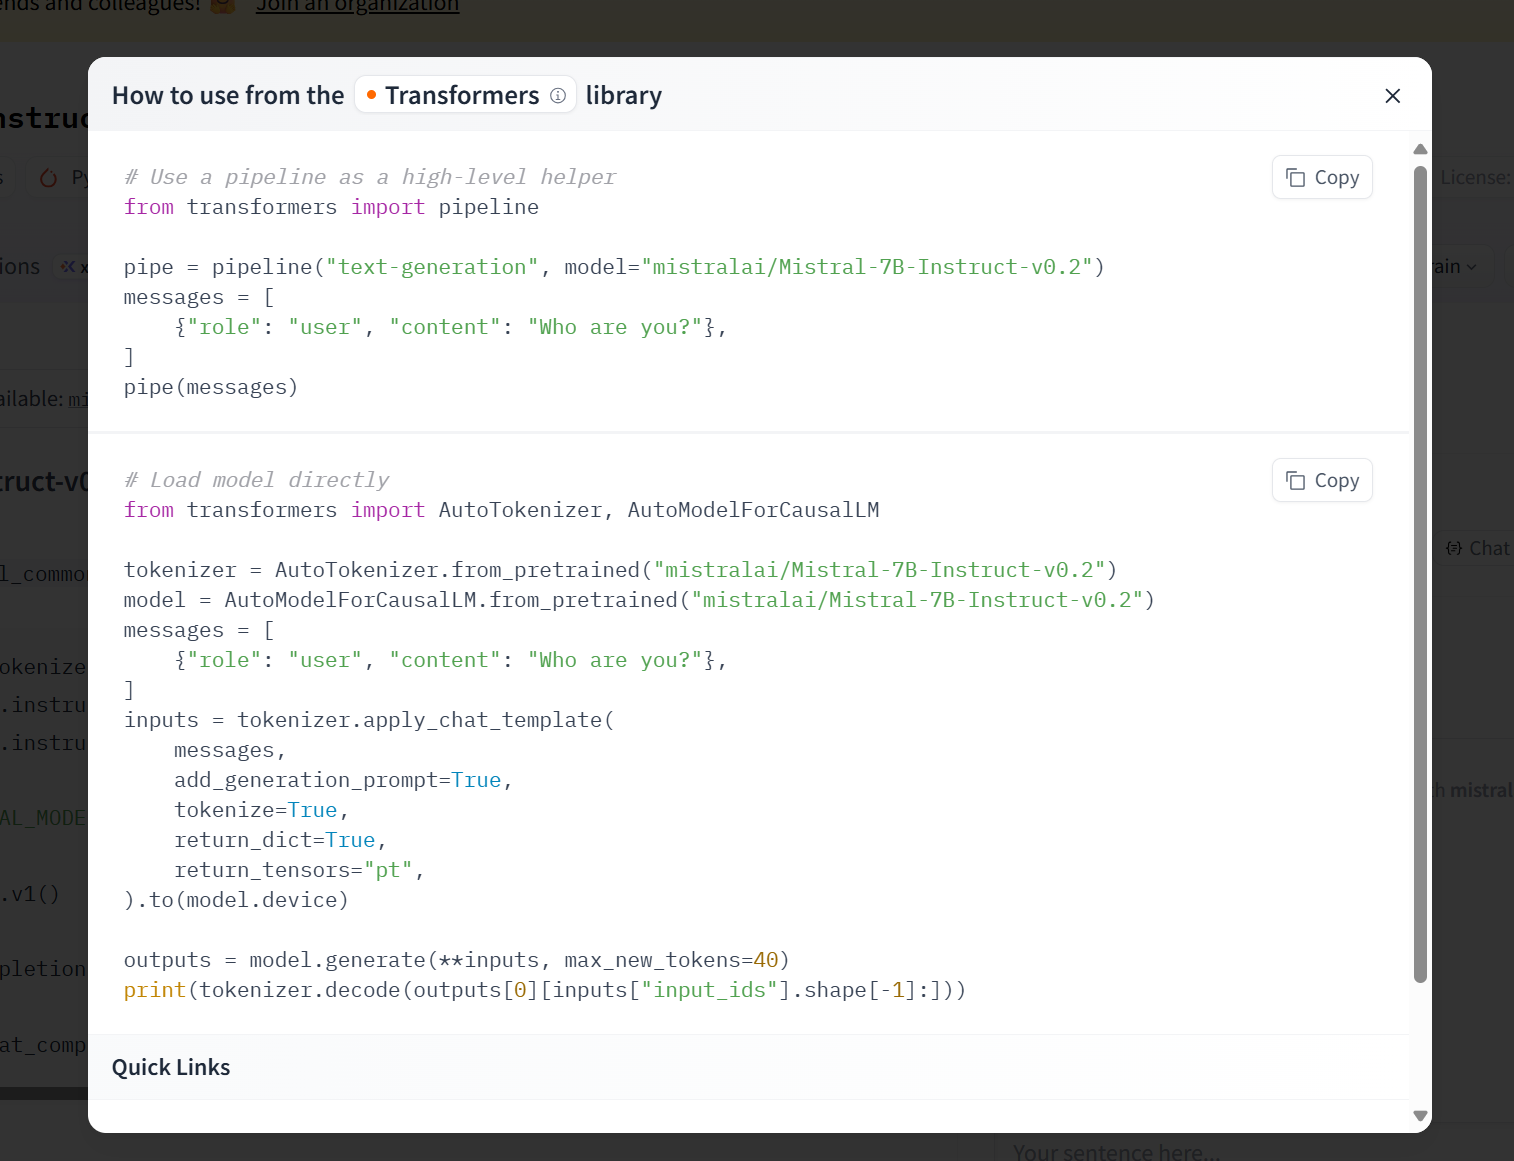
1)点击use this model, 选择接下来要使用的测试软件
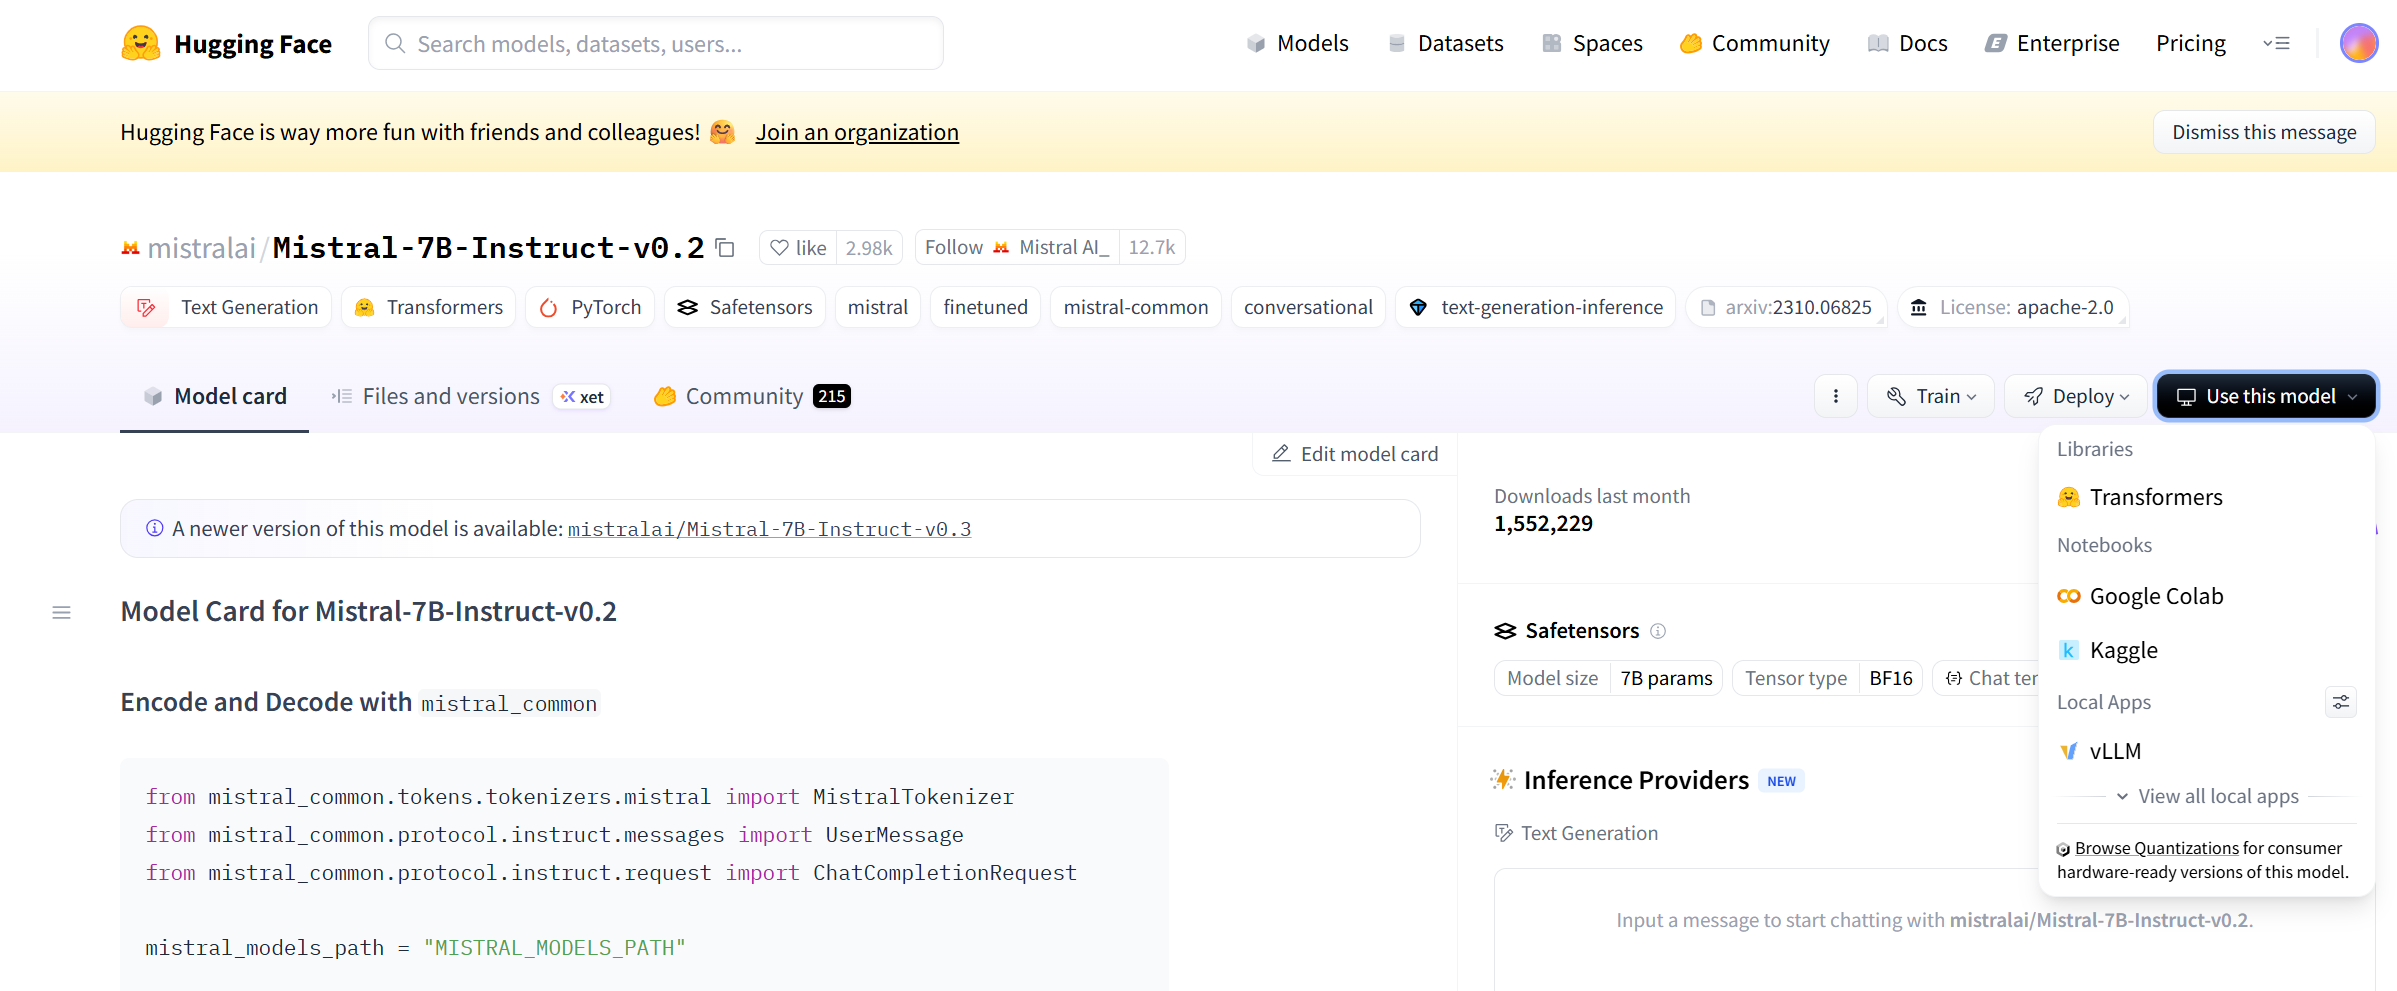
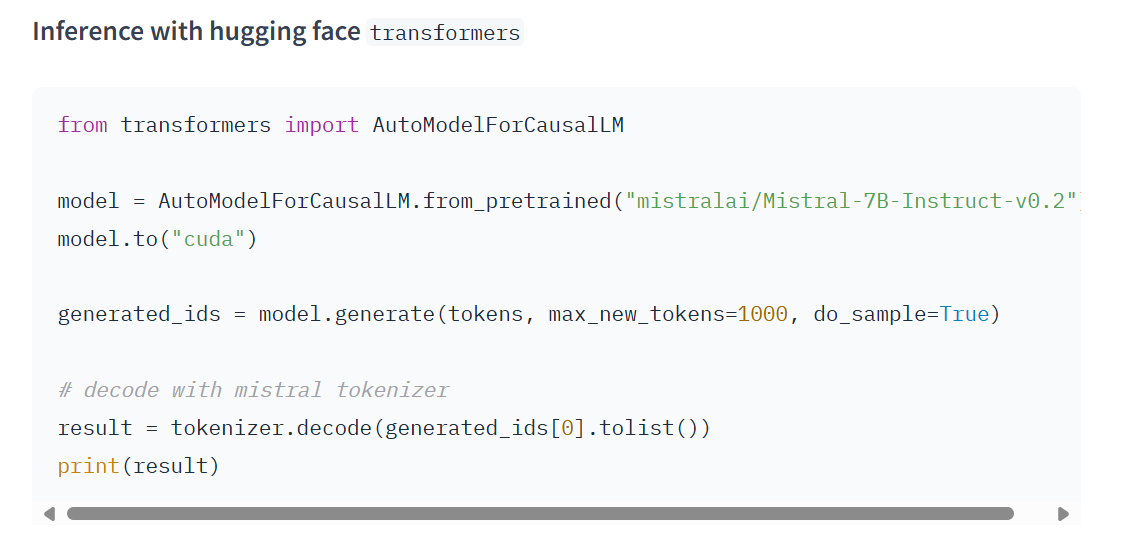
即可获得如下调用代码:
2)也可以直接将画面下翻即可看到大模型作者的贴心标语与调用指南
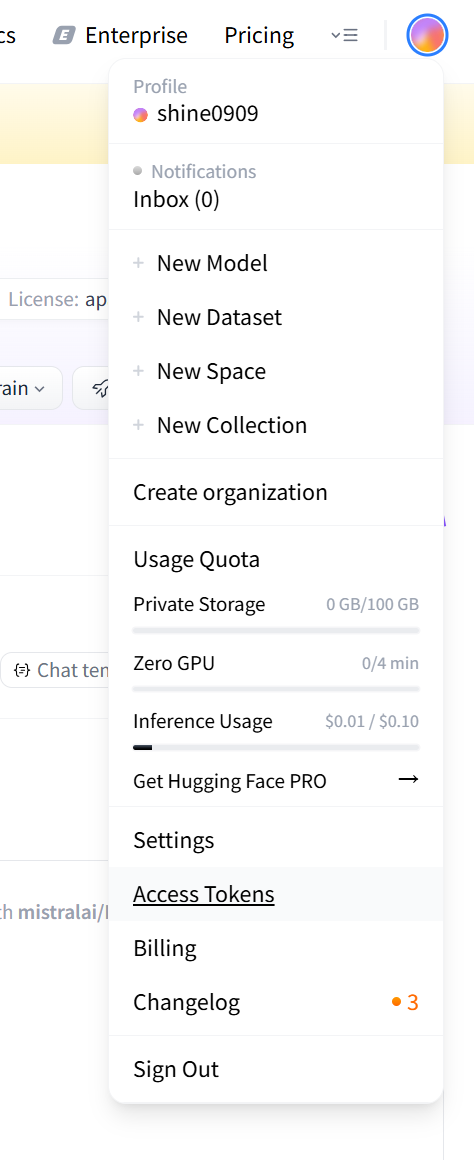
4.配置API:
1)点击页面右上角图像,点击Access Tokens
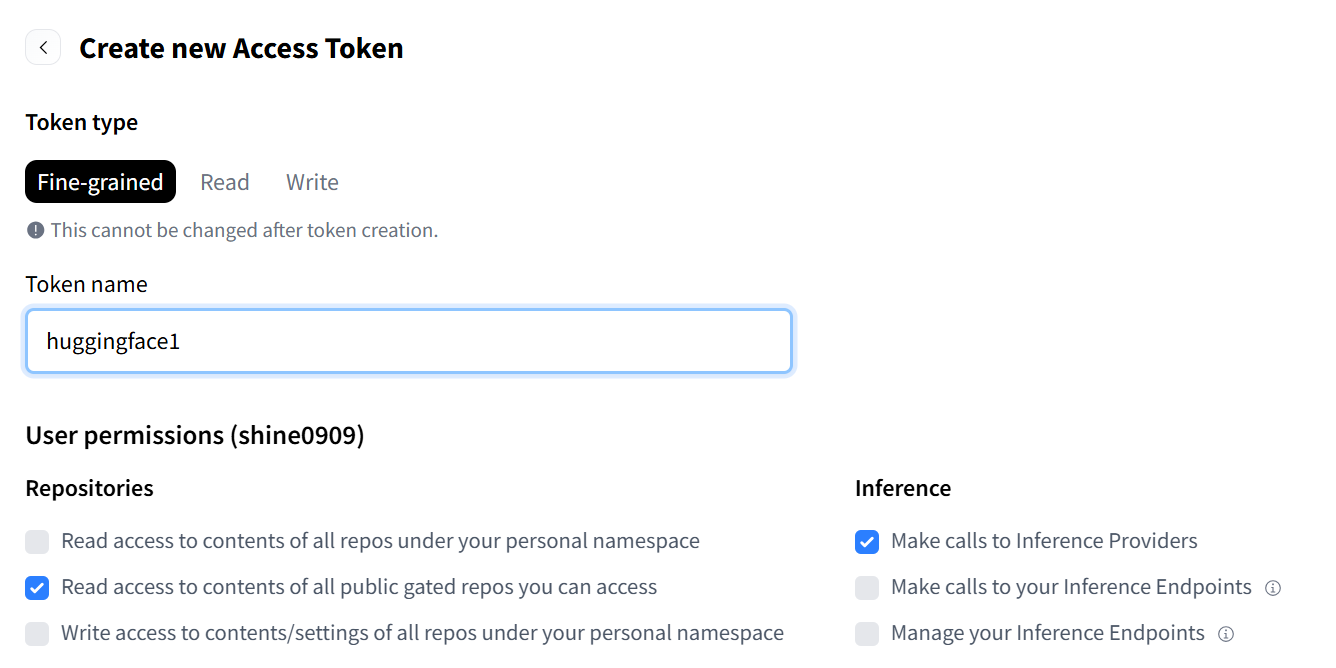
2)点击create new tokens:

3)API许可配置:
如果你的用途是测试模型,只需选择这两项并为你的token起名。
但如果是需要看模型内部详细代码等,则需要勾选write access一项。(部分模型还需要再申请获得作者许可才可以使用)
而后点击完成即可获得你的hugging face账号专属API。
5.调用模型:
在获得你的个人API之后就可以前往调用huggingface里面的大部分模型啦!
PS:个别模型在调用之前需要在第二步:模型主界面位置向作者进行许可申请
接下来以Mistral-7B-Instruct-v0.2为例阐述调用大致流程以及需要自行更改的部分
1)导入需要的使用的包
# 1. 安装必要的库:transformers, accelerate (用于分布式推理), bitsandbytes (用于4-bit量化)
!pip install transformers accelerate bitsandbytes sentencepiece protobuf
!pip install torch torchvision torchaudio  # 确保 PyTorch 环境是最新的
2)输入你的个人API登入huggingface账号
from huggingface_hub import login
# 将您的 Token 粘贴在引号内
login(token="你的API")
3)按照第三步作者提供的模型调用代码按照自己的需求自行更改
# ======================== 块 B: 模型加载和配置 (使用 Mistral-7B-Instruct) ========================
import torch
from transformers import AutoModelForCausalLM, AutoTokenizer, BitsAndBytesConfig

# 检查 GPU 是否可用
if not torch.cuda.is_available():
    raise SystemError("未检测到 GPU。请检查“运行时”设置。")
print("已检测到 GPU。")

# 1. 指定新的、顶级的通用指令模型 ID
model_id = "mistralai/Mistral-7B-Instruct-v0.2"

# 2. 配置 4-bit 量化 (NF4 dtype, Float16 compute)
bnb_config = BitsAndBytesConfig(
    load_in_4bit=True,
    bnb_4bit_quant_type="nf4",
    bnb_4bit_compute_dtype=torch.float16
)

print(f"正在加载模型: {model_id}...")

# 3. 加载模型
model = AutoModelForCausalLM.from_pretrained(
    model_id,
    device_map="auto", # 自动分配到 GPU
    quantization_config=bnb_config,
    torch_dtype=torch.float16,
    # Mistral 模型是公开的,通常不需要 Hugging Face token=True,但加上无妨
    token=True
)

# 4. 加载分词器
tokenizer = AutoTokenizer.from_pretrained(model_id, token=True)
tokenizer.pad_token = tokenizer.eos_token
print("模型和分词器加载完成,已准备就绪。")
4)输入你的prompt话语情景
# ======================== 块 C: Mistral 变量定义 (修正) ========================

# 定义 system_instruction 变量,以便在块 D 中使用
system_instruction = (
   输入你的背景prompt
)

print("System Instruction 变量已定义。")
5)输入具体prompt,并得到对应的结果
# ======================== 块 D: 问答推理 (最终修正:传递模板) ========================
import torch

# 1. 组合英文 Prompt (核心推理部分)
optimized_user_prompt_en = """
**Scenario:**
prompt

**Question:**
prompt

Let's think step by step to ensure a coherent and professional answer.
"""

# 2. 打印结果
response = tokenizer.decode(output_ids[0], skip_special_tokens=True)

print("\n======== 模型反馈结果 (Mistral-7B-Instruct 最终尝试) ========")

# 清理 LLM 输出:找到 [/INST] 标记的末尾,并提取之后的内容
user_prompt_end_marker = "[/INST]"
start_index = response.rfind(user_prompt_end_marker)

if start_index != -1:
    # 提取模型响应部分
    clean_response = response[start_index + len(user_prompt_end_marker):].strip()
else:
    # 如果没有找到标记,则打印全部响应
    clean_response = response.strip()

print(clean_response)
二、总结
最后,总结苯人在过程中踩到的所有坑
1.电脑配置不足:
坚持在自己的电脑上进行模型下载而本地空间不够导致模型加载不下来
2.模型选择错误:
下载好了但是选错了模型,进行了问答prompt,但是模型是处理填空与总结信息的。
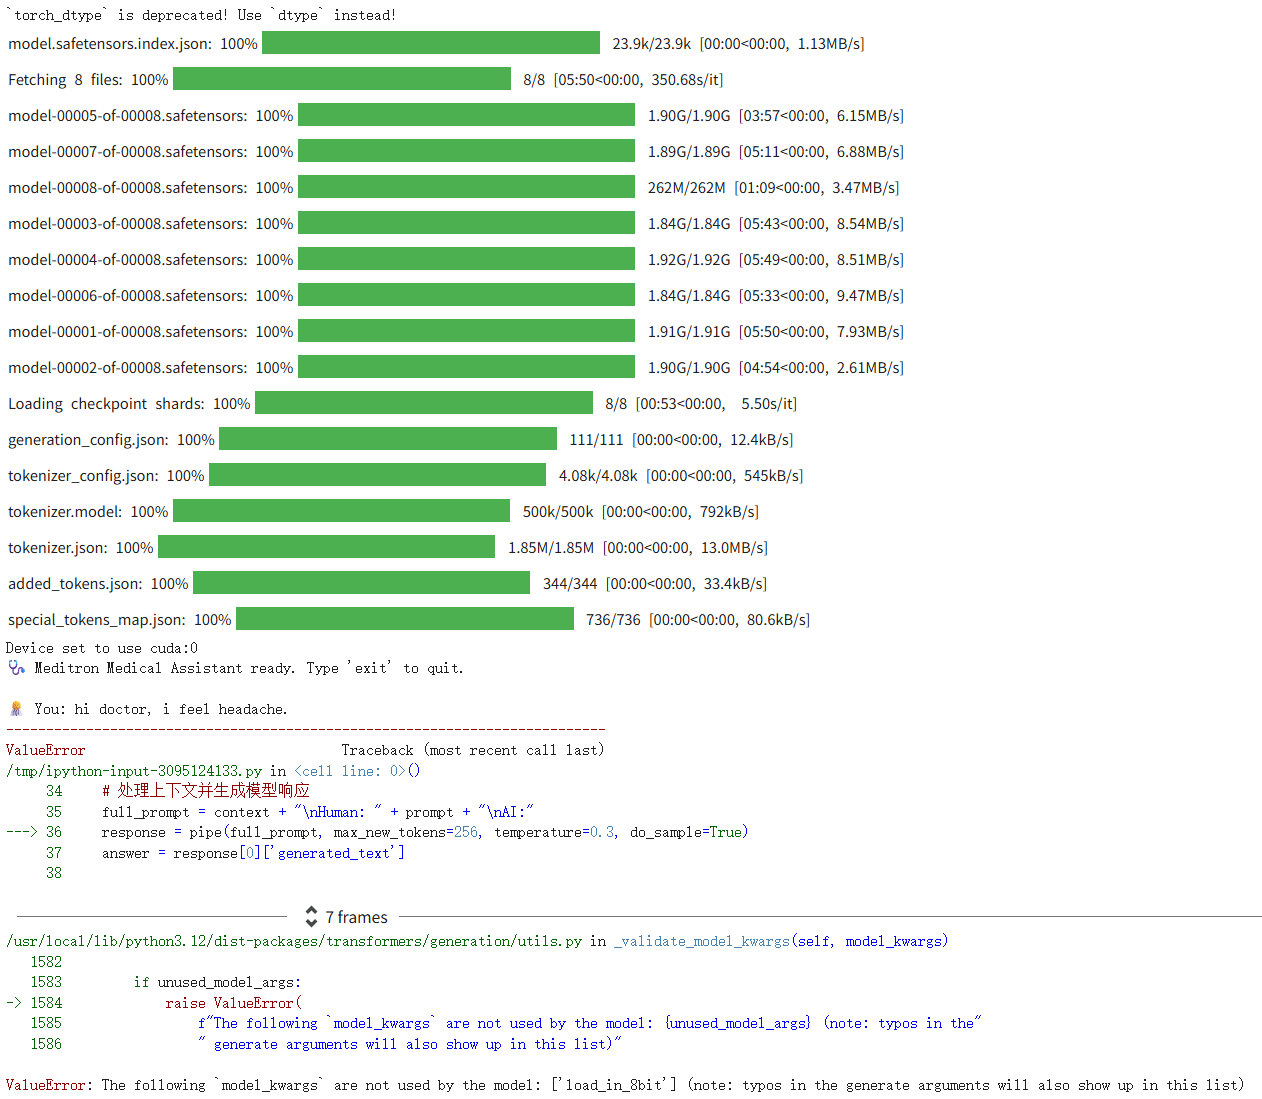
3.误把测试代码当作调用代码
误把huggingface模型快捷测试当作模型调用代码,此部分点击generate只能进行简单的填空测试。
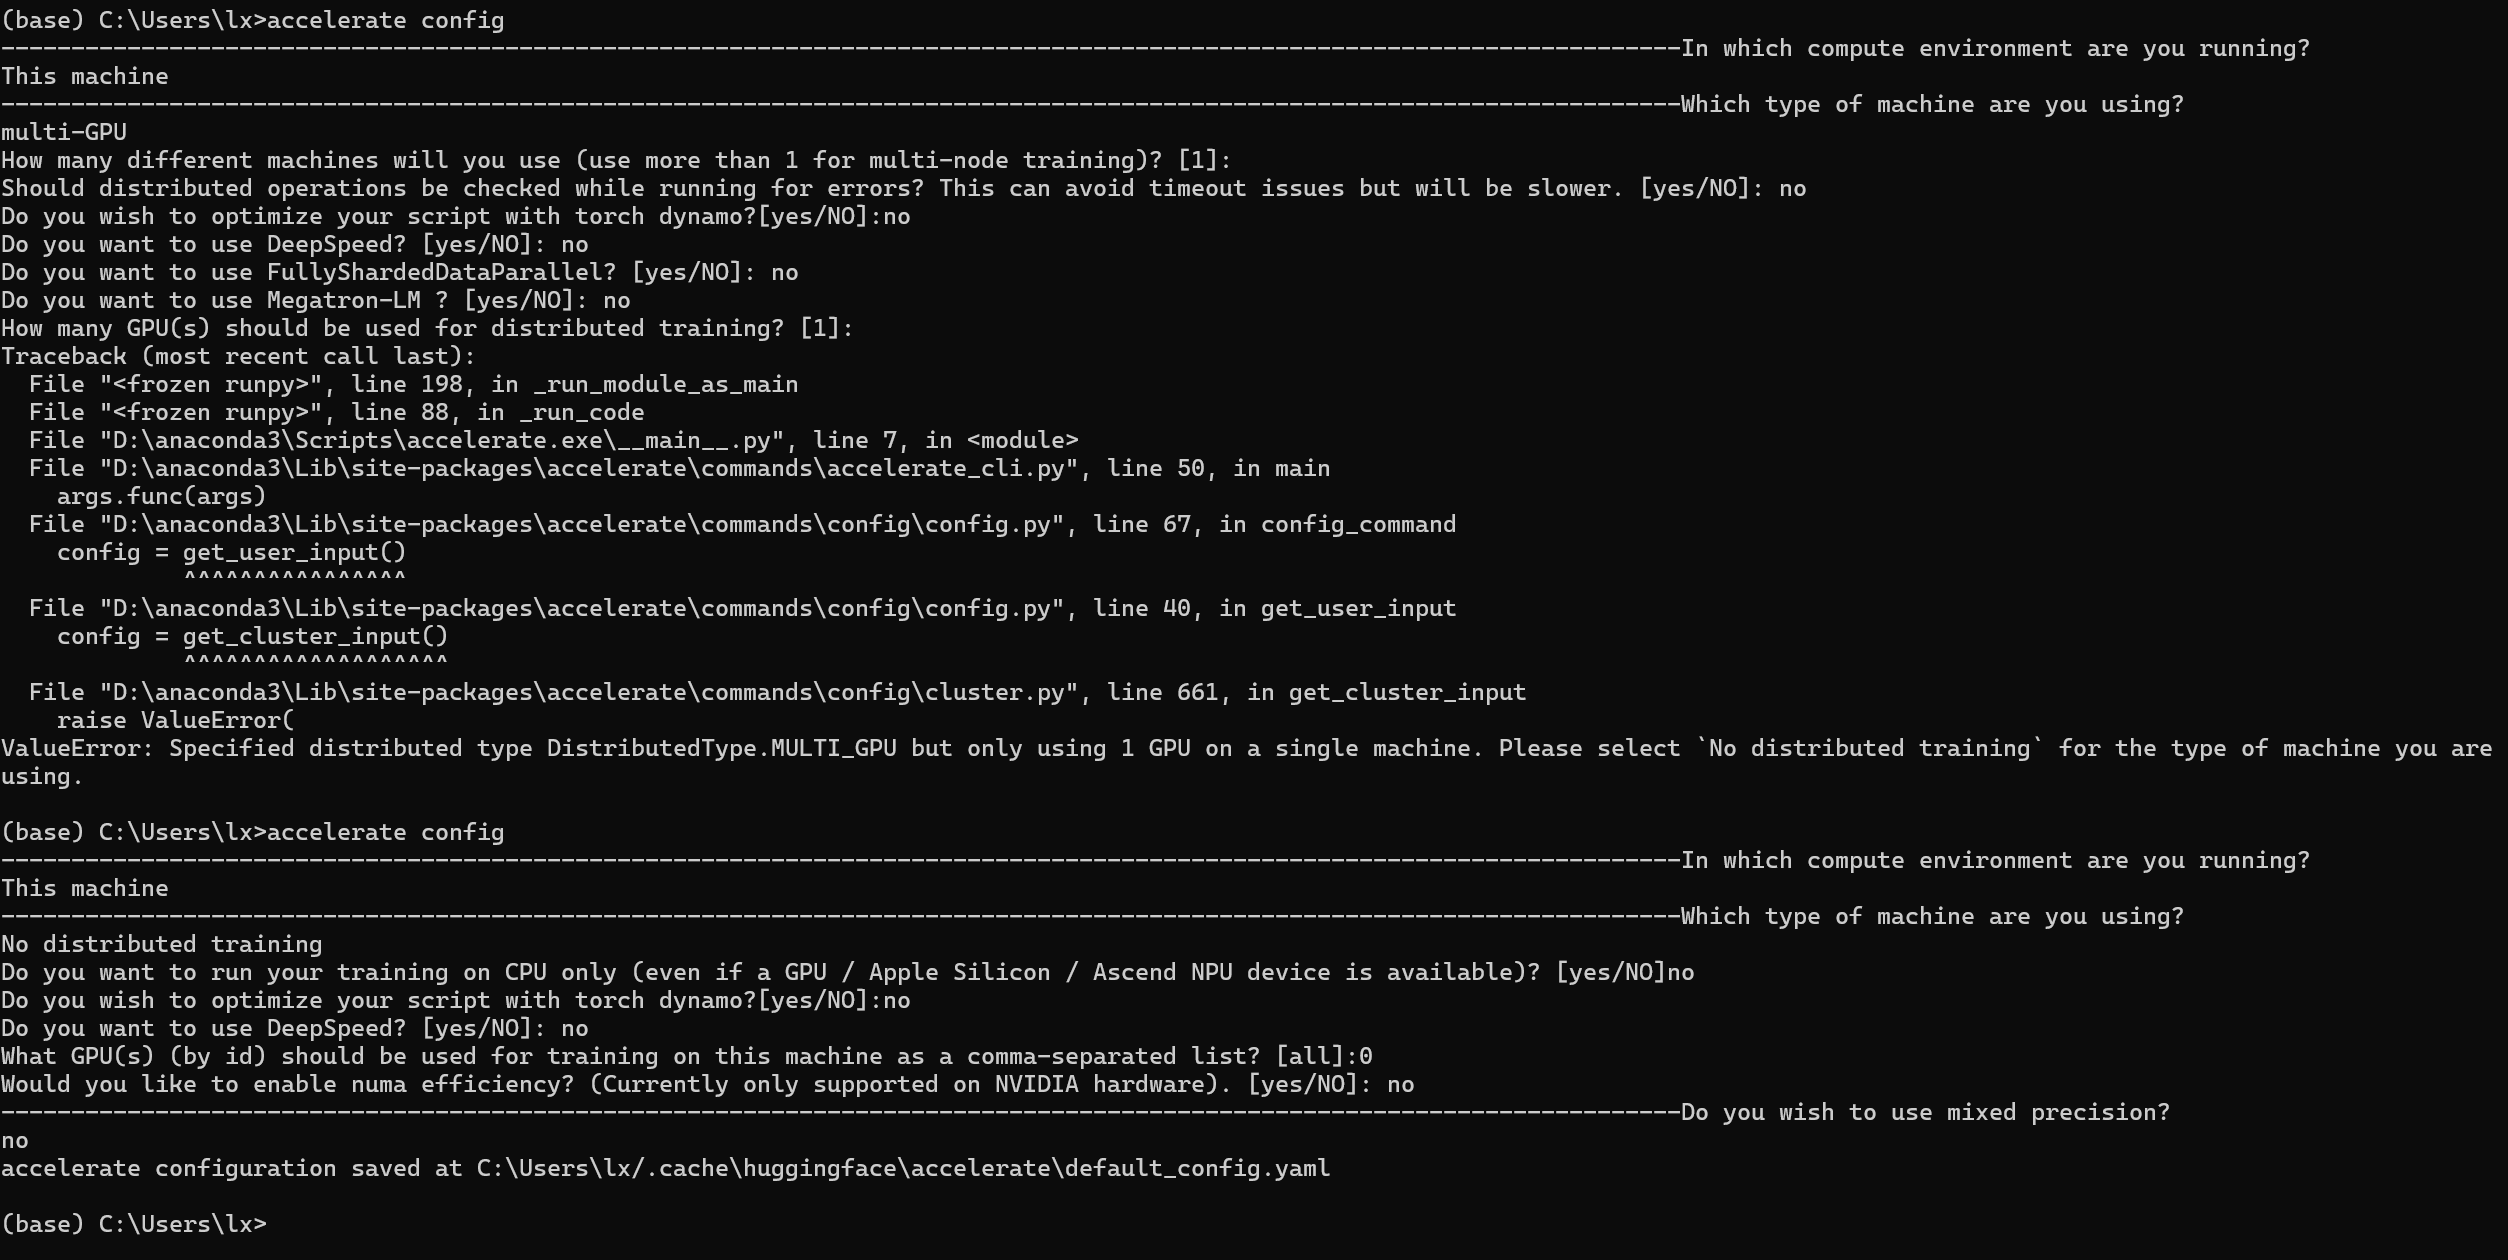
4.轻信AI:
因电脑配置不足,询问AI建议通过镜像网址下载,实践后配置依旧不够
加速配置如下:

火山引擎开发者社区是火山引擎打造的AI技术生态平台,聚焦Agent与大模型开发,提供豆包系列模型(图像/视频/视觉)、智能分析与会话工具,并配套评测集、动手实验室及行业案例库。社区通过技术沙龙、挑战赛等活动促进开发者成长,新用户可领50万Tokens权益,助力构建智能应用。
更多推荐
 14
14 0
0- 0


 已为社区贡献1条内容

所有评论(0)