XEngine开发日记(day5)
上集说道为了实现自己的输入功能我们创建了Input抽象类并创建具体的windowsInput类以实现面向windows的输入功能。
今天主要是利用ImGui的示例来实现窗口的停靠与视口。
📋 文章摘要
本文是XEngine游戏引擎开发系列的第二篇,主要介绍了如何为引擎集成ImGui的停靠(Docking)功能,实现可自由拖拽、组合的编辑器界面。主要内容包括:
- 引入GLM数学库 - 添加OpenGL Mathematics库作为子模块,为图形编程提供数学支持
- 切换ImGui到docking分支 - 将ImGui子模块从master分支切换到docking分支,获取停靠功能支持
- 重写ImGuiLayer类 - 重构ImGui渲染层,启用停靠和多视口功能,集成OpenGL和GLFW后端
- 优化层栈管理 - 将LayerStack中的迭代器改为索引,避免迭代器失效问题
- 开发环境迁移 - 将项目迁移到VS2026开发环境
通过本文的改造,XEngine引擎获得了现代化的编辑器界面,支持窗口自由停靠、拖拽和组合,为后续的编辑器开发奠定了基础。
引入GLM
GLM(OpenGL Mathematics)是一个专为图形编程设计的 C++ 数学库,它提供了与 GLSL(OpenGL Shading Language)高度一致的向量、矩阵等数学运算接口。GLM 库体积小巧、头文件化,无需编译即可直接包含使用,是 OpenGL、Vulkan 等图形 API 开发中常用的数学工具库。
github网址 glm
依旧fork
然后引入为子模块。
但是它不需要premake文件。因为他只需要一个头文件就可以引入,非常方便。
引入ImGui的docking分支
由于停靠的代码在ImGui的docking分支中,因此我们如果要使用他的实现,需要把ImGui子模块的分支切换到docking分支。
由于我之前只fork了master分支,现在要增加对docking分支的引入。
通过在这里直接搜索docking就可以直接获取到fork对象的docking分支(我这里已经获取完了)。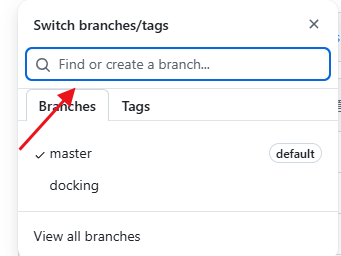
然后好像要在这里同步一下fork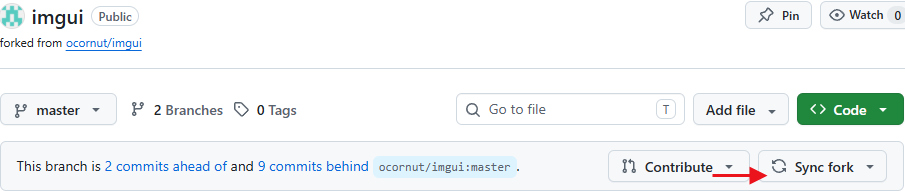
然后就获取到了最新的docking分支的代码。
然后我们回到本地的ImGui目录打开控制台。
输入git status对当前git状态进行查看,可以看到当前在主分支上。
由于我们引入了新的分支,这里不能直接切换(checkout),因为还没有获取远程的索引之类的,本地并不知道我们进行了添加,如果你直接checkout就会变成这样
说明本地并不知道docking的存在。
因此我们先进行fetch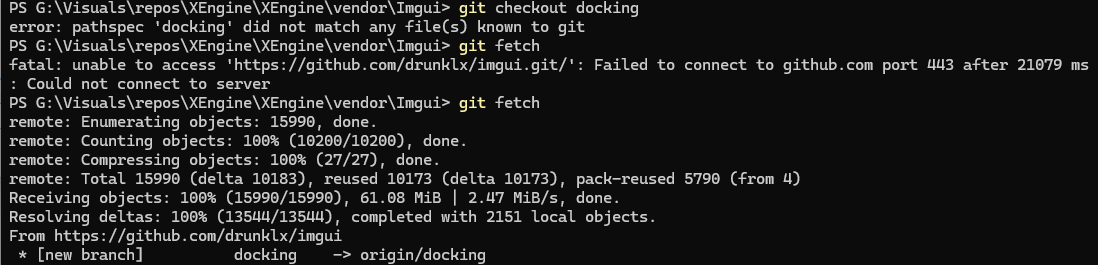
可以看到第一次fetch失败了,因为没开科学上网工具导致连不上github网络,第二次成功获取到了docking分支。
然后我们再次进行checkout,成功切换到docking。
现在就可以正常进行使用了。
改写ImGuiLayer
首先我们在Imgui目录下新建ImguiBuild.cpp
ImguiBuild.cpp
#include  "xepch.h"

#define IMGUI_IMPL_OPENGL_LOADER_CUSTOM
#include "glad/glad.h"

#include "backends/imgui_impl_opengl3.cpp"
#include "backends/imgui_impl_glfw.cpp"
这个宏定义主要是
imgui_impl_opengl3.cpp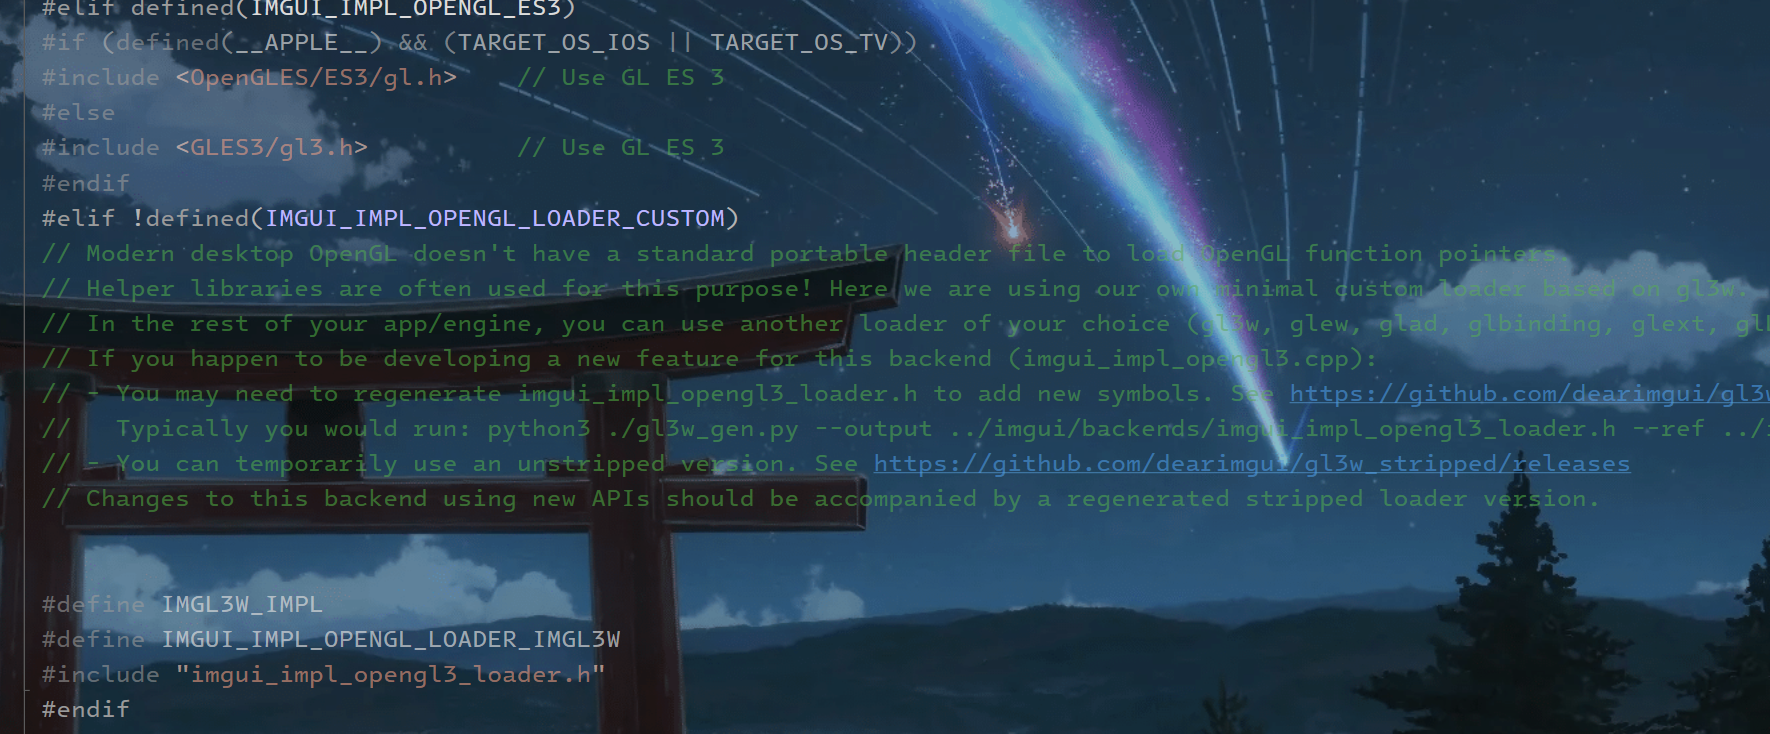
这里面它使用了自定义的opengl3_loader,我们要使用glad进行加载因此直接进行宏定义。
这个文件大体就是用来对这两个文件(imgui_impl_opengl3.cpp和imgui_impl_glfw.cpp)进行编译。
便于我们来使用。
接着来改写一下ImguiLayer
ImguiLayer.h
#pragma once

#include "XEngine/Layer.h"


namespace XEngine
{
	// ImGui渲染层,负责引擎中Imgui的初始化、渲染、事件拦截与销毁
	class X_API ImguiLayer : public Layer
	{
	public:
		ImguiLayer();                     // 构造函数:初始化ImguiLayer成员变量
		virtual ~ImguiLayer() = default;   // 析构函数:默认实现

		virtual void OnAttach() override;          // 层被添加时调用:初始化ImGui上下文、样式、后端
		virtual void OnDetach() override;          // 层被移除时调用:释放ImGui资源
		virtual void OnImGuiRender() override;

		void Begin();                       // 开始新一帧ImGui
		void End();                         // 结束ImGui帧,渲染ImGui界面

	private:
		float m_Time;                     // 记录时间,用于ImGui计算帧间隔
	};
}
ImguiLayer.cpp
#include "xepch.h"
#include "ImguiLayer.h"
#include "imgui.h"
// OpenGL 渲染 ImGui 的实现
#include "backends/imgui_impl_opengl3.h"
#include "backends/imgui_impl_glfw.h"
// 应用程序类,获取窗口信息
#include "XEngine/Application.h"
// GLFW 窗口库
#include "GLFW/glfw3.h"
// OpenGL 函数加载
#include <glad/glad.h>

namespace XEngine
{
	// 构造函数:调用父类Layer,设置层名称
	ImguiLayer::ImguiLayer()
		: Layer("ImguiLayer")
	{
	}

	// 层被附加时调用:初始化 ImGui 上下文 + OpenGL 后端
	void ImguiLayer::OnAttach()
	{
		// Setup Dear ImGui context
		IMGUI_CHECKVERSION();
		ImGui::CreateContext();
		ImGuiIO& io = ImGui::GetIO(); (void)io;
		io.ConfigFlags |= ImGuiConfigFlags_NavEnableKeyboard;     // Enable Keyboard Controls
		io.ConfigFlags |= ImGuiConfigFlags_NavEnableGamepad;      // Enable Gamepad Controls
		io.ConfigFlags |= ImGuiConfigFlags_DockingEnable;         // Enable Docking
		io.ConfigFlags |= ImGuiConfigFlags_ViewportsEnable;       // Enable Multi-Viewport / Platform Windows
		//io.ConfigViewportsNoAutoMerge = true;
		//io.ConfigViewportsNoTaskBarIcon = true;

		// Setup Dear ImGui style
		ImGui::StyleColorsDark();

		ImGuiStyle& style = ImGui::GetStyle();
		if (io.ConfigFlags & ImGuiConfigFlags_ViewportsEnable)
		{
			style.WindowRounding = 0.0f;
			style.Colors[ImGuiCol_WindowBg].w = 1.0f;
		}

		Application& app = Application::Get();			//!!!Get是静态函数,GetWindow是成员函数,使用方法不同
		GLFWwindow* window = static_cast<GLFWwindow*>(app.GetWindow().GetNativeWindow());

		// Setup Platform/Renderer bindings
		ImGui_ImplGlfw_InitForOpenGL(window, true);
		ImGui_ImplOpenGL3_Init("#version 410");
	}

	// 层被分离时调用:释放 ImGui 资源(目前空实现)
	void ImguiLayer::OnDetach()
	{
		// Cleanup
		ImGui_ImplOpenGL3_Shutdown();
		ImGui_ImplGlfw_Shutdown();
		ImGui::DestroyContext();
	}


	void ImguiLayer::Begin()
	{
		// Start the Dear ImGui frame
		ImGui_ImplOpenGL3_NewFrame();						//每一帧开始时准备 OpenGL 渲染环境以供 Dear ImGui 绘制 UI 元素
		ImGui_ImplGlfw_NewFrame();
		ImGui::NewFrame();									//清除之前的 UI 数据,准备接受新的 UI 绘制指令(准备新帧),并更新输入状态
	}

	void ImguiLayer::OnImGuiRender()						//此函数将会被设置在 Begin 和 End 之间,并且可以由任何层编写
	{
		static bool show = true;
		ImGui::ShowDemoWindow(&show);
	}


	void ImguiLayer::End()
	{
		Application& app = Application::Get();
		ImGuiIO& io = ImGui::GetIO();
		io.DisplaySize = ImVec2(app.GetWindow().GetWidth(), app.GetWindow().GetHeight());
		// Rendering
		ImGui::Render();										//结束当前帧的 UI 绘制过程,并准备将绘制的数据保存到暂存区
		ImGui_ImplOpenGL3_RenderDrawData(ImGui::GetDrawData());	//将缓冲区中的绘制数据提交给渲染器进行操作
		if (io.ConfigFlags & ImGuiConfigFlags_ViewportsEnable)
		{
			GLFWwindow* backup_current_context = glfwGetCurrentContext();
			ImGui::UpdatePlatformWindows();
			ImGui::RenderPlatformWindowsDefault();
			glfwMakeContextCurrent(backup_current_context);
		}
	}
}
这里OnAttach基本上是对其实现的复制
example_glfw_opengl3/main.cpp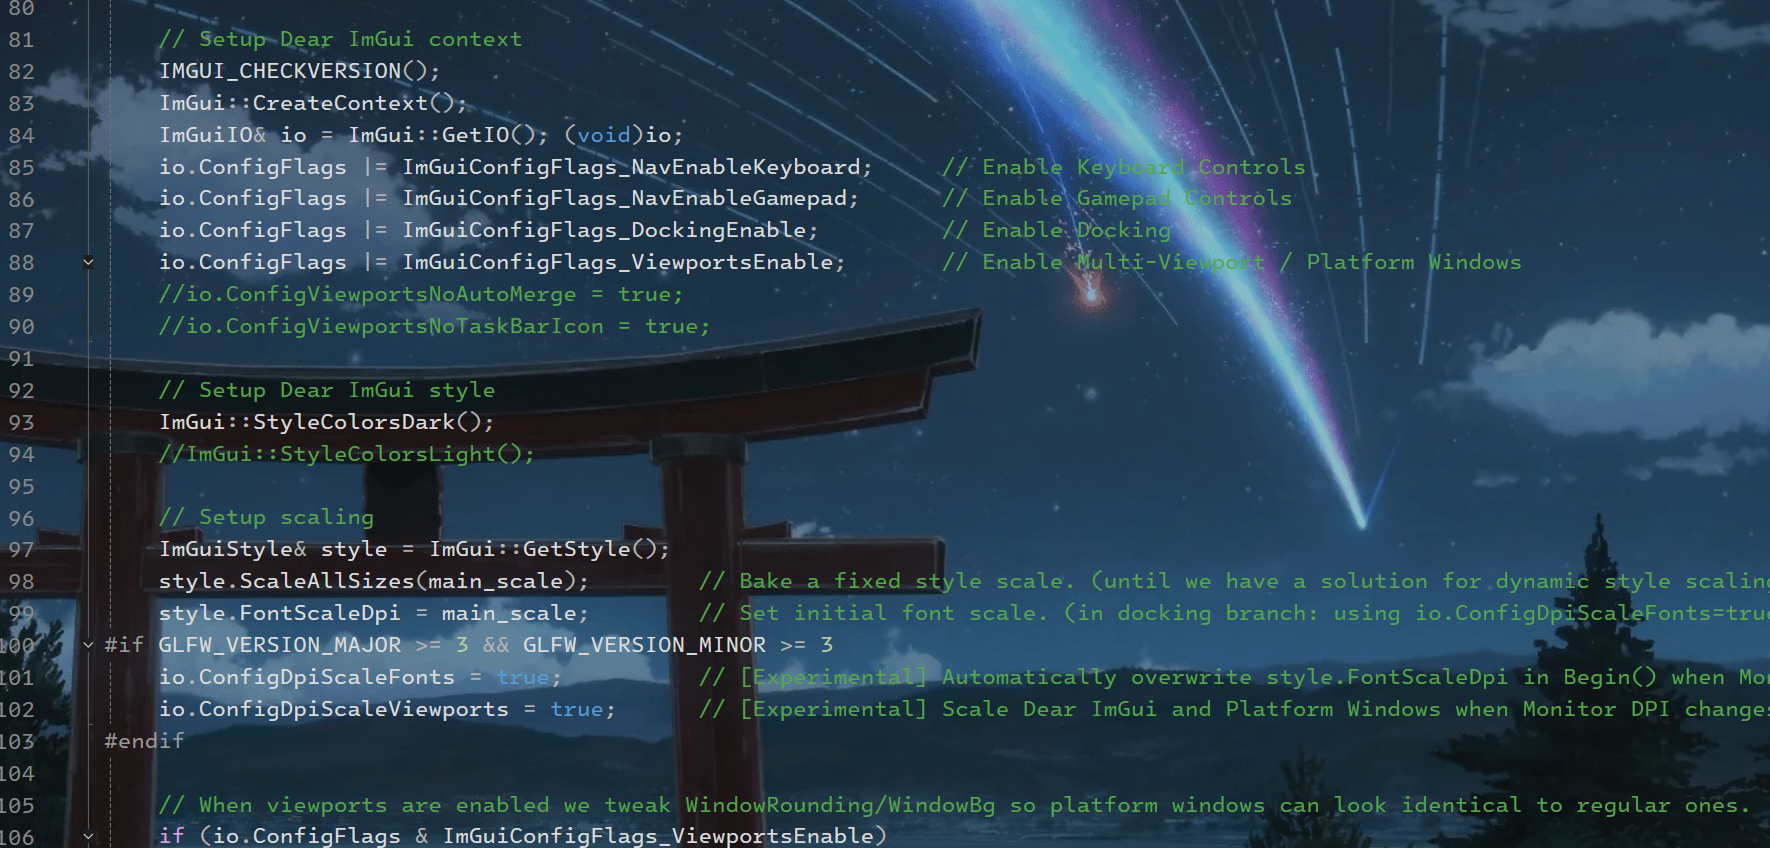
这样就基本完成了对ImGui类的改写。
然后我们不再将ImGuiLayer的创建放在客户端而是直接在引擎中进行创建了。
//application.h
ImguiLayer* m_ImGuiLayer;
//application.cpp
Application::Application()
{
	...
	m_ImGuiLayer = new ImguiLayer();
	PushOverlay(m_ImGuiLayer);
}
测试一下功能。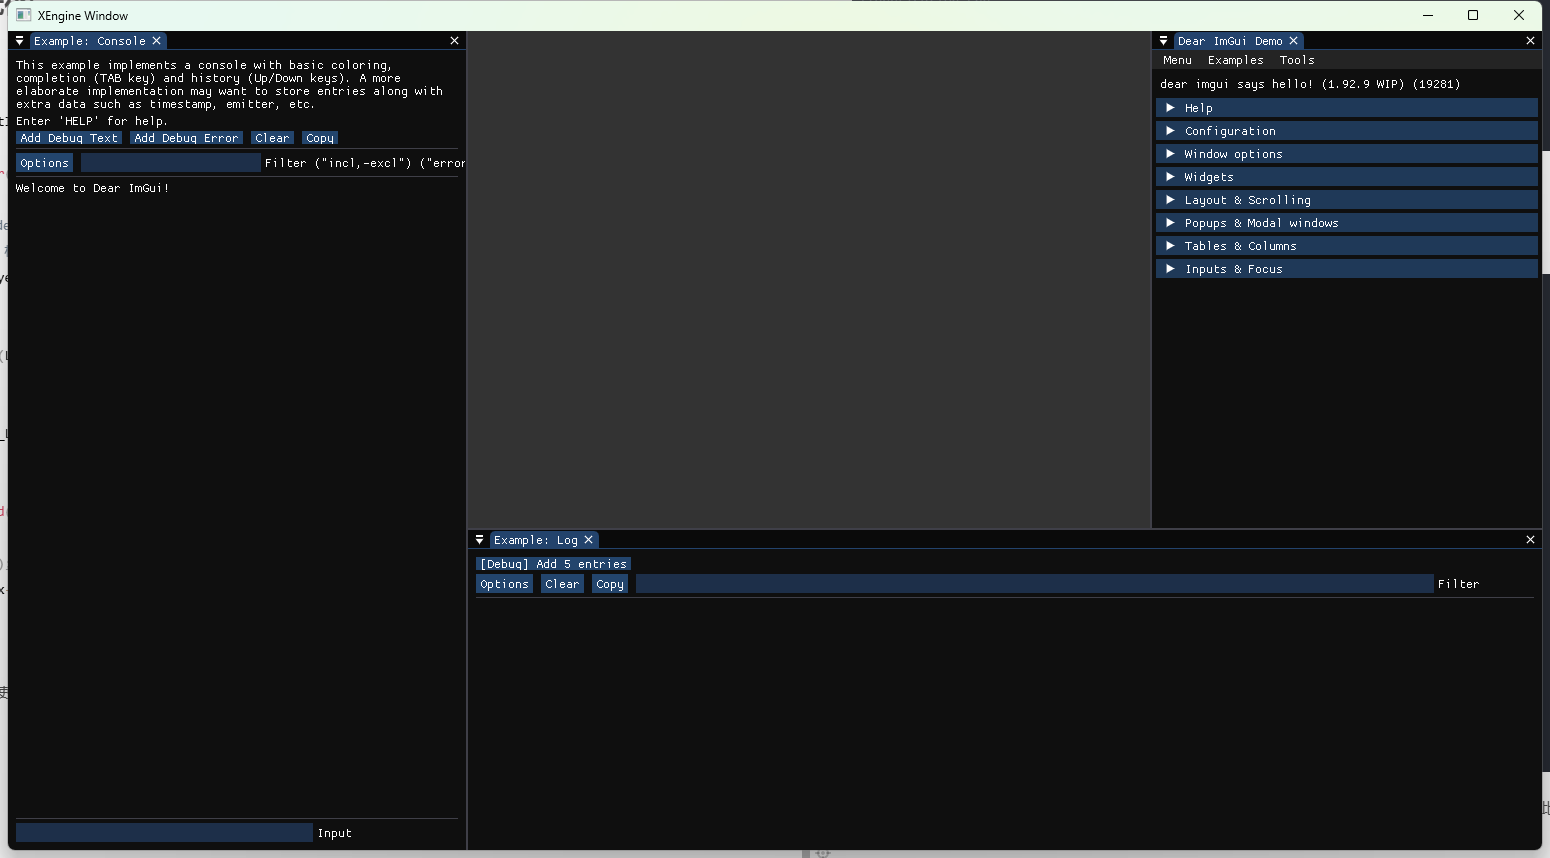
看起来很不错,我们可以自由的将窗口进行停靠或者移动。
更改一下层栈(优化)
//LayerStack.h
unsigned int m_LayerInsertIndex=0;
//LayerStack.cpp
void LayerStack::PushLayer(Layer* layer)
{
	// 在 m_LayerInsertIndex 迭代器位置插入层
	// m_LayerInsertIndex 标记普通层和覆盖层的分界线
	m_Layers.emplace(m_Layers.begin()+m_LayerInsertIndex, layer);
}
// 从层栈中移除【普通层】
void LayerStack::PopLayer(Layer* layer)
{
	// 查找要移除的层
	auto it = std::find(m_Layers.begin(), m_Layers.end(), layer);

	// 如果找到了
	if (it != m_Layers.end())
	{
		m_Layers.erase(it);    // 从容器中删除
		m_LayerInsertIndex--;       // 插入指针同步前移
	}
}
由于之前对Insert这个变量使用的是vector的迭代器,但是由于迭代器可能在resize过程中失效,因此改成使用直接索引来记录保存的Layer位置。
开发环境迁移
由于换了新的电脑,打算试试vs2026因此要对原本的环境进行迁移。
把GenerateProjects.bat改一下就行。
call Vendor\bin\premake5.exe vs2026
PAUSE
然后直接运行,重新编译就好了。
premake太强大了。

中国智能体开发者社区,聚焦智能体与大模型开发,提供前沿资讯、实用工具链、开源项目及行业案例。通过技术沙龙、开发者大赛等活动,促进经验交流与协作,助力开发者快速构建创新智能应用。
更多推荐
 4
4 0
0- 0


 已为社区贡献2条内容

所有评论(0)