JavaSpring AI 接入本地ollama大模型
·
嗨嗨嗨,2026第一篇文章,新年快乐!
背景:macos 15.4 with m4pro
前置知识:mac本地ollama部署大模型
IDEA最新版:就是合并了社区版和商业版的新版本,新版自带免费的SpringBoot!!!~~泪目了wuwuwuwu,属于插件的时代还是过去了哈哈哈哈💦
maven使用最新稳定版本,Spring使用3.5.11
稳定版本
———————————————————————正式开始——————————————————————
1.新建项目开始,直接使用自带的生成器即可
使用jdk17就行了,非常经典的jdk版本。
然后配置文件yaml和properties类型都可以,个人更加习惯yaml一点
项目类型我是用的maven
依赖选择:web , reactive web,ollama 即可
<?xml version="1.0" encoding="UTF-8"?>
<project xmlns="http://maven.apache.org/POM/4.0.0" xmlns:xsi="http://www.w3.org/2001/XMLSchema-instance"
         xsi:schemaLocation="http://maven.apache.org/POM/4.0.0 https://maven.apache.org/xsd/maven-4.0.0.xsd">
    <modelVersion>4.0.0</modelVersion>
    <parent>
        <groupId>org.springframework.boot</groupId>
        <artifactId>spring-boot-starter-parent</artifactId>
        <version>3.5.11</version>
        <relativePath/> <!-- lookup parent from repository -->
    </parent>
    <groupId>com.wc</groupId>
    <artifactId>ai-demo</artifactId>
    <version>0.0.1-SNAPSHOT</version>
    <name>ai-demo</name>
    <description>ai-demo</description>
    <url/>
    <licenses>
        <license/>
    </licenses>
    <developers>
        <developer/>
    </developers>
    <scm>
        <connection/>
        <developerConnection/>
        <tag/>
        <url/>
    </scm>
    <properties>
        <java.version>17</java.version>
        <spring-ai.version>1.1.2</spring-ai.version>
    </properties>
    <dependencies>
        <dependency>
            <groupId>org.springframework.boot</groupId>
            <artifactId>spring-boot-starter-web</artifactId>
        </dependency>
        <dependency>
            <groupId>org.springframework.boot</groupId>
            <artifactId>spring-boot-starter-webflux</artifactId>
        </dependency>
        <dependency>
            <groupId>org.springframework.ai</groupId>
            <artifactId>spring-ai-starter-model-ollama</artifactId>
        </dependency>

        <dependency>
            <groupId>org.springframework.boot</groupId>
            <artifactId>spring-boot-starter-test</artifactId>
            <scope>test</scope>
        </dependency>
        <dependency>
            <groupId>io.projectreactor</groupId>
            <artifactId>reactor-test</artifactId>
            <scope>test</scope>
        </dependency>
    </dependencies>
    <dependencyManagement>
        <dependencies>
            <dependency>
                <groupId>org.springframework.ai</groupId>
                <artifactId>spring-ai-bom</artifactId>
                <version>${spring-ai.version}</version>
                <type>pom</type>
                <scope>import</scope>
            </dependency>
        </dependencies>
    </dependencyManagement>

    <build>
        <plugins>
            <plugin>
                <groupId>org.springframework.boot</groupId>
                <artifactId>spring-boot-maven-plugin</artifactId>
            </plugin>
        </plugins>
    </build>

</project>
最后创建即可
2.配置文件
spring:
  application:
    name: ai-demo
  ai:
    ollama:
      base-url: http://localhost:11434
      chat:
        options:
          model: deepseek-r1:14b
也就是接上本地的大模型,这里我部署的模型是deepseek-r1的孙子版本哈哈哈哈哈💦
ollama默认的启动地址是11434,因此直接配置上去就行
3.controller
然后写一个简单的接口来访问模型即可:
package com.wc.aidemo.controller;

import org.springframework.ai.chat.client.ChatClient;
import org.springframework.web.bind.annotation.GetMapping;
import org.springframework.web.bind.annotation.RequestMapping;
import org.springframework.web.bind.annotation.RequestParam;
import org.springframework.web.bind.annotation.RestController;

@RestController
@RequestMapping("/ai")

public class ChatController {

    //这里使用构造器注入的方式

    private final ChatClient client;

    public ChatController(ChatClient.Builder clientBuilder) {
        this.client = clientBuilder.build();
    }

    @GetMapping("/chat")
    public String chat(@RequestParam String input) {

        return client.prompt(input).call().content();
    }
}
4.在postman中可以测试:
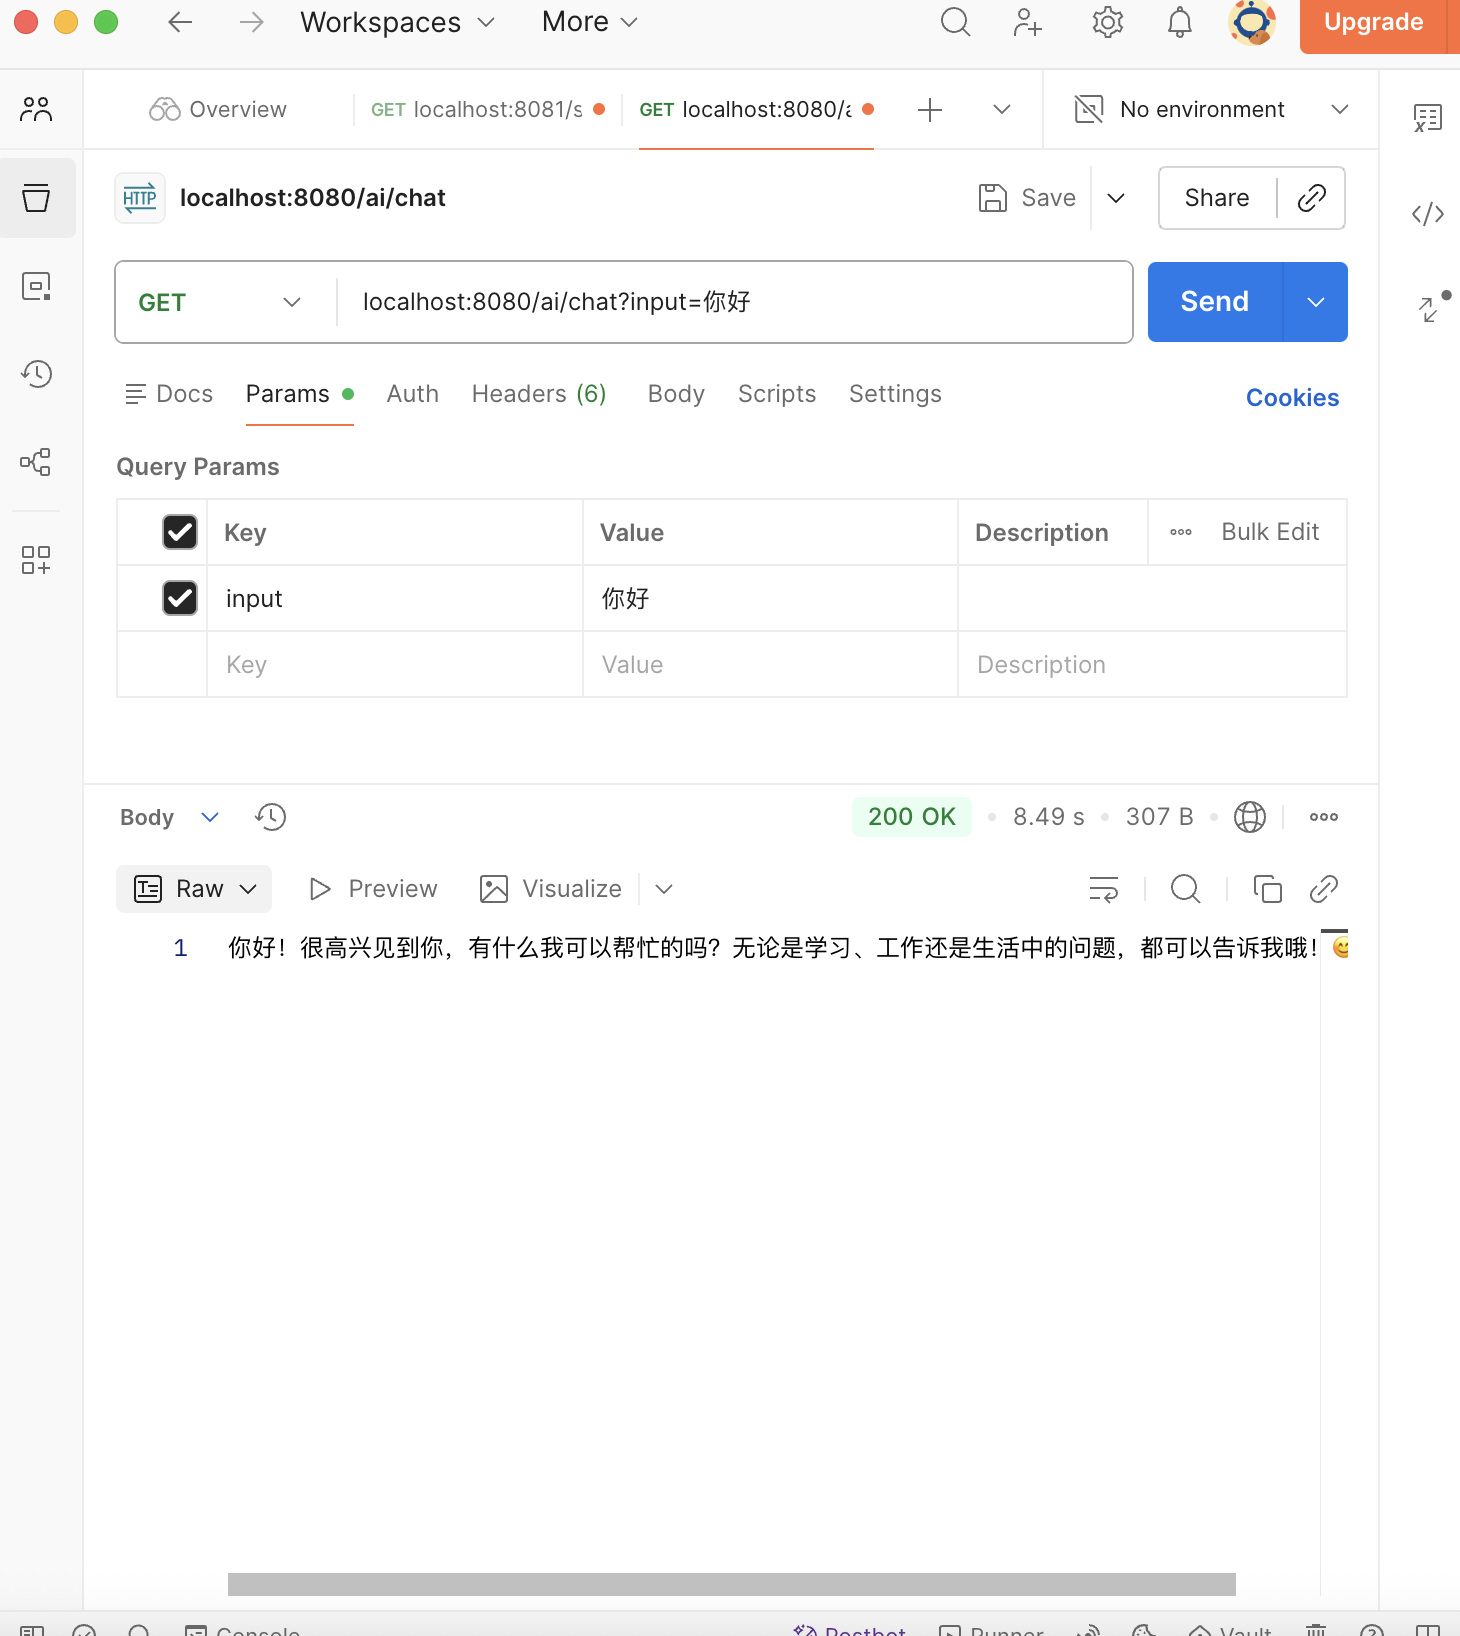
这样就算是接入成功了!!!!!man !!!!!
怎么样,是不是很有意思,快去试试吧~

中国智能体开发者社区,聚焦智能体与大模型开发,提供前沿资讯、实用工具链、开源项目及行业案例。通过技术沙龙、开发者大赛等活动,促进经验交流与协作,助力开发者快速构建创新智能应用。
更多推荐

 1
1 0
0- 0


 已为社区贡献3条内容

所有评论(0)