在ec2上部署qwen-image模型
本文介绍了在AWS GPU环境下部署Qwen-Image模型的实践过程。测试环境采用4块A10G显卡(24GB显存),使用Docker容器和Kubernetes部署。尝试了两种推理方式:通过diffusers库直接推理时遇到单卡显存不足问题(需20GB以上显存),而ComfyUI方案通过FP8量化模型减少了显存需求,成功在单卡上完成推理(约38秒/图)。实验表明,Qwen-Image模型对显存要求
参考资料
-
https://zhuanlan.zhihu.com/p/1937260131931882107
-
https://blog.csdn.net/qq_52065352/article/details/150394958
-
https://qianwen-res.oss-cn-beijing.aliyuncs.com/Qwen-Image/Qwen_Image.pdf
-
https://modelscope.cn/aigc/imageGeneration?tab=advanced
环境初始化
测试环境为g5.12xlarge机器,4卡A10G,cuda版本
# nvidia-smi
Tue Nov 18 10:52:16 2025
NVIDIA-SMI 570.172.08             Driver Version: 570.172.08     CUDA Version: 12.8

# nvcc --version
Cuda compilation tools, release 12.4, V12.4.131
模型下载并上传到efs中
modelscope download --model Qwen/Qwen-Image
使用镜像环境调试
FROM public.ecr.aws/deep-learning-containers/pytorch-inference:2.6.0-gpu-py312
RUN pip config set global.index-url https://mirrors.aliyun.com/pypi/simple/
ENTRYPOINT ["sleep", "infinity"]
构建镜像
docker pull public.ecr.aws/deep-learning-containers/pytorch-inference:2.6.0-gpu-py312

docker build -t qwenllm:imagev1 .
docker tag qwenllm:imagev1 xxxxxxx.dkr.ecr.cn-north-1.amazonaws.com.cn/qwenllm:imagev1
docker push xxxxxxx.dkr.ecr.cn-north-1.amazonaws.com.cn/qwenllm:imagev1
使用模板启动pod,将仓库和模型通过efs挂载到pod中
apiVersion: apps/v1
kind: Deployment
metadata:
  name: diffuse-qwen-image
  namespace: aitao
  labels:
    app: diffuse
spec:
  replicas: 1
  selector:
    matchLabels:
      app: diffuse
  template:
    metadata:
      labels:
        app: diffuse
    spec:
      serviceAccount: sa-service-account-api
      nodeSelector:
        eks.amazonaws.com/nodegroup: llm-ng
      containers:
        - name: diffuse-container
          image: xxxxxxx.dkr.ecr.cn-north-1.amazonaws.com.cn/qwenllm:imagev1
          ports:
            - containerPort: 8000
              name: http-api
          resources:
            limits:
              nvidia.com/gpu: 4
              memory: "64Gi"
              cpu: "24"
            requests:
              nvidia.com/gpu: 4
              memory: "32Gi"
              cpu: "16"
          volumeMounts:
          - name: persistent-storage
            mountPath: /efs
      volumes:
      - name: persistent-storage
        persistentVolumeClaim:
          claimName: efs-claim
      restartPolicy: Always
通过diffusers库推理
使用如下脚本
- device_map不设置为balanced会仅使用单卡(A10G只有20GB显存),导致oom
- 实际生成时也只使用单卡,每个step约1分钟时间较久
model_path = "/efs/models/Qwen/Qwen-Image"

pipe = DiffusionPipeline.from_pretrained(
    model_path,
    torch_dtype=torch.bfloat16,
    device_map="balanced",
)
...
image = pipe(
    prompt="中国古典庭院,阳光明媚,高清写实",
    width=width,
    height=height,
    num_inference_steps=20,
    true_cfg_scale=4.0,
    generator=generator
).images[0]
多卡并行的官方示例中主要通过以下方式实现
- 使用
torch.multiprocessing.set_start_method('spawn', force=True)设置多进程启动方法为’spawn’ - 每个GPU对应一个独立的进程(GPUWorker),避免了Python GIL限制和CUDA上下文冲突
- 使用[MultiGPUManager](javascript:void(0))类管理所有GPU Worker进程,任务自动分配给空闲的GPU Worker
- 通过队列机制实现了简单的负载均衡
但是这个代码似乎不会对单个生成任务进行多卡并行推理。
- 每个生成任务会被分配到一个GPU上处理
- 通过任务队列([task_queue](javascript:void(0)))分发给不同的GPU Worker进程
- 每个任务只会在一个GPU上执行,而不是跨多个GPU并行执行
所以还是会出现oom
GPU 0 model initialization failed: CUDA out of memory. Tried to allocate 72.00 MiB. GPU 0 has a total capacity of 22.30 GiB of which 68.69 MiB is free. Process 3960521 has 22.23 GiB memory in use. Of the allocated memory 21.79 GiB is allocated by PyTorch, and 196.79 MiB is reserved by PyTorch but unallocated. If reserved but unallocated memory is large try setting PYTORCH_CUDA_ALLOC_CONF=expandable_segments:True to avoid fragmentation. See documentation for Memory Management (https://pytorch.org/docs/stable/notes/cuda.html#environment-variables)
使用comfyUI
- https://comfyanonymous.github.io/ComfyUI_examples/qwen_image/
仍旧使用上面的pod模板
# 安装 modelscope
pip install modelscope
下载fp8模型
# 下载模型文件
modelscope download --model Comfy-Org/Qwen-Image_ComfyUI split_files/diffusion_models/qwen_image_fp8_e4m3fn.safetensors
# 下载Text Encoder模型
modelscope download --model Comfy-Org/Qwen-Image_ComfyUI split_files/text_encoders/qwen_2.5_vl_7b_fp8_scaled.safetensors
# 下载VAE模型
modelscope download --model Comfy-Org/Qwen-Image_ComfyUI split_files/vae/qwen_image_vae.safetensors

$ tree
.
├── diffusion_models
│   └── qwen_image_fp8_e4m3fn.safetensors
├── text_encoders
│   └── qwen_2.5_vl_7b_fp8_scaled.safetensors
└── vae
    └── qwen_image_vae.safetensors
拷贝模型到ComfyUI的model目录下
aws s3 sync ./ s3://bucketname/Comfy-Org/Qwen-Image_ComfyUI/
启动ComfyUI
git clone https://github.com/comfyanonymous/ComfyUI.git
cd ComfyUI && pip install -i https://mirrors.ustc.edu.cn/pypi/simple/ -r requirements.txt
python  main.py  --port 8000
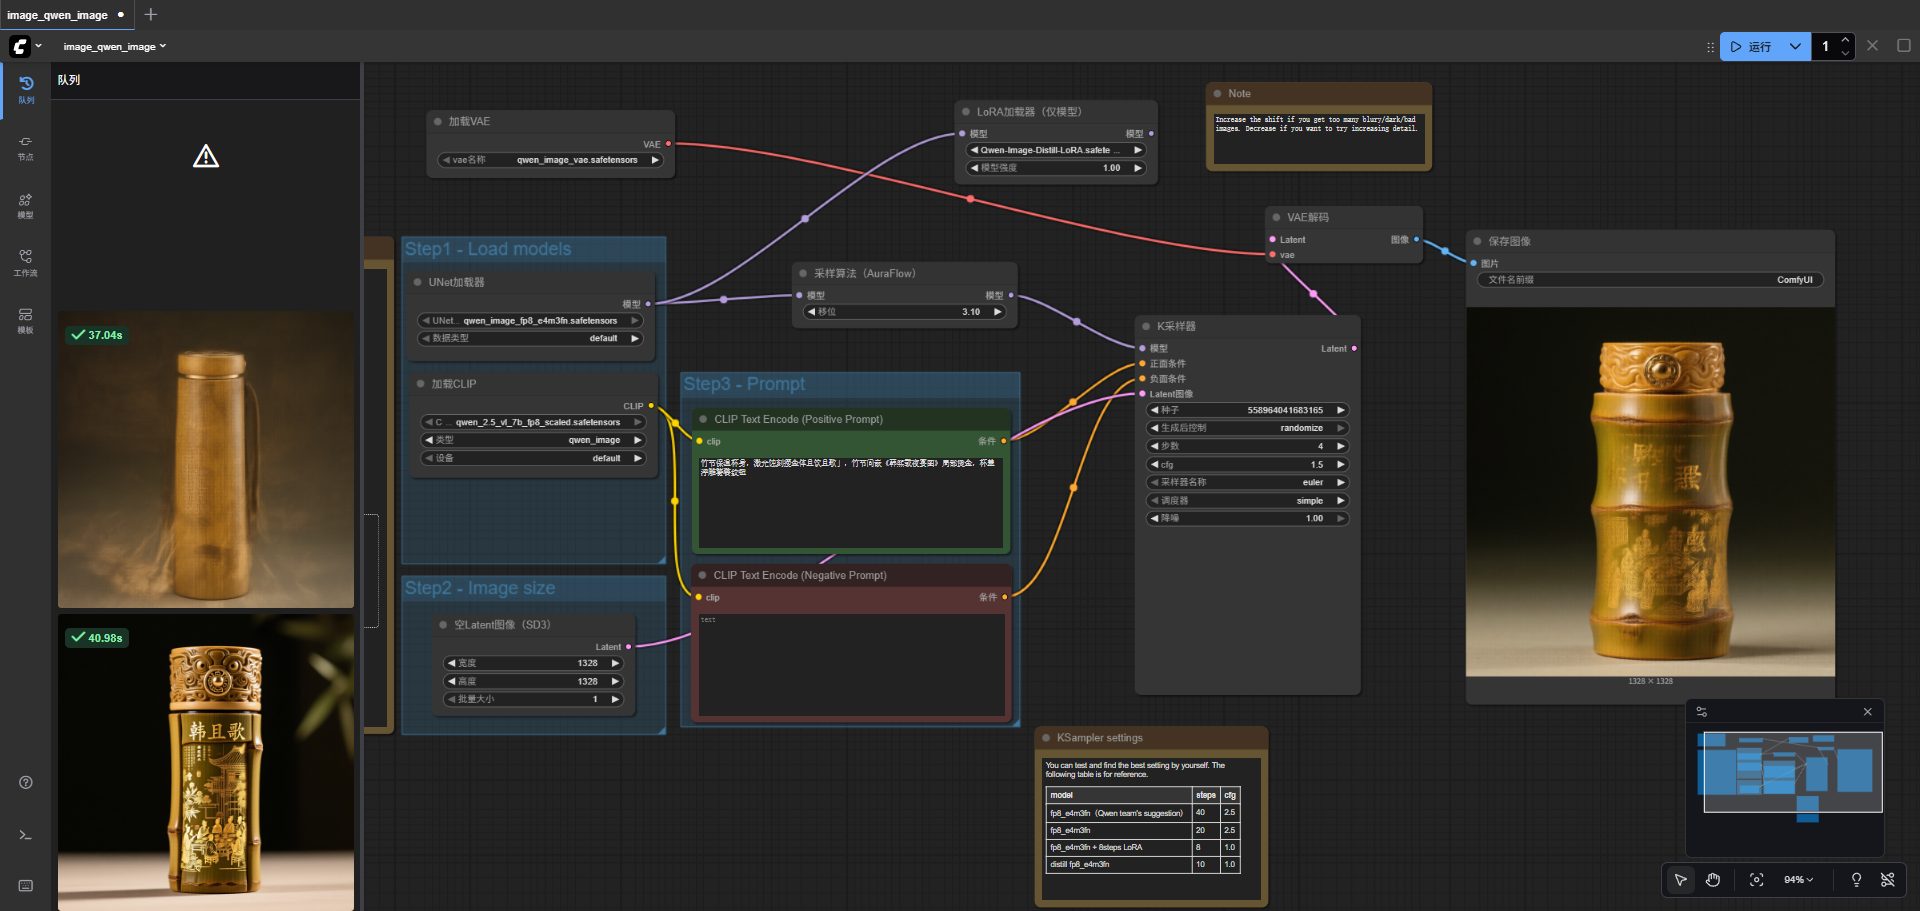
测试生成,大约耗时38s
- 查看资源消耗,仍旧没有使用多卡,目前看来得需要一个强大的单卡会更好(显存要够)。
- 部分模型参数被offload到cpu中,消耗了月20GB内存,所以理论上单卡的g5机型就能运行起来。

下载lora模型
/efs/ComfyUI/models/loras# modelscope download --model DiffSynth-Studio/Qwen-Image-LoRA-ArtAug-v1 model.safetensors --local_dir ./
使用4step 和8step 的lora模型能够大幅加快生成速度
https://www.modelscope.cn/models/lightx2v/Qwen-Image-Lightning/files
效果如下
后续需要封装为api可以参考文档

火山引擎开发者社区是火山引擎打造的AI技术生态平台,聚焦Agent与大模型开发,提供豆包系列模型(图像/视频/视觉)、智能分析与会话工具,并配套评测集、动手实验室及行业案例库。社区通过技术沙龙、挑战赛等活动促进开发者成长,新用户可领50万Tokens权益,助力构建智能应用。
更多推荐
 3
3 0
0- 0


 已为社区贡献11条内容

所有评论(0)