书生大模型第五期-L1G4(Swift 版)课程实践过程记录
为大家提供了处理好的arxiv 数据集和采集得到的数据。训练集下载链接:https://www.modelscope.cn/datasets/JimmyMa99/smartflow-arxiv-dataset/files运行下列代码mkdir l1g4cd l1g4运行结果下载后数据的位置接下来运行下列代码,将数据集进行归类处理。
InternLM 论文分类微调实践
L1G4(Swift 版)课程
🌟 大家好呀~欢迎来到我的博客小天地!
✨ 这一期主要记录书生大模型第五期:L1G4(Swift 版)课程实践过程记录
💖 你的支持是我更新的动力! 如果喜欢这篇内容,别忘了 点赞❤️ + 关注🔔,后续还有更多分享~ 也欢迎在评论区聊聊你的想法🎉
💡参考资料:https://aicarrier.feishu.cn/wiki/HfQuwYa4Xi4WJVkuNF3cygqnnch、https://aicarrier.feishu.cn/wiki/I5ywwN1ZZi5m1pk5fhKcGL0Dn0j、https://aicarrier.feishu.cn/wiki/D7kZw9Nx4iMyDnkpL0Gc5giNn5g
👉 立即报名:https://colearn.intern-ai.org.cn/set?s=883(复制链接并且用微信打开即可报名)
大概的流程:
- LoRA 预训练(刚跑完,并已 merge 到
…checkpoint-144-merged/) - LoRA-SFT 用带有指令-答案的
sft_only数据,再跑一轮监督微调 - 再次合并 把 SFT 阶段生成的 LoRA adapter 合并,得到最终模型
- 推理 / 部署 / 量化 用最新的
*-merged/直接上线或再做下游实验
1 环境安装
- 在创建开发机界面选择镜像为 Cuda12.2-conda,并选择 GPU 为30% A100。
- 安装 ms-swift
conda create -n ms-swift python=3.10 -y
conda activate ms-swift
pip install ms-swift -U
pip install wandb
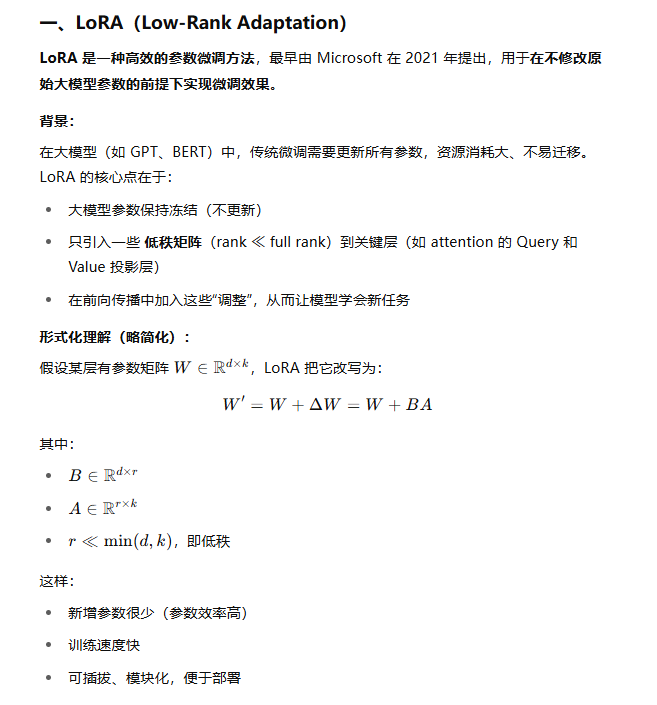
2 简单介绍一下LoRA 和 SFT LoRA
2.1 LoRA
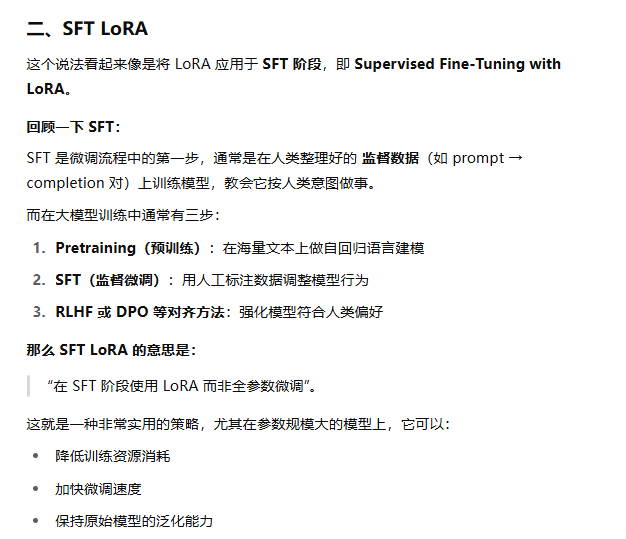
2.2 SFT LoRA
3训练
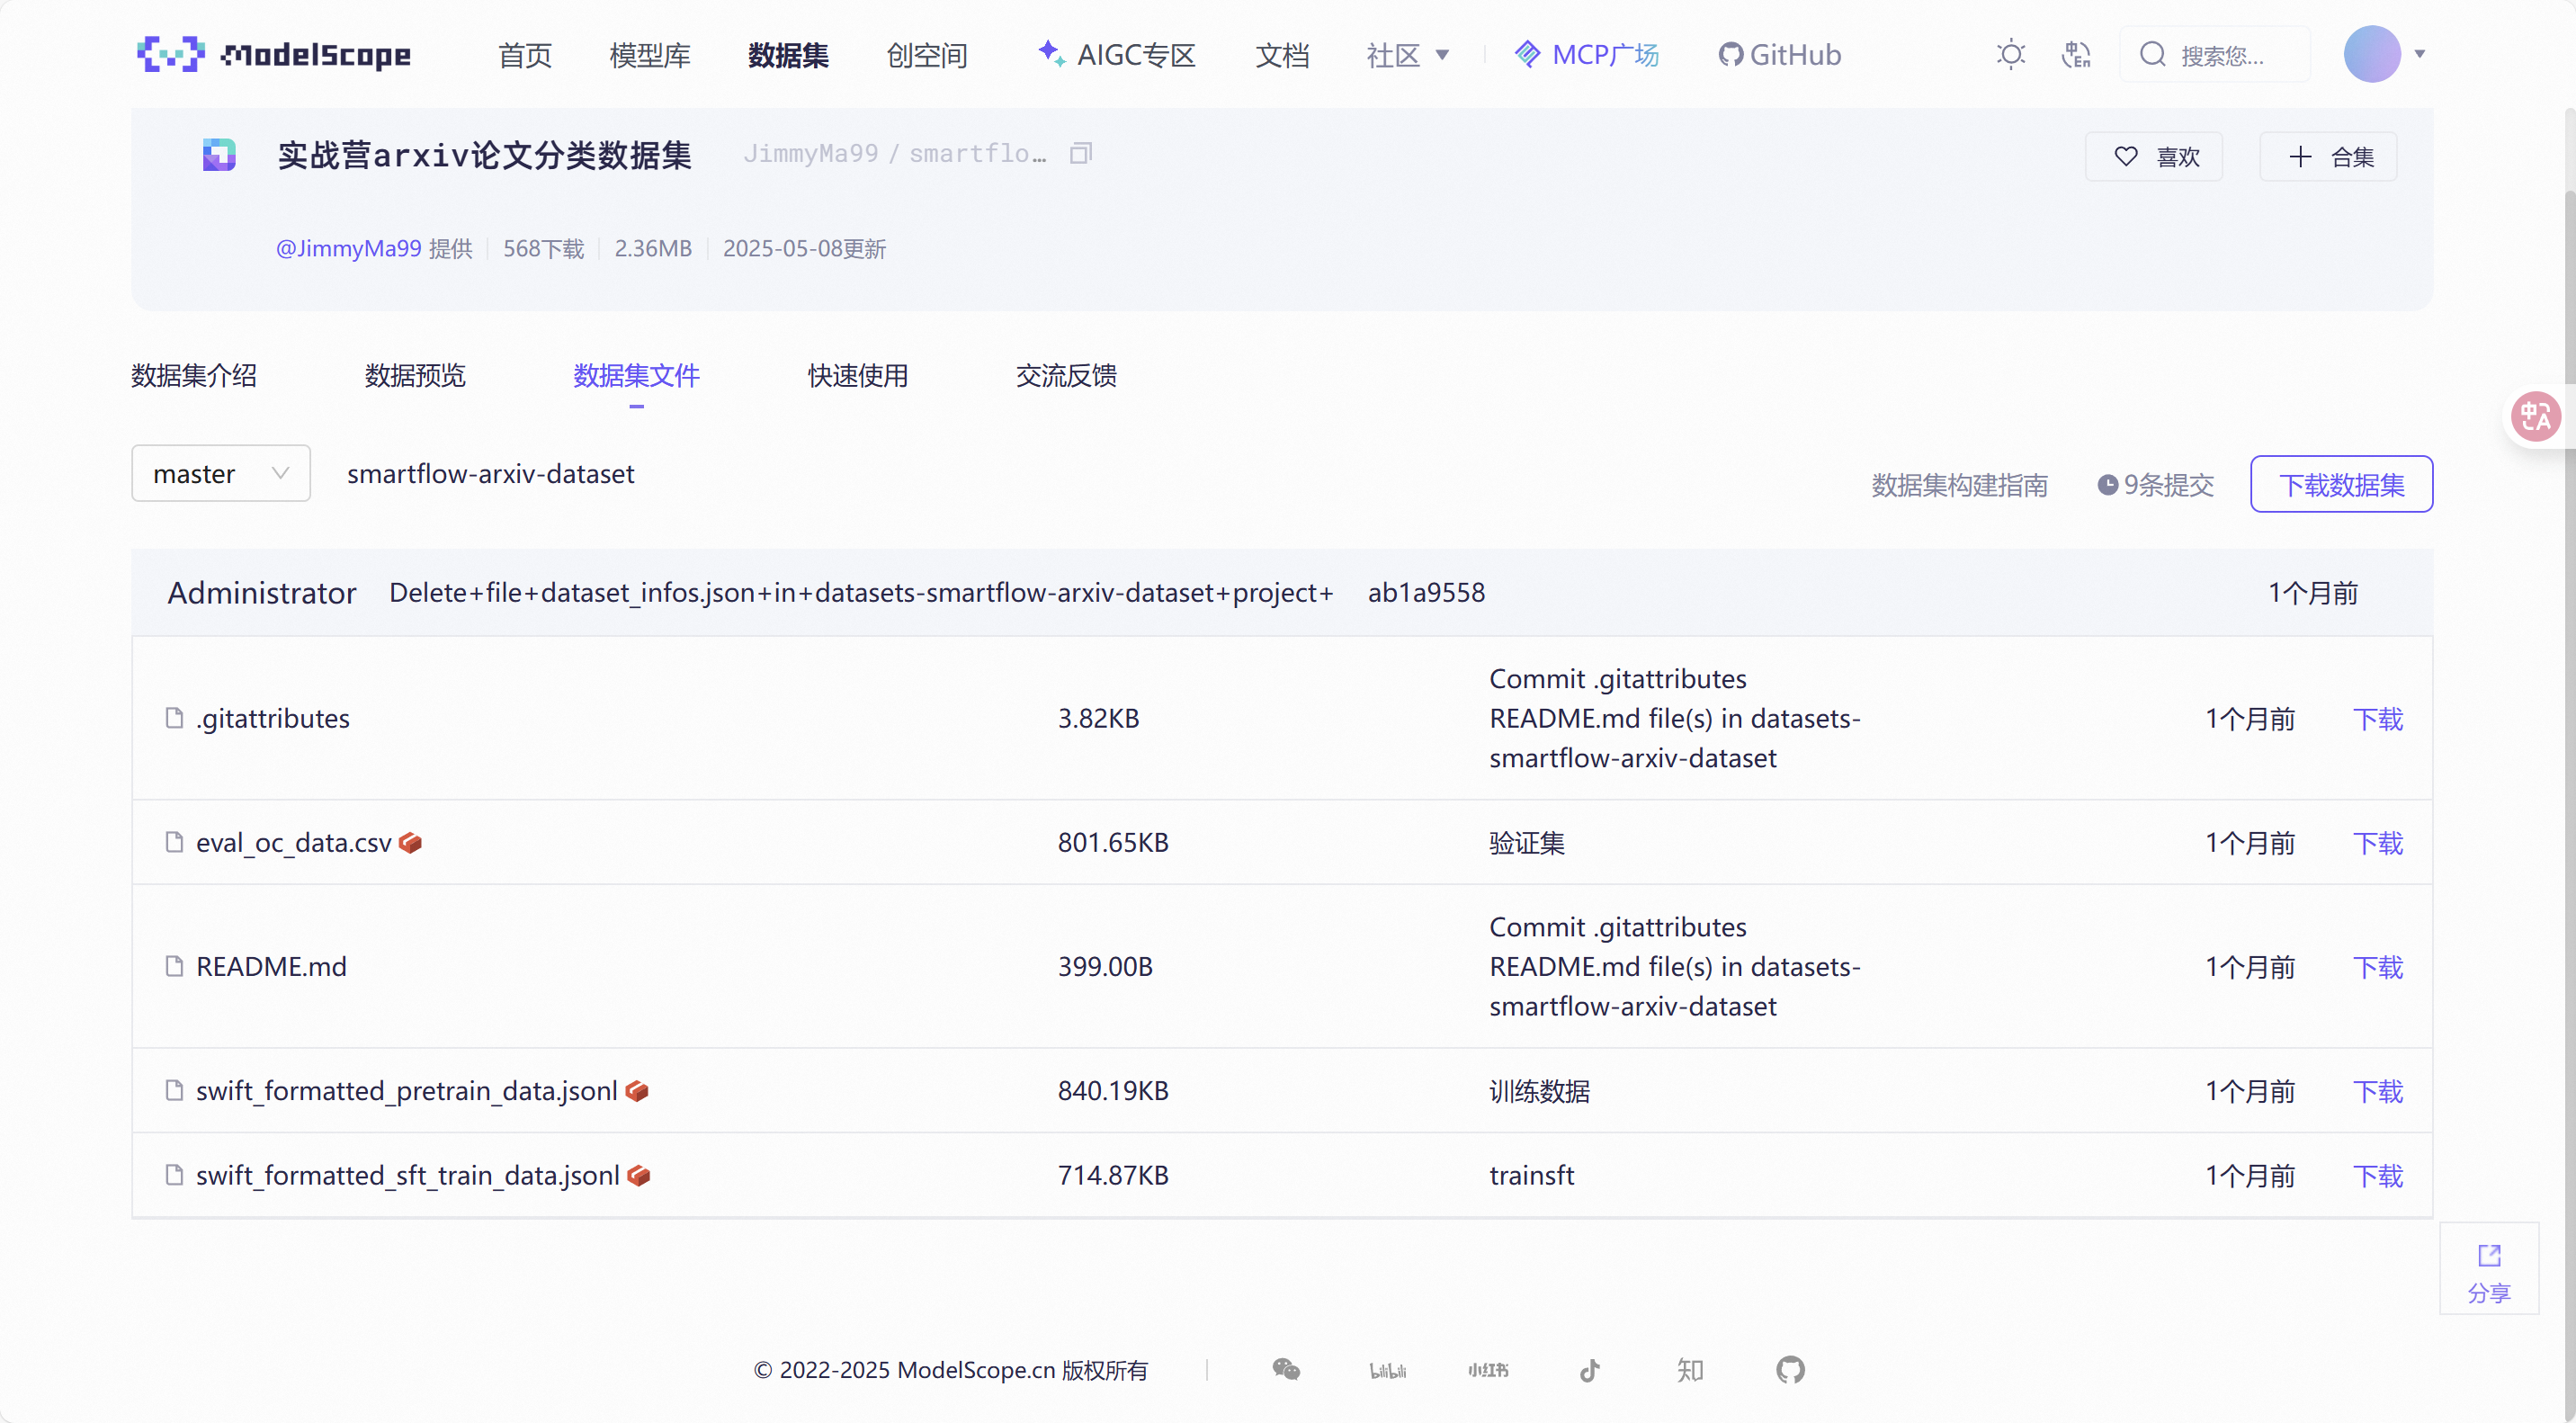
3.1下载数据集
为大家提供了处理好的 arxiv 数据集和采集得到的数据。
训练集下载链接:https://www.modelscope.cn/datasets/JimmyMa99/smartflow-arxiv-dataset/files
- 运行下列代码
mkdir l1g4
cd l1g4
conda activate ms-swift
pip install modelscope
modelscope download --dataset JimmyMa99/smartflow-arxiv-dataset --local_dir ./datasets/train
- 运行结果

- 下载后数据的位置
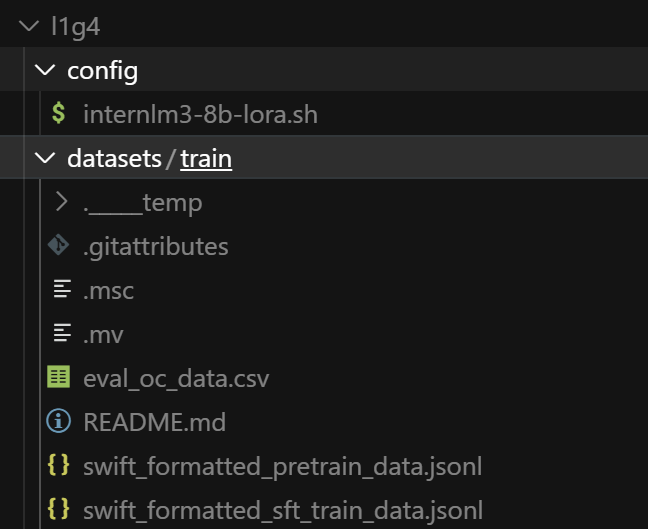
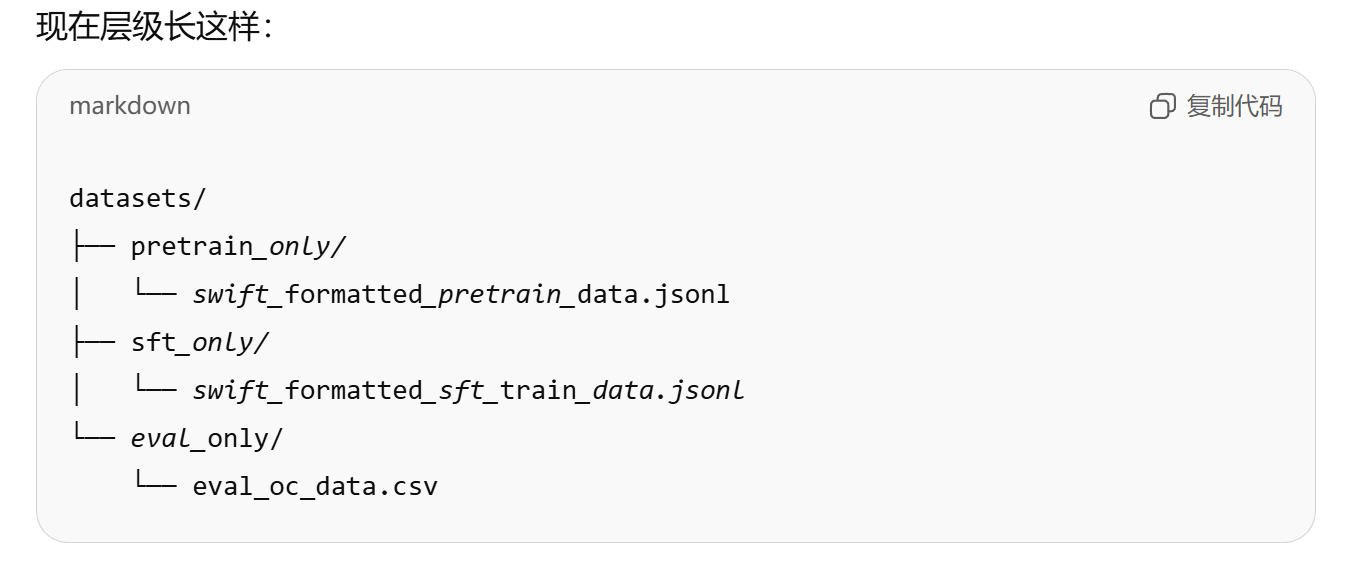
- 接下来运行下列代码,将数据集进行归类处理
# 1) 预训练数据
mkdir -p datasets/pretrain_only
mv datasets/train/swift_formatted_pretrain_data.jsonl datasets/pretrain_only/

# 2) SFT 数据
mkdir -p datasets/sft_only
mv datasets/train/swift_formatted_sft_train_data.jsonl datasets/sft_only/

# 3) 验证 CSV (可选)
mkdir -p datasets/eval_only
mv datasets/train/eval_oc_data.csv datasets/eval_only/
3.2预训练
3.2.1使用lora进行预训练
- 创建一个文件夹config
- 创建一个.sh文件
- 将下列代码放进去(请删除注释、更改模型路径与数据集路径)
#!/bin/bash

# 创建日志目录
LOG_DIR="logs"
mkdir -p $LOG_DIR  # 确保日志目录存在,如果不存在则创建

# 获取当前时间戳,用于生成唯一的日志文件名
TIMESTAMP=$(date +"%Y%m%d_%H%M%S")
LOG_FILE="$LOG_DIR/internlm3-8b_lora_sft_${TIMESTAMP}.log"  # 设置日志文件路径

# 设置CUDA环境变量
export NPROC_PER_NODE=1  # 设置每个节点使用的进程数为1
export OMP_NUM_THREADS=1  # 限制OpenMP线程数为1,避免过多线程竞争
export CUDA_VISIBLE_DEVICES=0  # 指定使用的GPU编号为0
export MASTER_PORT=$((10000 + RANDOM % 50000))

# 使用nohup命令在后台运行训练任务,即使终端关闭也能继续运行
nohup swift sft \
    --model {model_path} \  # 指定基础模型路径
    --train_type lora \  # 使用LoRA训练方法
    --dataset {data_path} \  # 指定训练数据集
    --torch_dtype bfloat16 \  # 使用bfloat16精度以节省显存
    --num_train_epochs 1 \  # 设置训练轮数为2
    --per_device_train_batch_size 2 \  # 每个设备的训练批次大小为4
    --learning_rate 5e-5 \  # 学习率设置为5e-5
    --warmup_ratio 0.1 \  # 预热阶段占总训练步数的10%
    --split_dataset_ratio 0 \  # 不拆分数据集
    --lora_rank 8 \  # LoRA的秩设置为8
    --lora_alpha 32 \  # LoRA的alpha参数设置为32
    --use_chat_template false \  # 不使用聊天模板
    --target_modules all-linear \  # 对所有线性层应用LoRA
    --gradient_accumulation_steps 2 \  # 梯度累积步数为2,用于增大有效批次大小
    --save_steps 2000 \  # 每2000步保存一次模型
    --save_total_limit 5 \  # 最多保存5个检查点
    --gradient_checkpointing_kwargs '{"use_reentrant": false}' \  # 梯度检查点设置,禁用重入
    --logging_steps 5 \  # 每5步记录一次日志
    --max_length 2048 \  # 最大序列长度设为2048
    --output_dir ./swift_output/InternLM3-8B-Lora \  # 输出目录
    --dataloader_num_workers 256 \  # 数据加载器使用256个工作线程
    --model_author JimmyMa99 \  # 模型作者信息
    --model_name InternLM3-8B-Lora \  # 模型名称
    > "$LOG_FILE" 2>&1 &  # 将标准输出和错误输出重定向到日志文件,并在后台运行

# 打印进程ID和日志文件位置,便于用户跟踪
echo "Training started with PID $!"  # 显示后台进程的PID
echo "Log file: $LOG_FILE"  # 显示日志文件位置

# 提示用户如何实时查看日志
echo "To view logs in real-time, use:"
echo "tail -f $LOG_FILE"
- 如图所示(请注意我各个文件夹的路径位置)
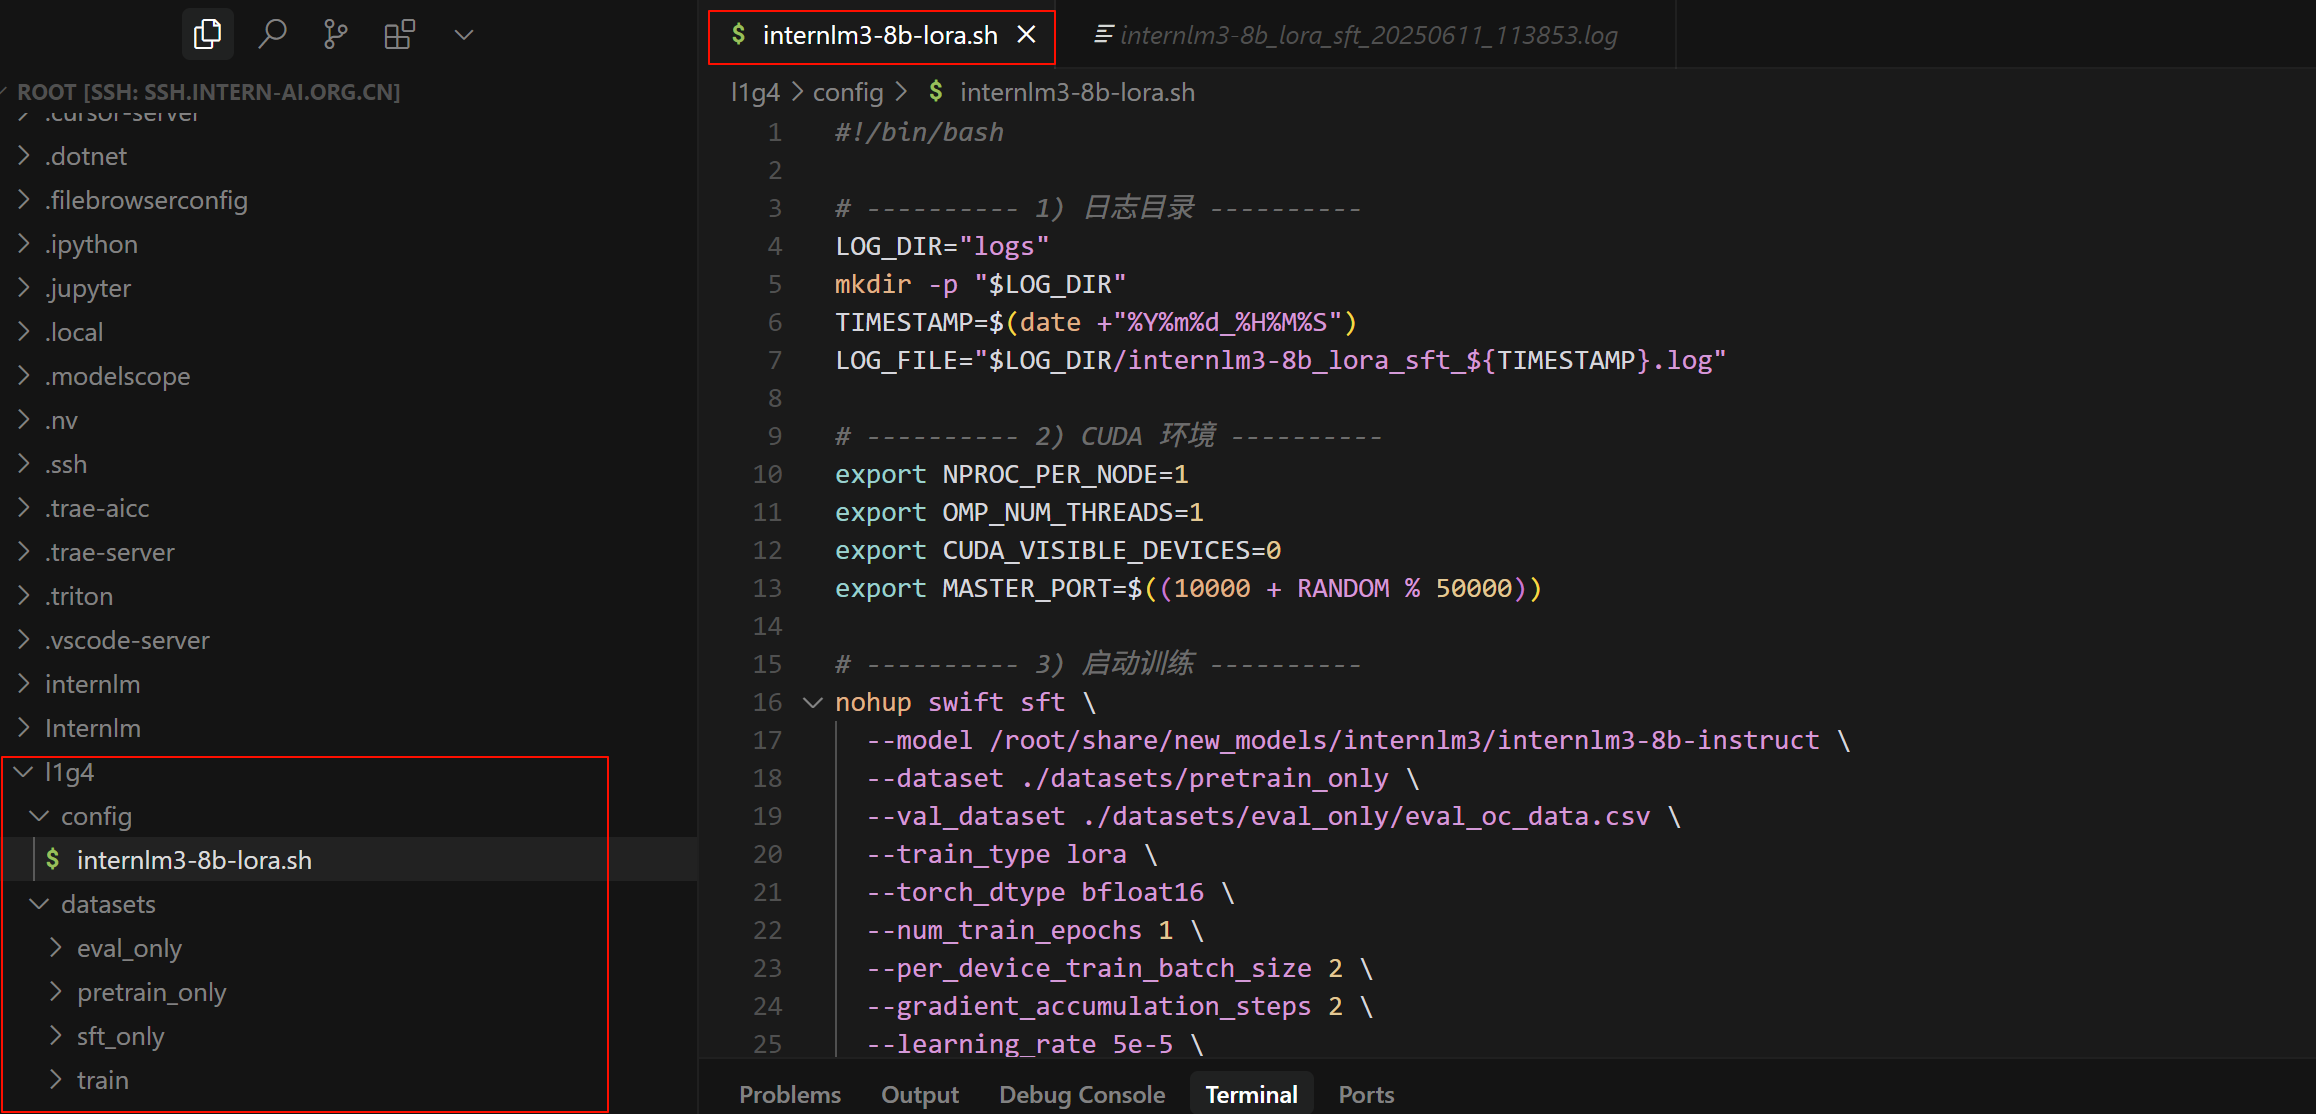
- 修改代码中的{model_path} 和{data_path}为实际的模型路径和数据路径
- 对于{model_path} :改为
/root/share/new_models/internlm3/internlm3-8b-instruct\ - 对于{data_path}:改为./datasets/pretrain_only \
- 加一行:
--val_dataset ./datasets/eval_only/eval_oc_data.csv \ - 我的代码
#!/bin/bash

# ---------- 1) 日志目录 ----------
LOG_DIR="logs"
mkdir -p "$LOG_DIR"
TIMESTAMP=$(date +"%Y%m%d_%H%M%S")
LOG_FILE="$LOG_DIR/internlm3-8b_lora_sft_${TIMESTAMP}.log"

# ---------- 2) CUDA 环境 ----------
export NPROC_PER_NODE=1
export OMP_NUM_THREADS=1
export CUDA_VISIBLE_DEVICES=0
export MASTER_PORT=$((10000 + RANDOM % 50000))

# ---------- 3) 启动训练 ----------
nohup swift sft \
  --model /root/share/new_models/internlm3/internlm3-8b-instruct \
  --dataset ./datasets/pretrain_only \
  --val_dataset ./datasets/eval_only/eval_oc_data.csv \
  --train_type lora \
  --torch_dtype bfloat16 \
  --num_train_epochs 1 \
  --per_device_train_batch_size 2 \
  --gradient_accumulation_steps 2 \
  --learning_rate 5e-5 \
  --warmup_ratio 0.1 \
  --split_dataset_ratio 0 \
  --lora_rank 8 \
  --lora_alpha 32 \
  --target_modules all-linear \
  --use_chat_template false \
  --save_steps 2000 \
  --save_total_limit 5 \
  --logging_steps 5 \
  --output_dir ./swift_output/InternLM3-8B-Lora \
  --gradient_checkpointing_kwargs '{"use_reentrant": false}' \
  --max_length 2048 \
  --dataloader_num_workers 256 \
  --model_author QHz_Echo \
  --model_name InternLM3-8B-Lora \
  > "$LOG_FILE" 2>&1 &

# ---------- 4) 进程提示 ----------
echo "Training started with PID $!"
echo "Log file: $LOG_FILE"
echo "To view logs in real-time:"
echo "  tail -f $LOG_FILE"
- 运行下列代码
bash config/internlm3-8b-lora.sh
- 应该有类似输出

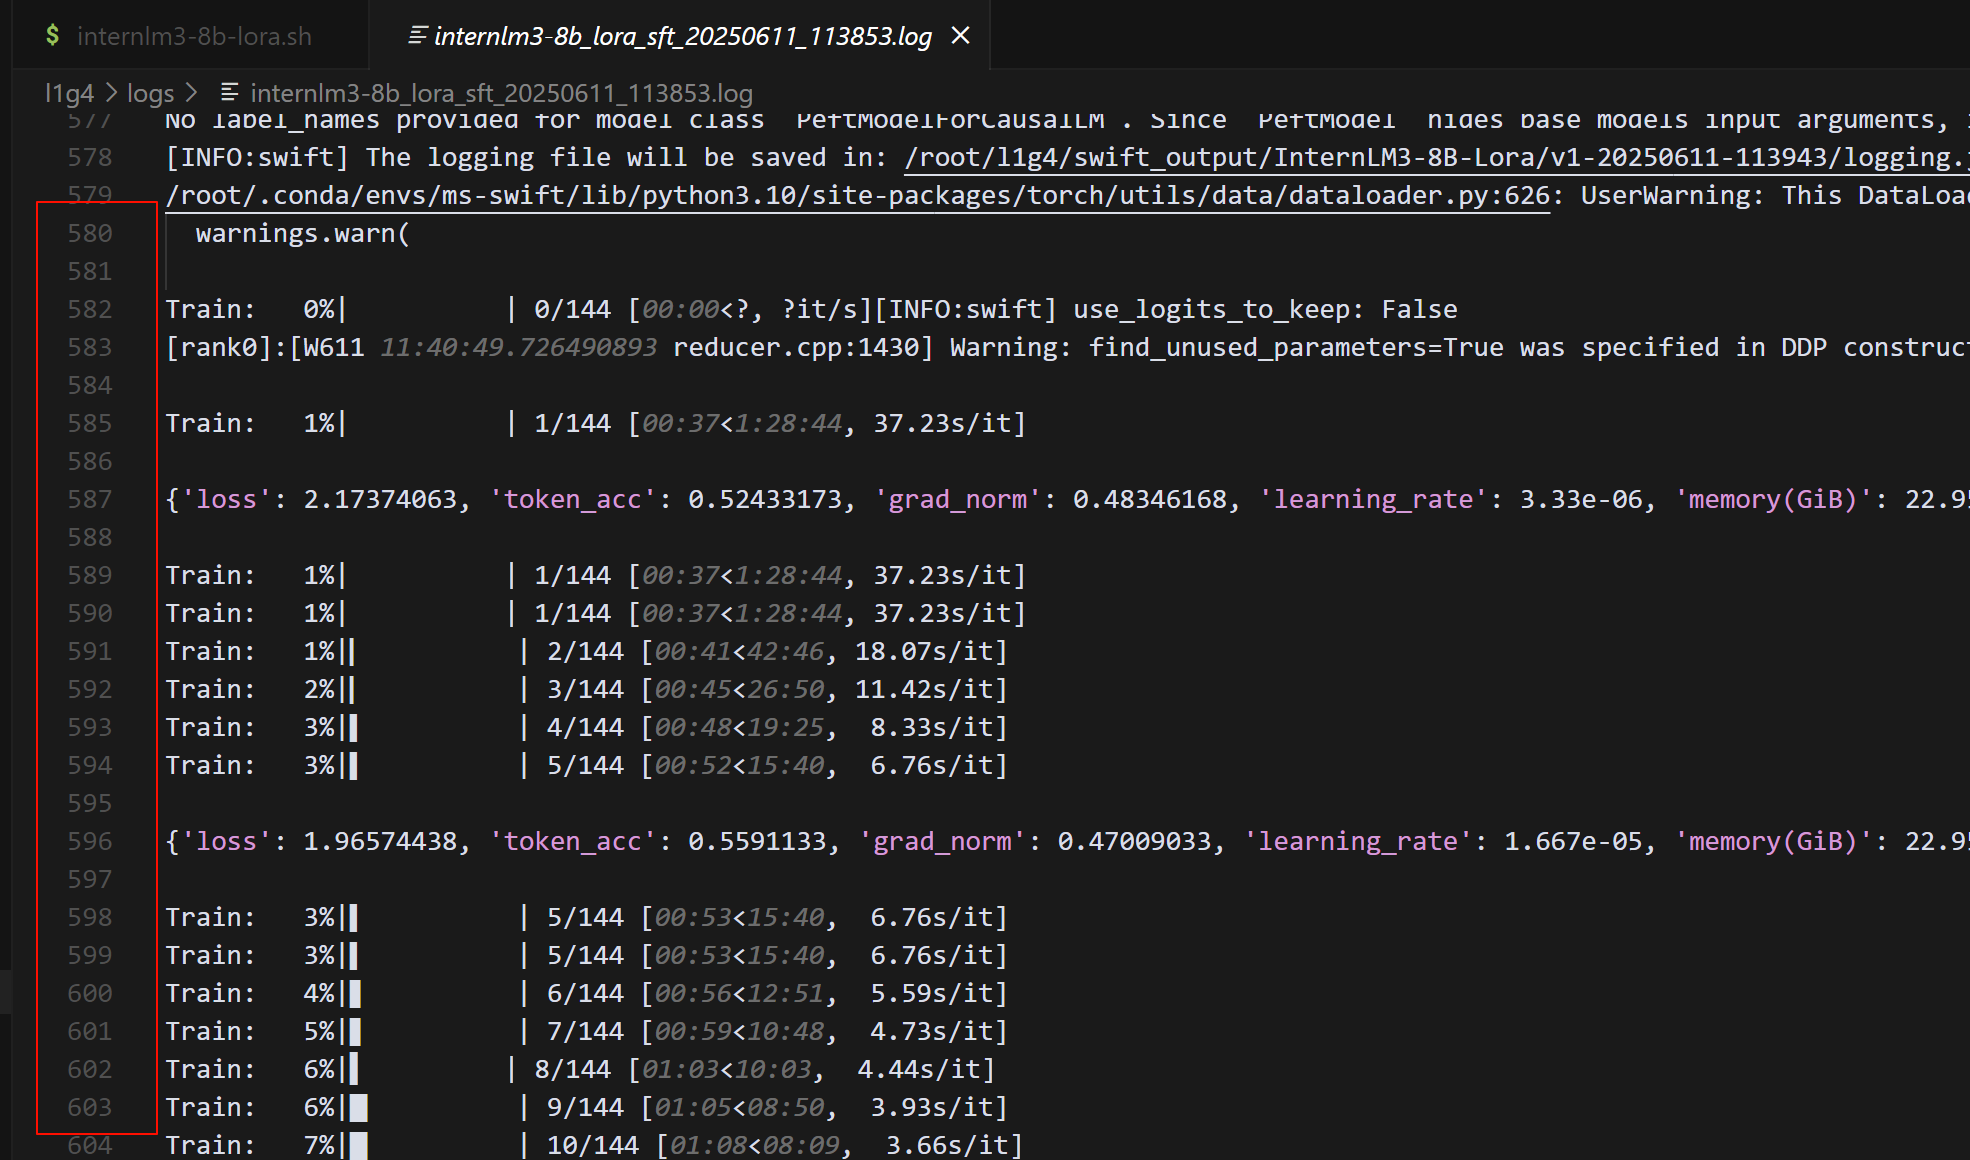
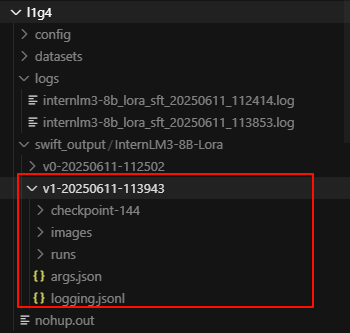
- 打开
~/l1g4/logs/internlm3-8b_lora_sft_20250611_113853.log,看看输出记录。大概到500多行的时候就开始训练了
- 出现类似消息,表示训练完成了
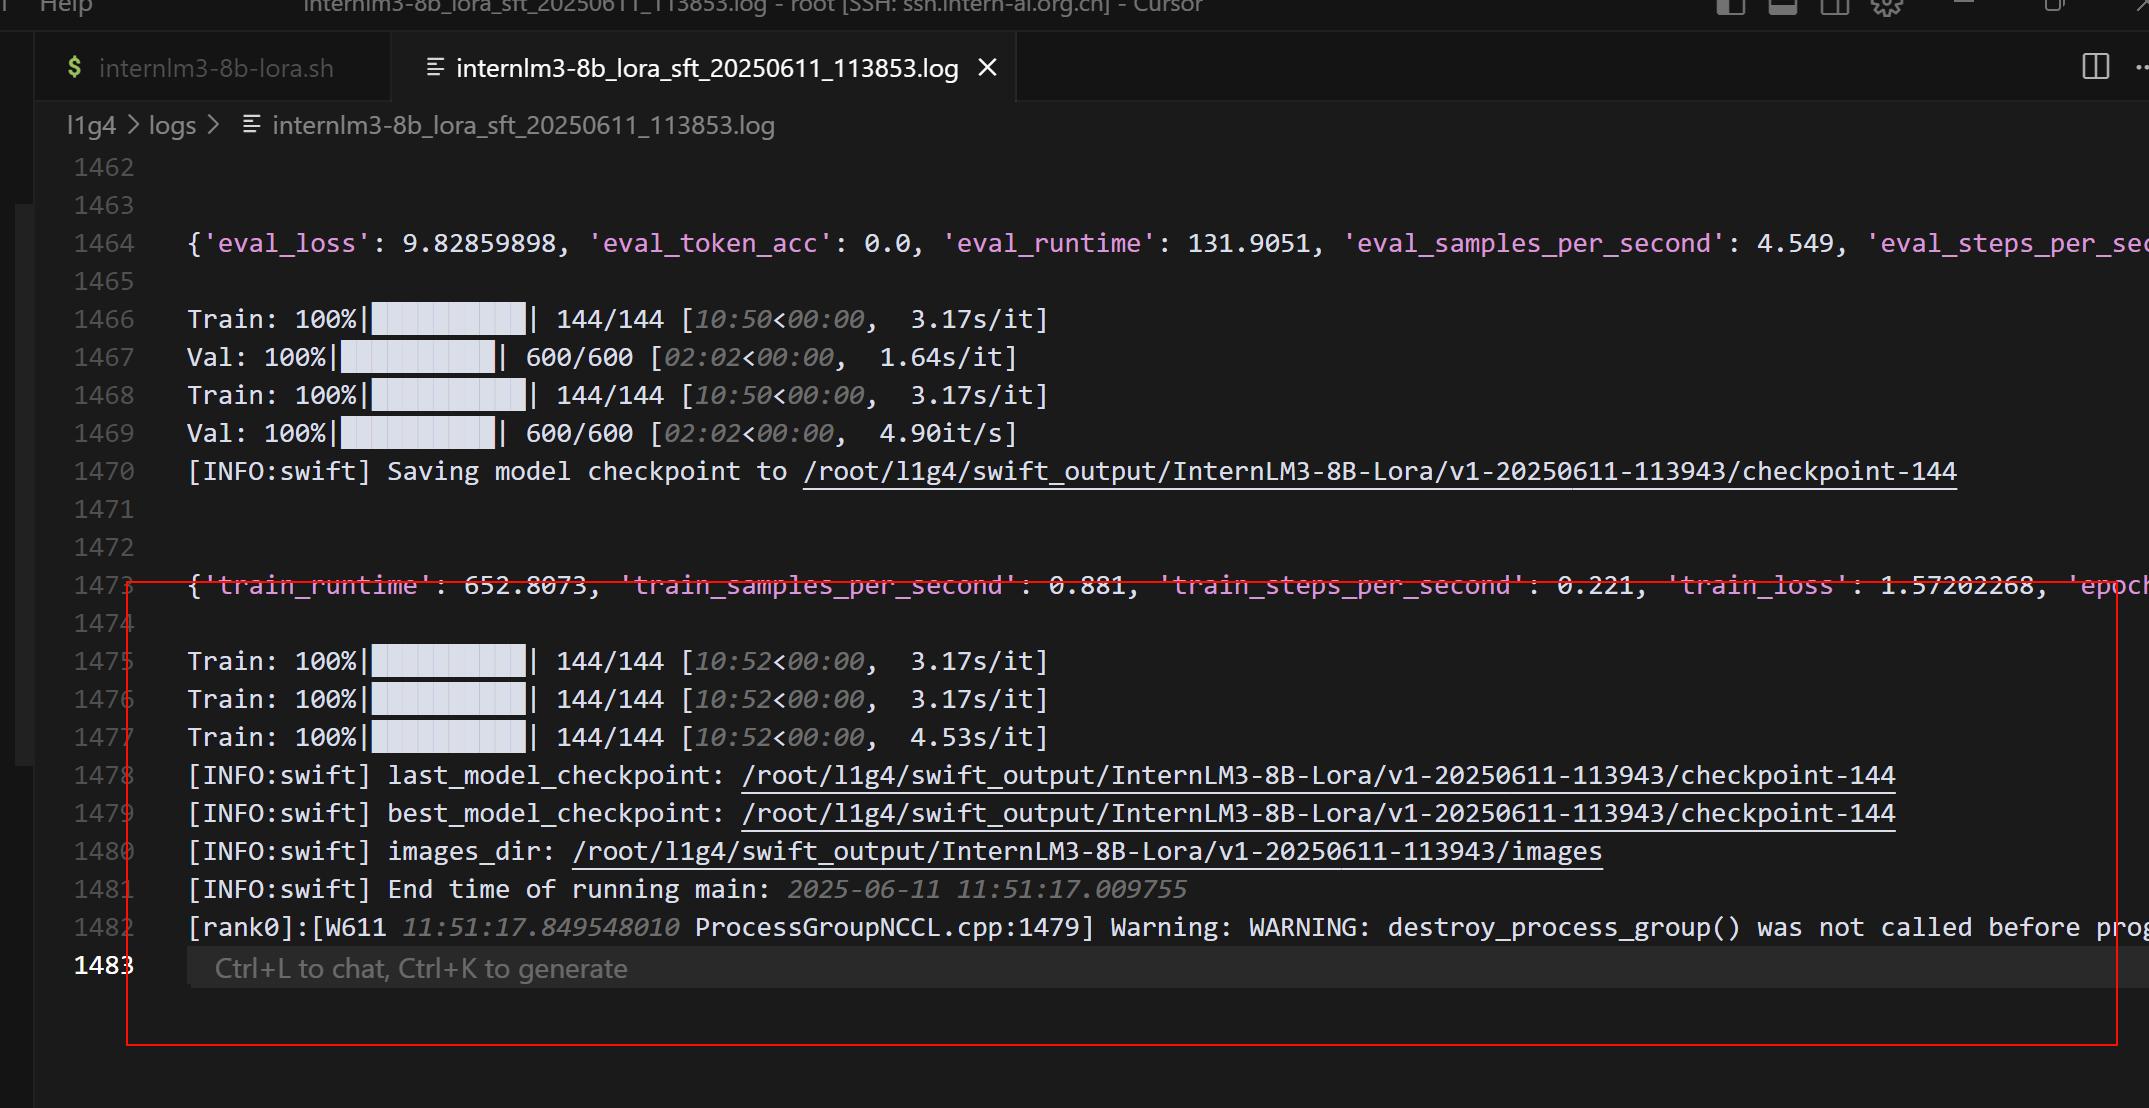
日志里最后几行关键信息:
global_step/max_steps: '144/144'→ 所有训练步已完成Saving model checkpoint to …/checkpoint-144→ 最后一份权重已保存best_model_checkpoint: …/checkpoint-144→ Swift 认定这就是当前最佳- 训练总耗时
10 m 52 s
3.2.2合并权重
**把 LoRA 的“增量权重”(adapter)直接写回到基座模型的全参数里,生成一个可单独推理的完整模型 **
- 将刚刚跑完的 log 中显示的权重保存路径修改为以下 “增量权重”(adapter) 的参数
swift export --adapters xx/checkpoint-xxx --merge_lora true
| 参数 | 作用 |
|---|---|
swift export |
Swift 提供的“模型导出 / 合并”子命令 |
--adapters PATH |
填 LoRA adapter 的目录就是训练日志里出现的 …/checkpoint-144 |
--merge_lora true |
表示 “把 LoRA 写回基座” 而不是仅导出 adapter 自身 |
- 执行后 Swift 会:
- 读取
./adapter_config.json+./adapter_model.bin - 找到它记录的 base_model 路径
- 把两者权重相加 → 保存到
xx-merged/
- 读取
- 我的日志写明 最佳 checkpoint:
best_model_checkpoint:
/root/l1g4/swift_output/InternLM3-8B-Lora/v1-20250611-113943/checkpoint-144
- 实际合并命令就是:
swift export \
  --adapters ./swift_output/InternLM3-8B-Lora/v1-20250611-113943/checkpoint-144 \
  --merge_lora true
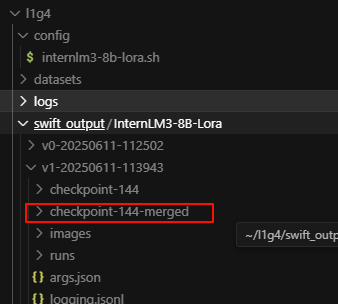
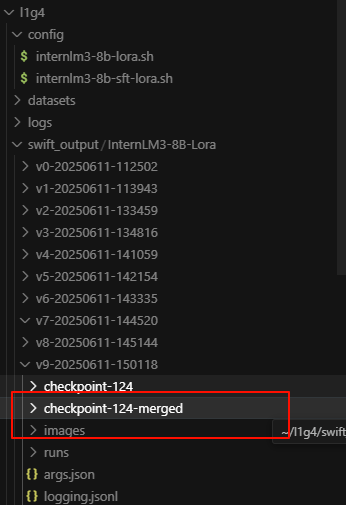
- 确认一下目录
- 执行完会得到:
./swift_output/InternLM3-8B-Lora/v1-20250611-113943/checkpoint-144-merged/
├── config.json
├── model.safetensors
└── generation_config.json
3.3SFT( Supervised Fine-Tuning(监督式微调))
- SFT 跟刚才的 LoRA 预训练有什么区别?
| 维度 | LoRA 预训练(刚跑完) | SFT |
|---|---|---|
| 数据 | 论文摘要等“纯文本”,无明确指令 | 明确结构:{"instruction": "...", "input": "...", "output": "..."} |
| 目的 | 给模型补充专业领域知识 | 让模型学会 看到指令就按要求作答 |
| 效果 | 知识更丰富但回答可能跑题 | 回答更贴题、格式统一 |
| 技巧 | LoRA + 小 batch 就能收敛 | LoRA 同样适用,数据少时很快 |
3.3.1使用lora进行SFT
- 在config文件夹下新建一个.sh文件
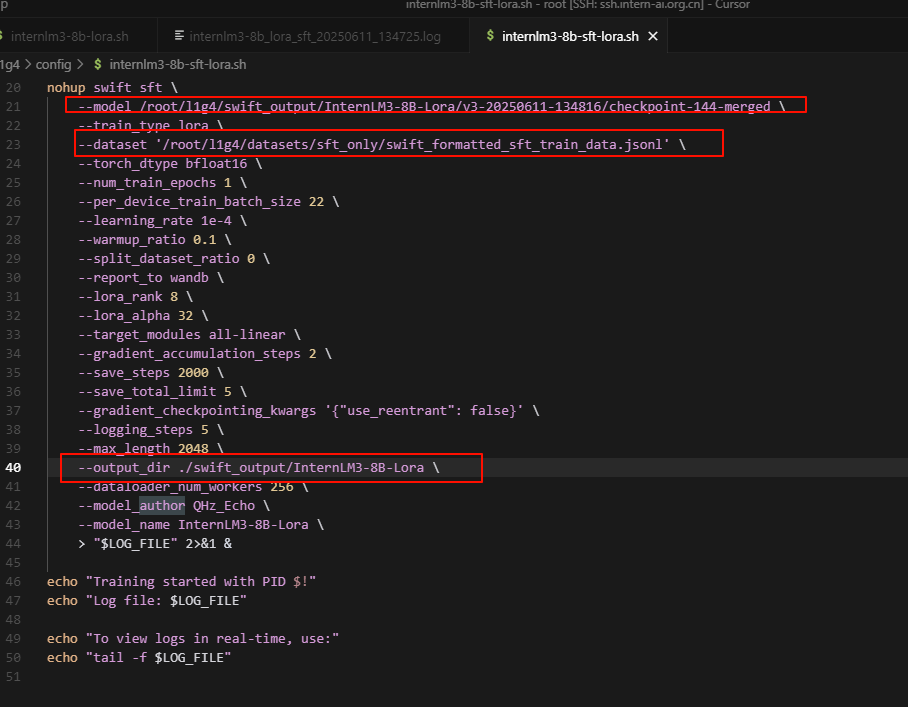
internlm3-8b-sft-lora.sh - 将下列代码放进去(记得删除注释,修改对应的路径,同时建议先删掉:建议先删掉这一行:
--report_to wandb \)
#!/bin/bash
# 指定使用bash解释器执行脚本

# 创建日志目录
LOG_DIR="logs"
# 定义日志存储目录变量
mkdir -p $LOG_DIR
# 创建日志目录,-p参数确保即使目录已存在也不会报错

# 获取当前时间戳
TIMESTAMP=$(date +"%Y%m%d_%H%M%S")
# 获取当前时间并格式化为年月日_时分秒格式
LOG_FILE="$LOG_DIR/internlm3-8b_lora_sft_${TIMESTAMP}.log"
# 组合日志文件路径,使用时间戳确保文件名唯一

# 设置CUDA设备
export NPROC_PER_NODE=1
# 设置每个节点的进程数为1
export OMP_NUM_THREADS=1
# 设置OpenMP线程数为1,限制并行线程数
export CUDA_VISIBLE_DEVICES=0
# 指定使用的GPU设备为0号设备

nohup swift sft \
# 使用nohup命令在后台运行swift sft命令,即使终端关闭也能继续运行
    --model /root/code/camp5_course/swift_output/InternLM3-8B-Lora/v1-20250416-140542/checkpoint-74-merged \
    # 指定基础模型路径,使用之前训练的checkpoint-74的合并模型
    --train_type lora \
    # 设置训练类型为LoRA(低秩适应)
    --dataset '/root/code/camp5_course/data/swift_formatted_sft_train_data.jsonl' \
    # 指定训练数据集的路径
    --torch_dtype bfloat16 \
    # 设置模型参数的数据类型为bfloat16,减少内存占用
    --num_train_epochs 1 \
    # 设置训练轮数为5轮
    --per_device_train_batch_size 8 \
    # 设置每个设备的训练批次大小为8
    --learning_rate 1e-4 \
    # 设置学习率为0.0001
    --warmup_ratio 0.1 \
    # 设置预热比例为0.1,即10%的训练步骤用于学习率从小到大的预热
    --split_dataset_ratio 0 \
    # 设置数据集分割比例为0,不进行训练/验证分割
    --report_to wandb \
    # 设置训练报告发送到Weights & Biases平台(建议先删掉)
    --lora_rank 8 \
    # 设置LoRA的秩为8,控制可训练参数的数量
    --lora_alpha 32 \
    # 设置LoRA的alpha为32,影响LoRA更新的缩放程度
    --target_modules all-linear \
    # 设置LoRA目标模块为所有线性层
    --gradient_accumulation_steps 2 \
    # 设置梯度累积步数为2,相当于扩大了批次大小
    --save_steps 2000 \
    # 每2000步保存一次检查点
    --save_total_limit 5 \
    # 最多保存5个检查点,超过会删除旧的
    --gradient_checkpointing_kwargs '{"use_reentrant": false}' \
    # 设置梯度检查点的参数,关闭重入功能以提高稳定性
    --logging_steps 5 \
    # 每5步记录一次日志
    --max_length 2048 \
    # 设置最大序列长度为2048
    --output_dir ./swift_output/InternLM3-8B-Lora \
    # 设置输出目录
    --dataloader_num_workers 256 \
    # 设置数据加载器的工作进程数为256,加速数据加载
    --model_author JimmyMa99 \
    # 设置模型作者信息
    --model_name InternLM3-8B-Lora \
    # 设置模型名称
    > "$LOG_FILE" 2>&1 &
    # 将标准输出和标准错误重定向到日志文件,并在后台运行

# 打印进程ID和日志文件位置
echo "Training started with PID $!"
# 显示训练进程的PID($!代表最近一个后台进程的PID)
echo "Log file: $LOG_FILE"
# 显示日志文件的路径

# 显示查看日志的命令
echo "To view logs in real-time, use:"
echo "tail -f $LOG_FILE"
# 提示用户如何实时查看日志文件内容
- 运行
bash config/internlm3-8b-sft-lora.sh

- 检查一下log,看看是否在正常运行
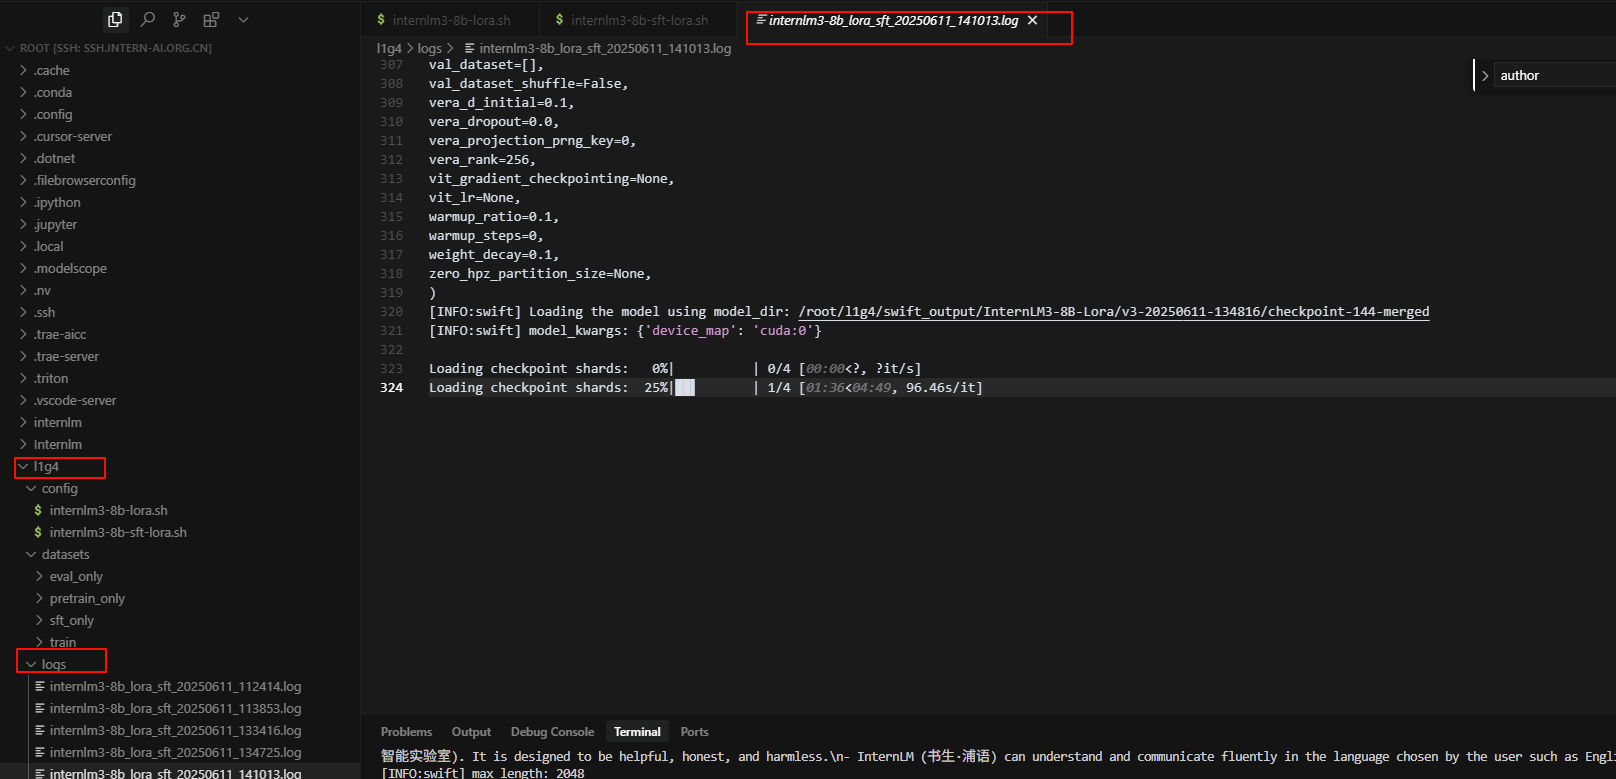
- 输出结果

3.3.2再次合并权重
- 运行下列代码
swift export --adapters xx/checkpoint-xxx --merge_lora true
- 将
xx/checkpoint-xxx改为你的路径 - 比如我是:
swift export \
  --adapters ./swift_output/InternLM3-8B-Lora/v9-20250611-150118/checkpoint-124 \
  --merge_lora true
- 运行成功

4推理测试
4.1新建 streamlit 代码
- 在
root/l1g4下新建一个.py文件,将下列代码粘贴到文件中,修改其中的模型路径model_name_or_path="xxxxx"为sft-merge的路径。
"""This script refers to the dialogue example of streamlit, the interactive
generation code of chatglm2 and transformers.

We mainly modified part of the code logic to adapt to the
generation of our model.
Please refer to these links below for more information:
    1. streamlit chat example:
        https://docs.streamlit.io/knowledge-base/tutorials/build-conversational-apps
    2. chatglm2:
        https://github.com/THUDM/ChatGLM2-6B
    3. transformers:
        https://github.com/huggingface/transformers
Please run with the command `streamlit run path/to/web_demo.py
    --server.address=0.0.0.0 --server.port 7860`.
Using `python path/to/web_demo.py` may cause unknown problems.
"""
# isort: skip_file
import copy
import warnings
from dataclasses import asdict, dataclass
from typing import Callable, List, Optional

import streamlit as st #  用于创建 Web UI
import torch
from torch import nn
from transformers.generation.utils import (LogitsProcessorList,
                                           StoppingCriteriaList)
from transformers.utils import logging

from transformers import AutoTokenizer, AutoModelForCausalLM  # isort: skip

logger = logging.get_logger(__name__)
# model_name_or_path="/root/finetune/models/internlm2-chat-7b"
model_name_or_path="/root/l1g4/swift_output/InternLM3-8B-Lora/v9-20250611-150118/checkpoint-124-merged"

# 生成参数的封装类,用于控制采样策略。
# top_p: nucleus sampling 的阈值。
# temperature: 控制输出多样性。
# do_sample: 是否使用采样(否则为贪婪搜索)。
# repetition_penalty: 抑制重复输出。
@dataclass
class GenerationConfig:
    # this config is used for chat to provide more diversity
    max_length: int = 32768
    top_p: float = 0.8
    temperature: float = 0.8
    do_sample: bool = True
    repetition_penalty: float = 1.005


@torch.inference_mode()
def generate_interactive(
    model,
    tokenizer,
    prompt,
    generation_config: Optional[GenerationConfig] = None,
    logits_processor: Optional[LogitsProcessorList] = None,
    stopping_criteria: Optional[StoppingCriteriaList] = None,
    prefix_allowed_tokens_fn: Optional[Callable[[int, torch.Tensor],
                                                List[int]]] = None,
    additional_eos_token_id: Optional[int] = None,
    **kwargs,
):
    # 1. 编码输入
    inputs = tokenizer([prompt], padding=True, return_tensors='pt')
    input_length = len(inputs['input_ids'][0])
    for k, v in inputs.items():
        inputs[k] = v.cuda()
    input_ids = inputs['input_ids']
    _, input_ids_seq_length = input_ids.shape[0], input_ids.shape[-1]
    if generation_config is None:
        generation_config = model.generation_config
    # 2. 配置生成参数
    generation_config = copy.deepcopy(generation_config)
    model_kwargs = generation_config.update(**kwargs)
    bos_token_id, eos_token_id = (  # noqa: F841  # pylint: disable=W0612
        generation_config.bos_token_id,
        generation_config.eos_token_id,
    )
    if isinstance(eos_token_id, int):
        eos_token_id = [eos_token_id]
    if additional_eos_token_id is not None:
        eos_token_id.append(additional_eos_token_id)
    has_default_max_length = kwargs.get(
        'max_length') is None and generation_config.max_length is not None
    if has_default_max_length and generation_config.max_new_tokens is None:
        warnings.warn(
            f"Using 'max_length''s default \
                ({repr(generation_config.max_length)}) \
                to control the generation length. "
            'This behaviour is deprecated and will be removed from the \
                config in v5 of Transformers -- we'
            ' recommend using `max_new_tokens` to control the maximum \
                length of the generation.',
            UserWarning,
        )
    elif generation_config.max_new_tokens is not None:
        generation_config.max_length = generation_config.max_new_tokens + \
            input_ids_seq_length
        if not has_default_max_length:
            logger.warn(  # pylint: disable=W4902
                f"Both 'max_new_tokens' (={generation_config.max_new_tokens}) "
                f"and 'max_length'(={generation_config.max_length}) seem to "
                "have been set. 'max_new_tokens' will take precedence. "
                'Please refer to the documentation for more information. '
                '(https://huggingface.co/docs/transformers/main/'
                'en/main_classes/text_generation)',
                UserWarning,
            )

    if input_ids_seq_length >= generation_config.max_length:
        input_ids_string = 'input_ids'
        logger.warning(
            f'Input length of {input_ids_string} is {input_ids_seq_length}, '
            f"but 'max_length' is set to {generation_config.max_length}. "
            'This can lead to unexpected behavior. You should consider'
            " increasing 'max_new_tokens'.")

    # 2. Set generation parameters if not already defined 3. 构建 logits 处理逻辑
    logits_processor = logits_processor if logits_processor is not None \
        else LogitsProcessorList()
    stopping_criteria = stopping_criteria if stopping_criteria is not None \
        else StoppingCriteriaList()

    logits_processor = model._get_logits_processor(
        generation_config=generation_config,
        input_ids_seq_length=input_ids_seq_length,
        encoder_input_ids=input_ids,
        prefix_allowed_tokens_fn=prefix_allowed_tokens_fn,
        logits_processor=logits_processor,
    )

    stopping_criteria = model._get_stopping_criteria(
        generation_config=generation_config,
        stopping_criteria=stopping_criteria)
    logits_warper = model._get_logits_warper(generation_config)

    unfinished_sequences = input_ids.new(input_ids.shape[0]).fill_(1)
    scores = None

    #  4. 逐步生成 Token
    while True:
        model_inputs = model.prepare_inputs_for_generation(
            input_ids, **model_kwargs)
        # forward pass to get next token
        outputs = model(
            **model_inputs,
            return_dict=True,
            output_attentions=False,
            output_hidden_states=False,
        )

        next_token_logits = outputs.logits[:, -1, :]

        # pre-process distribution
        next_token_scores = logits_processor(input_ids, next_token_logits)
        next_token_scores = logits_warper(input_ids, next_token_scores)

        # sample
        probs = nn.functional.softmax(next_token_scores, dim=-1)
        #  5. 采样或贪婪选择
        if generation_config.do_sample:
            next_tokens = torch.multinomial(probs, num_samples=1).squeeze(1)
        else:
            next_tokens = torch.argmax(probs, dim=-1)

        # update generated ids, model inputs, and length for next step 6. 拼接输入并判断终止
        input_ids = torch.cat([input_ids, next_tokens[:, None]], dim=-1)
        model_kwargs = model._update_model_kwargs_for_generation(
            outputs, model_kwargs, is_encoder_decoder=False)
        unfinished_sequences = unfinished_sequences.mul(
            (min(next_tokens != i for i in eos_token_id)).long())

        output_token_ids = input_ids[0].cpu().tolist()
        output_token_ids = output_token_ids[input_length:]
        for each_eos_token_id in eos_token_id:
            if output_token_ids[-1] == each_eos_token_id:
                output_token_ids = output_token_ids[:-1]
        response = tokenizer.decode(output_token_ids)

        yield response
        # stop when each sentence is finished
        # or if we exceed the maximum length
        if unfinished_sequences.max() == 0 or stopping_criteria(
                input_ids, scores):
            break


def on_btn_click():
    del st.session_state.messages

#  模型加载(缓存避免重复加载)
@st.cache_resource
def load_model():
    model = (AutoModelForCausalLM.from_pretrained(
        model_name_or_path,
        trust_remote_code=True).to(torch.bfloat16).cuda())
    tokenizer = AutoTokenizer.from_pretrained(model_name_or_path,
                                              trust_remote_code=True)
    return model, tokenizer

# 生成配置 UI(侧边栏)
def prepare_generation_config():
    with st.sidebar:
        max_length = st.slider('Max Length',
                               min_value=8,
                               max_value=32768,
                               value=32768)
        top_p = st.slider('Top P', 0.0, 1.0, 0.8, step=0.01)
        temperature = st.slider('Temperature', 0.0, 1.0, 0.7, step=0.01)
        st.button('Clear Chat History', on_click=on_btn_click)

    generation_config = GenerationConfig(max_length=max_length,
                                         top_p=top_p,
                                         temperature=temperature)

    return generation_config

#  模板化 Prompt 处理
user_prompt = '<|im_start|>user\n{user}<|im_end|>\n'
robot_prompt = '<|im_start|>assistant\n{robot}<|im_end|>\n'
cur_query_prompt = '<|im_start|>user\n{user}<|im_end|>\n\
    <|im_start|>assistant\n'


def combine_history(prompt):
    messages = st.session_state.messages
    meta_instruction = ('You are a helpful, honest, '
                        'and harmless AI assistant.')
    total_prompt = f'<s><|im_start|>system\n{meta_instruction}<|im_end|>\n'
    for message in messages:
        cur_content = message['content']
        if message['role'] == 'user':
            cur_prompt = user_prompt.format(user=cur_content)
        elif message['role'] == 'robot':
            cur_prompt = robot_prompt.format(robot=cur_content)
        else:
            raise RuntimeError
        total_prompt += cur_prompt
    total_prompt = total_prompt + cur_query_prompt.format(user=prompt)
    return total_prompt


def main():
    # st.title('internlm2_5-7b-chat-assistant')
    st.title('InternLM3-8B-Lora-chat-assistant')


    # torch.cuda.empty_cache()
    print('load model begin.')
    model, tokenizer = load_model()
    print('load model end.')

    generation_config = prepare_generation_config()

    # 聊天记录加载与显示
    # Initialize chat history
    if 'messages' not in st.session_state:
        st.session_state.messages = []

    # Display chat messages from history on app rerun
    for message in st.session_state.messages:
        with st.chat_message(message['role'], avatar=message.get('avatar')):
            st.markdown(message['content'])
    #  接收用户输入
    # Accept user input
    if prompt := st.chat_input('What is up?'):
        # Display user message in chat message container

        with st.chat_message('user', avatar='user'):

            st.markdown(prompt)
        real_prompt = combine_history(prompt)
        # Add user message to chat history
        st.session_state.messages.append({
            'role': 'user',
            'content': prompt,
            'avatar': 'user'
        })

        with st.chat_message('robot', avatar='assistant'):

            message_placeholder = st.empty()
            # 实时流式响应(展示中间结果)
            for cur_response in generate_interactive(
                    model=model,
                    tokenizer=tokenizer,
                    prompt=real_prompt,
                    additional_eos_token_id=92542,
                    device='cuda:0',
                    **asdict(generation_config),
            ):
                # Display robot response in chat message container
                message_placeholder.markdown(cur_response + '▌')
            message_placeholder.markdown(cur_response)
        # Add robot response to chat history
        st.session_state.messages.append({
            'role': 'robot',
            'content': cur_response,  # pylint: disable=undefined-loop-variable
            'avatar': 'assistant',
        })
        torch.cuda.empty_cache()


if __name__ == '__main__':
    main()
- 运行下列代码:
streamlit run /root/l1g4/xtuner_streamlit_demo.py --server.address=0.0.0.0 --server.port=7860
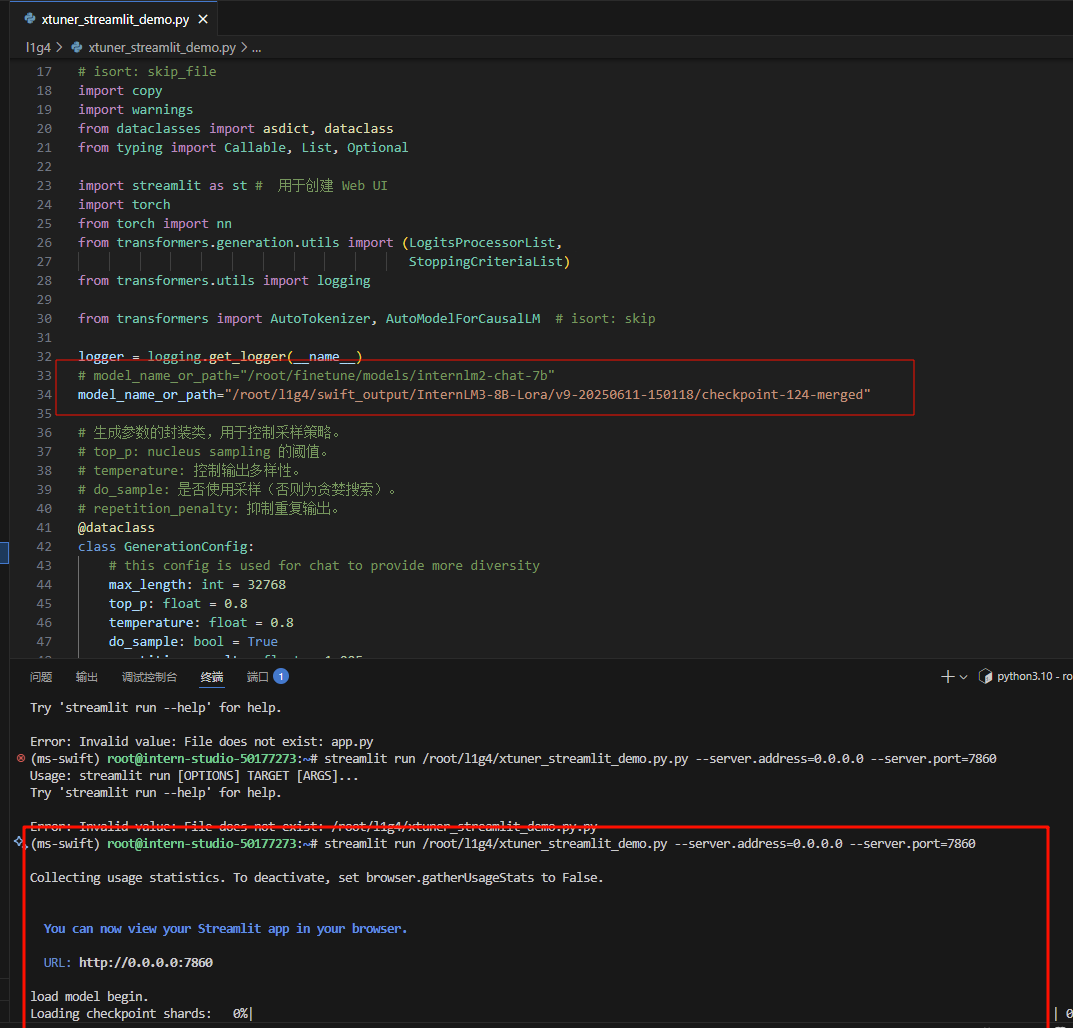
- 点击连接,等待模型加载
5测评
5.1练习赛在线评测
使用opencompass进行测评(教程”L1G2“已经克隆过该仓库并且下载过相应的环境)
5.1.1克隆仓库
git clone https://github.moeyy.xyz/https://github.com/open-compass/opencompass opencompass
cd opencompass
conda create -n opencompass python=3.10 -y
conda activate opencompass
pip install -e .
5.1.2修改内容
我们将使用huggingface 进行推理
所以需要修改一个文件opencompass/opencompass/models/huggingface.py
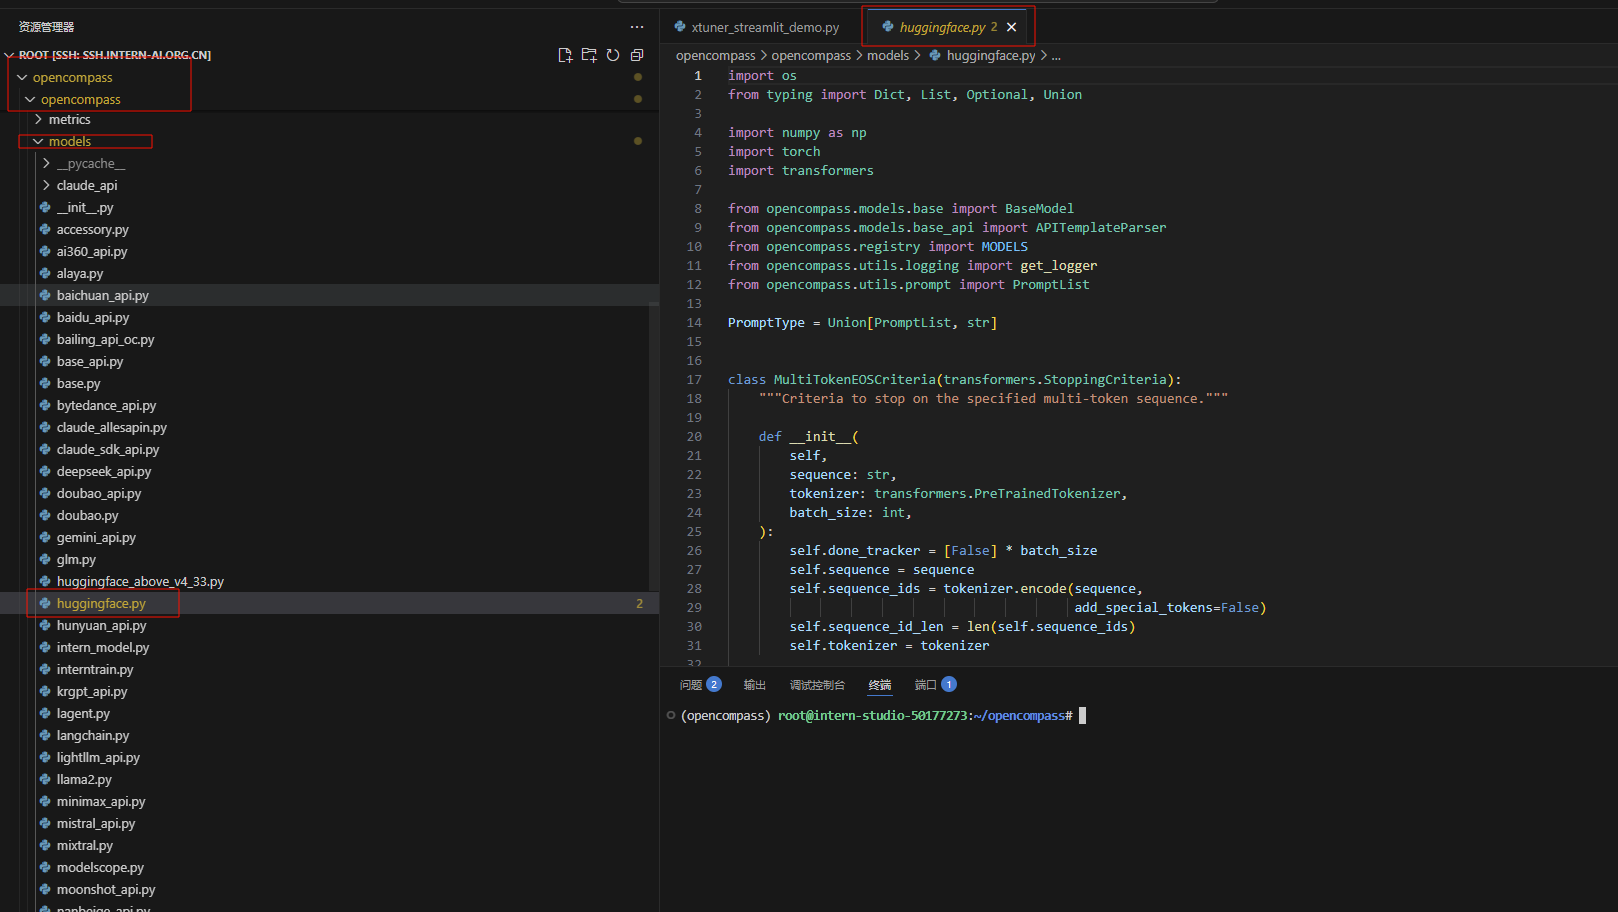
# 681行
- self.model = AutoModelForCausalLM.from_pretrained(path, **model_kwargs)
+ self.model = AutoModelForCausalLM.from_pretrained(path, trust_remote_code=True,**model_kwargs)
# 135行
- tokenizer_path if tokenizer_path else path, **tokenizer_kwargs)
+ tokenizer_path if tokenizer_path else path, trust_remote_code=True, **tokenizer_kwargs)
5.1.3新建一个 py 脚本internlm3-oc_eval.py
路径:/root/opencompass/internlm3-oc_eval.py
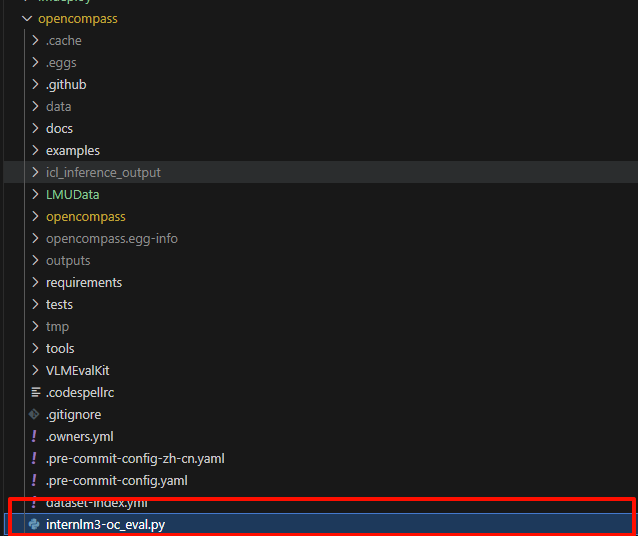
内容如下:
# To run this example, you need to do the following steps:
# 1. Install latest opencompass
# 2. Start a local server with Qwen2.5-72B-Instruct as LLMJudge server (i.e. using vLLM or LMDeploy)
# 3. Change the judge_cfg openai_api_base to your corresponindg local server address
# 4. Start this evaluation by running 'opencompass eval_internlm3_math500_thinking.py'
# from opencompass.models import VLLMwithChatTemplate, OpenAISDK
from mmengine.config import read_base
from opencompass.models import HuggingFaceCausalLM

models = [
    dict(
        type=HuggingFaceCausalLM,
        path='/root/code/camp5_course/swift_output/InternLM3-8B-Lora/v3-20250416-163856/checkpoint-95-merged',
        tokenizer_path='/root/code/camp5_course/swift_output/InternLM3-8B-Lora/v3-20250416-163856/checkpoint-95-merged',
        tokenizer_kwargs=dict(padding_side='left', truncation_side='left'),
        model_kwargs=dict(device_map='auto'),
        max_seq_len=32768,
        max_out_len=16384,
        batch_size=2,
        run_cfg=dict(num_gpus=1),
    )
]

datasets = [
    {"path": "/root/code/camp5_course/test_data/newformat_sft_test_data.csv", "data_type": "mcq", "infer_method": "gen"},
]
运行下列代码:
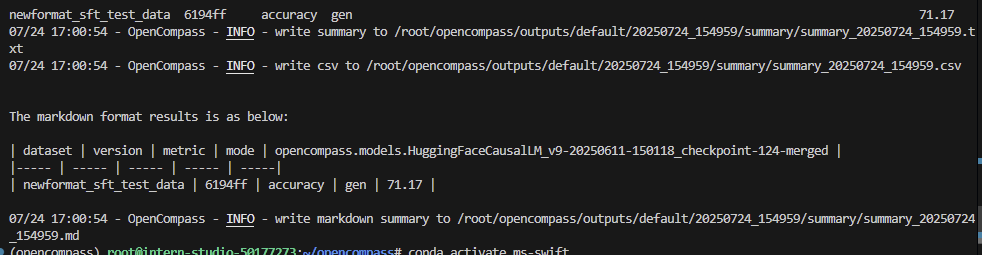
python /root/opencompass/internlm3-oc_eval.py internlm3-oc_eval.py --debug
- 运行结果:
6提交模型完成评测
将微调好的模型上传模型至 ModelScope 模型库 ,有 **① swift 指令 ② ModeScope 官方 Python SDK ****两种方法,二选一**即可。
成功上传至ModelScope 模型库后,把hub_model_id(下面会告诉大家如何获得)填写至信息提交单中,后台会自动拉取并跑评测,因此稍等一段时间就可以在榜单上看到自己的成绩。
6.1swift 指令
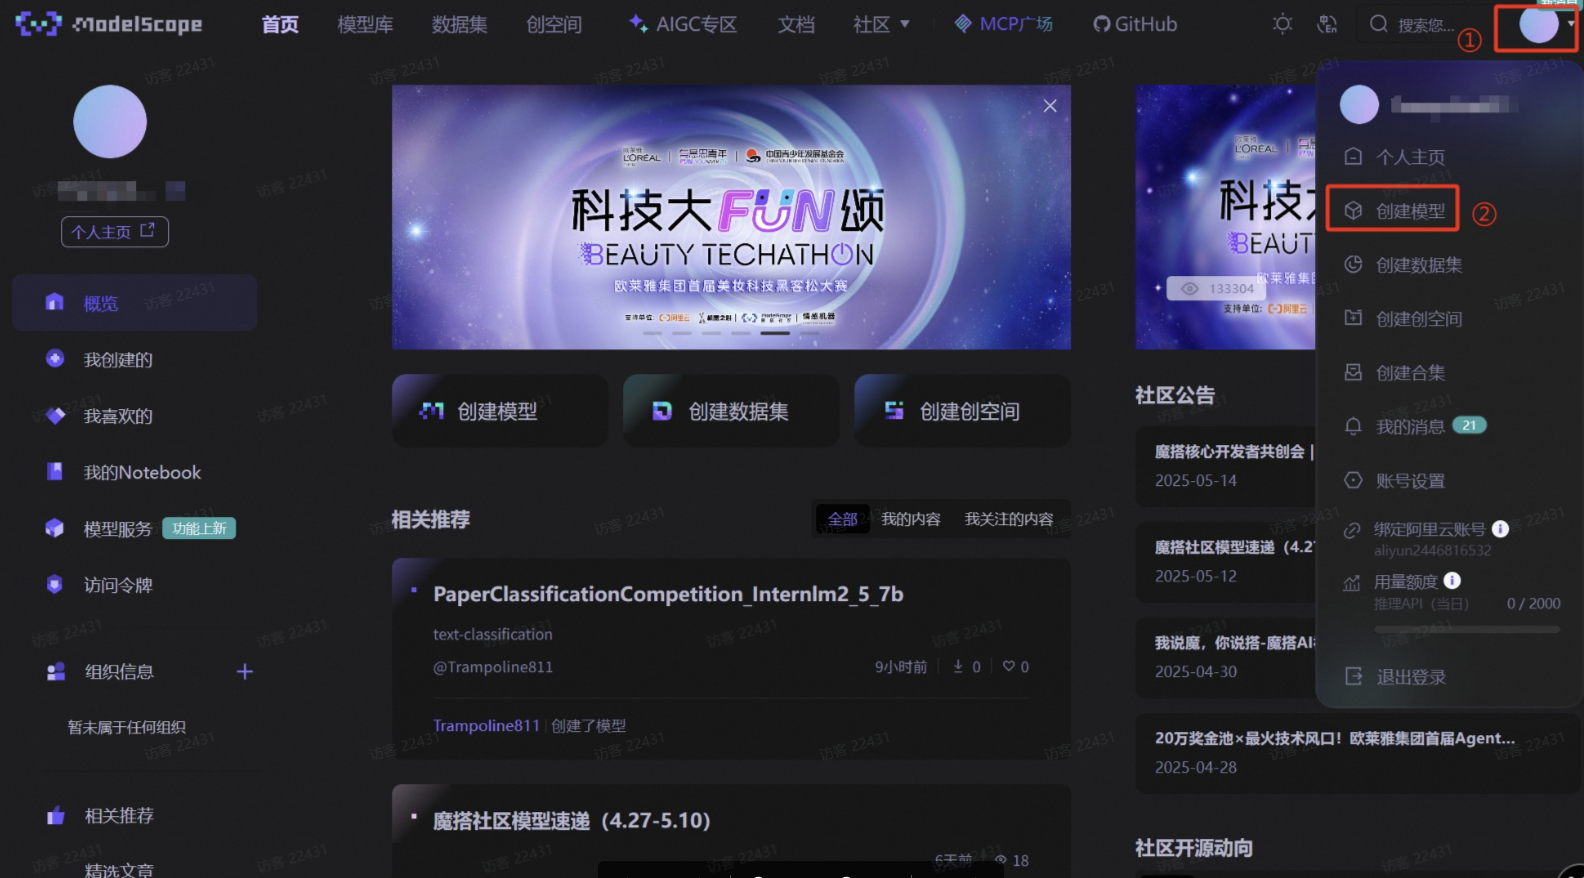
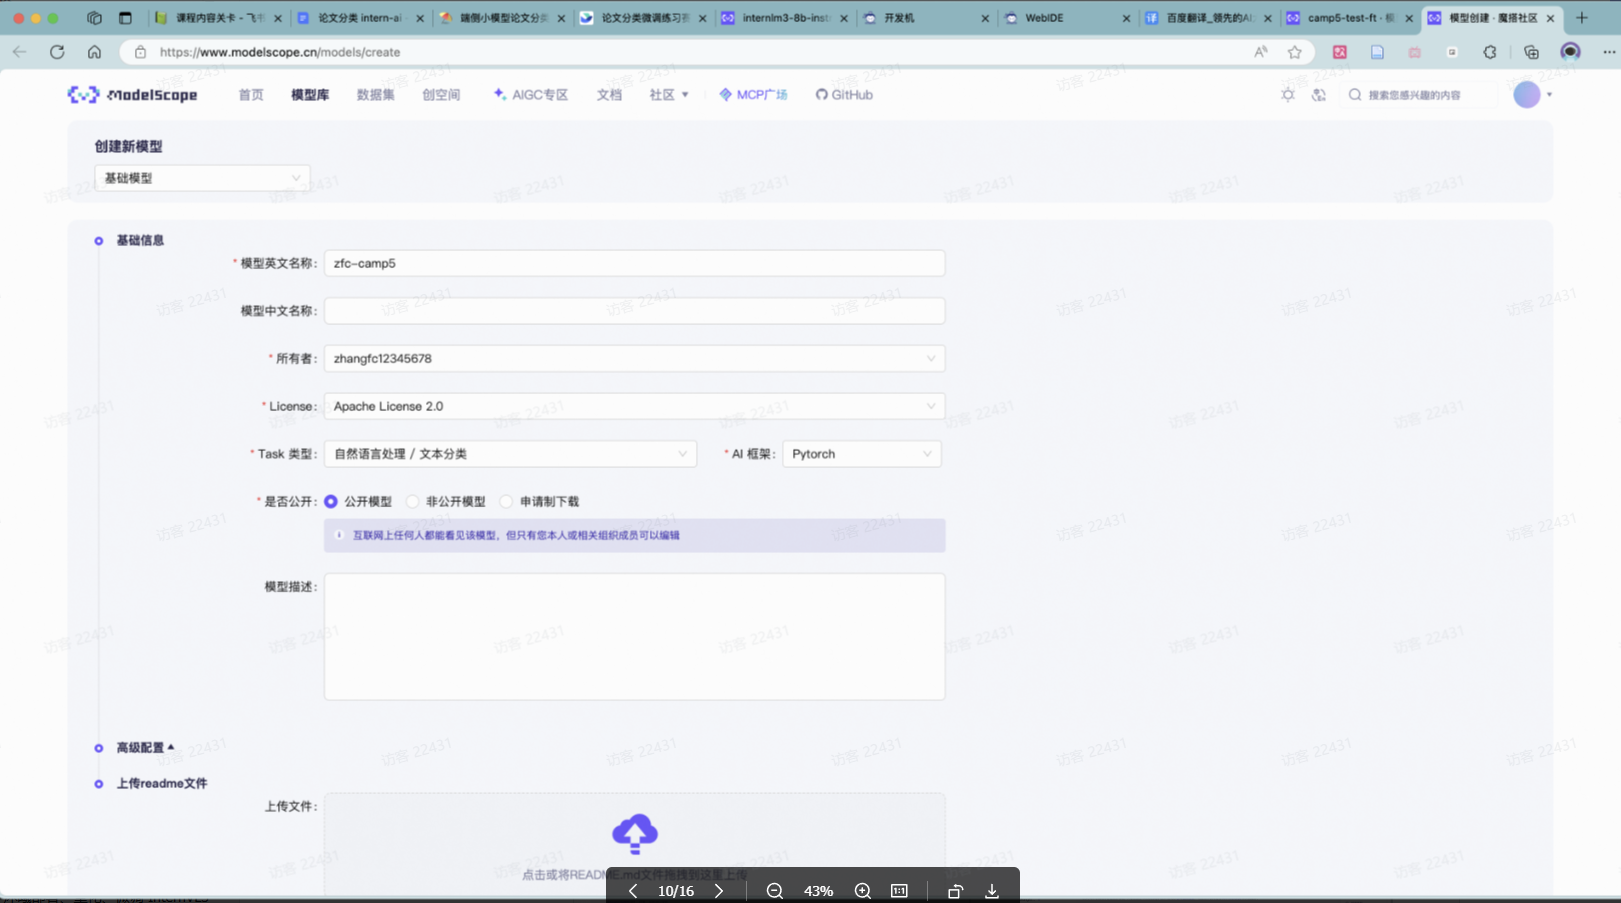
- 首先需要在 ModelScope 创建模型,为你的模型取一个响亮优雅又好听的名字,然后按右下图中的信息创建。
- 接下来需要两个步骤:
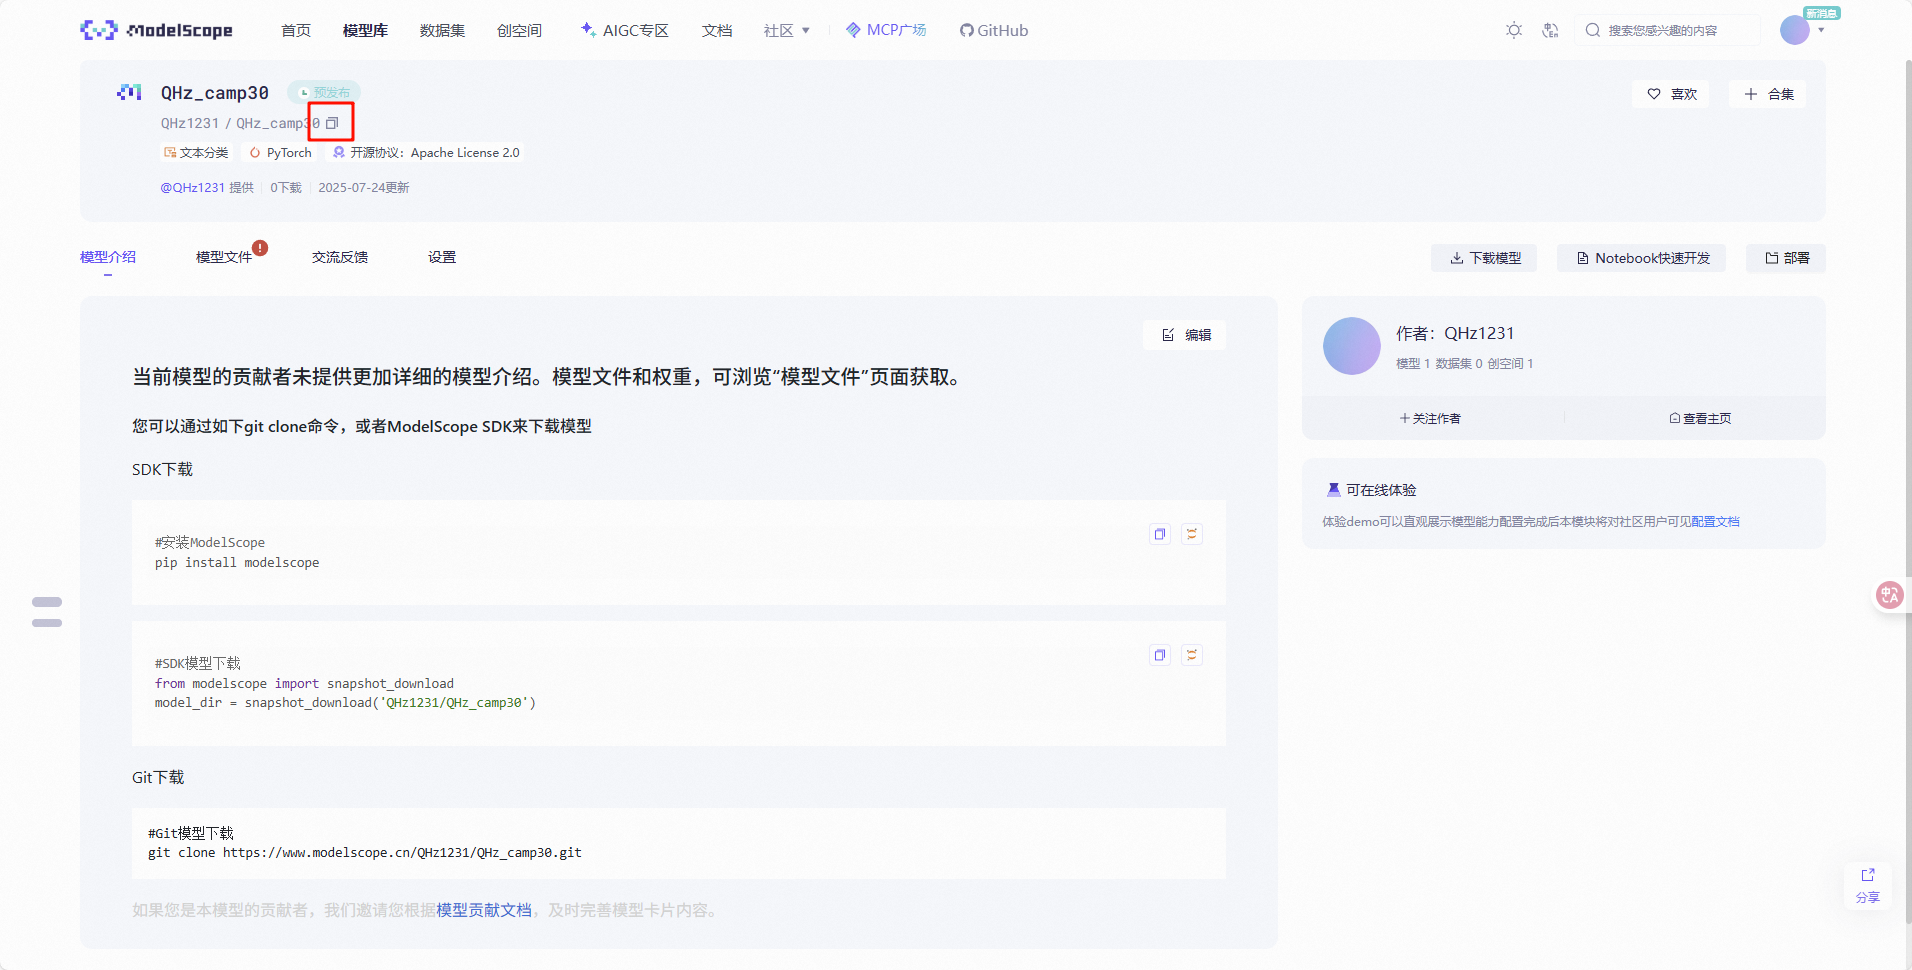
- 到刚创建好的模型仓库中,拿到
**hub_model_id**,实际上就是**{账号名称/模型库名称}**,如“**Shanghai_AI_Laboratory/internlm3-8b-instruct**” - 账号设置-访问令牌 中拿到
**hub_token**,需妥善保存,不要暴露给他人
- 到刚创建好的模型仓库中,拿到
hub_model_id获取方式如下图
hub_token获取方式如下图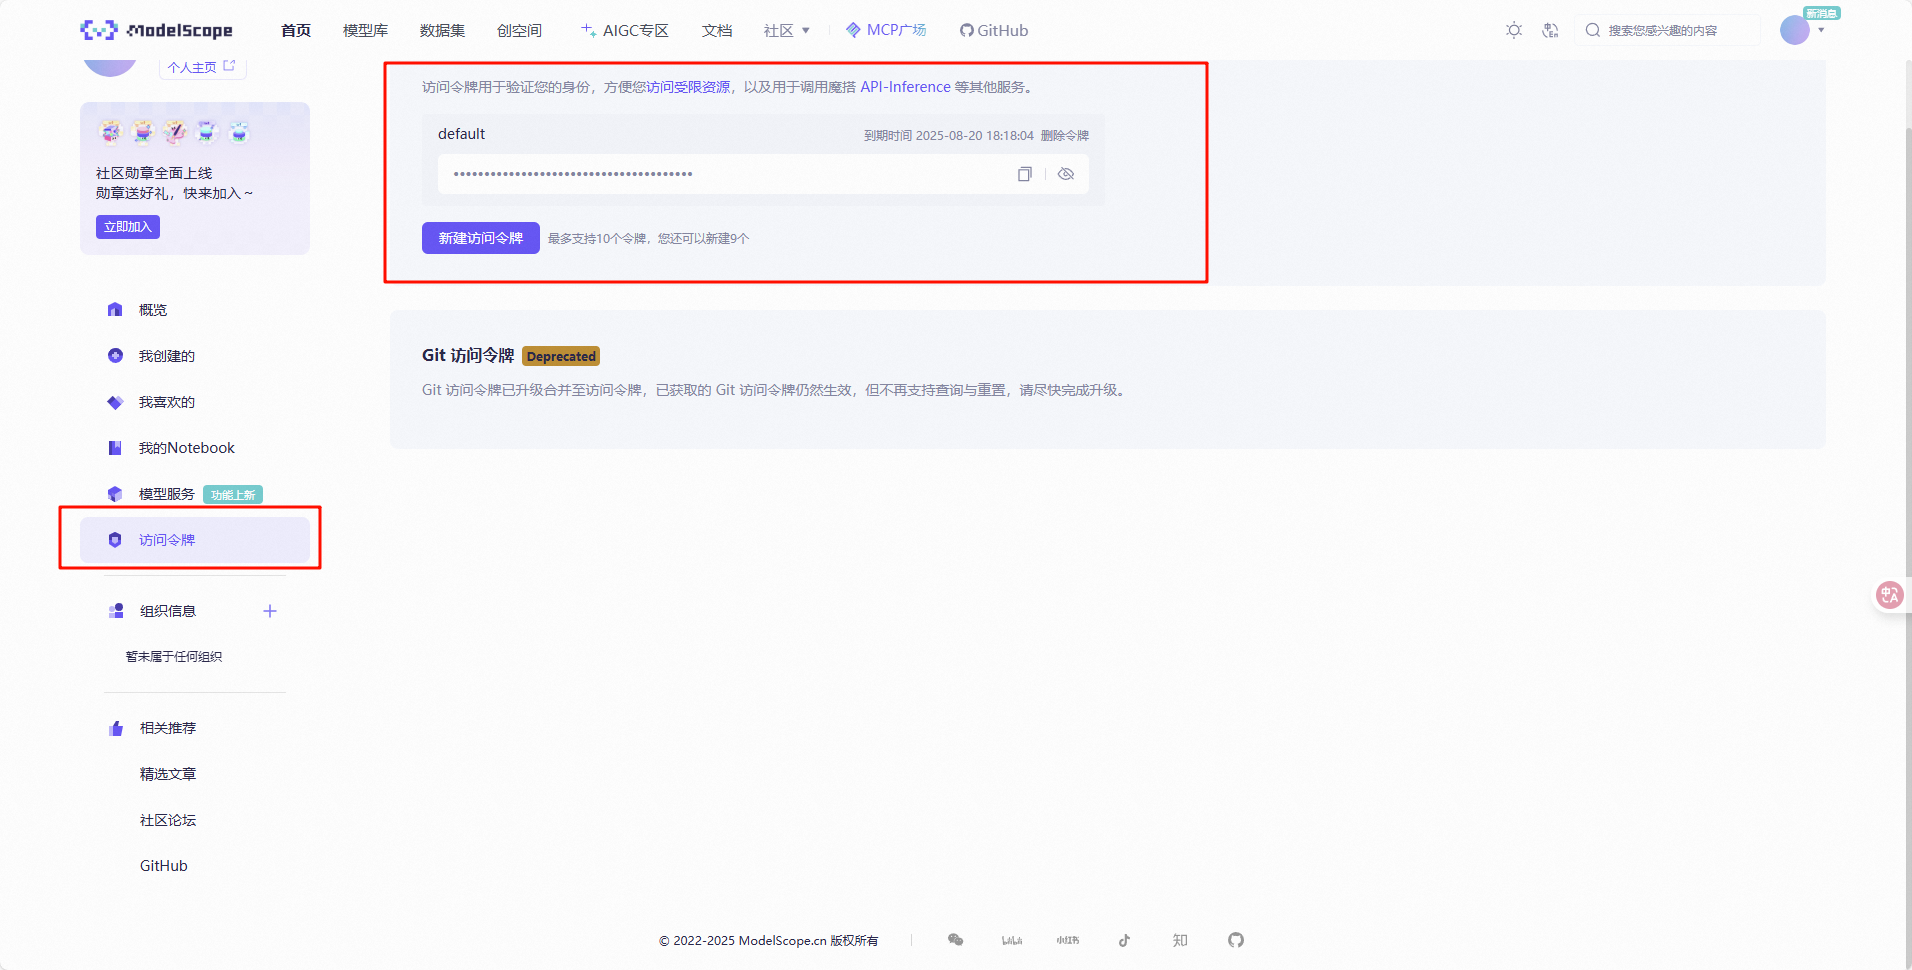
- 下载git
- 运行下列命令
apt-get install git-lfs
git lfs install
- 提交
swift export \
    --model /root/l1g4/swift_output/InternLM3-8B-Lora/v3-20250611-134816/checkpoint-144-merged\
    --push_to_hub true \
    --hub_model_id 'QHz1231/QHz_cxxxx' \
    --hub_token 'ms-1ca62axx' \
    --use_hf false
6.2ModeScope 官方 Python SDK
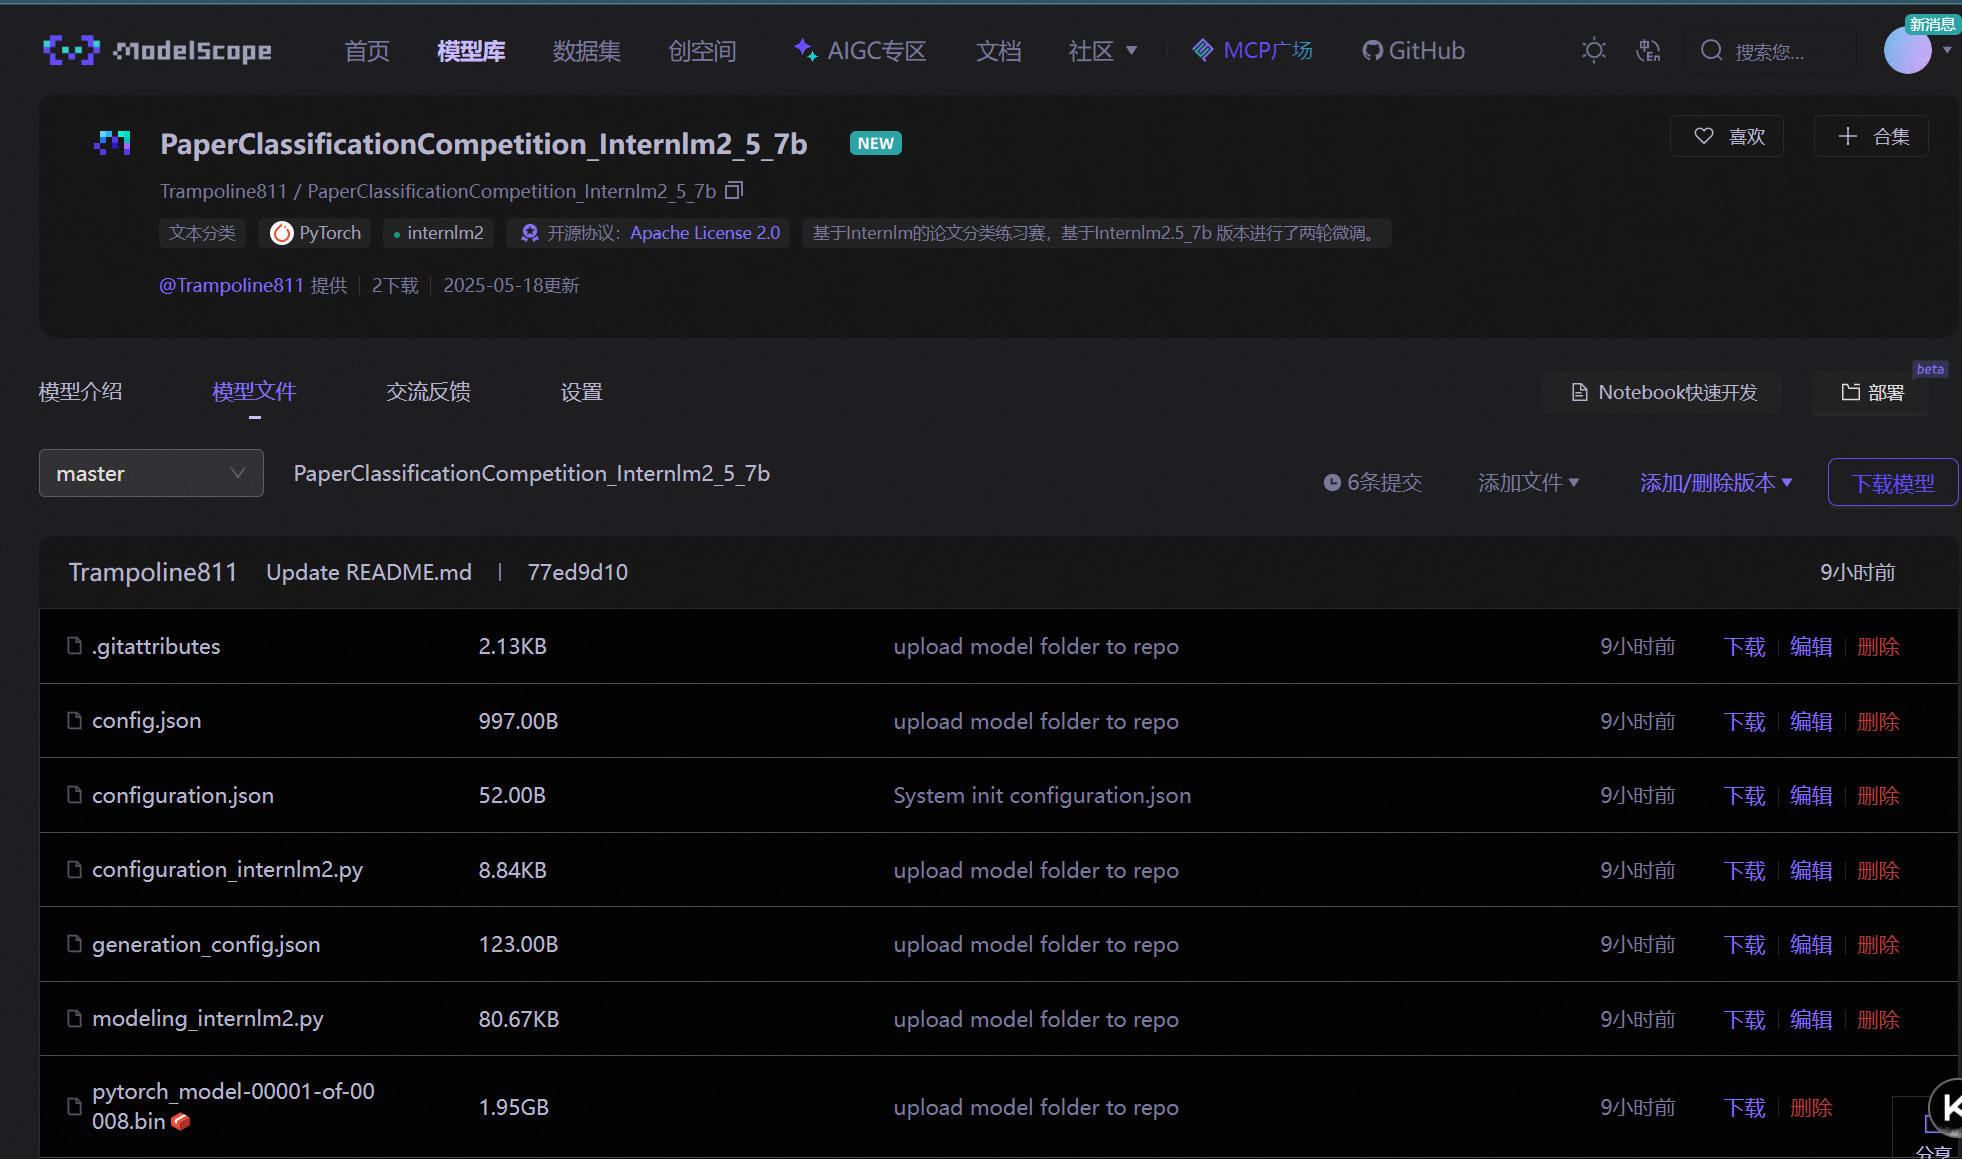
复制脚本并修改关键信息后直接运行就上传了,上传后 ModelScope 会花一点时间审核,等待一段时间,待审核全部通过后,再进行下一节的提交。
pip install modelscope
【上传脚本】
from modelscope.hub.api import HubApi
from modelscope.hub.constants import Licenses, ModelVisibility

# 配置基本信息
YOUR_ACCESS_TOKEN = 'xxx(从modelscope获取,即上节的hub_token)'
api = HubApi()
api.login(YOUR_ACCESS_TOKEN)

# 取名字
owner_name = 'xxx'    # ModelScope 的用户名,需根据自己情况修改
model_name = 'xxx'    # 为模型库取个响亮优雅又好听的名字,需根据自己情况修改
model_id = f"{owner_name}/{model_name}"

# 创建模型库,若已通过6.1节的ModelScope网页端创建,此段代码可忽略
api.create_model(
     model_id,
     visibility=ModelVisibility.PUBLIC,
     license=Licenses.APACHE_V2,
     chinese_name=f"{owner_name}的论文分类打榜赛模型"
    )

# 上传模型
api.upload_folder(
    repo_id=f"{owner_name}/{model_name}",
    folder_path='/root/path/to/your/model',    # 微调后模型的文件夹名称
    commit_message='upload model folder to repo',    # 写点开心的上传信息
)
【参考】
https://www.modelscope.cn/docs/models/upload
上传成功后如下图:
7填链接提交模型

火山引擎开发者社区是火山引擎打造的AI技术生态平台,聚焦Agent与大模型开发,提供豆包系列模型(图像/视频/视觉)、智能分析与会话工具,并配套评测集、动手实验室及行业案例库。社区通过技术沙龙、挑战赛等活动促进开发者成长,新用户可领50万Tokens权益,助力构建智能应用。
更多推荐
 18
18 0
0- 0


 已为社区贡献2条内容

所有评论(0)