鸿蒙0基础学习【使用Web组件显示网页弹框】ArkUI
在HTML中,可以使用JavaScript创建三种类型的弹框:警告框window.alert(message)、确认框window.confirm(message)和提示框window.prompt(message, defaultValue)。这些弹框可以用于向用户传递信息、确认操作或请求输入。当前,ArkWeb暂未提供默认的应用弹框。如果需要网页的弹框能够正常使用,应用需要通过[onAlert
在HTML中,可以使用JavaScript创建三种类型的弹框:警告框window.alert(message)、确认框window.confirm(message)和提示框window.prompt(message, defaultValue)。这些弹框可以用于向用户传递信息、确认操作或请求输入。
当前,ArkWeb暂未提供默认的应用弹框。如果需要网页的弹框能够正常使用,应用需要通过[onAlert]、[onConfirm]和[onPrompt]接口自定义弹框功能。
实现Alert弹框
window.alert()用于显示一个包含可选信息的对话框。警告框用于确保用户可以得到某些信息。当警告框出现后,用户需要点击确定按钮才能继续进行操作。
- 可选参数message是要显示在警告对话框中的字符串,如果传入其他类型的值,会转换成字符串。
- 该方法不存在返回值。
应用可以通过[onAlert]事件监听网页alert方法,并创建合适的弹框。
- 用[AlertDialog]创建弹框。
import { webview } from '@kit.ArkWeb';


@Entry
@Component
struct Index {
  @State message: string = 'Hello World';
  webviewController: webview.WebviewController = new webview.WebviewController();
  uiContext: UIContext = this.getUIContext();


  build() {
    Row() {
      Web({ src: $rawfile('test.html'), controller: this.webviewController })
        .onAlert((event) => {
          if (event) {
            console.log("event.url:" + event.url);
            console.log("event.message:" + event.message);
            this.uiContext.showAlertDialog({
              title: "来自" + event.url + "的警告",
              message: event.message,
              confirm:{
                value: "确认",
                action: ()=>{
                  console.info('Alert confirmed.');
                  event.result.handleConfirm();
                }
              },
              cancel: () => {
                event.result.handleCancel();
              }
            })
          }
          return true;
        })
    }
  }
}
加载的html。
<!doctype html>
<html lang="en">
<head>
    <meta charset="UTF-8">
    <meta name="viewport"
          content="width=device-width, user-scalable=no, initial-scale=1.0, maximum-scale=1.0, minimum-scale=1.0">
    <meta http-equiv="X-UA-Compatible" content="ie=edge">
    <title>Document</title>
    <style>
        button,label,input {
        margin: 5px 0;
        }
    </style>
</head>
<body>
<input type="text" id="alert-message" placeholder="message for alert"><br/>
<button onclick="handleAlert()">alert</button><br/>
<script>
    function handleAlert() {
        let message = document.getElementById("alert-message").value;
        let result = window.alert(message ? message : 'alert');
    }
</script>
</body>
</html>
- 用[CustomDialog-AlertDialog]创建弹框。
import { AlertDialog, router } from '@kit.ArkUI';
import { webview } from '@kit.ArkWeb';
@Entry
@Component
struct AlertDialogPage {
@State message: string = 'Hello World';
@State title: string = 'Hello World';
@State subtitle: string = '';
@State result: JsResult | null = null;
webviewController: webview.WebviewController = new webview.WebviewController();
dialogControllerAlert: CustomDialogController = new CustomDialogController({
builder: AlertDialog({
primaryTitle: this.title,
secondaryTitle: this.subtitle,
content: this.message,
primaryButton: {
value: '确认',
role: ButtonRole.ERROR,
action: () => {
console.info('Callback when the second button is clicked');
this.result?.handleConfirm();
}
},
}),
onWillDismiss: ()=>{
this.result?.handleCancel();
this.dialogControllerAlert.close();
}
})
build() {
Column() {
Button('back').onClick((event: ClickEvent) => {
router.back()
})
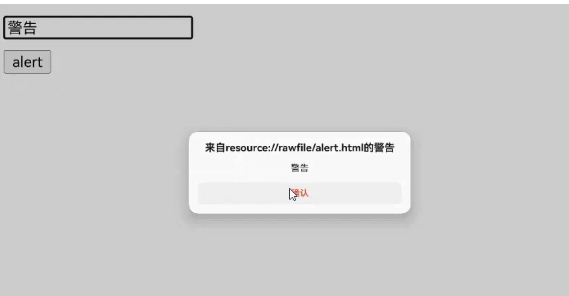
Web({ src: $rawfile('alert.html'), controller: this.webviewController })
.onAlert((event) => {
if (event) {
console.log("event.url:" + event.url);
console.log("event.message:" + event.message);
this.title = "来自" + event.url + "的警告";
this.message = event.message;
this.result = event.result;
this.dialogControllerAlert.open();
}
return true;
})
}
}
}
加载的html。
<!doctype html>
<html lang="en">
<head>
    <meta charset="UTF-8">
    <meta name="viewport"
          content="width=device-width, user-scalable=no, initial-scale=1.0, maximum-scale=1.0, minimum-scale=1.0">
    <meta http-equiv="X-UA-Compatible" content="ie=edge">
    <title>Document</title>
    <style>
        button,label,input {
        margin: 5px 0;
        }
    </style>
</head>
<body>
<input type="text" id="alert-message" placeholder="message for alert"><br/>
<button onclick="handleAlert()">alert</button><br/>
<script>
    function handleAlert() {
        let message = document.getElementById("alert-message").value;
        let result = window.alert(message ? message : 'alert');
    }
</script>
</body>
</html>
实现Confirm弹框
window.confirm()用于显示一个包含可选消息的对话框,并等待用户确认或取消该对话框。
- 可选参数message是要显示在对话框中的字符串,如果传入其他类型的值,会转换成字符串。
- 该方法返回一个布尔值,表示是否选择了确定(true)或取消(false)。如果应用忽略了页面内的对话框,那么返回值总是false。
确认框用于验证用户是否接受某个操作,常用于询问用户是否离开网页,以防页面表单等数据丢失。
应用可以通过[onConfirm]事件监听网页confirm方法,并创建合适的弹框。
- 用[AlertDialog]创建弹框。
**import { webview } from '@kit.ArkWeb';


@Entry
@Component
struct Index {
  @State message: string = 'Hello World';
  webviewController: webview.WebviewController = new webview.WebviewController();
  uiContext: UIContext = this.getUIContext();


  build() {
    Column() {
      Web({ src: $rawfile('test.html'), controller: this.webviewController })
        .onConfirm((event) => {
          if (event) {
            console.log("event.url:" + event.url);
            console.log("event.message:" + event.message);
            this.uiContext.showAlertDialog({
              title: "来自" + event.url + "的消息",
              message: event.message,
              primaryButton: {
                value: 'cancel',
                action: () => {
                  event.result.handleCancel();
                }
              },
              secondaryButton: {
                value: 'ok',
                action: () => {
                  event.result.handleConfirm();
                }
              },
              cancel: () => {
                event.result.handleCancel();
              }
            })
          }
          return true;
        })
    }
  }
}
加载的html。
<!doctype html>
<html lang="en">
<head>
    <meta charset="UTF-8">
    <meta name="viewport"
          content="width=device-width, user-scalable=no, initial-scale=1.0, maximum-scale=1.0, minimum-scale=1.0">
    <meta http-equiv="X-UA-Compatible" content="ie=edge">
    <title>Document</title>
    <style>
        button,label,input {
        margin: 5px 0;
        }
    </style>
</head>
<body>
result:<label id="confirmLabel" for="confirm"></label><br/>
<input type="text" id="confirm-message" placeholder="message for confirm"><br/>
<button id="confirm" onclick="handleConfirm()">confirm</button><br/>
<script>
    function handleConfirm() {
        let message = document.getElementById("confirm-message").value;
        let result = window.confirm(message ? message : 'confirm');
        console.log(result);
        document.getElementById("confirmLabel").innerHTML=String(result);
    }
</script>
</body>
</html>
- 用[CustomDialog-ConfirmDialog]创建弹框。
import { webview } from '@kit.ArkWeb';
import { ConfirmDialog } from '@kit.ArkUI';
@Entry
@Component
struct DialogConfirmDialog {
@State message: string = 'Hello World';
@State title: string = 'Hello World';
@State result: JsResult | null = null;
webviewController: webview.WebviewController = new webview.WebviewController();
isChecked = false;
dialogControllerCheckBox: CustomDialogController = new CustomDialogController({
builder: ConfirmDialog({
title: this.title,
content: this.message,
// 勾选框选中状态
isChecked: this.isChecked,
// 勾选框说明文本
checkTips: '禁止后不再提示',
primaryButton: {
value: '禁止',
action: () => {
this.result?.handleCancel();
},
},
secondaryButton: {
value: '允许',
action: () => {
this.isChecked = false;
console.info('Callback when the second button is clicked');
this.result?.handleConfirm();
}
},
onCheckedChange: (checked) => {
this.isChecked = checked;
console.info('Callback when the checkbox is clicked');
},
}),
onWillDismiss: () => {
this.result?.handleCancel();
this.dialogControllerCheckBox.close();
},
autoCancel: true
})
build() {
Column() {
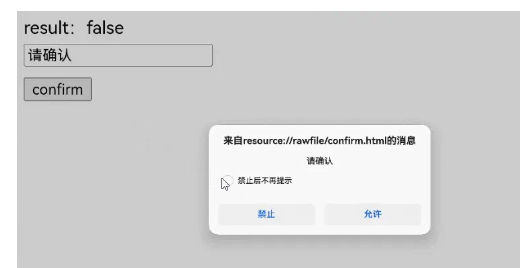
Web({ src: $rawfile('confirm.html'), controller: this.webviewController })
.onConfirm((event) => {
if (event) {
if (this.isChecked) {
event.result.handleCancel();
} else {
console.log("event.url:" + event.url);
console.log("event.message:" + event.message);
this.title = "来自" + event.url + "的消息";
this.message = event.message;
this.result = event.result;
this.dialogControllerCheckBox.open();
}
}
return true;
})
}
}
}
加载的html。
<!doctype html>
<html lang="en">
<head>
    <meta charset="UTF-8">
    <meta name="viewport"
          content="width=device-width, user-scalable=no, initial-scale=1.0, maximum-scale=1.0, minimum-scale=1.0">
    <meta http-equiv="X-UA-Compatible" content="ie=edge">
    <title>Document</title>
    <style>
        button,label,input {
        margin: 5px 0;
        }
    </style>
</head>
<body>
result:<label id="confirmLabel" for="confirm"></label><br/>
<input type="text" id="confirm-message" placeholder="message for confirm"><br/>
<button id="confirm" onclick="handleConfirm()">confirm</button><br/>
<script>
    function handleConfirm() {
        let message = document.getElementById("confirm-message").value;
        let result = window.confirm(message ? message : 'confirm');
        console.log(result);
        document.getElementById("confirmLabel").innerHTML=String(result);
    }
</script>
</body>
</html>
实现Prompt弹框
window.prompt()用于显示一个对话框,并等待用户提交文本或取消对话框。用户需要输入某个值,然后点击确认或取消按钮。点击确认返回输入的值,点击取消返回null。
- 可选参数message向用户显示的一串文本。如果在提示窗口中没有什么可显示的,可以省略。
- 可选参数defaultValue是一个字符串,包含文本输入字段中显示的默认值。
- 返回值为用户输入文本的字符串,或null。
提示框用于提示用户输入某个值,常用于需要用户输入临时的口令或验证码等场景。
应用可以通过[onPrompt]事件监听网页prompt方法,并创建合适的弹框。
- 用[CustomDialog-CustomContentDialog]创建弹框。
import { CustomContentDialog } from '@kit.ArkUI';
import { webview } from '@kit.ArkWeb';
@Entry
@Component
struct PromptDialog {
@State message: string = 'Hello World';
@State title: string = 'Hello World';
@State result: JsResult | null = null;
promptResult: string = '';
webviewController: webview.WebviewController = new webview.WebviewController();
dialogController: CustomDialogController = new CustomDialogController({
builder: CustomContentDialog({
primaryTitle: this.title,
contentBuilder: () => {
this.buildContent();
},
buttons: [
{
value: '取消',
buttonStyle: ButtonStyleMode.TEXTUAL,
action: () => {
console.info('Callback when the button is clicked');
this.result?.handleCancel();
}
},
{
value: '确认',
buttonStyle: ButtonStyleMode.TEXTUAL,
action: () => {
this.result?.handlePromptConfirm(this.promptResult);
}
}
],
}),
onWillDismiss: () => {
this.result?.handleCancel();
this.dialogController.close();
}
});
// 自定义弹出框的内容区
@Builder
buildContent(): void {
Column() {
Text(this.message)
TextInput()
.onChange((value) => {
this.promptResult = value;
})
.defaultFocus(true)
}
.width('100%')
}
build() {
Column() {
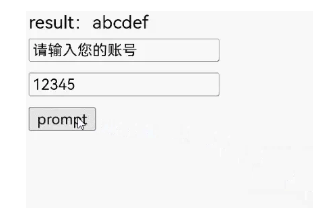
Web({ src: $rawfile('prompt.html'), controller: this.webviewController })
.onPrompt((event) => {
if (event) {
console.log("event.url:" + event.url);
console.log("event.message:" + event.message);
console.log("event.value:" + event.value);
this.title = "来自" + event.url + "的消息";
this.message = event.message;
this.promptResult = event.value;
this.result = event.result;
this.dialogController.open();
}
return true;
})
}
}
}
加载的html。
<!doctype html>
<html lang="en">
<head>
    <meta charset="UTF-8">
    <meta name="viewport"
          content="width=device-width, user-scalable=no, initial-scale=1.0, maximum-scale=1.0, minimum-scale=1.0">
    <meta http-equiv="X-UA-Compatible" content="ie=edge">
    <title>Document</title>
    <style>
        button,label,input {
        margin: 5px 0;
        }
    </style>
</head>
<body>
result:<label id="promptLabel" for="prompt"></label><br/>
<input type="text" id="prompt-message" placeholder="message for prompt"><br/>
<input type="text" id="prompt-value" placeholder="default value for prompt"><br/>
<button id="prompt" onclick="handlePrompt()">prompt</button><br/>
<script>
    function handlePrompt() {
        let message = document.getElementById("prompt-message").value;
        let defaultValue = document.getElementById("prompt-value").value;
        let result = window.prompt(message ? message : 'prompt', defaultValue);
        console.log(result);
        document.getElementById("promptLabel").innerHTML=result;
    }
</script>
</body>
</html>

火山引擎开发者社区是火山引擎打造的AI技术生态平台,聚焦Agent与大模型开发,提供豆包系列模型(图像/视频/视觉)、智能分析与会话工具,并配套评测集、动手实验室及行业案例库。社区通过技术沙龙、挑战赛等活动促进开发者成长,新用户可领50万Tokens权益,助力构建智能应用。
更多推荐
 3
3 0
0- 0


 已为社区贡献7条内容

所有评论(0)