Rokid眼镜天气应用:自定义界面+TTS语音播报
继上一篇《新手上手:Rokid移动端+眼镜端最小实践》之后,本文将带你实现一个完整的天气应用,充分利用Rokid眼镜的特性:自定义界面显示天气信息,TTS语音播报天气摘要,让天气信息在眼镜端呈现得更直观、更智能。
如果您有任何疑问、对文章写的不满意、发现错误或者有更好的方法,如果你想支持下一期请务必点赞~,欢迎在评论、私信或邮件中提出,非常感谢您的支持。🙏
那么你将获得
- 完整天气应用:移动端获取天气 → 眼镜端自定义界面显示 → TTS语音播报
- 可直接复制的 Kotlin 代码片段(天气API调用、自定义界面JSON生成、TTS播报)
- 眼镜特性深度应用:Custom View、全局TTS、界面更新
- 高频踩坑与排错清单
一、总体流程
天气应用的完整流程如下:
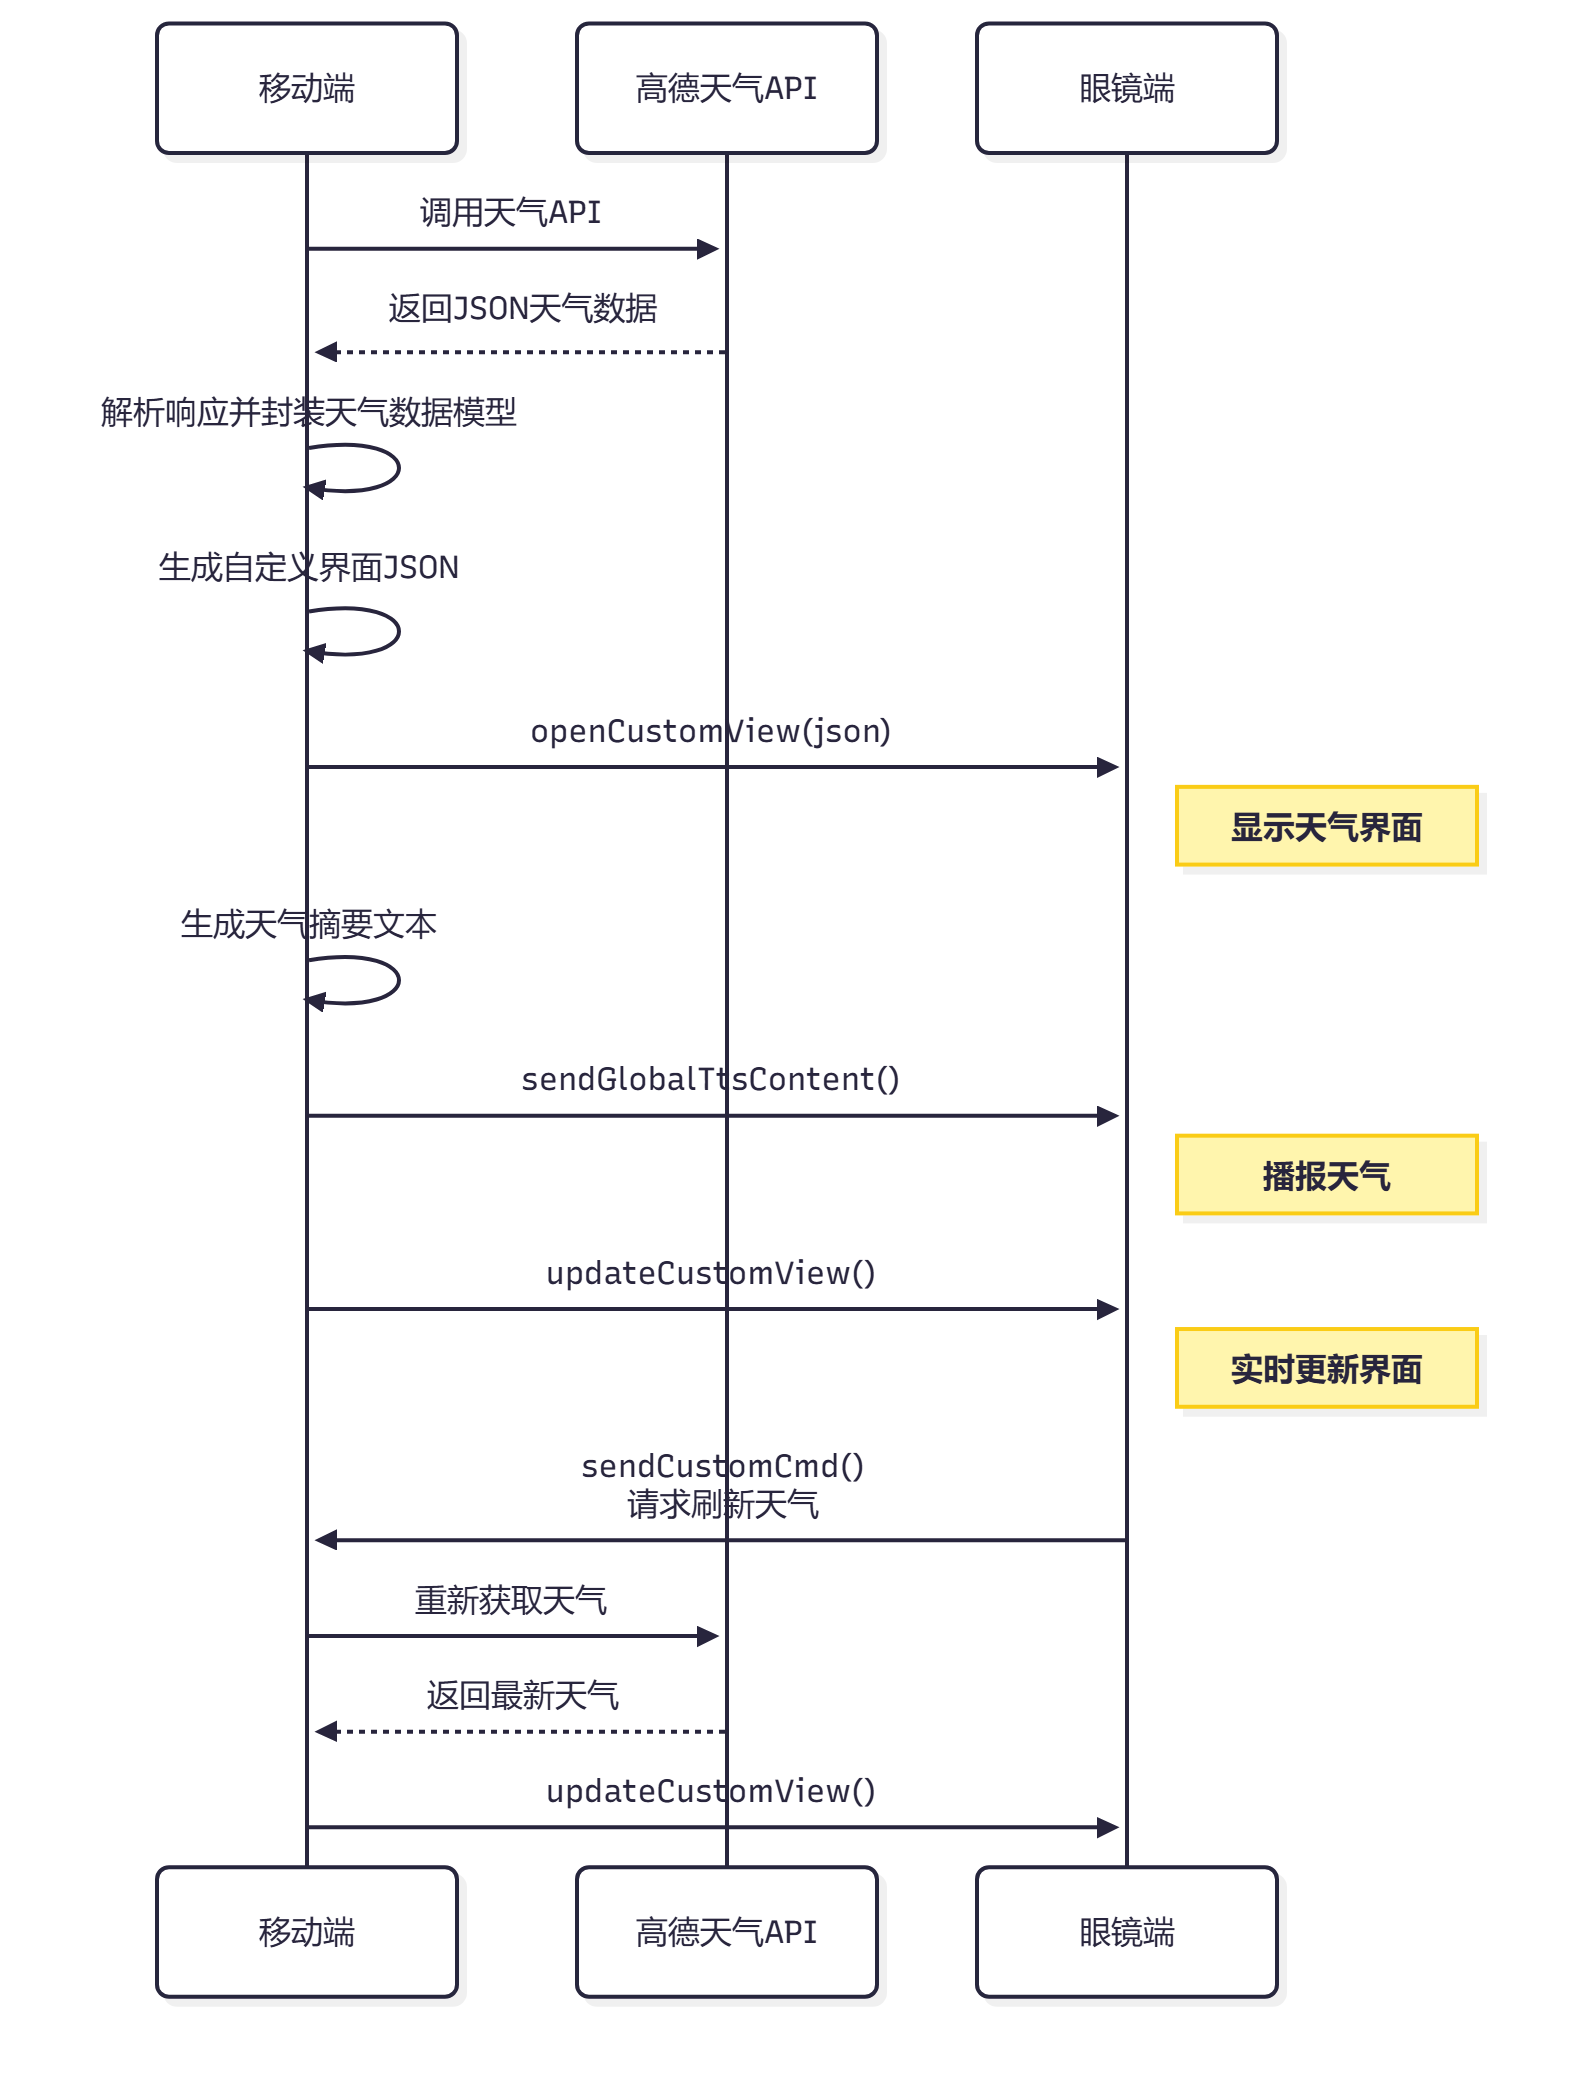
从移动端获取天气到眼镜端显示的完整路径:
- 天气数据获取:移动端调用高德天气API → 解析JSON响应 → 封装天气数据模型
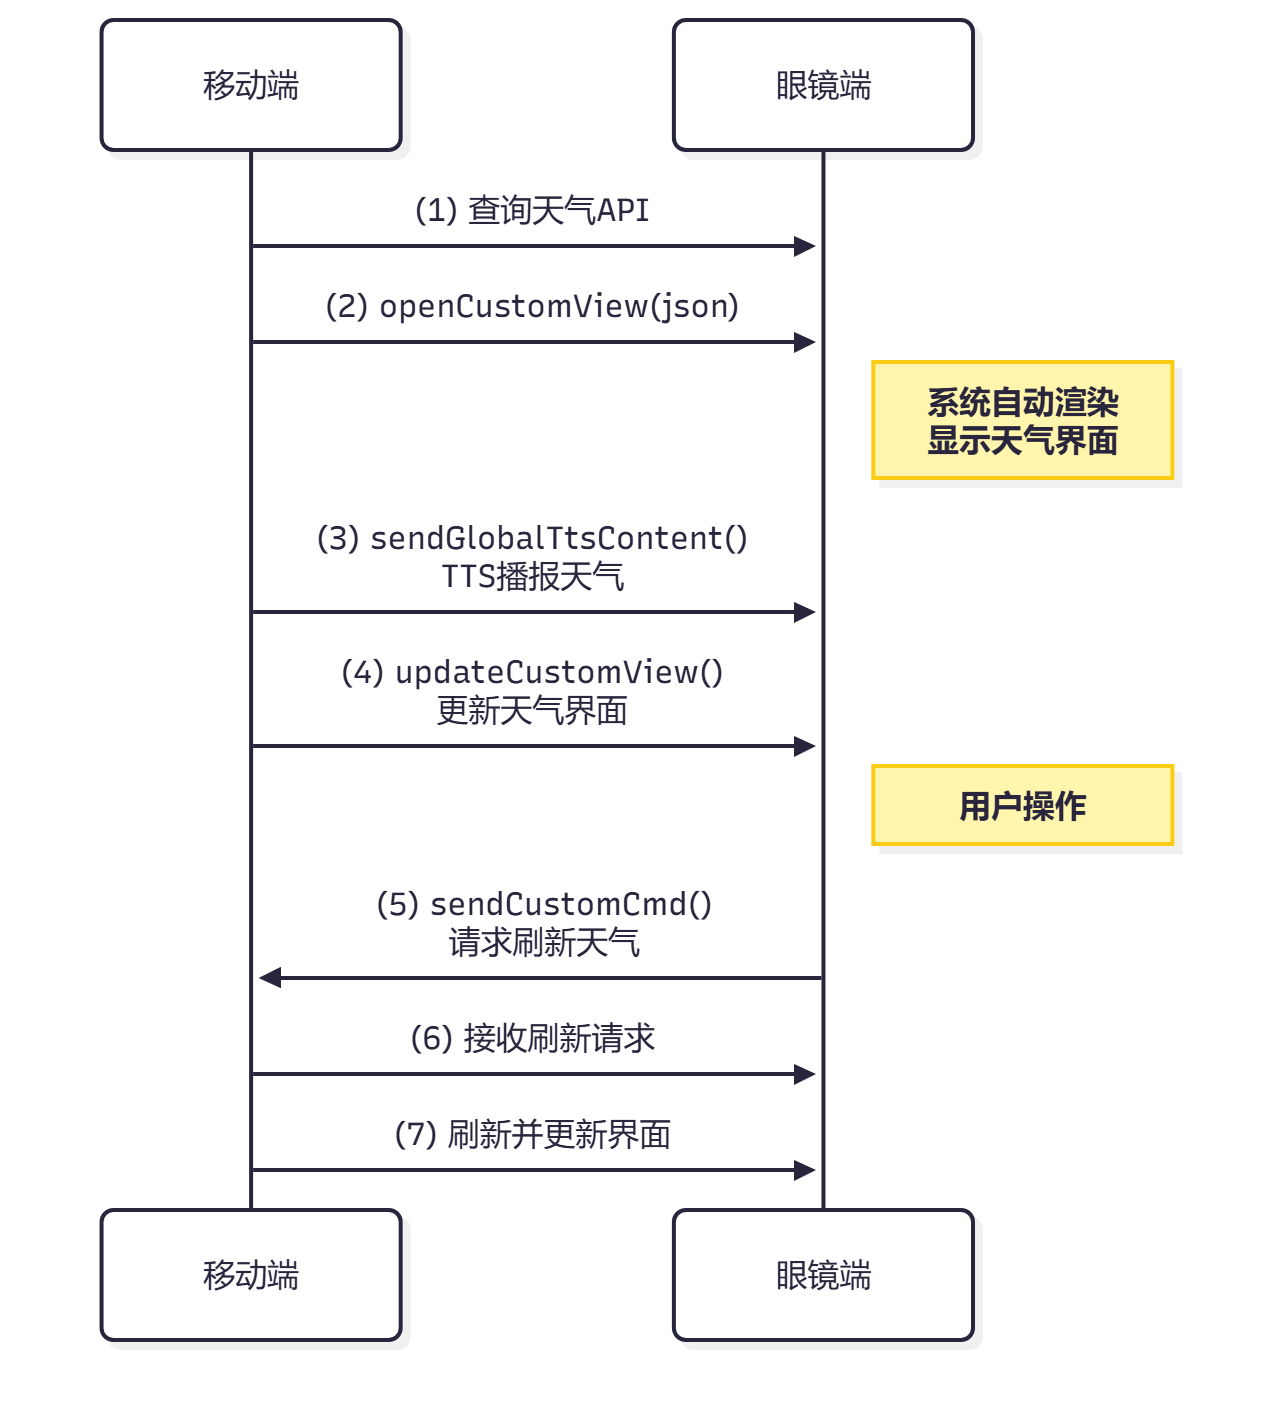
- 自定义界面显示:生成自定义界面JSON → 通过
openCustomView()在眼镜端打开天气界面 → 实时显示天气信息 - TTS语音播报:生成天气摘要文本 → 通过
sendGlobalTtsContent()在眼镜端播报天气 - 界面动态更新:使用
updateCustomView()更新天气界面,无需重新打开 - 双向交互(可选):眼镜端可发送刷新请求 → 移动端接收并刷新天气数据
关键特性:
- 自定义界面(Custom View):在眼镜端显示结构化的天气卡片
- TTS语音播报:无需查看界面即可获取天气信息
- 界面更新:支持动态更新天气数据,提升用户体验
- 双向通信:眼镜端可主动请求移动端刷新数据
交互流程图:
二、技术架构
2.1 核心组件
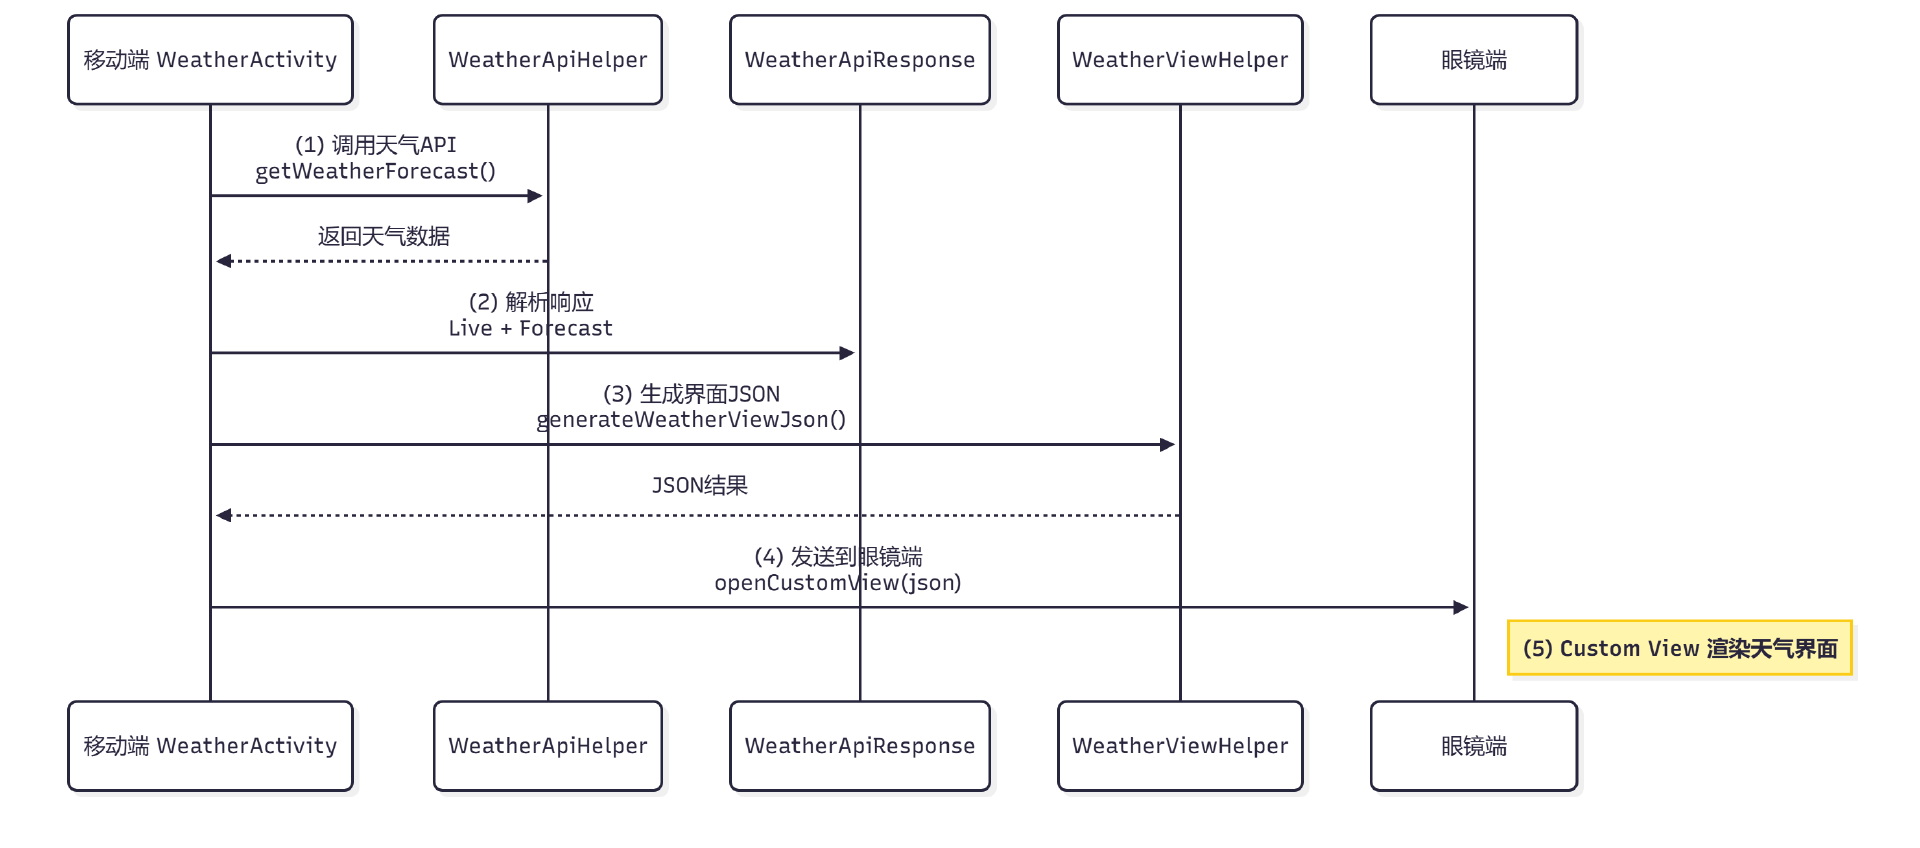
- WeatherModel.kt:天气数据模型(基于高德API响应格式)
- WeatherApiHelper.kt:天气API调用封装(OkHttp + Gson)
- WeatherViewHelper.kt:自定义界面JSON生成工具
- WeatherActivity.kt:移动端主Activity(整合所有功能)
2.2 数据流程
三、移动端实现
3.1 天气数据模型
基于高德天气API的响应格式,定义Kotlin数据类:
import com.google.gson.annotations.SerializedName
/**
* 高德天气API响应数据模型
*/
data class WeatherApiResponse(
/**
* 返回状态 值为0或1 1:成功;0:失败
*/
@SerializedName("status")
val status: String? = null,
/**
* 返回结果总数目
*/
@SerializedName("count")
val count: String? = null,
/**
* 返回的状态信息
*/
@SerializedName("info")
val info: String? = null,
/**
* 返回状态说明,10000代表正确
*/
@SerializedName("infocode")
val infocode: String? = null,
/**
* 实况天气数据信息
*/
@SerializedName("lives")
val lives: List<Live>? = null,
/**
* 预报天气数据信息
*/
@SerializedName("forecasts")
val forecasts: List<Forecast>? = null
)
/**
* 实况天气数据信息
*/
data class Live(
/**
* 省份名
*/
@SerializedName("province")
val province: String? = null,
/**
* 城市名
*/
@SerializedName("city")
val city: String? = null,
/**
* 区域编码
*/
@SerializedName("adcode")
val adcode: String? = null,
/**
* 天气现象(汉字描述)
*/
@SerializedName("weather")
val weather: String? = null,
/**
* 实时气温,单位:摄氏度
*/
@SerializedName("temperature")
val temperature: String? = null,
/**
* 风向描述
*/
@SerializedName("winddirection")
val winddirection: String? = null,
/**
* 风力级别,单位:级
*/
@SerializedName("windpower")
val windpower: String? = null,
/**
* 空气湿度
*/
@SerializedName("humidity")
val humidity: String? = null,
/**
* 数据发布的时间
*/
@SerializedName("reporttime")
val reporttime: String? = null
)
/**
* 预报天气信息数据
*/
data class Forecast(
/**
* 城市编码
*/
@SerializedName("adcode")
val adcode: String? = null,
/**
* 省份名称
*/
@SerializedName("province")
val province: String? = null,
/**
* 城市名称
*/
@SerializedName("city")
val city: String? = null,
/**
* 预报发布时间
*/
@SerializedName("reporttime")
val reporttime: String? = null,
/**
* 预报数据list结构,元素cast,按顺序为当天、第二天、第三天的预报数据
*/
@SerializedName("casts")
val casts: List<Cast>? = null
)
/**
* 预报天气信息数据项
*/
data class Cast(
/**
* 日期
*/
@SerializedName("date")
val date: String? = null,
/**
* 星期几
*/
@SerializedName("week")
val week: String? = null,
/**
* 白天天气现象
*/
@SerializedName("dayweather")
val dayweather: String? = null,
/**
* 晚上天气现象
*/
@SerializedName("nightweather")
val nightweather: String? = null,
/**
* 白天温度
*/
@SerializedName("daytemp")
val daytemp: String? = null,
/**
* 晚上温度
*/
@SerializedName("nighttemp")
val nighttemp: String? = null,
/**
* 白天风向
*/
@SerializedName("daywind")
val daywind: String? = null,
/**
* 晚上风向
*/
@SerializedName("nightwind")
val nightwind: String? = null,
/**
* 白天风力
*/
@SerializedName("daypower")
val daypower: String? = null,
/**
* 晚上风力
*/
@SerializedName("nightpower")
val nightpower: String? = null
)
3.2 天气API调用封装
使用OkHttp封装高德天气API调用:
import android.util.Log
import com.google.gson.Gson
import okhttp3.*
import okhttp3.MediaType.Companion.toMediaType
import okhttp3.RequestBody.Companion.toRequestBody
import java.io.IOException
import java.util.concurrent.TimeUnit
/**
* 天气API调用辅助类
* 封装高德地图天气API的调用逻辑
*/
class WeatherApiHelper {
companion object {
private const val TAG = "WeatherApiHelper"
// 高德天气API基础URL
private const val BASE_URL = "https://restapi.amap.com/v3/weather/weatherInfo"
// 注意:实际使用时需要在应用中配置API Key
// 这里使用占位符,实际使用时应该从配置文件或环境变量读取
private const val API_KEY = "YOUR_AMAP_API_KEY"
// HTTP客户端
private val client = OkHttpClient.Builder()
.connectTimeout(10, TimeUnit.SECONDS)
.readTimeout(10, TimeUnit.SECONDS)
.writeTimeout(10, TimeUnit.SECONDS)
.build()
private val gson = Gson()
}
/**
* 获取实时天气信息(基础版)
*
* @param cityCode 城市编码(adcode),例如:110101(北京东城区)
* @param callback 回调接口,返回天气数据或错误信息
*/
fun getWeatherLive(
cityCode: String,
callback: WeatherCallback
) {
getWeather(cityCode, "base", callback)
}
/**
* 获取天气预报信息(包含未来3天)
*
* @param cityCode 城市编码(adcode)
* @param callback 回调接口,返回天气数据或错误信息
*/
fun getWeatherForecast(
cityCode: String,
callback: WeatherCallback
) {
getWeather(cityCode, "all", callback)
}
/**
* 获取天气信息
*
* @param cityCode 城市编码
* @param extensions base:返回实时天气, all:返回预报天气
* @param callback 回调接口
*/
private fun getWeather(
cityCode: String,
extensions: String,
callback: WeatherCallback
) {
if (API_KEY == "YOUR_AMAP_API_KEY") {
callback.onError("请先配置高德地图API Key")
return
}
val url = "$BASE_URL?city=$cityCode&extensions=$extensions&output=JSON&key=$API_KEY"
Log.d(TAG, "请求天气API: $url")
val request = Request.Builder()
.url(url)
.get()
.build()
client.newCall(request).enqueue(object : Callback {
override fun onFailure(call: Call, e: IOException) {
Log.e(TAG, "天气API请求失败", e)
callback.onError("网络请求失败: ${e.message}")
}
override fun onResponse(call: Call, response: Response) {
try {
val responseBody = response.body?.string()
if (!response.isSuccessful || responseBody == null) {
callback.onError("API请求失败: HTTP ${response.code}")
return
}
Log.d(TAG, "天气API响应: $responseBody")
val weatherResponse = gson.fromJson(responseBody, WeatherApiResponse::class.java)
if (weatherResponse.status == "1" && weatherResponse.info == "OK") {
callback.onSuccess(weatherResponse)
} else {
callback.onError("API返回错误: ${weatherResponse.info} (${weatherResponse.infocode})")
}
} catch (e: Exception) {
Log.e(TAG, "解析天气数据失败", e)
callback.onError("解析数据失败: ${e.message}")
} finally {
response.close()
}
}
})
}
/**
* 天气API回调接口
*/
interface WeatherCallback {
/**
* 请求成功
* @param response 天气响应数据
*/
fun onSuccess(response: WeatherApiResponse)
/**
* 请求失败
* @param error 错误信息
*/
fun onError(error: String)
}
/**
* 常用城市编码(部分示例)
*/
object CityCodes {
// 北京
const val BEIJING_DONGCHENG = "110101" // 东城区
const val BEIJING_HAIDIAN = "110108" // 海淀区
// 上海
const val SHANGHAI_HUANGPU = "310101" // 黄浦区
const val SHANGHAI_PUDONG = "310115" // 浦东新区
// 深圳
const val SHENZHEN_FUTIAN = "440304" // 福田区
const val SHENZHEN_NANSHAN = "440305" // 南山区
// 杭州
const val HANGZHOU_XIHU = "330106" // 西湖区
const val HANGZHOU_SHANGCHENG = "330102" // 上城区
// 广州
const val GUANGZHOU_TIANHE = "440106" // 天河区
}
}
注意事项:
- 需要在高德开放平台申请API Key
- 城市编码(adcode)可通过高德API获取,常用编码参考
WeatherApiHelper.CityCodes
3.3 自定义界面JSON生成
根据天气数据生成Rokid眼镜自定义界面的JSON格式:
import android.util.Log
import com.google.gson.Gson
import com.google.gson.JsonObject
import org.json.JSONArray
import org.json.JSONObject
/**
* 天气界面JSON生成工具
* 根据天气数据生成Rokid眼镜自定义界面的JSON格式
*/
class WeatherViewHelper {
companion object {
private const val TAG = "WeatherViewHelper"
// 自定义界面JSON中的控件ID
object ViewIds {
const val TV_CITY = "tv_city"
const val TV_TEMPERATURE = "tv_temperature"
const val TV_WEATHER = "tv_weather"
const val TV_WIND = "tv_wind"
const val TV_HUMIDITY = "tv_humidity"
const val TV_TIME = "tv_time"
const val TV_FORECAST_DAY1 = "tv_forecast_day1"
const val TV_FORECAST_DAY2 = "tv_forecast_day2"
const val TV_FORECAST_DAY3 = "tv_forecast_day3"
}
}
/**
* 生成天气界面的初始化JSON
*
* @param live 实时天气数据(可为null)
* @param forecast 预报天气数据(可为null)
* @return 自定义界面的JSON字符串
*/
fun generateWeatherViewJson(
live: Live? = null,
forecast: Forecast? = null
): String {
val root = JSONObject()
// 根布局:LinearLayout(垂直方向)
root.put("type", "LinearLayout")
val props = JSONObject()
props.put("layout_width", "match_parent")
props.put("layout_height", "match_parent")
props.put("orientation", "vertical")
props.put("gravity", "center_horizontal")
props.put("paddingTop", "80dp")
props.put("paddingBottom", "80dp")
props.put("paddingStart", "20dp")
props.put("paddingEnd", "20dp")
props.put("backgroundColor", "#FF000000") // 黑色背景
root.put("props", props)
val children = JSONArray()
// 1. 城市名称
children.put(createTextView(
id = ViewIds.TV_CITY,
text = live?.city ?: "未知城市",
textSize = "20sp",
textStyle = "bold",
marginBottom = "20dp"
))
// 2. 温度(大字体显示)
children.put(createTextView(
id = ViewIds.TV_TEMPERATURE,
text = "${live?.temperature ?: "--"}°",
textSize = "48sp",
textStyle = "bold",
marginBottom = "15dp"
))
// 3. 天气状况
children.put(createTextView(
id = ViewIds.TV_WEATHER,
text = live?.weather ?: "--",
textSize = "18sp",
marginBottom = "15dp"
))
// 4. 风向风力(水平布局)
val windLayout = createRelativeLayout(
layoutHeight = "wrap_content",
marginBottom = "10dp"
)
val windLayoutChildren = JSONArray()
windLayoutChildren.put(createTextView(
id = ViewIds.TV_WIND,
text = "${live?.winddirection ?: "--"} ${live?.windpower ?: "--"}",
textSize = "14sp",
layoutWidth = "wrap_content",
layoutHeight = "wrap_content"
))
windLayout.put("children", windLayoutChildren)
children.put(windLayout)
// 5. 湿度
children.put(createTextView(
id = ViewIds.TV_HUMIDITY,
text = "湿度: ${live?.humidity ?: "--"}%",
textSize = "14sp",
marginBottom = "15dp"
))
// 6. 更新时间
children.put(createTextView(
id = ViewIds.TV_TIME,
text = "更新: ${live?.reporttime ?: "--"}",
textSize = "12sp",
textColor = "#FF808080", // 灰色
marginTop = "30dp",
marginBottom = "20dp"
))
// 7. 未来3天预报(如果有预报数据)
forecast?.casts?.take(3)?.let { casts ->
casts.forEachIndexed { index, cast ->
val dayText = when (index) {
0 -> "今天"
1 -> "明天"
else -> "后天"
}
val forecastText = "$dayText ${cast.daytemp ?: "--"}°/${cast.nighttemp ?: "--"}° ${cast.dayweather ?: "--"}"
val viewId = when (index) {
0 -> ViewIds.TV_FORECAST_DAY1
1 -> ViewIds.TV_FORECAST_DAY2
else -> ViewIds.TV_FORECAST_DAY3
}
children.put(createTextView(
id = viewId,
text = forecastText,
textSize = "14sp",
marginBottom = if (index < 2) "8dp" else "0dp"
))
}
}
root.put("children", children)
val jsonString = root.toString()
Log.d(TAG, "生成的天气界面JSON: $jsonString")
return jsonString
}
/**
* 生成更新天气界面的JSON(仅更新部分控件)
*
* @param live 实时天气数据
* @param forecast 预报天气数据
* @return 更新操作的JSON数组
*/
fun generateWeatherUpdateJson(
live: Live? = null,
forecast: Forecast? = null
): String {
val updates = JSONArray()
live?.let {
// 更新城市
if (!it.city.isNullOrEmpty()) {
updates.put(createUpdateAction(ViewIds.TV_CITY, "text", it.city))
}
// 更新温度
if (!it.temperature.isNullOrEmpty()) {
updates.put(createUpdateAction(ViewIds.TV_TEMPERATURE, "text", "${it.temperature}°"))
}
// 更新天气
if (!it.weather.isNullOrEmpty()) {
updates.put(createUpdateAction(ViewIds.TV_WEATHER, "text", it.weather))
}
// 更新风向风力
val windText = "${it.winddirection ?: "--"} ${it.windpower ?: "--"}"
updates.put(createUpdateAction(ViewIds.TV_WIND, "text", windText))
// 更新湿度
if (!it.humidity.isNullOrEmpty()) {
updates.put(createUpdateAction(ViewIds.TV_HUMIDITY, "text", "湿度: ${it.humidity}%"))
}
// 更新时间
if (!it.reporttime.isNullOrEmpty()) {
updates.put(createUpdateAction(ViewIds.TV_TIME, "text", "更新: ${it.reporttime}"))
}
}
// 更新预报
forecast?.casts?.take(3)?.forEachIndexed { index, cast ->
val dayText = when (index) {
0 -> "今天"
1 -> "明天"
else -> "后天"
}
val forecastText = "$dayText ${cast.daytemp ?: "--"}°/${cast.nighttemp ?: "--"}° ${cast.dayweather ?: "--"}"
val viewId = when (index) {
0 -> ViewIds.TV_FORECAST_DAY1
1 -> ViewIds.TV_FORECAST_DAY2
else -> ViewIds.TV_FORECAST_DAY3
}
updates.put(createUpdateAction(viewId, "text", forecastText))
}
val jsonString = updates.toString()
Log.d(TAG, "生成的天气更新JSON: $jsonString")
return jsonString
}
/**
* 创建TextView控件
*/
private fun createTextView(
id: String,
text: String,
textSize: String = "16sp",
textColor: String = "#FF00FF00", // 绿色(眼镜端显示)
textStyle: String? = null,
layoutWidth: String = "wrap_content",
layoutHeight: String = "wrap_content",
gravity: String = "center",
marginTop: String? = null,
marginBottom: String? = null,
marginStart: String? = null,
marginEnd: String? = null
): JSONObject {
val view = JSONObject()
view.put("type", "TextView")
val props = JSONObject()
props.put("id", id)
props.put("layout_width", layoutWidth)
props.put("layout_height", layoutHeight)
props.put("text", text)
props.put("textSize", textSize)
props.put("textColor", textColor)
props.put("gravity", gravity)
textStyle?.let { props.put("textStyle", it) }
marginTop?.let { props.put("marginTop", it) }
marginBottom?.let { props.put("marginBottom", it) }
marginStart?.let { props.put("marginStart", it) }
marginEnd?.let { props.put("marginEnd", it) }
view.put("props", props)
return view
}
/**
* 创建RelativeLayout布局
*/
private fun createRelativeLayout(
layoutWidth: String = "match_parent",
layoutHeight: String = "wrap_content",
backgroundColor: String = "#00000000",
marginTop: String? = null,
marginBottom: String? = null
): JSONObject {
val layout = JSONObject()
layout.put("type", "RelativeLayout")
val props = JSONObject()
props.put("layout_width", layoutWidth)
props.put("layout_height", layoutHeight)
props.put("backgroundColor", backgroundColor)
marginTop?.let { props.put("marginTop", it) }
marginBottom?.let { props.put("marginBottom", it) }
layout.put("props", props)
return layout
}
/**
* 创建更新操作
*/
private fun createUpdateAction(
id: String,
propName: String,
propValue: Any
): JSONObject {
val action = JSONObject()
action.put("action", "update")
action.put("id", id)
val props = JSONObject()
props.put(propName, propValue)
action.put("props", props)
return action
}
/**
* 生成天气TTS播报文本
*
* @param live 实时天气数据
* @param forecast 预报天气数据
* @return TTS播报文本
*/
fun generateWeatherTtsText(
live: Live?,
forecast: Forecast? = null
): String {
if (live == null) {
return "天气数据获取失败"
}
val city = live.city ?: "当前城市"
val temperature = live.temperature ?: "--"
val weather = live.weather ?: "未知"
val wind = "${live.winddirection ?: ""} ${live.windpower ?: ""}".trim()
val ttsText = StringBuilder()
ttsText.append("$city 当前天气,")
ttsText.append("温度 $temperature 度,")
ttsText.append("$weather")
if (wind.isNotEmpty()) {
ttsText.append(",$wind")
}
// 添加预报信息
forecast?.casts?.firstOrNull()?.let { cast ->
val tomorrowTemp = cast.daytemp ?: "--"
val tomorrowWeather = cast.dayweather ?: "--"
ttsText.append("。明天 $tomorrowWeather,温度 $tomorrowTemp 度")
}
return ttsText.toString()
}
}
自定义界面JSON格式说明:
- 支持布局:
LinearLayout、RelativeLayout - 支持控件:
TextView、ImageView - 颜色格式:
#FF00FF00(ARGB,绿色在眼镜端显示) - 尺寸单位:
dp(布局)、sp(文字)
3.4 TTS播报文本生成
生成适合TTS播报的天气摘要文本:
// WeatherViewHelper.kt
fun generateWeatherTtsText(
live: Live?,
forecast: Forecast? = null
): String {
if (live == null) {
return "天气数据获取失败"
}
val city = live.city ?: "当前城市"
val temperature = live.temperature ?: "--"
val weather = live.weather ?: "未知"
val wind = "${live.winddirection ?: ""} ${live.windpower ?: ""}".trim()
val ttsText = StringBuilder()
ttsText.append("$city 当前天气,")
ttsText.append("温度 $temperature 度,")
ttsText.append("$weather")
if (wind.isNotEmpty()) {
ttsText.append(",$wind")
}
// 添加明天预报
forecast?.casts?.firstOrNull()?.let { cast ->
val tomorrowTemp = cast.daytemp ?: "--"
val tomorrowWeather = cast.dayweather ?: "--"
ttsText.append("。明天 $tomorrowWeather,温度 $tomorrowTemp 度")
}
return ttsText.toString()
}
3.5 主Activity整合
在WeatherActivity中整合所有功能:
/**
* 天气应用Activity - Rokid眼镜端天气显示示例
*
* 功能:
* 1. 调用高德天气API获取天气数据
* 2. 在眼镜端使用自定义界面显示天气信息
* 3. 使用TTS语音播报天气信息
* 4. 支持更新天气界面
*/
class WeatherActivity : AppCompatActivity() {
companion object {
private const val TAG = "WeatherActivity"
}
private lateinit var tvStatus: TextView
private lateinit var etCityCode: EditText
private lateinit var btnQueryWeather: Button
private lateinit var btnShowWeather: Button
private lateinit var btnUpdateWeather: Button
private lateinit var btnTtsWeather: Button
private lateinit var btnCloseView: Button
private val weatherApiHelper = WeatherApiHelper()
private val weatherViewHelper = WeatherViewHelper()
private var currentWeatherResponse: WeatherApiResponse? = null
private var isCustomViewOpened = false
override fun onCreate(savedInstanceState: Bundle?) {
super.onCreate(savedInstanceState)
setContentView(R.layout.activity_weather)
initViews()
setupCustomViewListener()
// 默认城市编码:北京东城区
etCityCode.setText(WeatherApiHelper.CityCodes.BEIJING_DONGCHENG)
updateStatus("天气应用已启动,请先连接Rokid设备")
}
private fun initViews() {
tvStatus = findViewById(R.id.tvStatus)
etCityCode = findViewById(R.id.etCityCode)
btnQueryWeather = findViewById(R.id.btnQueryWeather)
btnShowWeather = findViewById(R.id.btnShowWeather)
btnUpdateWeather = findViewById(R.id.btnUpdateWeather)
btnTtsWeather = findViewById(R.id.btnTtsWeather)
btnCloseView = findViewById(R.id.btnCloseView)
btnQueryWeather.setOnClickListener { queryWeather() }
btnShowWeather.setOnClickListener { showWeatherOnGlasses() }
btnUpdateWeather.setOnClickListener { updateWeatherOnGlasses() }
btnTtsWeather.setOnClickListener { ttsWeatherOnGlasses() }
btnCloseView.setOnClickListener { closeCustomView() }
// 初始状态:只有查询天气按钮可用
btnShowWeather.isEnabled = false
btnUpdateWeather.isEnabled = false
btnTtsWeather.isEnabled = false
btnCloseView.isEnabled = false
}
/**
* 设置自定义界面监听器
* 监听眼镜端自定义界面的状态变化
*/
private fun setupCustomViewListener() {
val customViewListener = object : CustomViewListener {
override fun onOpened() {
Log.d(TAG, "自定义界面已打开")
runOnUiThread {
updateStatus("自定义界面已打开")
isCustomViewOpened = true
btnUpdateWeather.isEnabled = true
btnCloseView.isEnabled = true
}
}
override fun onClosed() {
Log.d(TAG, "自定义界面已关闭")
runOnUiThread {
updateStatus("自定义界面已关闭")
isCustomViewOpened = false
btnUpdateWeather.isEnabled = false
btnCloseView.isEnabled = false
}
}
override fun onUpdated() {
Log.d(TAG, "自定义界面已更新")
runOnUiThread {
updateStatus("自定义界面已更新")
}
}
override fun onOpenFailed(errorCode: Int) {
Log.e(TAG, "自定义界面打开失败: $errorCode")
runOnUiThread {
updateStatus("自定义界面打开失败: $errorCode")
isCustomViewOpened = false
}
}
override fun onIconsSent() {
Log.d(TAG, "图标已发送")
runOnUiThread {
updateStatus("图标已发送")
}
}
}
CxrApi.getInstance().setCustomViewListener(customViewListener)
}
/**
* 查询天气数据
*/
private fun queryWeather() {
val cityCode = etCityCode.text.toString().trim()
if (cityCode.isEmpty()) {
updateStatus("请输入城市编码")
return
}
updateStatus("正在查询天气...")
btnQueryWeather.isEnabled = false
// 获取实时天气和预报天气
weatherApiHelper.getWeatherForecast(cityCode, object : WeatherApiHelper.WeatherCallback {
override fun onSuccess(response: WeatherApiResponse) {
Log.d(TAG, "天气查询成功: $response")
currentWeatherResponse = response
runOnUiThread {
val live = response.lives?.firstOrNull()
val cityName = live?.city ?: "未知城市"
val temperature = live?.temperature ?: "--"
val weather = live?.weather ?: "--"
updateStatus("查询成功: $cityName $temperature° $weather")
btnQueryWeather.isEnabled = true
btnShowWeather.isEnabled = true
btnTtsWeather.isEnabled = true
}
}
override fun onError(error: String) {
Log.e(TAG, "天气查询失败: $error")
runOnUiThread {
updateStatus("查询失败: $error")
btnQueryWeather.isEnabled = true
btnShowWeather.isEnabled = false
btnTtsWeather.isEnabled = false
}
}
})
}
/**
* 在眼镜端显示天气界面
* 使用自定义界面(Custom View)功能
*/
private fun showWeatherOnGlasses() {
if (!checkBluetoothConnected()) {
return
}
val response = currentWeatherResponse
if (response == null) {
updateStatus("请先查询天气数据")
return
}
val live = response.lives?.firstOrNull()
val forecast = response.forecasts?.firstOrNull()
// 生成自定义界面JSON
val viewJson = weatherViewHelper.generateWeatherViewJson(live, forecast)
Log.d(TAG, "打开自定义界面: $viewJson")
// 打开自定义界面
val status = CxrApi.getInstance().openCustomView(viewJson)
handleRequestStatus(
status = status,
successMessage = "正在打开天气界面...",
waitingMessage = "请求处理中,请稍候...",
failedMessage = "打开天气界面失败"
)
}
/**
* 更新眼镜端的天气界面
*/
private fun updateWeatherOnGlasses() {
if (!checkBluetoothConnected()) {
return
}
if (!isCustomViewOpened) {
updateStatus("请先打开天气界面")
return
}
val response = currentWeatherResponse
if (response == null) {
updateStatus("请先查询天气数据")
return
}
val live = response.lives?.firstOrNull()
val forecast = response.forecasts?.firstOrNull()
// 生成更新JSON
val updateJson = weatherViewHelper.generateWeatherUpdateJson(live, forecast)
Log.d(TAG, "更新天气界面: $updateJson")
// 更新自定义界面
val status = CxrApi.getInstance().updateCustomView(updateJson)
handleRequestStatus(
status = status,
successMessage = "正在更新天气界面...",
waitingMessage = "更新请求处理中,请稍候...",
failedMessage = "更新天气界面失败"
)
}
/**
* 在眼镜端使用TTS播报天气
* 使用全局TTS功能
*/
private fun ttsWeatherOnGlasses() {
if (!checkBluetoothConnected()) {
return
}
val response = currentWeatherResponse
if (response == null) {
updateStatus("请先查询天气数据")
return
}
val live = response.lives?.firstOrNull()
val forecast = response.forecasts?.firstOrNull()
// 生成TTS文本
val ttsText = weatherViewHelper.generateWeatherTtsText(live, forecast)
Log.d(TAG, "播报天气TTS: $ttsText")
// 发送全局TTS消息
val status = CxrApi.getInstance().sendGlobalTtsContent(ttsText)
handleRequestStatus(
status = status,
successMessage = "正在播报天气...",
waitingMessage = "TTS请求处理中,请稍候...",
failedMessage = "TTS播报失败"
)
}
/**
* 关闭眼镜端的自定义界面
*/
private fun closeCustomView() {
if (!checkBluetoothConnected()) {
return
}
val status = CxrApi.getInstance().closeCustomView()
handleRequestStatus(
status = status,
successMessage = "正在关闭天气界面...",
waitingMessage = "关闭请求处理中,请稍候...",
failedMessage = "关闭天气界面失败"
)
}
/**
* 统一处理API请求状态
*
* @param status API返回的状态
* @param successMessage 成功时的提示信息
* @param waitingMessage 等待时的提示信息
* @param failedMessage 失败时的提示信息
*/
private fun handleRequestStatus(
status: ValueUtil.CxrStatus,
successMessage: String,
waitingMessage: String = "请求处理中,请稍候...",
failedMessage: String = "操作失败"
) {
when (status) {
ValueUtil.CxrStatus.REQUEST_SUCCEED -> {
updateStatus(successMessage)
}
ValueUtil.CxrStatus.REQUEST_WAITING -> {
updateStatus(waitingMessage)
}
ValueUtil.CxrStatus.REQUEST_FAILED -> {
updateStatus(failedMessage)
}
else -> {
// 处理意外状态(理论上不应该出现)
Log.w(TAG, "收到意外的状态: $status")
updateStatus("未知状态: $status")
}
}
}
/**
* 检查蓝牙连接状态
*/
private fun checkBluetoothConnected(): Boolean {
val isConnected = CxrApi.getInstance().isBluetoothConnected()
if (!isConnected) {
updateStatus("请先连接Rokid设备")
}
return isConnected
}
/**
* 更新状态显示
*/
private fun updateStatus(message: String) {
Log.d(TAG, message)
tvStatus.text = "状态: $message"
}
override fun onDestroy() {
super.onDestroy()
// 清理自定义界面监听器
CxrApi.getInstance().setCustomViewListener(null)
}
}
四、眼镜端交互处理
4.1 自定义界面系统级支持
重要说明:Rokid眼镜端的自定义界面(Custom View)是系统级功能,不需要在眼镜端编写额外的代码。移动端通过openCustomView()发送的JSON会自动在眼镜端渲染显示。
交互流程:
移动端 openCustomView(json)
  ↓
蓝牙/WiFi传输
  ↓
眼镜端系统自动渲染显示
4.2 消息通道交互方式
如果需要在眼镜端实现更复杂的交互(比如接收天气数据更新、发送反馈等),可以使用消息通道方式。
4.2.1 接收移动端消息
眼镜端通过CustomCmdListener接收来自移动端的消息:
// GlassesMainActivity.kt (眼镜端)
class GlassesMainActivity : AppCompatActivity() {
companion object {
private const val TAG = "GlassesMain"
private const val CHANNEL_WEATHER = "weather_update"
private const val CHANNEL_WEATHER_REFRESH = "weather_refresh"
}
private val gson = Gson()
override fun onCreate(savedInstanceState: Bundle?) {
super.onCreate(savedInstanceState)
setupMessageListener()
}
/**
* 设置消息监听器
* 接收来自移动端的天气相关消息
*/
private fun setupMessageListener() {
CxrApi.getInstance().setCustomCmdListener(object : CustomCmdListener {
override fun onCustomCmd(name: String, args: Caps?) {
Log.d(TAG, "收到命令: channel=$name, args.size=${args?.size()}")
when (name) {
CHANNEL_WEATHER -> handleWeatherUpdate(args)
CHANNEL_WEATHER_REFRESH -> handleWeatherRefresh(args)
else -> Log.w(TAG, "未知通道: $name")
}
}
})
}
/**
* 处理天气数据更新
*/
private fun handleWeatherUpdate(caps: Caps?) {
if (caps == null || caps.size() < 2) {
Log.e(TAG, "handleWeatherUpdate: caps 格式错误")
return
}
try {
// 按发送端写入顺序解析:
// 第1个:子命令 (如 "WEATHER_UPDATE")
// 第2个:载荷 (JSON字符串)
val subCommand = caps.at(0).getString()
val payloadJson = caps.at(1).getString()
Log.d(TAG, "子命令: $subCommand, 载荷: $payloadJson")
when (subCommand) {
"WEATHER_UPDATE" -> {
// 解析天气数据JSON
val weatherData = gson.fromJson(payloadJson, Map::class.java) as? Map<String, Any?>
val city = weatherData?.get("city") as? String
val temperature = weatherData?.get("temperature") as? String
val weather = weatherData?.get("weather") as? String
// 更新UI显示
updateWeatherDisplay(city, temperature, weather)
// 可选:发送ACK确认
sendAckToMobile("天气数据已接收: $city $temperature°")
}
"WEATHER_FORECAST" -> {
// 处理预报数据
handleForecastUpdate(payloadJson)
}
else -> {
Log.w(TAG, "未知子命令: $subCommand")
}
}
} catch (e: Exception) {
Log.e(TAG, "解析天气更新失败", e)
}
}
/**
* 处理天气刷新请求
*/
private fun handleWeatherRefresh(caps: Caps?) {
// 眼镜端可以请求移动端刷新天气
// 例如:用户通过眼镜按键触发刷新
Log.d(TAG, "收到天气刷新请求")
// 可选:发送请求到移动端
requestMobileRefresh()
}
/**
* 更新天气显示
*/
private fun updateWeatherDisplay(city: String?, temp: String?, weather: String?) {
runOnUiThread {
// 更新UI显示
// 注意:如果使用自定义界面,这部分由系统自动处理
Log.d(TAG, "更新显示: $city $temp° $weather")
}
}
/**
* 发送确认消息给移动端
*/
private fun sendAckToMobile(message: String) {
try {
val ackJson = gson.toJson(mapOf(
"code" to 0,
"message" to message,
"timestamp" to System.currentTimeMillis()
))
val caps = Caps().apply {
write("WEATHER_ACK")
write(ackJson)
}
CxrApi.getInstance().sendCustomCmd("glass_ack", caps)
Log.d(TAG, "已发送 ACK: $message")
} catch (e: Exception) {
Log.e(TAG, "发送 ACK 失败", e)
}
}
/**
* 请求移动端刷新天气
*/
private fun requestMobileRefresh() {
try {
val requestJson = gson.toJson(mapOf(
"action" to "refresh_weather",
"timestamp" to System.currentTimeMillis()
))
val caps = Caps().apply {
write("REFRESH_REQUEST")
write(requestJson)
}
CxrApi.getInstance().sendCustomCmd("glass_weather_request", caps)
Log.d(TAG, "已发送刷新请求")
} catch (e: Exception) {
Log.e(TAG, "发送刷新请求失败", e)
}
}
override fun onDestroy() {
super.onDestroy()
CxrApi.getInstance().setCustomCmdListener(null)
}
}
4.2.2 移动端发送天气消息(可选扩展)
如果需要在移动端通过消息通道发送天气数据(而不是使用自定义界面),可以在WeatherActivity中添加:
// WeatherActivity.kt (移动端扩展)
private const val CHANNEL_WEATHER = "weather_update"
/**
* 通过消息通道发送天气数据到眼镜端
*/
private fun sendWeatherViaMessage(live: Live?, forecast: Forecast?) {
if (!checkBluetoothConnected()) {
return
}
val weatherData = mapOf(
"city" to (live?.city ?: "--"),
"temperature" to (live?.temperature ?: "--"),
"weather" to (live?.weather ?: "--"),
"wind" to "${live?.winddirection ?: ""} ${live?.windpower ?: ""}".trim(),
"humidity" to (live?.humidity ?: "--"),
"timestamp" to System.currentTimeMillis()
)
val json = gson.toJson(weatherData)
val caps = Caps().apply {
write("WEATHER_UPDATE") // 子命令
write(json) // 载荷
}
val status = CxrApi.getInstance().sendCustomCmd(CHANNEL_WEATHER, caps)
handleRequestStatus(
status = status,
successMessage = "天气数据已发送",
failedMessage = "发送天气数据失败"
)
}
4.3 双向交互完整示例
场景:眼镜端显示天气 → 用户操作刷新 → 眼镜端请求移动端 → 移动端刷新并更新显示
移动端:监听眼镜端刷新请求
// WeatherActivity.kt (移动端)
private const val CHANNEL_WEATHER_REQUEST = "glass_weather_request"
private fun setupCustomCmdListener() {
CxrApi.getInstance().setCustomCmdListener(object : CustomCmdListener {
override fun onCustomCmd(name: String, args: Caps?) {
when (name) {
CHANNEL_WEATHER_REQUEST -> {
// 收到眼镜端的刷新请求
val subCommand = args?.at(0)?.getString()
if (subCommand == "REFRESH_REQUEST") {
// 自动刷新天气并更新眼镜端显示
refreshWeatherAndUpdateGlasses()
}
}
}
}
})
}
private fun refreshWeatherAndUpdateGlasses() {
val cityCode = etCityCode.text.toString().trim()
queryWeather() // 刷新天气数据
// 刷新成功后自动更新眼镜端显示
if (isCustomViewOpened) {
updateWeatherOnGlasses()
}
}
眼镜端:发送刷新请求
// GlassesMainActivity.kt (眼镜端)
/**
* 用户触发刷新(例如:按键、手势等)
*/
fun onUserRefreshRequest() {
requestMobileRefresh()
}
private fun requestMobileRefresh() {
val requestJson = gson.toJson(mapOf(
"action" to "refresh_weather",
"timestamp" to System.currentTimeMillis()
))
val caps = Caps().apply {
write("REFRESH_REQUEST")
write(requestJson)
}
CxrApi.getInstance().sendCustomCmd("glass_weather_request", caps)
}
4.4 交互方式对比
|
交互方式 |
适用场景 |
优点 |
缺点 |
|
自定义界面(Custom View) |
信息展示、界面渲染 |
无需开发眼镜端代码,系统自动渲染,支持动态更新 |
不支持复杂交互,界面布局受限于JSON格式 |
|
消息通道(CustomCmd) |
数据传递、双向通信、复杂交互 |
灵活、支持双向通信、可自定义协议 |
需要开发眼镜端代码,需自己实现界面渲染 |
五、踩坑与排错速查
5.1 天气API相关
- API Key未配置:在
WeatherApiHelper中配置API_KEY - 城市编码错误:使用高德API获取正确的adcode,或参考
WeatherApiHelper.CityCodes - 网络请求失败:检查网络权限、网络连接、API配额
- JSON解析失败:检查API响应格式,确保数据模型匹配
5.2 自定义界面相关
- 界面未显示:检查蓝牙连接状态、JSON格式是否正确、界面是否打开成功
- JSON格式错误:参考
CXR-M(移动端)自定义界面场景.md,确保格式符合规范 - 颜色不显示:使用绿色通道(
#FF00FF00),其他颜色在眼镜端可能不显示 - 更新不生效:确保使用正确的控件ID,更新JSON格式正确
5.3 TTS播报相关
- TTS不播报:检查蓝牙连接状态、文本内容是否为空
- 播报顺序混乱:TTS自动处理播放队列,避免快速连续发送
- 中文乱码:确保使用UTF-8编码
5.4 蓝牙连接相关
- 设备未连接:使用
CxrApi.getInstance().isBluetoothConnected()检查连接状态 - 连接断开:监听
BluetoothStatusCallback.onDisconnected(),处理重连逻辑 - 请求失败:确保在连接成功后再调用
openCustomView()、sendGlobalTtsContent()等API
5.5 常见错误码
REQUEST_SUCCEED:请求成功REQUEST_WAITING:请求处理中,不要重复请求REQUEST_FAILED:请求失败,检查连接状态和参数
六、扩展功能建议
6.1 定时刷新
// 使用Handler或协程定时刷新天气
private val handler = Handler(Looper.getMainLooper())
private val refreshRunnable = object : Runnable {
    override fun run() {
        queryWeather()
        handler.postDelayed(this, 30 * 60 * 1000) // 30分钟刷新一次
    }
}
6.2 位置定位
集成Android定位服务,自动获取当前城市编码:
// 使用FusedLocationProviderClient获取位置
// 然后通过高德逆地理编码API获取adcode
6.3 天气图标
使用sendCustomViewIcons()上传天气图标(晴、雨、雪等),在自定义界面中使用ImageView显示。
6.4 全局消息通知
使用sendGlobalMsgContent()或sendGlobalToastContent()在天气变化时发送通知。
6.5 多城市管理
支持添加多个城市,切换显示不同城市的天气信息。
七、最后
本文实现了一个不太完整的天气应用,充分利用了Rokid眼镜的自定义界面和TTS语音播报特性。通过这个示例,你可以:
- 学会调用第三方API并解析数据
- 掌握自定义界面的JSON格式定义
- 实现界面动态更新机制
- 使用TTS进行语音播报
- 处理眼镜端连接状态和错误
下一步,你可以基于这个框架实现更多应用场景,比如新闻播报、股票显示、日程提醒等。只要掌握了自定义界面和TTS的使用,就能快速开发出实用的眼镜端应用。
如果您有任何疑问、对文章写的不满意、发现错误或者有更好的方法,如果你想支持下一期请务必点赞~,欢迎在评论、私信或邮件中提出,这对我真的很重要,非常感谢您的支持。🙏
所有代码均已包含在项目中,可直接参考使用。

中国智能体开发者社区,聚焦智能体与大模型开发,提供前沿资讯、实用工具链、开源项目及行业案例。通过技术沙龙、开发者大赛等活动,促进经验交流与协作,助力开发者快速构建创新智能应用。
更多推荐

 27
27 0
0- 0


 已为社区贡献1条内容

所有评论(0)