Linux ALSA架构:PCM_OPEN流程
转自:https://blog.csdn.net/lyf_007217/article/details/145200557
一 应用端
源码路径: external\tinyalsa\pcm.c external\tinyalsa\pcm_hw.c
struct pcm *pcm_open(unsigned int card, unsigned int device,
unsigned int flags, struct pcm_config *config)
{
...
pcm->ops = &hw_ops;
pcm->fd = pcm->ops->open(card, device, flags, &pcm->data, pcm->snd_node);
/*实际是调用 pcm_hw.c 的pcm_hw_open 接口 open("/dev/snd/pcmC0D0c") 打开节点*/
if (pcm->ops->ioctl(pcm->data, SNDRV_PCM_IOCTL_INFO, &info)) {
oops(&bad_pcm, errno, "cannot get info");
goto fail_close;
}
if (pcm->ops->ioctl(pcm->data, SNDRV_PCM_IOCTL_HW_PARAMS, ¶ms)) {
oops(&bad_pcm, errno, "cannot set hw params");
goto fail_close;
}
/* get our refined hw_params */
config->period_size = param_get_int(¶ms, SNDRV_PCM_HW_PARAM_PERIOD_SIZE);
config->period_count = param_get_int(¶ms, SNDRV_PCM_HW_PARAM_PERIODS);
pcm->buffer_size = config->period_count * config->period_size;
if (pcm->ops->ioctl(pcm->data, SNDRV_PCM_IOCTL_SW_PARAMS, &sparams)) {
oops(&bad_pcm, errno, "cannot set sw params");
goto fail;
}
}
一键获取完整项目代码
二 audio 节点 介绍
1. /dev/snd下的pcm设备节点介绍
我们 adb shell, 进入手机中,ls -al /dev/snd 看下,可以看到很多设备节点。
简化如下:
$ cd /dev/snd
$ ls –l
crw-rw----+ 1 root audio 116, 8 2011-02-23 21:38 controlC0 ---> 用于声卡的控制,例如通道选择,混音,麦克风的控制等
crw-rw----+ 1 root audio 116, 4 2011-02-23 21:38 midiC0D0 ---> 用于播放midi 音频
crw-rw----+ 1 root audio 116, 7 2011-02-23 21:39 pcmC0D0c ---> 用于录音的pcm 设备 1
crw-rw----+ 1 root audio 116, 6 2011-02-23 21:56 pcmC0D0p ---> 用于播放的pcm 设备 1
crw-rw----+ 1 root audio 116, 5 2011-02-23 21:38 pcmC0D1p ---> 用于播放的pcm 设备 2
crw-rw----+ 1 root audio 116, 3 2011-02-23 21:38 seq ---> 音序器
crw-rw----+ 1 root audio 116, 2 2011-02-23 21:38 timer ---> 定时器
其中,
C0D0 代表的是声卡0 中的设备0,
pcmC0D0c 最后一个c 代表capture,
pcmC0D0p 最后一个p 代表 playback,
这些都是alsa-driver 中的命名规则。
2. /dev/snd下的pcm设备节点 创建过程分析
另外,还有一个发现,就,/dev/snd 下面所有的节点的主设备号 都是 116 ,面次设备号各不相同。
原因是因为,
在alsa 中所有的节点都是同一个主设备号,到时访问open 节点的时候就会先调用同一个主设备号的open 函数,
接着,在主设备号的open 函数中,再来分发调用,各个不同次设备号的open 函数。
2.1 CONFIG_SND_MAJOR 主设备号 116
代码可以参考 sound.c 中的代码:
主设备号注册
@\kernel\msm-3.18\include\sound\core.h
#define CONFIG_SND_MAJOR 116 /* standard configuration */ 定义主设备号
@ \kernel\msm-3.18\sound\core\sound.c
static int major = CONFIG_SND_MAJOR; // 主设备号
module_param(major, int, 0444);
MODULE_PARM_DESC(major, "Major # for sound driver.");
static const struct file_operations snd_fops =
{
.owner = THIS_MODULE,
.open = snd_open,
.llseek = noop_llseek,
};
static int __init alsa_sound_init(void)
{
snd_major = major;
snd_ecards_limit = cards_limit;
if (register_chrdev(major, "alsa", &snd_fops)) { // 主册一个主设备号
pr_err("ALSA core: unable to register native major device number %d\n", major);
return -EIO;
}
snd_info_minor_register();
return 0;
}
一键获取完整项目代码
2.2 snd_minors 数组分析
在 snd_register_device_for_dev 函数中,主要作用就是创建不同的次设备号节点,保存在 snd_minors[] 数组中。
其主要是在pcm.c 创建节点时被调用的。
可以发现在代码中,会根据声卡号和设备索引号,依次创建 pcmC%iD%ip 和 pcmC%iD%ic 两个设备节点的名字。
接着,调用 snd_register_device_for_dev 来创建设备节点,传入换参数就是 设备节点的名字。
@\kernel\msm-3.18\sound\core\pcm.c
static int snd_pcm_dev_register(struct snd_device *device)
{
pcm = device->device_data;
err = snd_pcm_add(pcm);
for (cidx = 0; cidx < 2; cidx++) {
int devtype = -1;
switch (cidx) {
case SNDRV_PCM_STREAM_PLAYBACK:
sprintf(str, "pcmC%iD%ip", pcm->card->number, pcm->device);
devtype = SNDRV_DEVICE_TYPE_PCM_PLAYBACK;
break;
case SNDRV_PCM_STREAM_CAPTURE:
sprintf(str, "pcmC%iD%ic", pcm->card->number, pcm->device);
devtype = SNDRV_DEVICE_TYPE_PCM_CAPTURE;
break;
}
/* device pointer to use, pcm->dev takes precedence if
* it is assigned, otherwise fall back to card's device
* if possible */
dev = pcm->dev;
/* register pcm */
err = snd_register_device_for_dev(devtype, pcm->card,
pcm->device,
&snd_pcm_f_ops[cidx],
pcm, str, dev);
dev = snd_get_device(devtype, pcm->card, pcm->device);
if (dev) {
err = sysfs_create_groups(&dev->kobj,
pcm_dev_attr_groups);
put_device(dev);
}
for (substream = pcm->streams[cidx].substream; substream; substream = substream->next)
snd_pcm_timer_init(substream);
}
list_for_each_entry(notify, &snd_pcm_notify_list, list)
notify->n_register(pcm);
return 0;
}
一键获取完整项目代码
在snd_register_device_for_dev() 中,会根据传入的字符串名字,创建不同的设备节点。
看 snd_register_device_for_dev() 代码前,我们来看一下snd_minors[] 这个数组。
static struct snd_minor *snd_minors[SNDRV_OS_MINORS];
其结构体描述如下:
@ \kernel\msm-3.18\include\sound\core.h
struct snd_minor {
int type; /* SNDRV_DEVICE_TYPE_XXX */
// 声卡类型: SNDRV_DEVICE_TYPE_PCM_PLAYBACK 和 SNDRV_DEVICE_TYPE_PCM_CAPTURE 两种
int card; /* card number */ //声卡号
int device; /* device number */ // 设备号
const struct file_operations *f_ops; /* file operations */ // 该节点换操作节构体
void *private_data; /* private data for f_ops->open */ // 私有参数
struct device *dev; /* device for sysfs */ // sys 设备节点描述符
struct snd_card *card_ptr; /* assigned card instance */ //声卡结构体
};
一键获取完整项目代码
从上面的结构体可以看出,snd_minors中 主要是包含了 card声卡下 device设备的操作方法 f_ops。
这样就很清楚了。
通过snd_minors[] 这个 数组,我人能够找到任意一个 声卡下的设备 的操作方法。
2.3 pcm设备节点创建代码
接下来,我们来分析snd_register_device_for_dev() 这个函数,
这个函数主要工作 如下:
step 1. 使用 snd_minor 指针将 要创建的声卡设备的信息保存下来
step 2. 给声卡设备分配 次设备号,如果定义了动态分配,则分配次设备号
step 3. 以次设备号为索引,将声卡设备的信息保存在 snd_minors[minor]数组中。
step 4. 通过 device_create 创建一个 主设备号 majore=116, 次设备号minor 的设备节点,节点名字就是字符串 pcmC%iD%ip 或 pcmC%iD%ic
@ \kernel\msm-3.18\sound\core\sound.c
/**
* snd_register_device_for_dev - Register the ALSA device file for the card
* @type: the device type, SNDRV_DEVICE_TYPE_XXX
* @card: the card instance
* @dev: the device index
* @f_ops: the file operations
* @private_data: user pointer for f_ops->open()
* @name: the device file name
* @device: the &struct device to link this new device to
*
* Registers an ALSA device file for the given card.
* The operators have to be set in reg parameter.
*
* Return: Zero if successful, or a negative error code on failure.
*/
int snd_register_device_for_dev(int type, struct snd_card *card, int dev,
const struct file_operations *f_ops,
void *private_data,
const char *name, struct device *device)
{
int minor;
struct snd_minor *preg;
preg = kmalloc(sizeof *preg, GFP_KERNEL);
// step 1. 使用 snd_minor 指针将 要创建的声卡设备的信息保存下来
preg->type = type;
preg->card = card ? card->number : -1;
preg->device = dev;
preg->f_ops = f_ops;
preg->private_data = private_data;
preg->card_ptr = card;
// step 2. 给声卡设备分配 次设备号,如果定义了动态分配,则分配次设备号
#ifdef CONFIG_SND_DYNAMIC_MINORS
minor = snd_find_free_minor(type);
#else
minor = snd_kernel_minor(type, card, dev);
if (minor >= 0 && snd_minors[minor])
minor = -EBUSY;
#endif
// step 3. 以次设备号为索引,将声卡设备的信息保存在 snd_minors[minor]数组中。
snd_minors[minor] = preg;
// step 4. 通过 device_create 创建一个 主设备号 majore=116, 次设备号minor 的设备节点,节点名字就是字符串 pcmC%iD%ip 或 pcmC%iD%ic
preg->dev = device_create(sound_class, device, MKDEV(major, minor),
private_data, "%s", name);
return 0;
}
一键获取完整项目代码
2.4 pcm设备节点创建open 过程分析
前面讲了pcm设备节点的创建过程,接下来我们来看下如何打开的。
先看下如下代码,在 snd_fops 文件操作节构全中,包含了 snd_open方法 。
在init 代码中,是通过 register_chrdev(major, “alsa”, &snd_fops) 来将 major=116 的主设备号 和 snd_fops绑定在一起。
也就是说,凡是打开 设备节点major 为 116 的节点时,都会调用该 snd_fop 的open方法 snd_open()。
@ \kernel\msm-3.18\sound\core\sound.c
static const struct file_operations snd_fops =
{
.owner = THIS_MODULE,
.open = snd_open,
.llseek = noop_llseek,
};
static int __init alsa_sound_init(void)
{
snd_major = major;
snd_ecards_limit = cards_limit;
if (register_chrdev(major, "alsa", &snd_fops)) {
pr_err("ALSA core: unable to register native major device number %d\n", major);
return -EIO;
}
snd_info_minor_register();
return 0;
}
一键获取完整项目代码
在 snd_open() 方法中,整个过程为:
step 1:获取次设备号
step 2:初始化一个 snd_minor 类型的指针, 和file_operations 类型的操作方法指针
step 3:根据设备的次设备号,从 snd_minors[minor]数组中获取对应设备的snd_minor 结构体信息
step 4:解析出该设备的 操作方法
step 5:替换文件的操作方法
step 6:调用open 方法
@ \kernel\msm-3.18\sound\core\sound.c
static int snd_open(struct inode *inode, struct file *file)
{
// step 1: 获取次设备号
unsigned int minor = iminor(inode);
// step 2:初始化一个 snd_minor 类型的指针, 和file_operations 类型的操作方法指针
struct snd_minor *mptr = NULL;
const struct file_operations *new_fops;
// step 3:根据设备的次设备号,从 snd_minors[minor]数组中获取对应设备的snd_minor 结构体信息。
mptr = snd_minors[minor];
// step 4:解析出该设备的 操作方法
new_fops = fops_get(mptr->f_ops);
// step 5: 替换文件的操作方法
replace_fops(file, new_fops);
// step 6: 调用open 方法
if (file->f_op->open)
err = file->f_op->open(inode, file);
return err;
}
一键获取完整项目代码
2.5 pcm设备节点 file_operations 介绍
前面,我们说了pcm设备节点的 open() 方法的调用流程,
不知道你有没有好奇心,是否想进去看下它做了啥呢? 哈哈。
在前面的代码中,fops 是在 snd_pcm_f_ops[cidx] 中传递过来的。
/* register pcm */
err = snd_register_device_for_dev(devtype, pcm->card,
pcm->device,
&snd_pcm_f_ops[cidx],
pcm, str, dev);
我们看下 snd_pcm_f_ops[cidx] 中的定义:
@ \kernel\msm-3.18\sound\core\pcm_native.c
const struct file_operations snd_pcm_f_ops[2] = {
{ // SNDRV_PCM_STREAM_PLAYBACK
.owner = THIS_MODULE,
.write = snd_pcm_write,
.aio_write = snd_pcm_aio_write,
.open = snd_pcm_playback_open,
.release = snd_pcm_release,
.llseek = no_llseek,
.poll = snd_pcm_playback_poll,
.unlocked_ioctl = snd_pcm_playback_ioctl,
.compat_ioctl = snd_pcm_ioctl_compat,
.mmap = snd_pcm_mmap,
.fasync = snd_pcm_fasync,
.get_unmapped_area = snd_pcm_get_unmapped_area,
},
{ // SNDRV_PCM_STREAM_CAPTURE
.owner = THIS_MODULE,
.read = snd_pcm_read,
.aio_read = snd_pcm_aio_read,
.open = snd_pcm_capture_open,
.release = snd_pcm_release,
.llseek = no_llseek,
.poll = snd_pcm_capture_poll,
.unlocked_ioctl = snd_pcm_capture_ioctl,
.compat_ioctl = snd_pcm_ioctl_compat,
.mmap = snd_pcm_mmap,
.fasync = snd_pcm_fasync,
.get_unmapped_area = snd_pcm_get_unmapped_area,
}
};
一键获取完整项目代码
可以看出,在 snd_pcm_f_ops 数组中,主要就是定义了 playback 和 capture 的各个操作方法。
2.6 pcm设备节点 snd_pcm_playback_open() 代码分析
我们以 playback 来分析下 其open 方法: snd_pcm_playback_open()
其主要工作 为:
step 1: 通过nonseekable_open函数,告诉内核,当前文件open 时,是不可 llseek 定位的
step 2: 获得 snd_minor 结构体中的 privdata 私有数据,其中保存了声卡的相关信息
step 3: 调用 snd_pcm_open() open 函数,传参为 pcm 和 SNDRV_PCM_STREAM_CAPTURE;
static int snd_pcm_playback_open(struct inode *inode, struct file *file)
{
struct snd_pcm *pcm;
// step 1: 通过nonseekable_open函数,告诉内核,当前文件open 时,是不可 llseek 定位的
int err = nonseekable_open(inode, file);
// step 2: 获得 snd_minor 结构体中的 privdata 私有数据,其中保存了声卡的相关信息
pcm = snd_lookup_minor_data(iminor(inode),
SNDRV_DEVICE_TYPE_PCM_PLAYBACK);
-------->
+ private_data = mreg->private_data;
+ return private_data;
<-------
// step 3: 调用 snd_pcm_open() open 函数,
err = snd_pcm_open(file, pcm, SNDRV_PCM_STREAM_PLAYBACK);
return err;
}
一键获取完整项目代码
2.7 snd_pcm_open() 代码分析
主要工作如下:
将 pcm->card 和 file 添加链表
构造当前进程对应的等待队列 wait
将wait 保存在 pcm->open_wait 中
上锁
在while(1) 中打开文件,如果失败就退出
在阻塞模式下,设置SO_RCVTIMEO和SO_SNDTIMEO会导致read/write函数返回EAGAIN
我们此返回 -EAGAIN 说明是正常的,数据还没写完
设置当前进和为可被中断
调度,让更高优先及的任务得到处理,或者让其他任务得到处理
等待调度到来,继续写播放数据
@ \kernel\msm-3.18\sound\core\pcm_native.c
static int snd_pcm_open(struct file *file, struct snd_pcm *pcm, int stream)
{
int err;
wait_queue_t wait;
// 1. 将 pcm->card 和 file 添加链表
err = snd_card_file_add(pcm->card, file);
if (!try_module_get(pcm->card->module)) {
err = -EFAULT;
goto __error2;
}
// 2. 构造当前进程对应的等待队列 wait
init_waitqueue_entry(&wait, current);
// 3. 将wait 保存在 pcm->open_wait 中
add_wait_queue(&pcm->open_wait, &wait);
// 4. 上锁
mutex_lock(&pcm->open_mutex);
while (1) {
// 5. 在while(1) 中打开文件,如果失败就退出
err = snd_pcm_open_file(file, pcm, stream);
if (err >= 0)
break;
// 6. 在阻塞模式下,设置SO_RCVTIMEO和SO_SNDTIMEO会导致read/write函数返回EAGAIN
// 我们此返回 -EAGAIN 说明是正常的
if (err == -EAGAIN) {
if (file->f_flags & O_NONBLOCK) {
// 如果是非阻塞模式下,则直接退出,在非阻塞模式下,write或read返回-1,errno为EAGAIN,表示相应的操作还没执行完成。
err = -EBUSY;
break;
}
} else
break;
// 7. 设置当前进和为可被中断
set_current_state(TASK_INTERRUPTIBLE);
mutex_unlock(&pcm->open_mutex);
// 8. 调度,让更高优先及的任务得到处理,或者让其他任务得到处理
schedule();
// 9. 等待调度到来,继续写播放数据
mutex_lock(&pcm->open_mutex);
if (pcm->card->shutdown) {
err = -ENODEV;
break;
}
if (signal_pending(current)) {
err = -ERESTARTSYS;
break;
}
}
remove_wait_queue(&pcm->open_wait, &wait);
mutex_unlock(&pcm->open_mutex);
return err;
}
一键获取完整项目代码
接下往下看snd_pcm_open_file
static int snd_pcm_open_file(struct file *file,
struct snd_pcm *pcm,
int stream)
{
struct snd_pcm_file *pcm_file;
struct snd_pcm_substream *substream;
int err;
err = snd_pcm_open_substream(pcm, stream, file, &substream);
if (err < 0)
return err;
pcm_file = kzalloc(sizeof(*pcm_file), GFP_KERNEL);
if (pcm_file == NULL) {
snd_pcm_release_substream(substream);
return -ENOMEM;
}
pcm_file->substream = substream;
if (substream->ref_count == 1)
substream->pcm_release = pcm_release_private;
file->private_data = pcm_file;
return 0;
}
一键获取完整项目代码
继续跟踪snd_pcm_open_substream
int snd_pcm_open_substream(struct snd_pcm *pcm, int stream,
struct file *file,
struct snd_pcm_substream **rsubstream)
{
struct snd_pcm_substream *substream;
int err;
err = snd_pcm_attach_substream(pcm, stream, file, &substream);
if (err < 0)
return err;
if (substream->ref_count > 1) {
*rsubstream = substream;
return 0;
}
err = snd_pcm_hw_constraints_init(substream);
if (err < 0) {
pcm_dbg(pcm, "snd_pcm_hw_constraints_init failed\n");
goto error;
}
err = substream->ops->open(substream);
if (err < 0)
goto error;
substream->hw_opened = 1;
err = snd_pcm_hw_constraints_complete(substream);
if (err < 0) {
pcm_dbg(pcm, "snd_pcm_hw_constraints_complete failed\n");
goto error;
}
*rsubstream = substream;
return 0;
error:
snd_pcm_release_substream(substream);
return err;
}
一键获取完整项目代码
substream->ops->open(substream);会调用创建PCM注册的ops
int soc_new_pcm(struct snd_soc_pcm_runtime *rtd, int num)
{
......
/* ASoC PCM operations */
if (rtd->dai_link->dynamic) {
rtd->ops.open = dpcm_fe_dai_open;
rtd->ops.hw_params = dpcm_fe_dai_hw_params;
rtd->ops.prepare = dpcm_fe_dai_prepare;
rtd->ops.trigger = dpcm_fe_dai_trigger;
rtd->ops.hw_free = dpcm_fe_dai_hw_free;
rtd->ops.close = dpcm_fe_dai_close;
rtd->ops.pointer = soc_pcm_pointer;
} else {
rtd->ops.open = soc_pcm_open;
rtd->ops.hw_params = soc_pcm_hw_params;
rtd->ops.prepare = soc_pcm_prepare;
rtd->ops.trigger = soc_pcm_trigger;
rtd->ops.hw_free = soc_pcm_hw_free;
rtd->ops.close = soc_pcm_close;
rtd->ops.pointer = soc_pcm_pointer;
}
......
}
一键获取完整项目代码
2.8 soc_pcm端的open() 代码分析
MTK平台是dynamic 调用FE的open,该接口作用有:
1.获取路由信息,计算当前FE绑定的BE
2.分别Open BE和FE pcm
static int dpcm_fe_dai_open(struct snd_pcm_substream *fe_substream)
{
struct snd_soc_pcm_runtime *fe = asoc_substream_to_rtd(fe_substream);
struct snd_soc_dapm_widget_list *list;
int ret;
int stream = fe_substream->stream;
snd_soc_dpcm_mutex_lock(fe);
fe->dpcm[stream].runtime = fe_substream->runtime;
ret = dpcm_path_get(fe, stream, &list);
if (ret < 0)
goto open_end;
/* calculate valid and active FE <-> BE dpcms */
dpcm_process_paths(fe, stream, &list, 1);
ret = dpcm_fe_dai_startup(fe_substream);
if (ret < 0)
dpcm_fe_dai_cleanup(fe_substream);
dpcm_clear_pending_state(fe, stream);
dpcm_path_put(&list);
open_end:
snd_soc_dpcm_mutex_unlock(fe);
return ret;
}
一键获取完整项目代码
继续看函数dpcm_fe_dai_startup
其中 dpcm_be_dai_startup 会调用BE端 __soc_pcm_open(be, be_substream);
/* start the DAI frontend */
ret = __soc_pcm_open(fe, fe_substream);
static int dpcm_fe_dai_startup(struct snd_pcm_substream *fe_substream)
{
struct snd_soc_pcm_runtime *fe = asoc_substream_to_rtd(fe_substream);
int stream = fe_substream->stream, ret = 0;
dpcm_set_fe_update_state(fe, stream, SND_SOC_DPCM_UPDATE_FE);
ret = dpcm_be_dai_startup(fe, stream);
if (ret < 0)
goto be_err;
dev_dbg(fe->dev, "ASoC: open FE %s\n", fe->dai_link->name);
/* start the DAI frontend */
ret = __soc_pcm_open(fe, fe_substream);
if (ret < 0)
goto unwind;
fe->dpcm[stream].state = SND_SOC_DPCM_STATE_OPEN;
dpcm_runtime_setup_fe(fe_substream);
dpcm_runtime_setup_be_format(fe_substream);
dpcm_runtime_setup_be_chan(fe_substream);
dpcm_runtime_setup_be_rate(fe_substream);
ret = dpcm_apply_symmetry(fe_substream, stream);
unwind:
if (ret < 0)
dpcm_be_dai_startup_unwind(fe, stream);
be_err:
dpcm_set_fe_update_state(fe, stream, SND_SOC_DPCM_UPDATE_NO);
if (ret < 0)
dev_err(fe->dev, "%s() failed (%d)\n", __func__, ret);
return ret;
}
一键获取完整项目代码
2.9 __soc_pcm_open 代码分析
该接口功能如下:
1. soc_pcm_components_open(substream); 调用component drv ops的open
2.snd_soc_link_startup(substream); 调用dai_link的rtd->dai_link->ops->startup(substream);
3.snd_soc_dai_startup调用cpu和codec 的dai->driver->ops->startup(substream, dai);
static int __soc_pcm_open(struct snd_soc_pcm_runtime *rtd,
struct snd_pcm_substream *substream)
{
struct snd_soc_component *component;
struct snd_soc_dai *dai;
int i, ret = 0;
snd_soc_dpcm_mutex_assert_held(rtd);
for_each_rtd_components(rtd, i, component)
pinctrl_pm_select_default_state(component->dev);
ret = snd_soc_pcm_component_pm_runtime_get(rtd, substream);
if (ret < 0)
goto err;
ret = soc_pcm_components_open(substream);
if (ret < 0)
goto err;
ret = snd_soc_link_startup(substream);
if (ret < 0)
goto err;
/* startup the audio subsystem */
for_each_rtd_dais(rtd, i, dai) {
ret = snd_soc_dai_startup(dai, substream);
if (ret < 0)
goto err;
}
/* Dynamic PCM DAI links compat checks use dynamic capabilities */
if (rtd->dai_link->dynamic || rtd->dai_link->no_pcm)
goto dynamic;
/* Check that the codec and cpu DAIs are compatible */
soc_pcm_init_runtime_hw(substream);
soc_pcm_update_symmetry(substream);
ret = soc_hw_sanity_check(substream);
if (ret < 0)
goto err;
soc_pcm_apply_msb(substream);
/* Symmetry only applies if we've already got an active stream. */
for_each_rtd_dais(rtd, i, dai) {
ret = soc_pcm_apply_symmetry(substream, dai);
if (ret != 0)
goto err;
}
dynamic:
snd_soc_runtime_activate(rtd, substream->stream);
ret = 0;
err:
if (ret < 0) {
soc_pcm_clean(rtd, substream, 1);
dev_err(rtd->dev, "%s() failed (%d)", __func__, ret);
}
return ret;
}
一键获取完整项目代码
整体流程图如下:
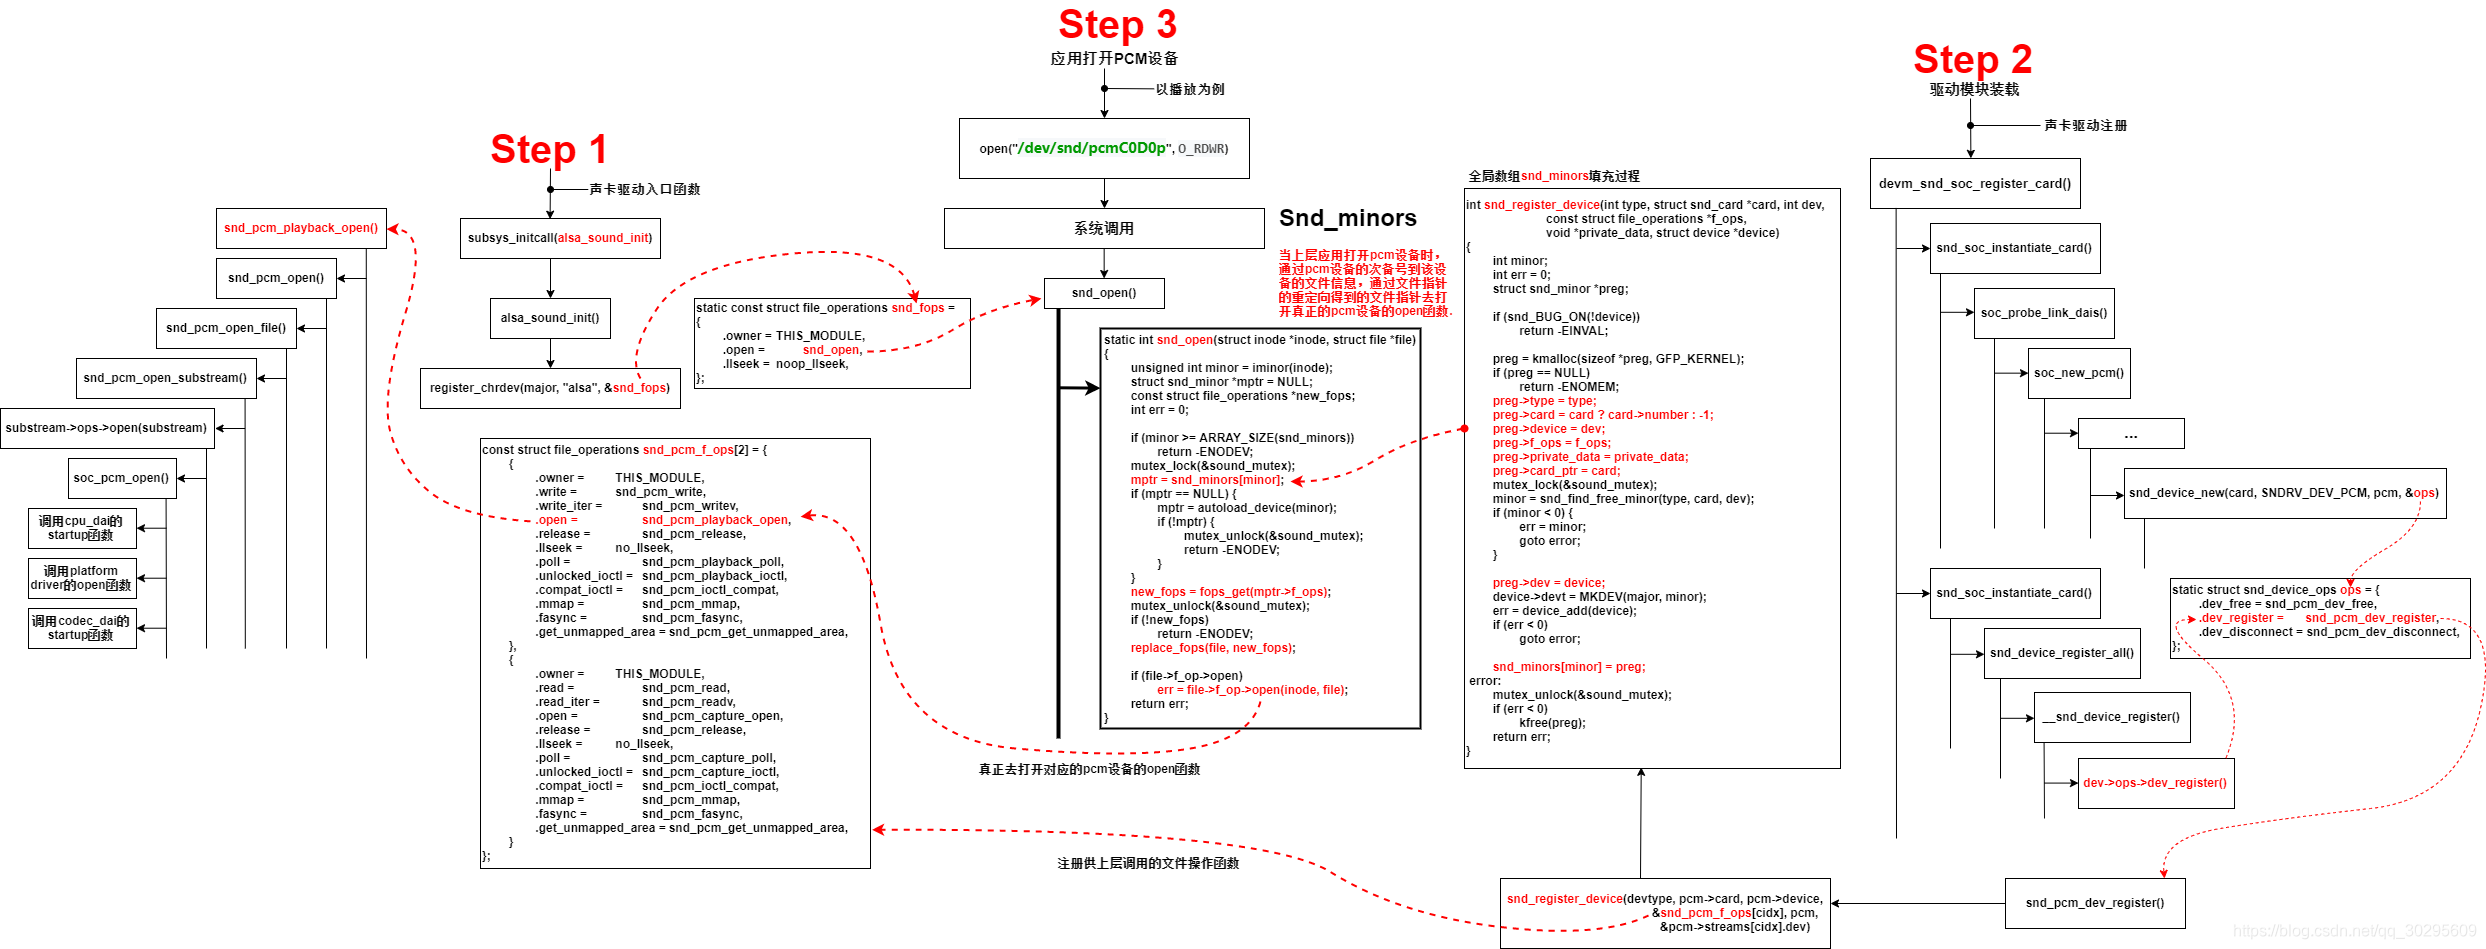

中国智能体开发者社区,聚焦智能体与大模型开发,提供前沿资讯、实用工具链、开源项目及行业案例。通过技术沙龙、开发者大赛等活动,促进经验交流与协作,助力开发者快速构建创新智能应用。
更多推荐


 0
0 0
0- 0


 已为社区贡献1条内容

所有评论(0)