【音频可视化】音频生成频谱瀑布图视频
·
音频频谱瀑布可视化工具
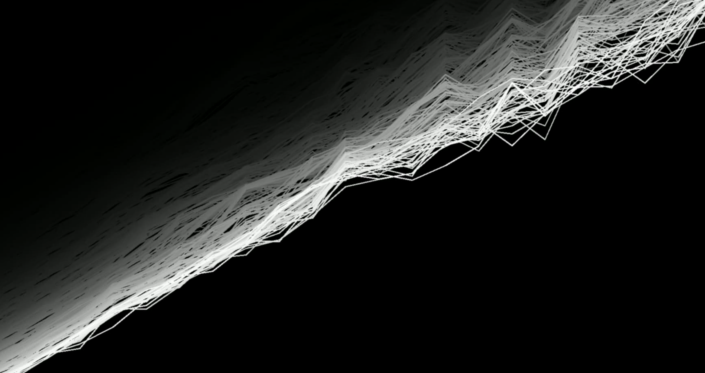
这是一个将WAV音频文件转换为三维瀑布频谱可视化视频的Python程序。程序生成黑色背景上的白色频谱图案,呈现出音频在50-600Hz范围内的三维瀑布流动效果(方向为从下往上,模拟地面向前移动效果)。输入音频应为WAV格式,输出视频为MP4格式。
功能
- 将音频频谱转换为三维瀑布流动效果
- 黑色背景上的白色频谱图案,视觉效果简洁美观
- 支持50-600Hz频率范围限制
- 梯形透视效果,模拟深度感
- 16:9比例输出视频,可调整
示例
代码
import numpy as np
import cv2
from scipy.io import wavfile
from scipy.signal import spectrogram
from scipy.interpolate import interp1d
import os
from tqdm import tqdm

def create_audio_visualization(
    wav_path,
    output_video_path,
    width=1920,
    height=1080,
    target_fps=30,
    freq_min=50,
    freq_max=600,
    perspective_start=0.2,
    perspective_end=1.0,
    height_scale=0.7,
    decay_factor=0.95,
    line_width=2,
    blur_size=(5,5),
    n_fft=2048,
    fixed_duration=True  # 新增:是否固定视频时长
):
    # 读取WAV文件
    rate, data = wavfile.read(wav_path)

    # 如果是立体声,转换为单声道
    if len(data.shape) > 1:
        data = data.mean(axis=1)

    # 计算音频时长
    duration = len(data) / rate

    # 设置视频帧率
    fps = target_fps

    # 计算期望的总帧数(用于固定时长)
    desired_frames = int(duration * fps)

    # 计算频谱图
    if fixed_duration:
        # 方法1:调整hop_length以匹配期望帧数
        hop_length = max(1, int(len(data) / desired_frames))
        win_length = min(n_fft, hop_length * 4)  # 确保窗口大小合理
    else:
        # 使用默认参数
        hop_length = n_fft // 4
        win_length = n_fft

    freqs, times, Sxx = spectrogram(
        data,
        fs=rate,
        nperseg=win_length,
        noverlap=win_length - hop_length,
        scaling='spectrum'
    )

    # 转换为分贝并归一化
    Sxx = 10 * np.log10(Sxx + 1e-12)
    Sxx = (Sxx - Sxx.min()) / (Sxx.max() - Sxx.min() + 1e-12)

    # 只保留50-600Hz的频率范围
    freq_mask = (freqs >= freq_min) & (freqs <= freq_max)
    freqs = freqs[freq_mask]
    Sxx = Sxx[freq_mask, :]

    # 方法2:重采样到固定帧数
    if fixed_duration and len(times) != desired_frames:
        interp_func = interp1d(times, Sxx, axis=1, kind='linear', fill_value="extrapolate")
        new_times = np.linspace(times.min(), times.max(), desired_frames)
        Sxx = interp_func(new_times)
        times = new_times
        print(f"重采样频谱图: {len(times)}帧 → {desired_frames}帧")

    # 创建频率索引映射到屏幕宽度
    x_positions = ((freqs - freq_min) / (freq_max - freq_min) * width).astype(int)

    # 创建透视效果参数
    perspective = np.linspace(perspective_start, perspective_end, len(freqs))

    # 创建视频写入器
    fourcc = cv2.VideoWriter_fourcc(*'mp4v')
    video_writer = cv2.VideoWriter(output_video_path, fourcc, fps, (width, height))

    # 初始化帧缓冲区
    frame_buffer = np.zeros((height, width), dtype=np.float32)

    # 生成每一帧
    for i in tqdm(range(len(times)), desc="Generating frames"):
        # 向下滚动缓冲区
        frame_buffer = np.roll(frame_buffer, -1, axis=0)
        frame_buffer[-1, :] = 0

        # 获取当前频谱
        spectrum = Sxx[:, i]

        # 应用透视效果
        spectrum_persp = spectrum * perspective

        # 计算Y位置
        y_values = height - (spectrum_persp * height * height_scale).astype(int)
        y_values = np.clip(y_values, 0, height - 1)

        # 绘制频谱线
        for j in range(len(freqs) - 1):
            x1, x2 = x_positions[j], x_positions[j + 1]
            y1, y2 = y_values[j], y_values[j + 1]

            if 0 <= x1 < width and 0 <= x2 < width:
                cv2.line(frame_buffer, (x1, y1), (x2, y2), 1.0, line_width)

        # 应用衰减
        frame_buffer *= decay_factor

        # 转换为图像并模糊
        frame_img = np.clip(frame_buffer * 255, 0, 255).astype(np.uint8)
        frame_img = cv2.GaussianBlur(frame_img, blur_size, 0)
        frame_bgr = cv2.cvtColor(frame_img, cv2.COLOR_GRAY2BGR)

        # 写入视频帧
        video_writer.write(frame_bgr)

    video_writer.release()
    print(f"视频生成完成: 时长={len(times)/fps:.2f}秒, 帧数={len(times)}")
    return output_video_path

if __name__ == "__main__":
    input_wav = "input.wav"
    output_video = "output_final.mp4"

    # 使用固定时长模式
    create_audio_visualization(
        input_wav,
        output_video,
        fixed_duration=True,
        perspective_start=0.1,  # 远处的高低
        perspective_end=1.0,    # 近处的高低
        decay_factor=0.99,      # 衰减
        height_scale=1.2       # 振幅
    )
安装依赖
pip install numpy scipy opencv-python tqdm
使用方式
在代码中修改为自己的文件名:
create_audio_visualization("input.wav", "output.mp4")
运行:
python audio_visualizer.py input.wav output.mp4
核心参数说明
基本参数
| 参数 | 默认值 | 说明 |
|---|---|---|
width |
1920 | 视频宽度 |
height |
1080 | 视频高度 |
target_fps |
30 | 目标帧率 |
freq_min |
50 | 最小频率(Hz) |
freq_max |
600 | 最大频率(Hz) |
视觉效果参数
| 参数 | 默认值 | 说明 | 调节效果 |
|---|---|---|---|
perspective_start |
0.2 | 远处透视系数 | ↗ 增加:远处频谱更高 ↘ 减少:远处更扁平 |
perspective_end |
1.0 | 近处透视系数 | ↗ 增加:近处频谱更高 ↘ 减少:近处更扁平 |
height_scale |
0.7 | 振幅高度缩放 | ↗ 增加:频谱波动更明显 ↘ 减少:频谱更平缓 |
decay_factor |
0.95 | 轨迹衰减系数 | ↗ 增加:轨迹更持久 ↘ 减少:轨迹快速消失 |
line_width |
2 | 频谱线宽度 | ↗ 增加:线条更粗 ↘ 减少:线条更细 |
blur_size |
(5,5) | 高斯模糊核大小 | ↗ 增加:更模糊柔和 ↘ 减少:更锐利清晰 |
音频处理参数
| 参数 | 默认值 | 说明 |
|---|---|---|
n_fft |
2048 | FFT窗口大小 |
fixed_duration |
True | 是否固定视频时长 |

中国智能体开发者社区,聚焦智能体与大模型开发,提供前沿资讯、实用工具链、开源项目及行业案例。通过技术沙龙、开发者大赛等活动,促进经验交流与协作,助力开发者快速构建创新智能应用。
更多推荐

 5
5 0
0- 0


 已为社区贡献1条内容

所有评论(0)