Python后端开发之旅(二)——前端框架
Python后端开发之旅(二)——前端框架
- 常用的编解码、加密方式
- Web 应用开发入门对比——FastAPI & uvicorn
- Web进阶——Flask 框架
- Web进阶——FastAPI框架
- [Typing 模块](https://blog.csdn.net/Yunyi_Chi/article/details/156769519)——类型注解
常用的编解码、加密方式
散列算法比较:MD5、SHA1、SHA256有哪些区别
Encode、Encrypt跟Hash
敏感数据加密–AES+BASE64
一般先使用AES等对称加密算法对敏感信息进行加密,然后将加密后的结果进行Base64编码,以方便在网络上传输
解密时,先对Base64编码的字符串进行解码,在用AES 解密
常见加密(MD5、AES、DES)、常见编码(BASE64,Unescape)
Web 应用开发入门对比——FastAPI & uvicorn
🚀 问题一:FastAPI + uvicorn 是什么?
✅ 简单回答:
- FastAPI 是一个现代、高性能的 Python Web 框架。
- Uvicorn 是一个 ASGI 服务器,用来运行 FastAPI 应用。
- 它们一起工作,就像
Spring Boot+Tomcat或Spring WebFlux+Netty。
🔍 详细解释(类比 Java)
| 概念 | 类比 Java | 说明 |
|---|---|---|
| FastAPI | Spring MVC / Spring WebFlux |
一个用于构建 API 的框架,支持异步和同步 |
| Uvicorn | Tomcat / Jetty / Undertow |
一个 ASGI 服务器,负责接收 HTTP 请求并交给 FastAPI 处理 |
| ASGI | Servlet API / WebFlux |
协议标准,定义了应用和服务器之间如何通信 |
✅ 假设你写了一个 Java Spring Boot 应用,它运行在 Tomcat 上 —— 这样:
Spring Boot=FastAPITomcat=UvicornServlet API=ASGI
💡 FastAPI 和 Uvicorn 如何协作?
# main.py
from fastapi import FastAPI

app = FastAPI()

@app.get("/")
def home():
    return {"message": "Hello from FastAPI!"}
然后启动:
uvicorn main:app --reload
main:app:表示文件名main.py中的变量app--reload:开发模式,代码变更自动重启热重载模式uvicorn:作为 ASGI 服务器,监听 8000 端口
🧠 类比:就像你用
mvn spring-boot:run启动 Spring Boot 应用一样!
🚀 问题二:ASGI 是什么?
✅ 简单回答:
- ASGI(Asynchronous Server Gateway Interface)是 Python 的异步 Web 协议标准
- 它是 WSGI 的升级版,支持 异步请求处理(像
async/await)
🔍 详细解释(类比 Java)
| 概念 | Java 对应 | 说明 |
|---|---|---|
| WSGI | Servlet API(同步) |
传统 Python Web 标准,每个请求由线程处理 |
| ASGI | WebFlux / Reactive |
支持异步 IO,适合高并发、长连接场景(如 WebSocket) |
✅ 举个例子:
你有一个 Java Spring 应用,它用@Async或CompletableFuture实现异步。
在 Python 中,ASGI 就相当于这个“异步能力”的底层协议。
⚠️ 为什么需要 ASGI?
| 场景 | WSGI | ASGI |
|---|---|---|
| 同步请求 | ✅ | ✅ |
异步请求(如 async def) |
❌ | ✅ |
| WebSocket | ❌ | ✅ |
| 长轮询 | ❌ | ✅ |
🧠 想象:如果你的 Java 应用有很多数据库查询、外部 API 调用,用了
CompletableFuture,那么 Python 的async/await+ASGI就是类似的。
📦 常见 ASGI 服务器(类似 Tomcat)
| 名称 | 类似 Java 中的 |
|---|---|
Uvicorn |
Tomcat / Jetty |
Hypercorn |
Netty |
Daphne |
Django Channels 的服务器 |
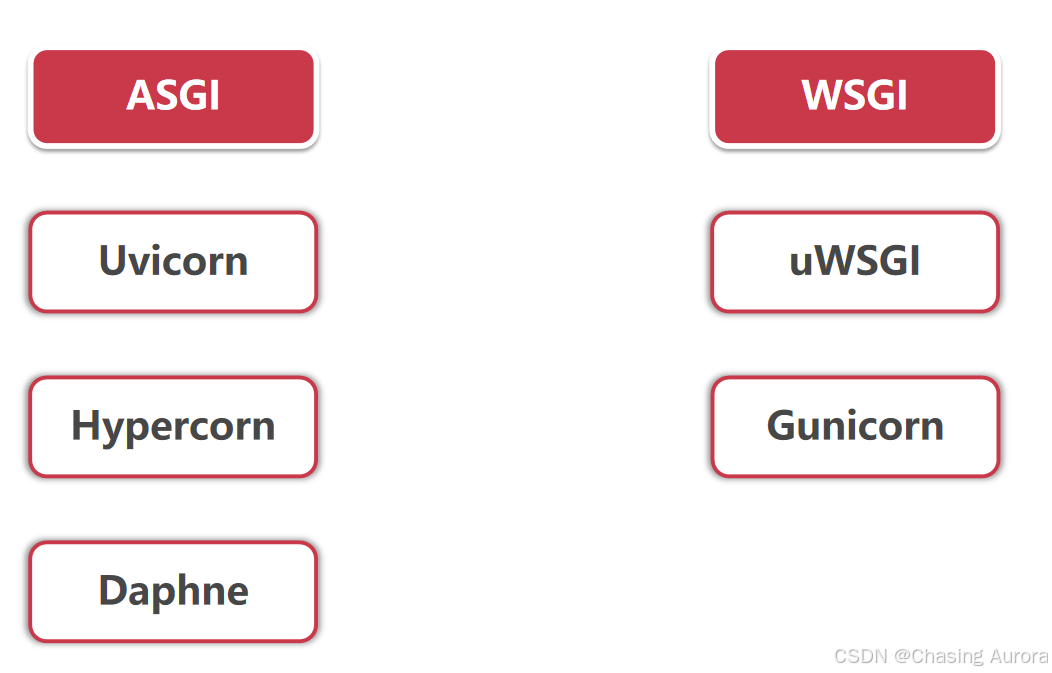
ASGI-Uvicorn-FastApi,WSGI-Gunicorn-Flask,全栈用Djanjo
🚀 问题三:FastAPI vs Flask vs Django,区别与优势
我们从 架构、性能、易用性、适用场景 来对比,方便你根据 Java 背景快速理解。
📊 三方对比表
| 特性 | Flask | Django | FastAPI |
|---|---|---|---|
| 架构 | 微框架(Microframework) | 全栈框架(Batteries-included) | 微框架 + 强大功能 |
| 同步/异步 | 同步为主 | 同步为主 | 支持异步(async/await) |
| 性能 | 中等 | 中等 | ⭐ 最高(接近 Node.js) |
| 数据验证 | 手动或 WTForms |
Django Forms |
自动 JSON Schema 验证(用 Pydantic) |
| 文档 | 手动生成 Swagger UI | 自动生成文档 | ⭐ 自动生成 OpenAPI docs(Swagger + ReDoc) |
| 依赖注入 | 无原生支持 | 内置 | 有(通过 Depends()) |
| 学习成本 | 低 | 高 | 中等(但有强大 IDE 支持) |
| 适用场景 | 小型 API、轻量服务 | 企业级 CMS、复杂业务系统 | 高性能 API、微服务、数据接口 |
🔍 深度解析
| 项目 | 类比 Java | 说明 |
|---|---|---|
| Flask | Spring Boot with minimal starter |
轻量,自由度高,适合小项目 |
| Django | Spring Security + Spring Data JPA + Thymeleaf |
功能全,自带 ORM、Admin、Auth 等 |
| FastAPI | Spring WebFlux + OpenAPI + RxJava |
现代化、异步、自动化文档、类型安全 |
✅ FastAPI 的核心优势——❤️
1. 自动生成 API 文档(Auto Docs)
- 内置 Swagger UI 和 ReDoc
- 不用手写文档,直接访问
http://localhost:8000/docs
🧠 类比:就像你在 Spring Boot 中用
@RestController+@GetMapping,然后自动生成 Springfox 文档。
2. 类型驱动开发(Type Hints + Pydantic)
- 所有参数都自动验证,把python的弱类型变成了java 的强类型解析
- 错误提示清晰,防止脏数据进入
from fastapi import FastAPI
from pydantic import BaseModel

class Item(BaseModel):
    name: str
    price: float

app = FastAPI()

@app.post("/items/")
def create_item(item: Item):
    return {"name": item.name, "price": item.price}
🧠 类比:就像 Java 的
@Valid+@RequestBody,但更直观、强类型!
3. 异步支持(async/await)
- 支持高并发 I/O 操作(数据库、HTTP 请求)
- 适合做高负载 API
import asyncio
from fastapi import FastAPI

app = FastAPI()

@app.get("/slow")
async def slow():
    await asyncio.sleep(2)
    return {"message": "Done"}
🧠 类比:就像 Java 的
@Async或CompletableFuture,但语法更简洁。
4. 性能媲美 Go / Node.js
- 使用 Starlette + Uvicorn + Pydantic
- 在基准测试中,FastAPI 比 Flask 快 5~10 倍
- Starlette 是一个轻量级的ASGI 框架/工具包,非常适合用于构建Python 异步Web 服务
🧠 类比:就像
Spring Boot + Netty的性能表现
✅ 总结建议
| 目标 | 推荐框架 |
|---|---|
| 快速上手、做小 API | ✅ Flask |
| 企业级项目、带 Admin、Auth | ✅ Django |
| 高性能、异步、自动化文档 | ✅ FastAPI |
💡 你现在已经有 Flask 基础,接下来可以尝试:
- 用 FastAPI 重写一个简单的 API
- 体验
@app.get("/")+async/await- 访问
/docs查看自动文档- 比较性能差异(可以用
wrk或ab测试)
🌟 补充:推荐学习路径
Flask (已学)
   ↓
FastAPI (重点学习) → 适合未来 API 服务
   ↓
Django (可选) → 适合全栈项目
Web进阶——Flask 框架
🌟 第一步:为什么 Flask 是 Python 的“Spring Boot”?
| Java | Python |
|---|---|
| Spring Boot(全栈) | Flask(轻量级) / Django(全栈) |
| @Controller + @RequestMapping | @app.route() |
| @Service + @Autowired | 自定义函数 + 模块导入 |
| Spring MVC | WSGI(Web Server Gateway Interface) |
✅ Flask 就是 Python 版的“小而美”的 Spring Boot!
第二步:安装 Flask 并运行第一个程序
🔧 1. 安装 Flask
pip install flask
📁 2. 创建文件 app.py
from flask import Flask, render_template, jsonify, request

# 创建 Flask 应用实例 —— 类似于 Java 中的 SpringApplication
app = Flask(__name__)

# 路由(类似 @RequestMapping("/hello"))
@app.route('/')
def home():
    return "<h1>Hello from Flask!</h1>"

# 路由:带参数的路径(类似 @PathVariable)
@app.route('/hello/<name>')
def greet(name):
    return f"<h1>Hello, {name}!</h1>"

# 路由:返回 JSON(类似 REST API 返回 JSON)
@app.route('/api/users')
def get_users():
    users = [
        {"id": 1, "name": "Alice"},
        {"id": 2, "name": "Bob"},
        {"id": 3, "name": "Charlie"}
    ]
    return jsonify(users)  # 返回 JSON 格式数据

# 路由:处理 POST 请求(类似 @PostMapping)
@app.route('/api/user', methods=['POST'])
def create_user():
    data = request.json  # 获取前端发送的 JSON 数据
    name = data.get("name")
    if not name:
        return jsonify({"error": "Name is required"}), 400

    return jsonify({
        "message": "User created!",
        "user": {"id": 100, "name": name}
    }), 201

# 启动服务器(类似 Java 的 main 方法)
if __name__ == '__main__':
    app.run(debug=True)
📝 注释说明
Flask(__name__):创建应用对象,类似于SpringApplication.run(App.class)@app.route('/'):映射 URL 到函数,类似@GetMapping("/")jsonify():将 Python 字典转为 JSON 响应request.json:获取前端提交的 JSON 数据methods=['POST']:指定请求方法,支持 GET/POST/PUT/DELETEdebug=True:开启调试模式,自动重启 + 错误页面好看
🔧 3. 运行服务
python app.py
访问以下地址:
http://localhost:5000/→ 显示Hello from Flask!http://localhost:5000/hello/Alice→ 显示Hello, Alice!http://localhost:5000/api/users→ 返回用户列表 JSONhttp://localhost:5000/api/user→ 发送 POST 请求添加用户
💡 使用工具测试:Postman 或 curl
curl -X POST http://localhost:5000/api/user \
     -H "Content-Type: application/json" \
     -d '{"name": "David"}'
第三步:使用模板渲染 HTML 页面(类似 JSP/Thymeleaf)
我们想在浏览器中显示一个动态页面。
📁 步骤 1:创建目录结构
project/
├── app.py
└── templates/
    └── index.html
📄 步骤 2:创建 templates/index.html
<!DOCTYPE html>
<html>
<head>
    <title>Flask Template</title>
</head>
<body>
    <h1>Welcome to Flask!</h1>
    <p>This page is rendered by Flask template engine.</p>

    <!-- 循环显示用户 -->
    {% for user in users %}
        <p>{{ user.name }} (ID: {{ user.id }})</p>
    {% endfor %}

    <!-- 表单提交 -->
    <form method="post" action="/submit">
        Name: <input type="text" name="name"><br>
        <input type="submit" value="Submit">
    </form>
</body>
</html>
📁 步骤 3:修改 app.py 添加模板渲染功能
from flask import Flask, render_template, request, jsonify

app = Flask(__name__)

# 用户数据(模拟数据库查询)
users = [
    {"id": 1, "name": "Alice"},
    {"id": 2, "name": "Bob"},
    {"id": 3, "name": "Charlie"}
]

# 路由:渲染 HTML 页面
@app.route('/')
def home():
    return render_template('index.html', users=users)

# 路由:处理表单提交(POST)
@app.route('/submit', methods=['POST'])
def submit():
    name = request.form['name']
    return f"<h1>You submitted: {name}</h1>"
🔧 测试
python app.py
打开浏览器:
http://localhost:5000/→ 显示用户名列表和表单- 提交名称 → 显示成功信息
✅ 类比 Java:JSP 渲染页面 + Servlet 处理表单
第四步:连接 MySQL 数据库(使用 SQLAlchemy——ORM)
我们将:
- 连接 MySQL
- 定义用户模型
- 实现增删改查(CRUD)
🔧 1. 安装依赖
pip install flask-sqlalchemy pymysql
pymysql是 Python 的 MySQL 驱动
📁 2. 创建 config.py(配置文件) 类似application.properties
# config.py
import os

class Config:
    # 数据库连接字符串
    SQLALCHEMY_DATABASE_URI = 'mysql+pymysql://username:password@localhost/flask_db'
    SQLALCHEMY_TRACK_MODIFICATIONS = False
    SECRET_KEY = 'your-secret-key-here'  # 用于 CSRF 等安全功能
⚠️ 请替换为你自己的数据库账号密码和数据库名
📁 3. 修改 app.py
from flask import Flask, render_template, request, jsonify
from flask_sqlalchemy import SQLAlchemy
from config import Config

# 创建 Flask 应用
app = Flask(__name__)
app.config.from_object(Config)  # 加载配置

# 初始化数据库
db = SQLAlchemy(app)

# 定义 User 模型
class User(db.Model):
    id = db.Column(db.Integer, primary_key=True)
    name = db.Column(db.String(50), nullable=False)
    email = db.Column(db.String(100), unique=True, nullable=False)

    def to_dict(self):
        return {
            "id": self.id,
            "name": self.name,
            "email": self.email
        }

# 创建数据库表(如果不存在)
with app.app_context():
    db.create_all()

# 路由:首页展示所有用户
@app.route('/')
def home():
    users = User.query.all()  # 查询所有用户
    return render_template('index.html', users=users)

# 路由:API - 获取所有用户
@app.route('/api/users')
def api_users():
    users = User.query.all()
    return jsonify([user.to_dict() for user in users])

# 路由:API - 添加新用户
@app.route('/api/users', methods=['POST'])
def add_user():
    data = request.json
    name = data.get('name')
    email = data.get('email')

    if not name or not email:
        return jsonify({"error": "Name and email are required"}), 400

    # 检查邮箱是否已存在
    if User.query.filter_by(email=email).first():
        return jsonify({"error": "Email already exists"}), 409

    new_user = User(name=name, email=email)
    db.session.add(new_user)
    db.session.commit()

    return jsonify(new_user.to_dict()), 201

# 路由:删除用户
@app.route('/api/users/<int:user_id>', methods=['DELETE'])
def delete_user(user_id):
    user = User.query.get(user_id)
    if not user:
        return jsonify({"error": "User not found"}), 404

    db.session.delete(user)
    db.session.commit()
    return jsonify({"message": "User deleted"}), 200

# 启动服务器
if __name__ == '__main__':
    app.run(debug=True)
📝 注释说明
SQLAlchemy:Python ORM,类似 Java 的 JPA/Hibernatedb.Model:继承自模型类db.Column:字段类型(Integer, String, etc.)query.all():等价于SELECT * FROM usersdb.session.add()/commit():插入/更新数据User.query.get(id):按 ID 查找.to_dict():方便转换成 JSON
第五步:测试数据库操作
🛠️ 1. 创建 MySQL 数据库
CREATE DATABASE flask_db;
USE flask_db;

-- 创建用户表
CREATE TABLE users (
    id INT AUTO_INCREMENT PRIMARY KEY,
    name VARCHAR(50) NOT NULL,
    email VARCHAR(100) UNIQUE NOT NULL
);
🛠️ 2. 运行 Flask 应用
python app.py
🛠️ 3. 使用 Postman 测试 API
✅ 获取用户列表
GET http://localhost:5000/api/users
✅ 添加用户
POST http://localhost:5000/api/users
Content-Type: application/json

{
  "name": "Diana",
  "email": "diana@example.com"
}
✅ 删除用户
DELETE http://localhost:5000/api/users/1
第六步:完整项目结构(推荐)
flask_project/
├── app.py
├── config.py
├── requirements.txt
├── templates/
│   └── index.html
└── migrations/
    └── (如果有 alembic 迁移文件)
总结:从 Java 到 Flask 的类比
| Java | Python (Flask) |
|---|---|
@SpringBootApplication |
app = Flask(__name__) |
@RestController |
@app.route() |
@Autowired UserService |
from models import User |
@Entity |
class User(db.Model) |
@Query 或 EntityManager |
User.query.all() |
application.properties |
config.py |
Tomcat |
Flask development server |
JPA |
SQLAlchemy |
HTML + Thymeleaf |
渲染render_template('index.html') |
REST API |
jsonify() + request.json |
Web进阶——FastAPI框架
1. 快速对比:FastAPI vs Flask
| 特性 | Flask | FastAPI |
|---|---|---|
| 类型提示 | ❌ 支持有限 | ✅ 全面支持 |
| 自动生成 API 文档 | ❌ 需要扩展(如 Swagger) | ✅ 自动提供 OpenAPI / Swagger / ReDoc |
| 异步支持 | ❌ 有限 | ✅ 原生支持异步(async/await) |
| 性能 | 中等 | ⚡️ 极高(基于 Starlette + Pydantic) |
| 数据验证 | ❌ 手动或第三方库 | ✅ 内置 Pydantic |
| 推荐场景 | 小型应用、学习 | 生产级、微服务、API 服务 |
2. 快速入门:用 5 分钟启动一个 FastAPI 应用
1. 安装
pip install fastapi uvicorn
fastapi:框架核心uvicorn:ASGI 服务器(类比 Tomcat/Jetty)
2. 创建 main.py
from fastapi import FastAPI
from pydantic import BaseModel
import asyncio

app = FastAPI()

# 1. 定义数据模型(类似 Java POJO)
class Item(BaseModel):
    name: str
    price: float
    is_offer: bool = None  # 可选字段

# 2. 路由:GET 请求
@app.get("/")
def read_root():
    return {"message": "Hello World"}

# 3. 路由:POST 请求
@app.post("/items/")
async def create_item(item: Item):  # 自动类型检查 + JSON 解析
    return item

# 4. 路由:路径参数
@app.get("/items/{item_id}")
async def read_item(item_id: int, q: str = None):
    return {"item_id": item_id, "q": q}
3. 启动服务
uvicorn main:app --reload
main:app:模块名:应用对象--reload:开发模式,代码变化自动重启,热重载
访问:
- http://localhost:8000/docs → 自动生成文档(Swagger UI)
- http://localhost:8000/redoc → ReDoc 文档
3. 核心概念(类比Java 风格解释)
| Java 概念 | FastAPI 对应 | 说明 |
|---|---|---|
@Controller |
@app 路由装饰器 |
@app.get()、@app.post() |
@RequestMapping |
@app.route() |
但 FastAPI 使用更清晰的 @get, @post |
@RequestBody |
def func(item: Item) |
参数自动从 JSON 绑定到 Pydantic 模型 |
@RequestParam |
def func(q: str = None) |
查询参数,可选,默认值 |
@PathVariable |
def func(item_id: int) |
路径参数 |
| DTO(Data Transfer Object) | Pydantic Model |
数据校验 + 序列化 |
| Spring Boot Actuator | FastAPI 自带 /docs |
文档、健康检查 |
| Spring Validation | Pydantic | 字段验证(类型、必填、范围等) |
| Async IO | async def |
异步非阻塞,提升性能 |
4. 数据模型:Pydantic(类似“DTO”)
Pydantic 是一个用于数据验证和序列化的 Python 模型库
它在 FastAPI 中广泛使用,用于定义请求体、响应体和其他数据模型,提供了强大的类型检查和自动文档生成功能。
只需创建一个继承自 pydantic.BaseModel 的类,并在其中定义字段
所有参数都自动验证,把python的弱类型变成了java 的强类型解析
from pydantic import BaseModel

class User(BaseModel):
    id: int
    name: str
    email: str
    age: int = None  # 可选
    disabled: bool = False

# 自动验证和错误提示
user_data = {
    "id": 1,
    "name": "Alice",
    "email": "alice@example.com"
}

user = User(**user_data)  # 常见的写法!
# ✅ 如果数据合法,创建成功
# 否则 会引发ValidationError异常
🔍 类似 Java 的
@Validated+@NotBlank+@Min(18),但更简洁!
pydantic.Field() 函数
- 在 Pydantic 中,BaseModel 用于定义数据模型,而 Field 提供了字段的元数据和验证约束功能。通过 Field,可以设置默认值、别名、验证规则
- Field 生成一个
FieldInfo对象,存储字段的元数据(如默认值、约束),Pydantic 在验证和序列化时使用这些信息 - Field 配合类型注解(如 str、int)增强验证,确保类型安全
- 默认值与必填字段 使用
Field(default)设置默认值,或用...表示字段为必填项。 - 验证约束 数值:
gt(大于)、ge(大于等于)、lt(小于)、le(小于等于)。 字符串:min_length(最小长度)、max_length(最大长度)、pattern(正则表达式) - 别名与序列化 使用
alias定义字段别名,支持输入/输出时的键名映射 - 动态默认值 通过
default_factory动态生成默认值,例如uuid.uuid4或当前时间id: str = Field(default_factory=lambda: str(uuid4()))
from pydantic import BaseModel, Field

class Item(BaseModel):
    name: str = Field(..., min_length=1, description="Item name")
    price: float = Field(gt=0, le=1000, default=0.0)
5. 异步 API:像写 Spring WebFlux 一样
from fastapi import FastAPI
import asyncio

app = FastAPI()

@app.get("/slow")
async def slow():
    await asyncio.sleep(2)
    return {"message": "I'm slow!"}
✅ 类比:Spring 的
@Async+CompletableFuture
6. 错误处理:类似 Java 的异常处理
from fastapi import FastAPI, HTTPException
from fastapi.responses import JSONResponse

app = FastAPI()

@app.get("/items/{item_id}")
async def read_item(item_id: int):
    if item_id <= 0:
        raise HTTPException(status_code=400, detail="Item ID must be positive")
    return {"item_id": item_id}
✅ 类似 Java 的
throw new IllegalArgumentException("...")
7. 工程化建议:项目结构(适合团队协作)
my_fastapi_project/
├── main.py                  # 主入口
├── app/
│   ├── __init__.py
│   ├── routers/
│   │   ├── users.py         # 用户路由
│   │   └── items.py         # 商品路由
│   ├── dependencies.py      # 依赖注入(类似 Spring @Autowired)
│   └── models.py            # Pydantic 模型
├── schemas/
│   └── user.py              # 数据模型(可选)
├── database/
│   └── db.py                # 数据库连接
└── requirements.txt
示例:app/routers/users.py
from fastapi import APIRouter, Depends, HTTPException
from .models import User

router = APIRouter()

@router.get("/users")
async def get_users():
    return [{"name": "Alice"}, {"name": "Bob"}]
示例:main.py 主入口
from fastapi import FastAPI
from app.routers import users, items

app = FastAPI(title="My API")

app.include_router(users.router)
app.include_router(items.router)
8. 依赖注入:类似 Spring 的 @Autowired
引入了 Depends,使用的时候Depends()
from fastapi import Depends

# 1. 定义依赖
def get_db():
    return {"db": "connected"}

# 2. 在路由中使用
@app.get("/data")
async def read_data(db=Depends(get_db)):
    return db
✅ 类似:Spring 的
@Autowired+@Bean
9. FastAPI 交互式 API 文档
FastAPI 内置支持 Swagger UI 和 ReDoc 两种交互式 API 文档,基于 OpenAPI 规范自动生成。开发者可以通过以下地址访问:
| 地址 | 文档类型 | 特点 |
|---|---|---|
| http://127.0.0.1:8000/docs | Swagger UI | 可交互测试,点击"Try it out"即可发送请求 |
| http://127.0.0.1:8000/redoc | ReDoc | 阅读体验好,适合浏览和查阅 API 定义 |
| http://127.0.0.1:8000/openapi.json | OpenAPI JSON | 原始的 OpenAPI 规范 JSON,可供工具消费 |
这些文档实时更新,支持直接测试 API 请求,极大提高了开发效率
from fastapi import FastAPI

app = FastAPI(
    title="我的 API",                    # API 标题
    description="这是一个示例 API,展示文档自定义功能",  # API 描述
    version="1.0.0",                    # API 版本
    terms_of_service="http://example.com/terms/",  # 服务条款 URL
    contact={                           # 联系信息
        "name": "开发者",
        "url": "http://example.com/contact/",
        "email": "dev@example.com",
    },
    license_info={                      # 许可证信息
        "name": "MIT",
        "url": "https://opensource.org/licenses/MIT",
    },
)
健康路径/health是什么
- 判断服务死活:外部工具(服务器、容器、监控平台)访问这个接口,能快速知道你的 Python 服务是否正常运行、能正常响应请求。
- 无业务逻辑:它不处理核心功能,只返回一个简单结果(比如
{"status": "ok"}),开销极小。 - 通用标准:行业通用约定,不是 Python 独有,所有语言写的服务都常用这个路径
@app.get("/health")
def health() -> dict[str, str]:
    return {"status": "ok"}
/health 就是给你的 Python Web 服务加一个极简的 “心跳接口”,专门用来告诉外界:我还在正常运行。
Typing 模块——类型注解
- JSON Schema 是一种用于描述和验证 JSON 数据结构的规范。它提供了一种标准化的方法来定义 JSON 数据的格式、类型、约束和关系,从而确保数据的一致性
- 注意:typing模块只有在python3.5以上的版本中才可以使用
- FastAPI 开发:FastAPI 基于类型注解实现数据校验和 OpenAPI 文档生成,没有类型注解,FastAPI 的自动校验和文档生成功能将无法使用;
- LLM 应用开发:LangChain、FastGPT 等 LLM 应用框架会根据类型注解识别工具参数的类型和格式,从而让大模型更准确地调用工具。
- 基础类型注解 不用显示导入
- 复合类型注解 需要显示导入
from typing import List, Dict, Tuple - 建议使用 Python 3.10 或更高版本,因为这些版本引入了新的类型注解工具,如联合类型的新写法、类型守卫等

中国智能体开发者社区,聚焦智能体与大模型开发,提供前沿资讯、实用工具链、开源项目及行业案例。通过技术沙龙、开发者大赛等活动,促进经验交流与协作,助力开发者快速构建创新智能应用。
更多推荐
 10
10 0
0- 0


 已为社区贡献1条内容

所有评论(0)