React+AntDesign实现类似Chatgpt交互界面
以下是一个基于React和Ant Design搭建的简单ChatGPT风格前端交互界面代码框架示例,该示例实现了基本的用户输入、发送请求以及展示回复的功能。请注意,上述代码中的/api/chat是模拟的后端API地址,实际应用中你需要将其替换为真实的与ChatGPT模型交互的后端接口地址。• handleSend函数在用户点击发送按钮或按下回车键时触发,它先将用户输入添加到对话列表,然后模拟向后端
·
以下是使用React和Ant Design实现类ChatGPT交互界面的完整方案,结合企业级实践与最新技术趋势:
一、架构设计(基于Ant Design X)
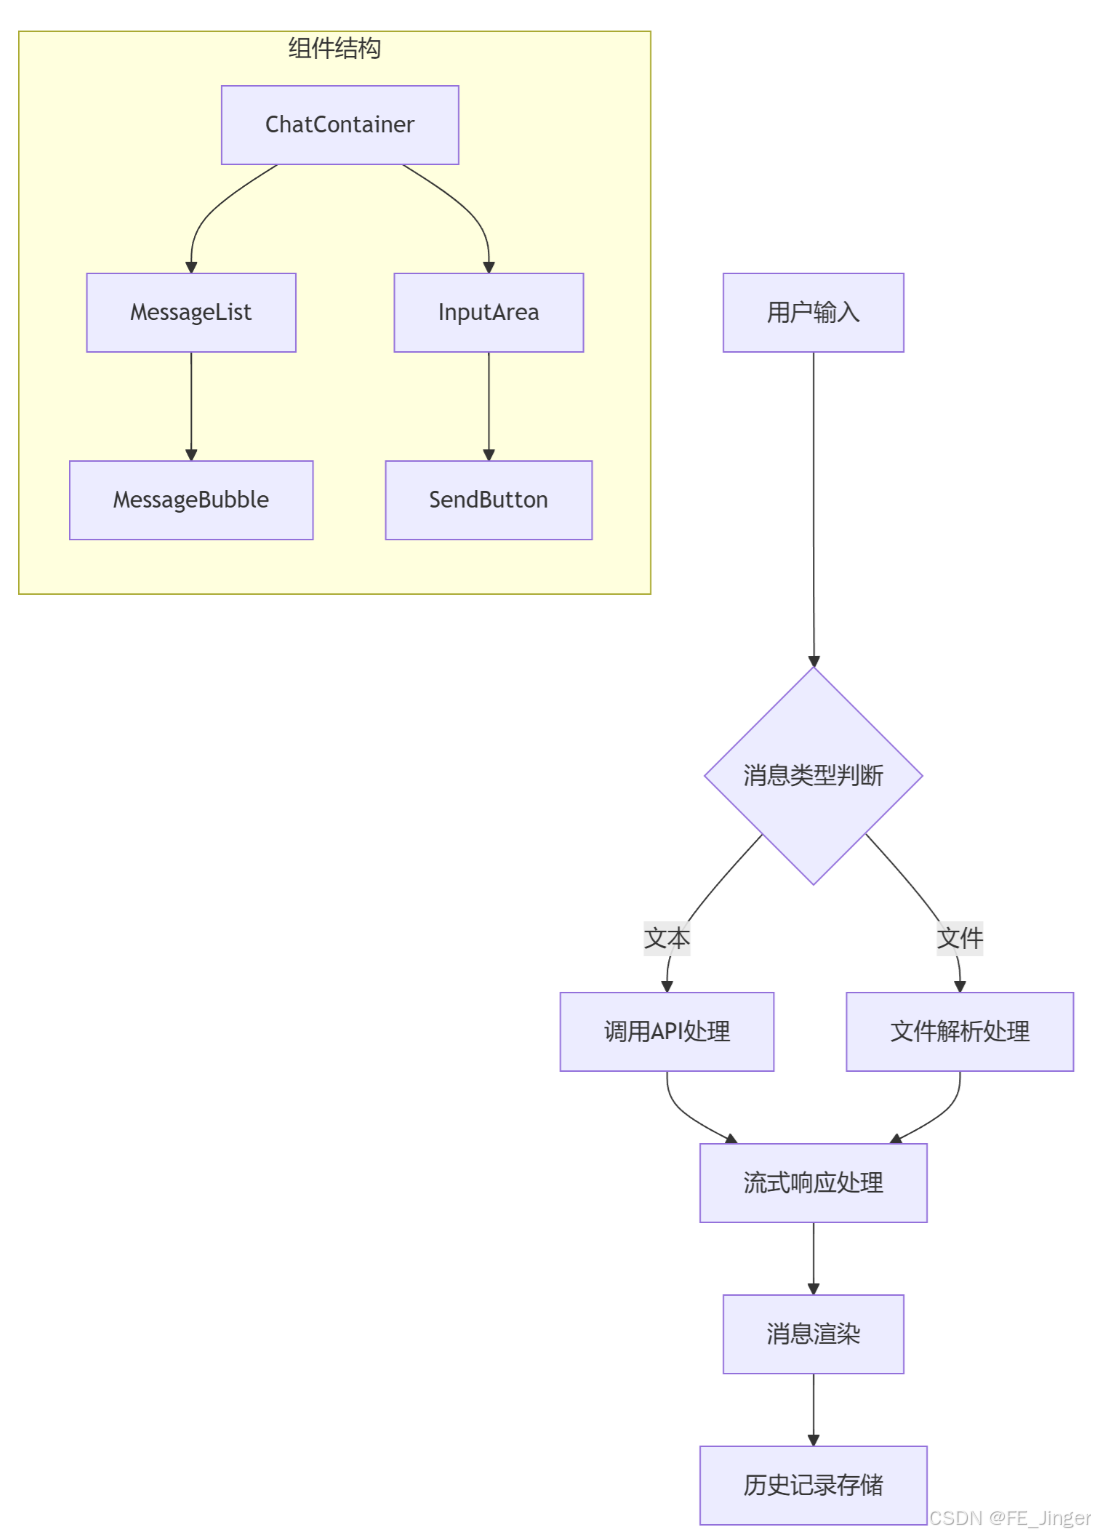
graph TD
    A[用户输入] --> B{消息类型判断}
    B -->|文本| C[调用API处理]
    B -->|文件| D[文件解析处理]
    C --> E[流式响应处理]
    D --> E
    E --> F[消息渲染]
    F --> G[历史记录存储]

    subgraph 组件结构
    H[ChatContainer] --> I[MessageList]
    H --> J[InputArea]
    I --> K[MessageBubble]
    J --> L[SendButton]
    end
二、核心实现步骤
1. 项目初始化
npx create-react-app chatgpt-clone
cd chatgpt-clone
npm install antd @ant-design/icons openai @ant-design/x
2. 消息组件开发(Ant Design X风格)
// src/components/AIChatBubble.tsx
import { Bubble, Sender } from '@ant-design/x';
import { UserOutlined, RobotOutlined } from '@ant-design/icons';

interface MessageBubbleProps {
  content: string;
  sender: 'user' | 'assistant';
  timestamp: string;
}

const AIChatBubble = ({ content, sender, timestamp }: MessageBubbleProps) => {
  const bubbleProps = {
    avatar: sender === 'user' ? <UserOutlined /> : <RobotOutlined />,
    content: (
      <div className="chat-content">
        <div className="bubble-header">
          <span>{timestamp}</span>
        </div>
        <div className="bubble-body" dangerouslySetInnerHTML={{ __html: content }} />
      </div>
    )
  };

  return sender === 'user' ? (
    <Bubble.Right {...bubbleProps} />
  ) : (
    <Bubble.Left {...bubbleProps} />
  );
};

export default AIChatBubble;
3. 对话容器实现
// src/components/AIChatContainer.tsx
import { useState, useRef, useEffect } from 'react';
import { Input, Button, List, Spin } from 'antd';
import { SendOutlined } from '@ant-design/icons';
import { ChatAgent } from '@ant-design/x';
import AIChatBubble from './AIChatBubble';
import { OpenAI } from 'openai';

const AIChatContainer = () => {
  const [messages, setMessages] = useState([]);
  const [inputValue, setInputValue] = useState('');
  const [loading, setLoading] = useState(false);
  const messagesEndRef = useRef<HTMLDivElement>(null);
  const agent = new ChatAgent({
    baseURL: 'https://api.openai.com/v1',
    model: 'gpt-3.5-turbo',
    apiKey: 'sk-your-key'
  });

  // 自动滚动到底部
  const scrollToBottom = () => {
    messagesEndRef.current?.scrollIntoView({ behavior: 'smooth' });
  };

  // 处理消息发送
  const handleSend = async () => {
    if (!inputValue.trim()) return;

    const userMessage = {
      id: Date.now(),
      sender: 'user',
      content: inputValue,
      timestamp: new Date().toLocaleTimeString()
    };

    setMessages(prev => [...prev, userMessage]);
    setInputValue('');
    setLoading(true);

    try {
      const stream = await agent.streamChat({
        messages: messages.concat(userMessage),
        stream: true
      });

      const reader = stream.getReader();
      let aiContent = '';

      while (true) {
        const { done, value } = await reader.read();
        if (done) break;
        const chunk = new TextDecoder().decode(value);
        aiContent += chunk;
        setMessages(prev => {
          const last = prev[prev.length - 1](@ref);
          if (last.sender === 'assistant') {
            return [...prev.slice(0, -1), { ...last, content: aiContent }];
          }
          return prev;
        });
      }
    } catch (error) {
      console.error('API Error:', error);
    } finally {
      setLoading(false);
    }
  };

  // 按Enter发送
  const handleKeyPress = (e: React.KeyboardEvent) => {
    if (e.key === 'Enter' && !loading) handleSend();
  };

  useEffect(scrollToBottom, [messages]);

  return (
    <div className="ai-chat-container">
      <List
        className="message-list"
        dataSource={messages}
        renderItem={item => (
          <List.Item>
            <AIChatBubble
              content={item.content}
              sender={item.sender}
              timestamp={item.timestamp}
            />
          </List.Item>
        )}
        footer={<div ref={messagesEndRef} />}
      />

      <div className="input-area">
        <Input
          value={inputValue}
          onChange={e => setInputValue(e.target.value)}
          onPressEnter={handleKeyPress}
          placeholder="请输入问题..."
          suffix={
            <Button
              type="primary"
              icon={<SendOutlined />}
              onClick={handleSend}
              loading={loading}
              disabled={loading}
            />
          }
        />
      </div>
    </div>
  );
};

export default AIChatContainer;
三、关键功能实现
1. 流式响应处理(逐字输出效果)
// 使用Ant Design X的流式处理
const stream = await agent.streamChat({
  messages: messages,
  stream: true
});

const reader = stream.getReader();
let aiContent = '';

while (true) {
  const { done, value } = await reader.read();
  if (done) break;
  const chunk = new TextDecoder().decode(value);
  aiContent += chunk;
  setMessages(prev => {
    const last = prev[prev.length - 1](@ref);
    if (last.sender === 'assistant') {
      return [...prev.slice(0, -1), { ...last, content: aiContent }];
    }
    return prev;
  });
}
2. 历史记录管理(本地持久化)
// 使用localStorage持久化
const loadHistory = () => {
  const history = localStorage.getItem('chatHistory');
  return history ? JSON.parse(history) : [];
};

const saveHistory = (messages: any[]) => {
  localStorage.setItem('chatHistory', JSON.stringify(messages));
};

// 在组件中使用
useEffect(() => {
  const history = loadHistory();
  setMessages(history);
}, []);

useEffect(() => {
  saveHistory(messages);
}, [messages]);
四、样式优化(Ant Design定制)
1. 主题配置
// src/theme.ts
import { ConfigProvider, theme } from 'antd';
import { createStyles } from 'antd-style';

export const { token } = theme.useToken();
export const useStyles = createStyles(({ token }) => ({
  container: {
    backgroundColor: token.colorBgLayout,
    borderRadius: token.borderRadiusLG,
    boxShadow: token.boxShadow,
    height: '100vh',
    display: 'flex',
    flexDirection: 'column'
  },
  bubble: {
    maxWidth: '70%',
    padding: token.paddingLG,
    borderRadius: token.borderRadiusSM,
    wordBreak: 'break-word'
  },
  inputArea: {
    borderTop: `1px solid ${token.colorSplit}`,
    backgroundColor: token.colorBgElevated
  }
}));
2. 自定义样式
// src/components/AIChatBubble.tsx
const useStyles = createStyles(({ token }) => ({
  userBubble: {
    backgroundColor: token.colorPrimary,
    color: token.colorBgContainer,
    '&:hover': {
      boxShadow: `0 2px 8px ${token.colorBgContainer}20`
    }
  },
  assistantBubble: {
    backgroundColor: token.colorBgContainer,
    color: token.colorText,
    border: `1px solid ${token.colorSplit}`
  }
}));
五、高级功能扩展
1. 文件上传处理
// 文件解析逻辑
const handleFileUpload = async (file: File) => {
  const formData = new FormData();
  formData.append('file', file);

  const response = await agent.uploadFile(formData);
  const fileContent = await response.parse();
  setInputValue(fileContent);
};
2. 思维链可视化
// 使用Ant Design X的思维链组件
import { ThoughtChain } from '@ant-design/x';

const ThoughtChainDemo = () => (
  <ThoughtChain
    steps={[
      { type: 'analysis', content: '识别用户核心需求' },
      { type: 'verification', content: '检查可行性方案' }
    ]}
  />
);
六、性能优化策略
-
虚拟滚动
使用
react-window优化长列表渲染:import { FixedSizeList } from 'react-window'; const MessageList = ({ messages }) => ( <FixedSizeList height={600} itemCount={messages.length} itemSize={80} width="100%" > {({ index, style }) => ( <MessageBubble style={style} {...messages[index]} /> )} </FixedSizeList> ); -
Web Worker
将文本处理逻辑移至Worker:
// worker.ts
self.onmessage = (e) => {
  const processedText = e.data.toUpperCase();
  self.postMessage(processedText);
};

// 主线程
const worker = new Worker('./worker.ts');
worker.postMessage(userInput);
七、完整项目结构
src/
├── components/
│   ├── AIChatContainer.tsx
│   ├── AIChatBubble.tsx
│   └── InputArea.tsx
├── hooks/
│   └── useChatHistory.ts
├── styles/
│   └── theme.ts
├── utils/
│   └── api.ts
└── App.tsx
八、调试与部署
-
错误边界
class ErrorBoundary extends Component { state = { hasError: false }; static getDerivedStateFromError() { return { hasError: true }; } componentDidCatch(error) { logErrorToService(error); } render() { return this.state.hasError ? <FallbackUI /> : this.props.children; } } -
Docker部署
FROM node:18-alpine
WORKDIR /app
COPY package*.json ./
RUN npm ci --omit=dev
COPY . .
RUN npm run build
CMD ["npm", "start"]
通过以上方案,可快速搭建具备企业级特性的AI对话系统。建议结合具体业务需求,扩展语音交互、知识库检索等高级功能。

火山引擎开发者社区是火山引擎打造的AI技术生态平台,聚焦Agent与大模型开发,提供豆包系列模型(图像/视频/视觉)、智能分析与会话工具,并配套评测集、动手实验室及行业案例库。社区通过技术沙龙、挑战赛等活动促进开发者成长,新用户可领50万Tokens权益,助力构建智能应用。
更多推荐
 23
23 0
0- 0


 已为社区贡献2条内容

所有评论(0)