GraphRAG完整搭建指南:避坑全攻略
在使用微软的graphrag包进行知识图谱的搭建中我遇到了几个意料之外的问题(这包的官方文档可真是太简洁了),查询了多方资料都难以收集到一个完整的解决方法,在这里我将汇集我遇到的所有问题,争取能让大家一次性就搭建一个完整的知识图谱,不用去体悟简洁到不能再简洁的文档来debug。这里是官方文档:Welcome - GraphRAG。
在开始之前需要安装好0.9.3版本以上的vllm,否则你需要获得OpenAI的官方API来进行实验(由于GraphRAG的构建需要频繁调用LLM,使用大量的token,如果不在本地部署的话可能会需要充值才能满足调用的需求),或者国内的几个大厂商(注意接口必须符合OpenAI的接口规范,否则无法使用)的模型比如MiniMax的模型。并且最好拥有一块24G显存的显卡(如果是使用官方API接口的话则不需要,8G即可)。
以下内容我均按照本地部署的流程进行,如果你使用的是API接口也没关系,只需要在一个地方(我之后会提到)稍微修改即可。
1. 首先做好LLM模型和Embedding模型的部署准备:
尽量不要选择太过于小的模型,因为知识图谱中实体关系的提取需要模型拥有一定的理解能力和格式化输出的能力,模型过小的输出可能会不符合格式导致需要重复询问。我在本地使用了Qwen3-7B的模型和一个中文的嵌入模型进行部署:
CUDA_VISIBLE_DEVICES=0 python3 -m vllm.entrypoints.openai.api_server --model BAAI/BGE-M3 --host 0.0.0.0 --port 8001 --gpu-memory-utilization 0.1

CUDA_VISIBLE_DEVICES=0 python3 -m vllm.entrypoints.openai.api_server   --model Qwen/Qwen3-4B-Instruct-2507   --host 0.0.0.0   --port 8000   --gpu-memory-utilization 0.65   --max-num-seqs 2 --max-model-len 30000
这里需要注意的一个坑是嵌入模型必须得选择和OpenAI格式相同的接口部署,其他的本地模型需要修改这个包的源码才能使用(个人觉得非常麻烦,而且有的embedding模型根本不能用vllm部署,修改源码难度较大而且麻烦,很讨厌),并且最好选一个token数较大的(4096),否则可能会出现总结字数太多超了embedding模型的最大token数结果报错退出的(别问我为什么知道)。这里我选择了BGE-M3模型。
2. 准备知识库:
我使用下来将所有的知识全部保存到一个txt文件中是最方便的方法。它还能接收csv和json数据。这里我以txt和json为例:
[
{
"doc_id": 0,
"text": "The presence of communication amid scientific minds was equally important to the success of the Manhattan Project as scientific intellect was. The only cloud hanging over the impressive achievement of the atomic researchers and engineers is what their success truly meant; hundreds of thousands of innocent lives obliterated."
},
{
"doc_id": 1,
"text": "The Manhattan Project and its atomic bomb helped bring an end to World War II. Its legacy of peaceful uses of atomic energy continues to have an impact on history and science."
}
]
The presence of communication amid scientific minds was equally important to the success of the Manhattan Project as scientific intellect was. The only cloud hanging over the impressive achievement of the atomic researchers and engineers is what their success truly meant; hundreds of thousands of innocent lives obliterated.
The Manhattan Project and its atomic bomb helped bring an end to World War II. Its legacy of peaceful uses of atomic energy continues to have an impact on history and science.
Essay on The Manhattan Project - The Manhattan Project The Manhattan Project was to see if making an atomic bomb possible. The success of this project would forever change the world forever making it known that something this powerful can be manmade.
The Manhattan Project was the name for a project conducted during World War II, to develop the first atomic bomb. It refers specifically to the period of the project from 194 ⦠2-1946 under the control of the U.S. Army Corps of Engineers, under the administration of General Leslie R. Groves.
versions of each volume as well as complementary websites. The first websiteâThe Manhattan Project: An Interactive Historyâis available on the Office of History and Heritage Resources website, http://www.cfo. doe.gov/me70/history. The Office of History and Heritage Resources and the National Nuclear Security
The Manhattan Project. This once classified photograph features the first atomic bomb â a weapon that atomic scientists had nicknamed Gadget.. The nuclear age began on July 16, 1945, when it was detonated in the New Mexico desert.
Nor will it attempt to substitute for the extraordinarily rich literature on the atomic bombs and the end of World War II. This collection does not attempt to document the origins and development of the Manhattan Project.
Manhattan Project. The Manhattan Project was a research and development undertaking during World War II that produced the first nuclear weapons. It was led by the United States with the support of the United Kingdom and Canada. From 1942 to 1946, the project was under the direction of Major General Leslie Groves of the U.S. Army Corps of Engineers. Nuclear physicist Robert Oppenheimer was the director of the Los Alamos Laboratory that designed the actual bombs. The Army component of the project was designated the
In June 1942, the United States Army Corps of Engineersbegan the Manhattan Project- The secret name for the 2 atomic bombs.txt文档最为简单也非常推荐,json文档可能会遇到性能上的困难,难以优化。
3. 初始化文件夹并构造知识图谱(会非常耗时):
(1)首先在项目根目录下创建一个文件夹ragtest,在其中创建一个input文件夹,将之前的txt文本和json放入到input文件夹中(可以放置多份)。
mkdir -p ./ragtest/input


# 放置好文档以后运行这个命令初始化
graphrag init --root ./ragtest
之后运行graphrag init --root ./ragtest初始化文件夹(这个名字其实也可以按照你的需求改一改 )
(2)修改配置文件,这里是settings.yaml文件,之后开始运行也是读取这里的配置进行:
### This config file contains required core defaults that must be set, along with a handful of common optional settings.
### For a full list of available settings, see https://microsoft.github.io/graphrag/config/yaml/

### LLM settings ###
## There are a number of settings to tune the threading and token limits for LLM calls - check the docs.

models:
  default_chat_model:
    type: openai_chat # or azure_openai_chat
    api_base: http://127.0.0.1:8000/v1
    # api_version: 2024-05-01-preview
    auth_type: api_key # or azure_managed_identity
    api_key: None # set this in the generated .env file
    # audience: "https://cognitiveservices.azure.com/.default"
    # organization: <organization_id>
    model: Qwen/Qwen3-4B-Instruct-2507
    # deployment_name: <azure_model_deployment_name>
    encoding_model: cl100k_base # automatically set by tiktoken if left undefined
    model_supports_json: true # recommended if this is available for your model.
    concurrent_requests: 15 # max number of simultaneous LLM requests allowed
    async_mode: asyncio # or asyncio
    retry_strategy: native
    max_retries: 3
    tokens_per_minute: auto              # set to null to disable rate limiting
    requests_per_minute: auto            # set to null to disable rate limiting
  default_embedding_model:
    type: openai_embedding # or azure_openai_embedding
    api_base: http://127.0.0.1:8001/v1
    # api_version: 2024-05-01-preview
    auth_type: api_key # or azure_managed_identity
    api_key: None
    # audience: "https://cognitiveservices.azure.com/.default"
    # organization: <organization_id>
    model: BAAI/BGE-M3
    # deployment_name: <azure_model_deployment_name>
    encoding_model: cl100k_base # automatically set by tiktoken if left undefined
    model_supports_json: true # recommended if this is available for your model.
    concurrent_requests: 5 # max number of simultaneous LLM requests allowed
    async_mode: asyncio # or asyncio
    retry_strategy: native
    max_retries: 2
    tokens_per_minute: null              # set to null to disable rate limiting or auto for dynamic
    requests_per_minute: null            # set to null to disable rate limiting or auto for dynamic

### Input settings ###

input:
  storage:
    type: file # or blob
    base_dir: "input"
  file_type: text # [csv, text, json]


chunks:
  size: 512                 # 每块的 token/字符长度
  overlap: 50               # 块之间的重叠
  # group_by_columns: [doc_id]  # 用 JSON 中的 doc_id 字段来分组

### Output/storage settings ###
## If blob storage is specified in the following four sections,
## connection_string and container_name must be provided

output:
  type: file # [file, blob, cosmosdb]
  base_dir: "output"

cache:
  type: file # [file, blob, cosmosdb]
  base_dir: "cache"

reporting:
  type: file # [file, blob, cosmosdb]
  base_dir: "logs"

vector_store:
  default_vector_store:
    type: lancedb
    db_uri: output/lancedb
    container_name: default
    overwrite: True

### Workflow settings ###

embed_text:
  model_id: default_embedding_model
  vector_store_id: default_vector_store

extract_graph:
  model_id: default_chat_model
  prompt: "prompts/extract_graph.txt"
  entity_types: [organization,person,geo,event]
  max_gleanings: 1

summarize_descriptions:
  model_id: default_chat_model
  prompt: "prompts/summarize_descriptions.txt"
  max_length: 500

extract_graph_nlp:
  text_analyzer:
    extractor_type: regex_english # [regex_english, syntactic_parser, cfg]

cluster_graph:
  max_cluster_size: 10

extract_claims:
  enabled: false
  model_id: default_chat_model
  prompt: "prompts/extract_claims.txt"
  description: "Any claims or facts that could be relevant to information discovery."
  max_gleanings: 1

community_reports:
  model_id: default_chat_model
  graph_prompt: "prompts/community_report_graph.txt"
  text_prompt: "prompts/community_report_text.txt"
  max_length: 2000
  max_input_length: 4000

embed_graph:
  enabled: true # if true, will generate node2vec embeddings for nodes

umap:
  enabled: false # if true, will generate UMAP embeddings for nodes (embed_graph must also be enabled)

snapshots:
  graphml: false
  embeddings: false

### Query settings ###
## The prompt locations are required here, but each search method has a number of optional knobs that can be tuned.
## See the config docs: https://microsoft.github.io/graphrag/config/yaml/#query

local_search:
  chat_model_id: default_chat_model
  embedding_model_id: default_embedding_model
  prompt: "prompts/local_search_system_prompt.txt"

global_search:
  chat_model_id: default_chat_model
  map_prompt: "prompts/global_search_map_system_prompt.txt"
  reduce_prompt: "prompts/global_search_reduce_system_prompt.txt"
  knowledge_prompt: "prompts/global_search_knowledge_system_prompt.txt"

drift_search:
  chat_model_id: default_chat_model
  embedding_model_id: default_embedding_model
  prompt: "prompts/drift_search_system_prompt.txt"
  reduce_prompt: "prompts/drift_search_reduce_prompt.txt"

basic_search:
  chat_model_id: default_chat_model
  embedding_model_id: default_embedding_model
  prompt: "prompts/basic_search_system_prompt.txt"
其中需要重点关注的有这里的模型配置。我采用的是本地vllm部署的模型,按照你本地的需要进行配置,其中的encoding_model是一个分词模型,如果你使用的不是默认的模型的话这里一定要显式指定出来,default_embedding_model选项中的这一个也是。由于我没有设置api_key所以换成None,你设置为你的即可。最后的配置大致如下:
models:
  default_chat_model:
    type: openai_chat # or azure_openai_chat
    api_base: http://127.0.0.1:8000/v1
    # api_version: 2024-05-01-preview
    auth_type: api_key # or azure_managed_identity
    api_key: None # set this in the generated .env file
    # audience: "https://cognitiveservices.azure.com/.default"
    # organization: <organization_id>
    model: Qwen/Qwen3-4B-Instruct-2507
    # deployment_name: <azure_model_deployment_name>
    encoding_model: cl100k_base # automatically set by tiktoken if left undefined
    model_supports_json: true # recommended if this is available for your model.
    concurrent_requests: 120 # max number of simultaneous LLM requests allowed
    async_mode: threaded # or asyncio
    retry_strategy: native
    max_retries: 10
    tokens_per_minute: auto              # set to null to disable rate limiting
    requests_per_minute: auto            # set to null to disable rate limiting
  default_embedding_model:
    type: openai_embedding # or azure_openai_embedding
    api_base: http://127.0.0.1:8001/v1
    # api_version: 2024-05-01-preview
    auth_type: api_key # or azure_managed_identity
    api_key: None
    # audience: "https://cognitiveservices.azure.com/.default"
    # organization: <organization_id>
    model: /workspace/models/bge-base-en-v1.5
    # deployment_name: <azure_model_deployment_name>
    encoding_model: cl100k_base # automatically set by tiktoken if left undefined
    model_supports_json: true # recommended if this is available for your model.
    concurrent_requests: 25 # max number of simultaneous LLM requests allowed
    async_mode: threaded # or asyncio
    retry_strategy: native
    max_retries: 10
    tokens_per_minute: null              # set to null to disable rate limiting or auto for dynamic
    requests_per_minute: null            # set to null to disable rate limiting or auto for dynamic
在input这里的配置根据你的文件类型来确定。group_by这里描述的是文本结合依据,如果设置了的话会非常非常非常慢(建议还是别设置了)。文本的话就这样配置就好:
### Input settings ###

input:
  storage:
    type: file # or blob
    base_dir: "input"
  file_type: text# [csv, text, json]


chunks:
  size: 512                 # 每块的 token/字符长度
  overlap: 50               # 块之间的重叠
# group_by_columns: [doc_id] # 用 JSON 中的 doc_id 字段来分组最后是这里总结的token数量,千万注意一定要和你的embedding模型最大可接收长度匹配,否则在这里报错会很难受的(哭)
summarize_descriptions:
  model_id: default_chat_model
  prompt: "prompts/summarize_descriptions.txt"
  max_length: 500

extract_graph_nlp:
  text_analyzer:
    extractor_type: regex_english # [regex_english, syntactic_parser, cfg]

cluster_graph:
  max_cluster_size: 10

extract_claims:
  enabled: false
  model_id: default_chat_model
  prompt: "prompts/extract_claims.txt"
  description: "Any claims or facts that could be relevant to information discovery."
  max_gleanings: 1

community_reports:
  model_id: default_chat_model
  graph_prompt: "prompts/community_report_graph.txt"
  text_prompt: "prompts/community_report_text.txt"
  max_length: 2000
  max_input_length: 3000
(3)运行GraphRAG自主构建知识图谱
graphrag index --rooot ./ragtest运行这个命令以后如果日志初始化后没有报错,那就是正常在跑了。可能会卡在一个地方非常非常久,不过不用在意,只要你查看一下vllm部署的Qwen模型是否在正常回复即可,他内部会自动处理提取三元组的一切逻辑(预计15000token需要2个小时)。
4. 读取知识图谱构建检索引擎进行检索:
当上一个命令运行结束后命令行界面会告诉你success并且结束。这时候最重要的就是output文件夹里的几个文件(其他的都不需要了,这个是最终的结果)有这么几个: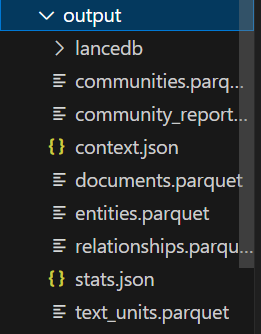
(1)全局检索:之后我们新起一个.py文件用python来调用这个知识图谱,以下代码来源于官方网站上的示例,但是在本地运行的时候出现了几个bug我调整了一下,这是我改过能够运行的最终版本:
import os

import pandas as pd
import tiktoken

from graphrag.config.enums import ModelType
from graphrag.config.models.language_model_config import LanguageModelConfig
from graphrag.language_model.manager import ModelManager
from graphrag.query.indexer_adapters import (
    read_indexer_communities,
    read_indexer_entities,
    read_indexer_reports,
)
from graphrag.query.structured_search.global_search.community_context import (
    GlobalCommunityContext,
)
from graphrag.query.structured_search.global_search.search import GlobalSearch

api_key = "dummy"
llm_model = "Qwen/Qwen3-4B-Instruct-2507"

config = LanguageModelConfig(
    api_key=api_key,
    type=ModelType.OpenAIChat,
    model=llm_model,
    api_base="http://127.0.0.1:8000/v1",
    encoding_model="cl100k_base",
    max_retries=5,
)
model = ModelManager().get_or_create_chat_model(
    name="global_search",
    model_type=ModelType.OpenAIChat,
    config=config,
)

token_encoder = tiktoken.get_encoding("cl100k_base")


# parquet files generated from indexing pipeline
INPUT_DIR = "ragtest/output"
COMMUNITY_TABLE = "communities"
COMMUNITY_REPORT_TABLE = "community_reports"
ENTITY_TABLE = "entities"

# community level in the Leiden community hierarchy from which we will load the community reports
# higher value means we use reports from more fine-grained communities (at the cost of higher computation cost)
COMMUNITY_LEVEL = 2

community_df = pd.read_parquet(f"{INPUT_DIR}/{COMMUNITY_TABLE}.parquet")
entity_df = pd.read_parquet(f"{INPUT_DIR}/{ENTITY_TABLE}.parquet")
report_df = pd.read_parquet(f"{INPUT_DIR}/{COMMUNITY_REPORT_TABLE}.parquet")

communities = read_indexer_communities(community_df, report_df)
reports = read_indexer_reports(report_df, community_df, COMMUNITY_LEVEL)
entities = read_indexer_entities(entity_df, community_df, COMMUNITY_LEVEL)

print(f"Total report count: {len(report_df)}")
print(
    f"Report count after filtering by community level {COMMUNITY_LEVEL}: {len(reports)}"
)

print(report_df.head())

# 打印信息
total_report_count = len(report_df)
filtered_report_count = len(reports)
# 保存到 TXT 文件
with open("output.txt", "w", encoding="utf-8") as f:
    f.write(f"Total report count: {total_report_count}\n")
    f.write(f"Report count after filtering by community level {COMMUNITY_LEVEL}: {filtered_report_count}\n\n")
    f.write("Report DataFrame preview:\n")
    f.write(report_df.head().to_string())
    f.write("\n\n")

    # 如果你还想保存全部报告内容
    f.write("All Reports:\n")
    f.write(report_df.to_string())

context_builder = GlobalCommunityContext(
    community_reports=reports,
    communities=communities,
    entities=entities,  # default to None if you don't want to use community weights for ranking
    token_encoder=token_encoder,
)

context_builder_params = {
    "use_community_summary": False,  # False means using full community reports. True means using community short summaries.
    "shuffle_data": True,
    "include_community_rank": True,
    "min_community_rank": 0,
    "community_rank_name": "rank",
    "include_community_weight": True,
    "community_weight_name": "occurrence weight",
    "normalize_community_weight": True,
    "max_tokens": 1200,  # change this based on the token limit you have on your model (if you are using a model with 8k limit, a good setting could be 5000)
    "context_name": "Reports",
}

map_llm_params = {
    "max_tokens": 512,
    "temperature": 0.0,
    "response_format": {"type": "json_object"},
}

reduce_llm_params = {
    "max_tokens": 512,  # change this based on the token limit you have on your model (if you are using a model with 8k limit, a good setting could be 1000-1500)
    "temperature": 0.0,
}

import asyncio
async def main():
    search_engine = GlobalSearch(
        model=model,
        context_builder=context_builder,
        token_encoder=token_encoder,
        max_data_tokens=12_000,
        map_llm_params=map_llm_params,
        reduce_llm_params=reduce_llm_params,
        allow_general_knowledge=False,
        json_mode=True,
        context_builder_params=context_builder_params,
        concurrent_coroutines=32,
        response_type="multiple paragraphs",
    )

    result = await search_engine.search("Which core practices are included in the Restorative Justice framework?")
    return result

result = asyncio.run(main())

print(result.response)
# inspect the data used to build the context for the LLM responses
print(result.context_data["reports"])

# inspect number of LLM calls and tokens
print(
    f"LLM calls: {result.llm_calls}. Prompt tokens: {result.prompt_tokens}. Output tokens: {result.output_tokens}."
)
官方是使用jupyter笔记本来运行的,我这里把他们合在了一起。你可以根据自己的需要来把我的这段代码分段展示(如果你检索的知识没有和你的问题相关的内容,那么他会回复你我不知道)。
(2)本地检索:
以下代码也来自官网,但是运行中有几个bug我修改了一下,这是可以直接跑通的版本:
import os

import pandas as pd
import tiktoken

from graphrag.query.context_builder.entity_extraction import EntityVectorStoreKey
from graphrag.query.indexer_adapters import (
    read_indexer_covariates,
    read_indexer_entities,
    read_indexer_relationships,
    read_indexer_reports,
    read_indexer_text_units,
)
from graphrag.query.question_gen.local_gen import LocalQuestionGen
from graphrag.query.structured_search.local_search.mixed_context import (
    LocalSearchMixedContext,
)
from graphrag.query.structured_search.local_search.search import LocalSearch
from graphrag.vector_stores.lancedb import LanceDBVectorStore

INPUT_DIR = "./ragtest/output"
LANCEDB_URI = f"{INPUT_DIR}/lancedb"

COMMUNITY_REPORT_TABLE = "community_reports"
ENTITY_TABLE = "entities"
COMMUNITY_TABLE = "communities"
RELATIONSHIP_TABLE = "relationships"
COVARIATE_TABLE = "covariates"
TEXT_UNIT_TABLE = "text_units"
COMMUNITY_LEVEL = 2

# read nodes table to get community and degree data
entity_df = pd.read_parquet(f"{INPUT_DIR}/{ENTITY_TABLE}.parquet")
community_df = pd.read_parquet(f"{INPUT_DIR}/{COMMUNITY_TABLE}.parquet")

entities = read_indexer_entities(entity_df, community_df, COMMUNITY_LEVEL)

# load description embeddings to an in-memory lancedb vectorstore
# to connect to a remote db, specify url and port values.
description_embedding_store = LanceDBVectorStore(
    collection_name="default-entity-description",
)
description_embedding_store.connect(db_uri=LANCEDB_URI)

print(f"Entity count: {len(entity_df)}")
print(entity_df.head())


relationship_df = pd.read_parquet(f"{INPUT_DIR}/{RELATIONSHIP_TABLE}.parquet")
relationships = read_indexer_relationships(relationship_df)

print(f"Relationship count: {len(relationship_df)}")
print(relationship_df.head())

# # NOTE: covariates are turned off by default, because they generally need prompt tuning to be valuable
# # Please see the GRAPHRAG_CLAIM_* settings
# covariate_df = pd.read_parquet(f"{INPUT_DIR}/{COVARIATE_TABLE}.parquet")

# claims = read_indexer_covariates(covariate_df)

# print(f"Claim records: {len(claims)}")
# covariates = {"claims": claims}


report_df = pd.read_parquet(f"{INPUT_DIR}/{COMMUNITY_REPORT_TABLE}.parquet")
reports = read_indexer_reports(report_df, community_df, COMMUNITY_LEVEL)

print(f"Report records: {len(report_df)}")
print(report_df.head())


text_unit_df = pd.read_parquet(f"{INPUT_DIR}/{TEXT_UNIT_TABLE}.parquet")
text_units = read_indexer_text_units(text_unit_df)

print(f"Text unit records: {len(text_unit_df)}")
print(text_unit_df.head())


from graphrag.config.enums import ModelType
from graphrag.config.models.language_model_config import LanguageModelConfig
from graphrag.language_model.manager import ModelManager


api_key = "dummy"
llm_model = "Qwen/Qwen3-4B-Instruct-2507"
embed_model = "BAAI/BGE-M3"

config = LanguageModelConfig(
    api_key=api_key,
    type=ModelType.OpenAIChat,
    model=llm_model,
    api_base="http://127.0.0.1:8000/v1",
    encoding_model="cl100k_base",
    max_retries=5,
)
chat_model = ModelManager().get_or_create_chat_model(
    name="global_search",
    model_type=ModelType.OpenAIChat,
    config=config,
)

token_encoder = tiktoken.get_encoding("cl100k_base")

embedding_config = LanguageModelConfig(
    api_key=api_key,
    type=ModelType.OpenAIEmbedding,
    model=embed_model,
    api_base="http://127.0.0.1:8001/v1",
    encoding_model="cl100k_base",
    max_retries=5,
)

text_embedder = ModelManager().get_or_create_embedding_model(
    name="local_search_embedding",
    model_type=ModelType.OpenAIEmbedding,
    config=embedding_config,
)


context_builder = LocalSearchMixedContext(
    community_reports=reports,
    text_units=text_units,
    entities=entities,
    relationships=relationships,
    # if you did not run covariates during indexing, set this to None
    covariates=None,
    entity_text_embeddings=description_embedding_store,
    embedding_vectorstore_key=EntityVectorStoreKey.ID,  # if the vectorstore uses entity title as ids, set this to EntityVectorStoreKey.TITLE
    text_embedder=text_embedder,
    token_encoder=token_encoder,
)


# text_unit_prop: proportion of context window dedicated to related text units
# community_prop: proportion of context window dedicated to community reports.
# The remaining proportion is dedicated to entities and relationships. Sum of text_unit_prop and community_prop should be <= 1
# conversation_history_max_turns: maximum number of turns to include in the conversation history.
# conversation_history_user_turns_only: if True, only include user queries in the conversation history.
# top_k_mapped_entities: number of related entities to retrieve from the entity description embedding store.
# top_k_relationships: control the number of out-of-network relationships to pull into the context window.
# include_entity_rank: if True, include the entity rank in the entity table in the context window. Default entity rank = node degree.
# include_relationship_weight: if True, include the relationship weight in the context window.
# include_community_rank: if True, include the community rank in the context window.
# return_candidate_context: if True, return a set of dataframes containing all candidate entity/relationship/covariate records that
# could be relevant. Note that not all of these records will be included in the context window. The "in_context" column in these
# dataframes indicates whether the record is included in the context window.
# max_tokens: maximum number of tokens to use for the context window.


local_context_params = {
    "text_unit_prop": 0.5,
    "community_prop": 0.1,
    "conversation_history_max_turns": 5,
    "conversation_history_user_turns_only": True,
    "top_k_mapped_entities": 10,
    "top_k_relationships": 10,
    "include_entity_rank": True,
    "include_relationship_weight": True,
    "include_community_rank": False,
    "return_candidate_context": False,
    "embedding_vectorstore_key": EntityVectorStoreKey.ID,  # set this to EntityVectorStoreKey.TITLE if the vectorstore uses entity title as ids
    "max_tokens": 1200,  # change this based on the token limit you have on your model (if you are using a model with 8k limit, a good setting could be 5000)
}

model_params = {
    "max_tokens": 512,  # change this based on the token limit you have on your model (if you are using a model with 8k limit, a good setting could be 1000=1500)
    "temperature": 0.0,
}


import asyncio
async def main():
    search_engine = LocalSearch(
    model=chat_model,
    context_builder=context_builder,
    token_encoder=token_encoder,
    model_params=model_params,
    context_builder_params=local_context_params,
    response_type="multiple paragraphs",  # free form text describing the response type and format, can be anything, e.g. prioritized list, single paragraph, multiple paragraphs, multiple-page report
    )
    result = await search_engine.search("Which core practices are included in the Restorative Justice framework?")
    return result

result = asyncio.run(main())

print(result.context_text)
print(result.response)

# inspect number of LLM calls and tokens
print(
    f"LLM calls: {result.llm_calls}. Prompt tokens: {result.prompt_tokens}. Output tokens: {result.output_tokens}."
)
最后可以使用context_text来获得所有的提示词,response来获得模型的回复。
5. 优化建议:
由于完整地构建一个GraphRAG实在是太耗时间了,而且如果不是本地部署的话会消耗大量的token。因此我这里给出几个优化的方向(其实就是权衡的策略),在实际使用中可以根据需要进行取舍:
(1)Graph RAG,结构检索搭建都非常复杂,构建时间和节点个数成O(N**2),和分块大小关系不大(亲测10个节点15000token长度在4090中需要大约1个半小时构建。60万长度的文本可能需要1天)。
(2)Hierarchical RAG,结构和检索都比较简单,可以轻松记录大量的数据并拥有一定的全局信息。该方法的效果非常依赖文档的处理,需要人工对文档进行分类分层。

中国智能体开发者社区,聚焦智能体与大模型开发,提供前沿资讯、实用工具链、开源项目及行业案例。通过技术沙龙、开发者大赛等活动,促进经验交流与协作,助力开发者快速构建创新智能应用。
更多推荐


 33
33 0
0- 0


 已为社区贡献6条内容

所有评论(0)