GPU编程--CUDA实现图像滤波器
最近对CUDA比较感兴趣,于是想从头用CUDA实现一个图像滤波器去处理图像文件,可以自由定制卷积核
有意思的东西
笔者正好会一点游戏渲染Shader,会发现这玩意写CUDA和写Shader的思路好多都一样
游戏中后处理会用到大量后处理技术,比如锐化啦,模糊啦,需要在GPU的像素着色器(Pixel Shader)中为每个像素执行卷积操作,利用GPU拥有成千上万个并行处理单元,可以同时处理大量像素
在DX10(2006年左右)之前,GPU物理结构是分顶点着色器(Vertex Shader)和像素着色器(Pixel Shader)的,分别作用于渲染的不同阶段
在DX10之后,GPU通常采用一种称为“统一着色器架构”的设计,也就是游戏中常用的顶点着色器和像素着色器使用的是同一种架构的物理结构,称为GPGPU(通用图形处理器),这玩意不光能对游戏加速,也能做大量并行计算
CUDA实际上是NVIDIA为GPGPU计算提供的一个具体实现和技术平台,挖矿,人工智能等大量需要大量并行计算的场景也都用的这玩意(挖矿挖完了,跑人工智能,导致显卡贵的要命)
图片文件读取和输出
这里我们选择BMP图片进行读取
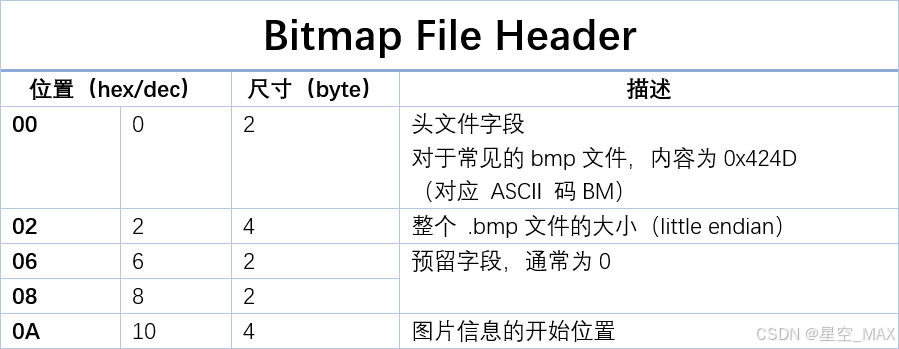
整个BMP二进制包含了BMP文件头和NMP文件位图信息头
BMP文件头:
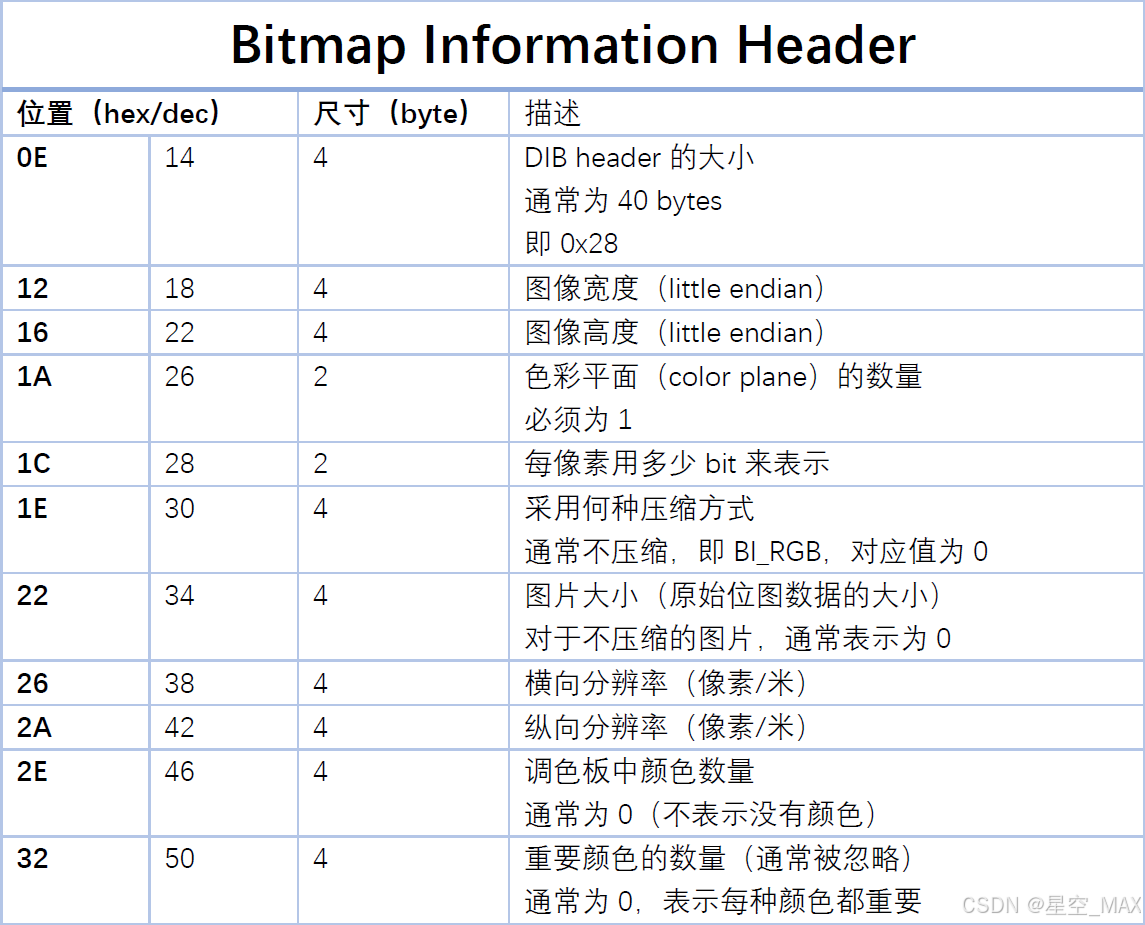
BMP文件位图信息头:
主要记录了具体的图片信息
BMP文件读取:
// 打开文件流
ifstream fp("test.bmp", ios::binary);
if (!fp) {
	cout << "Open File fail!" << endl;
	return 0;
}

// 定义BMP文件头
BITMAPFILEHEADER bfhead;
// 定义BMP位图信息头
BITMAPINFOHEADER bihead;

// 分别为要存入的存储区域,每个数据块的字节数,读取的块数,文件指针
fp.read(reinterpret_cast<char*>(&bfhead), sizeof(BITMAPFILEHEADER)); // 读取14个字节的文件头信息到bfhead结构体
fp.read(reinterpret_cast<char*>(&bihead), sizeof(BITMAPINFOHEADER)); // 读取40个字节的信息头信息到bihead结构体

// 计算每一行的字节数,使得字节对齐
int rowBytes = ((bihead.biBitCount * bihead.biWidth + 31) / 32) * 4;
//计算出全图像所存储的空间大小
size_t imageSize = rowBytes * bihead.biHeight;
//使用Vector分配这么大的内存
std::vector<unsigned char> imageData(imageSize);

// 跳过可能存在的调色板
fp.seekg(bfhead.bfOffBits, ios::beg);
//将图像数据复制到imageData中
fp.read(reinterpret_cast<char*>(imageData.data()), imageSize);
// 关闭文件
fp.close();
BMP文件拼接和输出代码:
//创建输出文件流
ofstream outFp("filter_test.bmp", ios::binary);
if (!outFp) {
	cout << "Failed to create output file." << endl;
	return 0;
}

//拼接输出文件
//拼接文件头
outFp.write(reinterpret_cast<const char*>(&bfhead), sizeof(BITMAPFILEHEADER));
//拼接信息头
outFp.write(reinterpret_cast<const char*>(&bihead), sizeof(BITMAPINFOHEADER));
//拼接输出的图像数据
outFp.seekp(bfhead.bfOffBits, ios::beg);
outFp.write(reinterpret_cast<const char*>(filteredImageData.data()), imageSize);

outFp.close();
注意:为如果一行的位数不是32的倍数,BMP格式会在每行末尾添加填充字节,直到该行的大小是4字节(32位)的倍数,所以会有rowBytes的计算
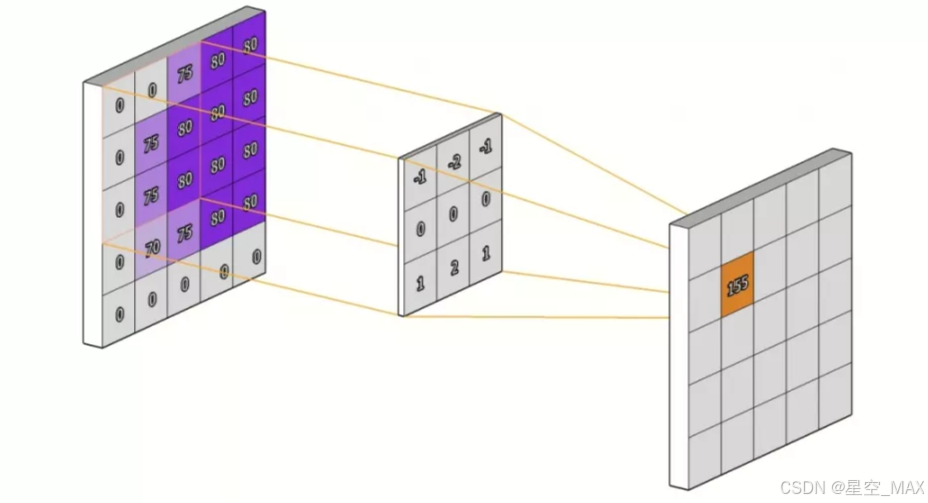
滤波器核函数
__global__ void FilterKernel(const unsigned char* input, unsigned char* output, float* kernel, int kernelSize, int width, int height, int rowBytes) {
	// 要处理像素的x坐标
	int x = blockIdx.x * blockDim.x + threadIdx.x;
	// 要处理像素的y坐标
	int y = blockIdx.y * blockDim.y + threadIdx.y;
	// 半径
	int radius = kernelSize / 2;

	//过滤图片最外一圈像素
	if (x >= radius && x < width - radius && y >= radius && y < height - radius) {
		for (int c = 0; c < 3; ++c) { // 对每个颜色通道进行处理
			float sum = 0.0f;
			for (int fy = -radius; fy <= radius; ++fy) {
				for (int fx = -radius; fx <= radius; ++fx) {
					// 每个点的卷积计算,从上下左右拿到
					sum += input[((y + fy) * rowBytes + (x + fx) * 3 + c)] * kernel[(fy + radius) * kernelSize + (fx + radius)];
				}
			}
			// 卷积结果输出到另一个数组中
			output[y * rowBytes + x * 3 + c] = static_cast<unsigned char>(min(max(sum, 0.0f), 255.0f));
		}
	}
}
这里也就是卷积操作的核心函数了,参数说明:
- input:指向输入图像数据的指针。
- output:指向输出图像数据的指针。
- kernel:指向卷积核(滤波器)的指针,它是一个浮点数数组。
- kernelSize:卷积核的尺寸(假设是方形的),例如3表示3x3的卷积核。
- int width:图像的宽度
- int height:图像和高度
- int rowBytes:每一行图像数据的字节数,通常是为了保证内存对齐而计算出来的值
关于x >= radius && x < width - radius && y >= radius && y < height - radius
由于在图片边上的一圈像素没有"邻居",所以没法计算卷积,所以直接不处理了,所以,得到的图片会比原来边上小一圈像素,不过一般有三种方法:
零填充(Zero Padding):将超出边界的像素视为0
复制边界(Replication Padding):用最接近边界的像素值填充
镜像填充(Mirror Padding):以边界为轴镜像反射图像内容
这里就不陈述了
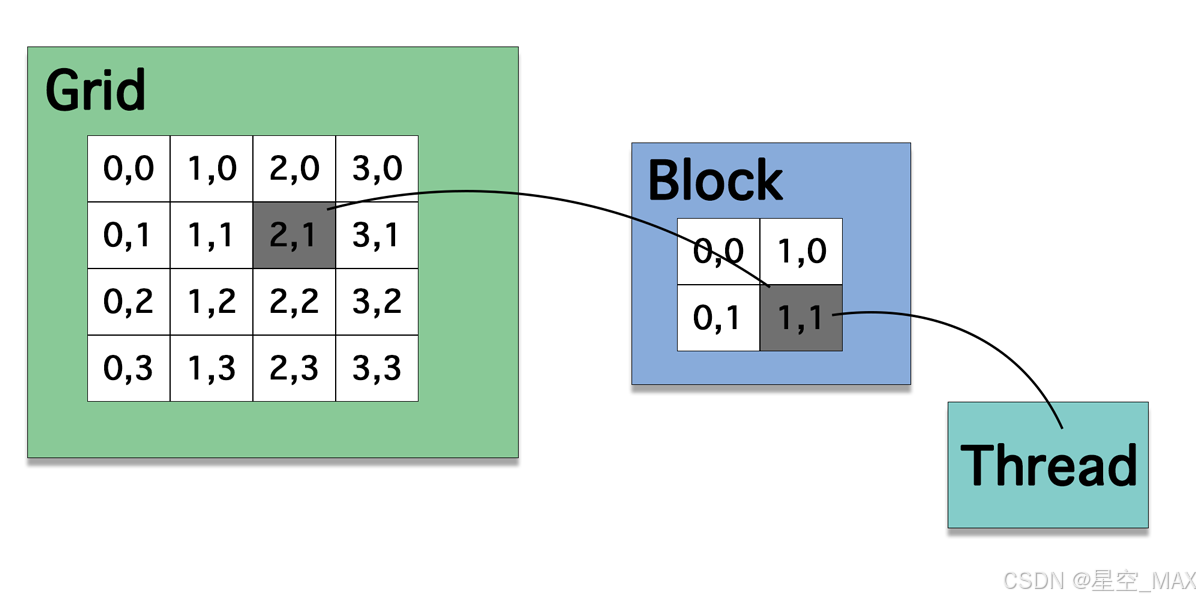
设置网格大小
	//设置网格和线程大小
	dim3 blockSize(16, 16);
	dim3 gridSize((bihead.biWidth + blockSize.x - 1) / blockSize.x, (bihead.biHeight + blockSize.y - 1) / blockSize.y);
给图片的每一个像素点分配一个线程
线程块的大小设为16*16,即包含16*16个线程
每个线程块横向就有16个线程(16个像素点)
那么横向最少需要的网格数量就是(图片横向像素点个数 + 16 - 1) / 16
全部代码
#include<windows.h>
#include<iostream>
#include<fstream>
#include<vector>
#include<cuda_runtime.h>
#include <curand_kernel.h>

using namespace std;

__global__ void FilterKernel(const unsigned char* input, unsigned char* output, float* kernel, int kernelSize, int width, int height, int rowBytes) {
	// 要处理像素的x坐标
	int x = blockIdx.x * blockDim.x + threadIdx.x;
	// 要处理像素的y坐标
	int y = blockIdx.y * blockDim.y + threadIdx.y;
	// 半径
	int radius = kernelSize / 2;

	//过滤图片最外一圈像素
	if (x >= radius && x < width - radius && y >= radius && y < height - radius) {
		for (int c = 0; c < 3; ++c) { // 对每个颜色通道进行处理
			float sum = 0.0f;
			for (int fy = -radius; fy <= radius; ++fy) {
				for (int fx = -radius; fx <= radius; ++fx) {
					// 每个点的卷积计算,从上下左右拿到
					sum += input[((y + fy) * rowBytes + (x + fx) * 3 + c)] * kernel[(fy + radius) * kernelSize + (fx + radius)];
				}
			}
			// 卷积结果输出到另一个数组中
			output[y * rowBytes + x * 3 + c] = static_cast<unsigned char>(min(max(sum, 0.0f), 255.0f));
		}
	}
}

int main()
{
	// 打开文件流
	ifstream fp("test.bmp", ios::binary);
	if (!fp) {
		cout << "Open File fail!" << endl;
		return 0;
	}

	// 定义BMP文件头
	BITMAPFILEHEADER bfhead;
	// 定义BMP位图信息头
	BITMAPINFOHEADER bihead;

	// 分别为要存入的存储区域,每个数据块的字节数,读取的块数,文件指针
	fp.read(reinterpret_cast<char*>(&bfhead), sizeof(BITMAPFILEHEADER)); // 读取14个字节的文件头信息到bfhead结构体
	fp.read(reinterpret_cast<char*>(&bihead), sizeof(BITMAPINFOHEADER)); // 读取40个字节的信息头信息到bihead结构体

	// 计算每一行的字节数,使得字节对齐
	int rowBytes = ((bihead.biBitCount * bihead.biWidth + 31) / 32) * 4;
	//计算出全图像所存储的空间大小
	size_t imageSize = rowBytes * bihead.biHeight;
	//使用Vector分配这么大的内存
	std::vector<unsigned char> imageData(imageSize);

	// 跳过可能存在的调色板
	fp.seekg(bfhead.bfOffBits, ios::beg);
	//将图像数据复制到imageData中
	fp.read(reinterpret_cast<char*>(imageData.data()), imageSize);
	// 关闭文件
	fp.close();

	//卷积核大小
	int kernelSize = 3;
	//卷积核
	float h_kernel[] = {
	1.0f / 9.0f, 1.0f / 9.0f, 1.0f / 9.0f,
	1.0f / 9.0f, 1.0f / 9.0f, 1.0f / 9.0f,
	1.0f / 9.0f, 1.0f / 9.0f, 1.0f / 9.0f
	};
	// 分配设备内存
	unsigned char* d_input, * d_output;
	float* d_kernel;

	//为输入和输出申请显存
	cudaMalloc(&d_input, imageSize);
	cudaMalloc(&d_output, imageSize);
	//为卷积核申请显存
	cudaMalloc(&d_kernel, kernelSize * kernelSize * sizeof(float));

	// 将数据从主机复制到设备
	cudaMemcpy(d_input, imageData.data(), imageSize, cudaMemcpyHostToDevice);
	cudaMemcpy(d_kernel, h_kernel, kernelSize * kernelSize * sizeof(float), cudaMemcpyHostToDevice);

	//设置网格和线程大小
	dim3 blockSize(16, 16);
	dim3 gridSize((bihead.biWidth + blockSize.x - 1) / blockSize.x, (bihead.biHeight + blockSize.y - 1) / blockSize.y);

	// 启动核函数
	FilterKernel <<<gridSize, blockSize >>> (d_input, d_output, d_kernel, kernelSize, bihead.biWidth, bihead.biHeight, rowBytes);
	//等待所有的核函数计算完成
	cudaDeviceSynchronize();

	// 将结果从设备复制回主机
	vector<unsigned char> filteredImageData(imageSize);
	cudaMemcpy(filteredImageData.data(), d_output, imageSize, cudaMemcpyDeviceToHost);

	// 释放设备内存
	cudaFree(d_input);
	cudaFree(d_output);
	cudaFree(d_kernel);

	//创建输出文件流
	ofstream outFp("filter_test.bmp", ios::binary);
	if (!outFp) {
		cout << "Failed to create output file." << endl;
		return 0;
	}

	//拼接输出文件
	//拼接文件头
	outFp.write(reinterpret_cast<const char*>(&bfhead), sizeof(BITMAPFILEHEADER));
	//拼接信息头
	outFp.write(reinterpret_cast<const char*>(&bihead), sizeof(BITMAPINFOHEADER));
	//拼接输出的图像数据
	outFp.seekp(bfhead.bfOffBits, ios::beg);
	outFp.write(reinterpret_cast<const char*>(filteredImageData.data()), imageSize);

	outFp.close();

	cout << "Image filtering completed successfully." << endl;
}
不同卷积核效果展示
替换代码中的
	//卷积核大小
	int kernelSize = 3;
	//卷积核
	float h_kernel[] = {
	1.0f / 9.0f, 1.0f / 9.0f, 1.0f / 9.0f,
	1.0f / 9.0f, 1.0f / 9.0f, 1.0f / 9.0f,
	1.0f / 9.0f, 1.0f / 9.0f, 1.0f / 9.0f
	};
即可有不同的卷积效果
原图:
高斯模糊:
	// 卷积核大小
	int kernelSize = 5;
	// 高斯卷积核 (5x5)
	float h_kernel[] = {
		1.0f / 256.0f, 4.0f / 256.0f,  6.0f / 256.0f,  4.0f / 256.0f,  1.0f / 256.0f,
		4.0f / 256.0f, 16.0f / 256.0f, 24.0f / 256.0f, 16.0f / 256.0f, 4.0f / 256.0f,
		6.0f / 256.0f, 24.0f / 256.0f, 36.0f / 256.0f, 24.0f / 256.0f, 6.0f / 256.0f,
		4.0f / 256.0f, 16.0f / 256.0f, 24.0f / 256.0f, 16.0f / 256.0f, 4.0f / 256.0f,
		1.0f / 256.0f, 4.0f / 256.0f,  6.0f / 256.0f,  4.0f / 256.0f,  1.0f / 256.0f
	};
锐化:
// 卷积核大小
int kernelSize = 3;
// 锐化卷积核
float h_kernel[] = {
    0.0f, -1.0f,  0.0f,
   -1.0f,  5.0f, -1.0f,
    0.0f, -1.0f,  0.0f
};
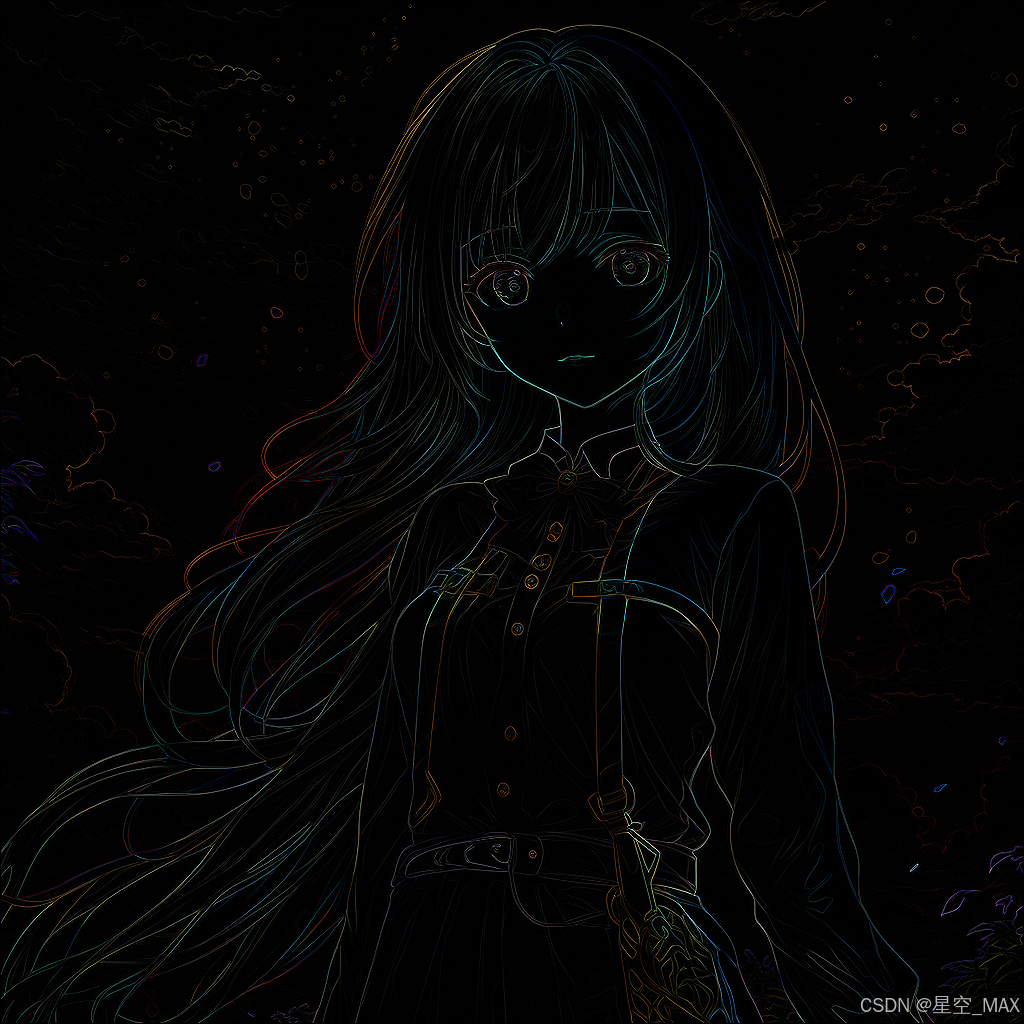
拉普拉斯核:
// 卷积核大小
int kernelSize = 3;
// 拉普拉斯卷积核
float h_kernel[] = {
    0.0f,  1.0f, 0.0f,
    1.0f, -4.0f, 1.0f,
    0.0f,  1.0f, 0.0f
};
浮雕效果:
float h_kernel[] = {
   -2.0f, -1.0f,  0.0f,
   -1.0f,  1.0f,  1.0f,
	0.0f,  1.0f,  2.0f
};

中国智能体开发者社区,聚焦智能体与大模型开发,提供前沿资讯、实用工具链、开源项目及行业案例。通过技术沙龙、开发者大赛等活动,促进经验交流与协作,助力开发者快速构建创新智能应用。
更多推荐


 10
10 0
0- 0


 已为社区贡献1条内容

所有评论(0)