快速入门限流降级神器-Sentinel
本文介绍了Sentinel流量治理组件的核心功能与实战应用。主要内容包括:1. Sentinel基础概念与工作原理,作为微服务流量治理组件,提供流量控制、熔断降级等能力;2. 详细配置指南,涵盖流控规则(QPS/线程数)、熔断策略(慢调用/异常比例/异常数)等核心功能;3. 规则持久化方案,通过Nacos实现配置中心化管理;4. 与主流框架整合,包括RestTemplate限流保护、OpenFei
目录
一、Sentinel 入门基础
1. Sentinel 介绍
随着微服务的流行,服务和服务之间的稳定性变得越来越重要。Sentinel 是面向分布式、多语言异构化服务架构的流量治理组件,主要以流量为切入点,从流量路由、流量控制、流量整形、熔断降级、系统自适应过载保护、热点流量防护等多个维度来帮助开发者保障微服务的稳定性。
Sentinel 官方网站:introduction | Sentinel
Sentinel Demo:https://gitee.com/original-intention/sentinel-gorgor-demo
2. Sentinel 基本概念
- 资源
资源是 Sentinel 的关键概念。它可以是 Java 应用程序中的任何内容,例如,由应用程序提供的服务,或由应用程序调用的其它应用提供的服务,甚至可以是一段代码。在接下来的文档中,我们都会用资源来描述代码块。
只要通过 Sentinel API 定义的代码,就是资源,能够被 Sentinel 保护起来。大部分情况下,可以使用方法签名,URL,甚至服务名称作为资源名来标示资源。
- 规则
围绕资源的实时状态设定的规则,可以包括流量控制规则、熔断降级规则以及系统保护规则。所有规则可以动态实时调整
3. Sentinel核心功能
| 功能 | 作用 | 应用场景 |
|---|---|---|
| 流量控制 | 限制QPS/线程数,防止突发流量击垮服务 | 秒杀活动、API防刷 |
| 熔断降级 | 自动阻断不稳定资源(如响应慢/高异常),避免级联故障 | 依赖服务超时、数据库访问异常 |
| 系统保护 | 全局维度的负载控制(CPU/线程数/总QPS) | 服务器资源过载预警 |
| 热点参数限流 | 针对特定参数(如用户ID)精细化控制流量 | 热门商品查询、高频用户限制 |
4. Sentinel 是如何工作的
Sentinel 的主要工作机制如下:
- 对主流框架提供适配或者显示的 API,来定义需要保护的资源,并提供设施对资源进行实时统计和调用链路分析。
- 根据预设的规则,结合对资源的实时统计信息,对流量进行控制。同时,Sentinel 提供开放的接口,方便您定义及改变规则。
- Sentinel 提供实时的监控系统,方便您快速了解目前系统的状态。
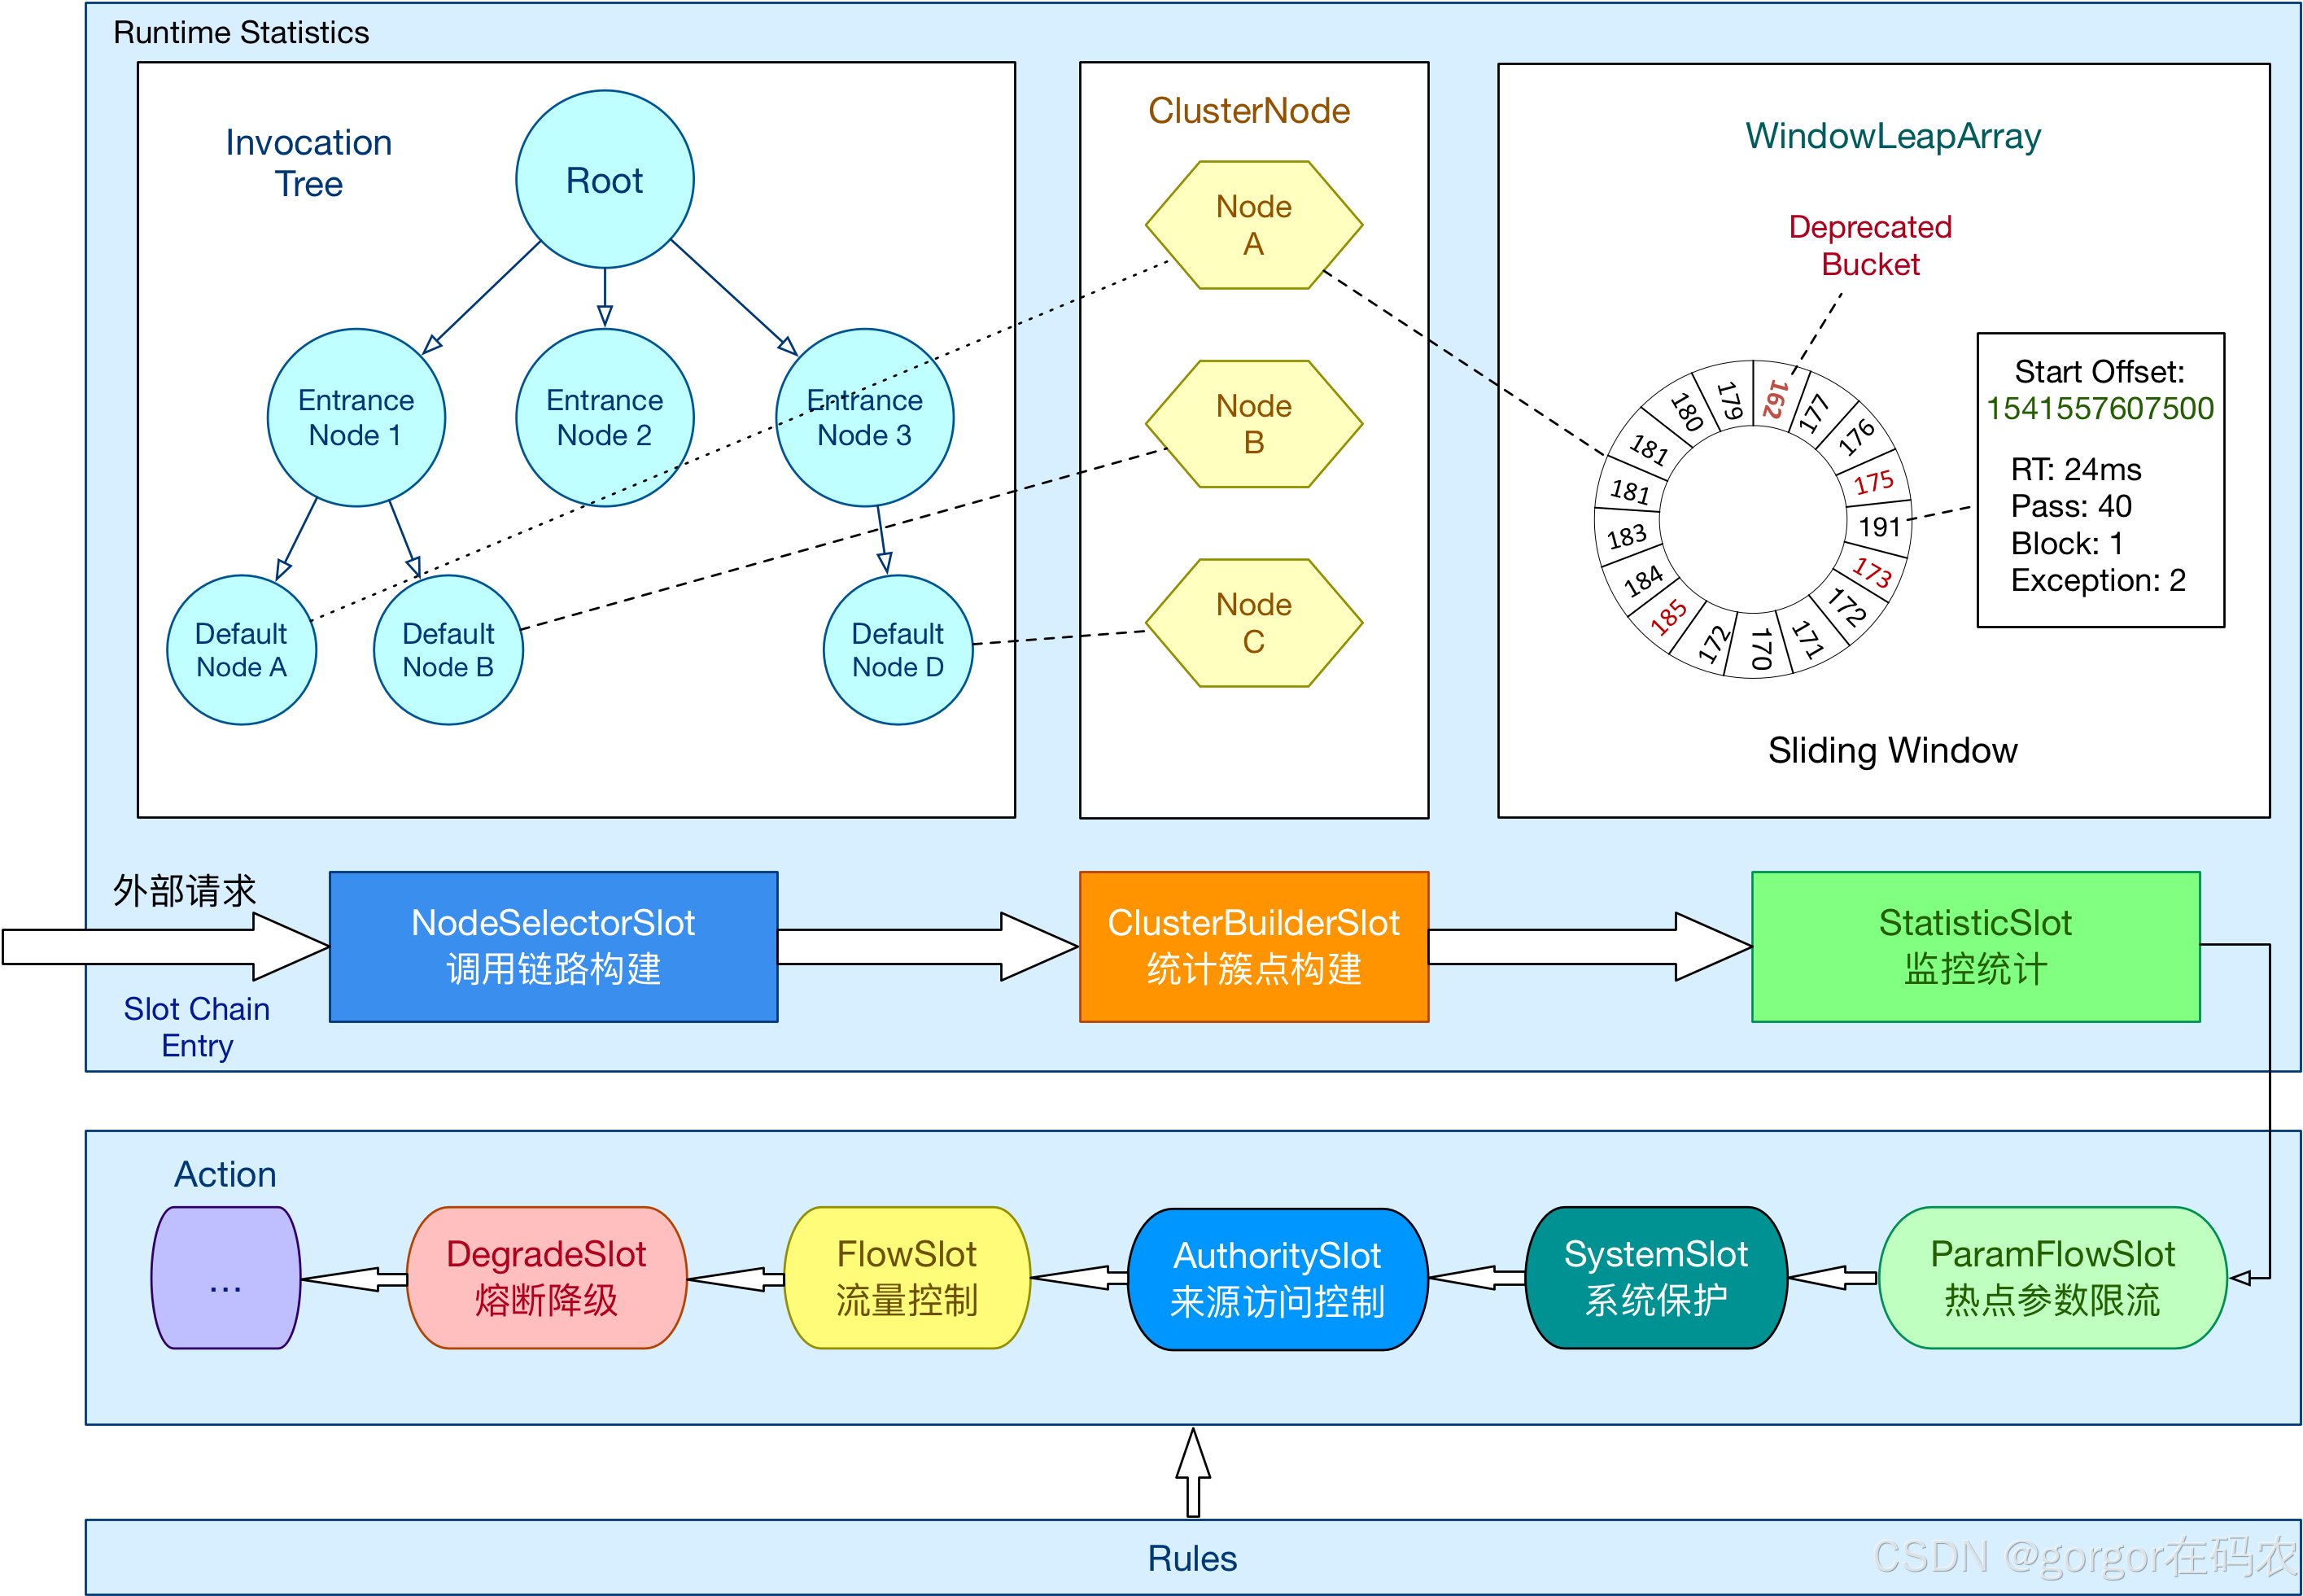
其核心工作机制基于责任链模式(Slot Chain)实现多维度流量控制、熔断降级和系统保护。以下是其主要工作机制的详细解析:
核心处理流程:Slot Chain 责任链
当资源(如方法、接口)被访问时,Sentinel 会触发一条由多个 ProcessorSlot 组成的处理链,按固定顺序执行以下核心槽位(Slot):
| 槽位 | 职责 | 关键技术 |
|---|---|---|
| NodeSelectorSlot | 构建资源调用路径树,区分不同入口(Context)的流量 | 树状结构(EntranceNode/DefaultNode) |
| ClusterBuilderSlot | 创建全局资源节点(ClusterNode)和来源节点(OriginNode) | 多维度统计(资源总流量、调用来源) |
| StatisticSlot | 实时统计运行时指标(QPS、RT、线程数、异常率) | 滑动窗口(LeapArray)、高性能内存计算 |
| SystemSlot | 检查系统负载(CPU、LOAD、入口QPS) | 动态阈值调整(仅对入口流量生效) |
| AuthoritySlot | 黑白名单控制(基于调用来源origin) | 字符串匹配规则 |
| FlowSlot | 流量控制(QPS/线程数限流) | 滑动窗口、令牌桶/漏桶算法 |
| DegradeSlot | 熔断降级(慢调用/异常比例/异常数) | 状态机(OPEN/HALF_OPEN/CLOSED) |
| LogSlot | 记录拦截日志 | 异常事件输出 |
控制台设置配置,服务接口配置的核心类:com.alibaba.csp.sentinel.command.handler.ModifyRulesCommandHandler
Spring Mvc 接口请求,触发限流降级的核心类:
com.alibaba.csp.sentinel.adapter.spring.webmvc.AbstractSentinelInterceptor
二、Sentinel 实战
1. Sentinel 控制台下载和启动
Sentinel 下载地址
启动命令
在 Cmd 中执行Sentinel jar 启动控制台
java -Dserver.port=8889 -Dcsp.sentinel.dashboard.server=localhost:8889 -Dproject.name=sentinel-dashboard-1.8.6 -jar sentinel-dashboard-1.8.6.jar
访问控制台
2. 启动 nacos
下载地址:nacos-server-2.2.0
在 bin 目录下启动 nacos命令
startup.cmd
3. Spring boot 集成
引入依赖
        <!-- sentinel 依赖-->
        <dependency>
            <groupId>com.alibaba.cloud</groupId>
            <artifactId>spring-cloud-starter-alibaba-sentinel</artifactId>
        </dependency>
配置控制台参数
spring:
  application:
    name: order-server

  cloud:
    sentinel:
      # 将其配置为 false 即可根据不同的 URL 进行链路限流
      web-context-unify: false
      transport:
        # 添加sentinel的控制台地址
        dashboard: localhost:8889
        # 指定应用与Sentinel控制台交互的端口,应用会起一个HttpServer占用该端口
        port: 8719
与 Spring boot 集成完毕,此时我们去 Sentinel 配置限流降级策略就可以。但有个要点要注意,
微服务 与 Sentinel 控制台的连接是在首次请求触发资源访问时建立的,而非应用启动时立即建立。这是 Sentinel 的懒加载机制设计。
连接建立流程
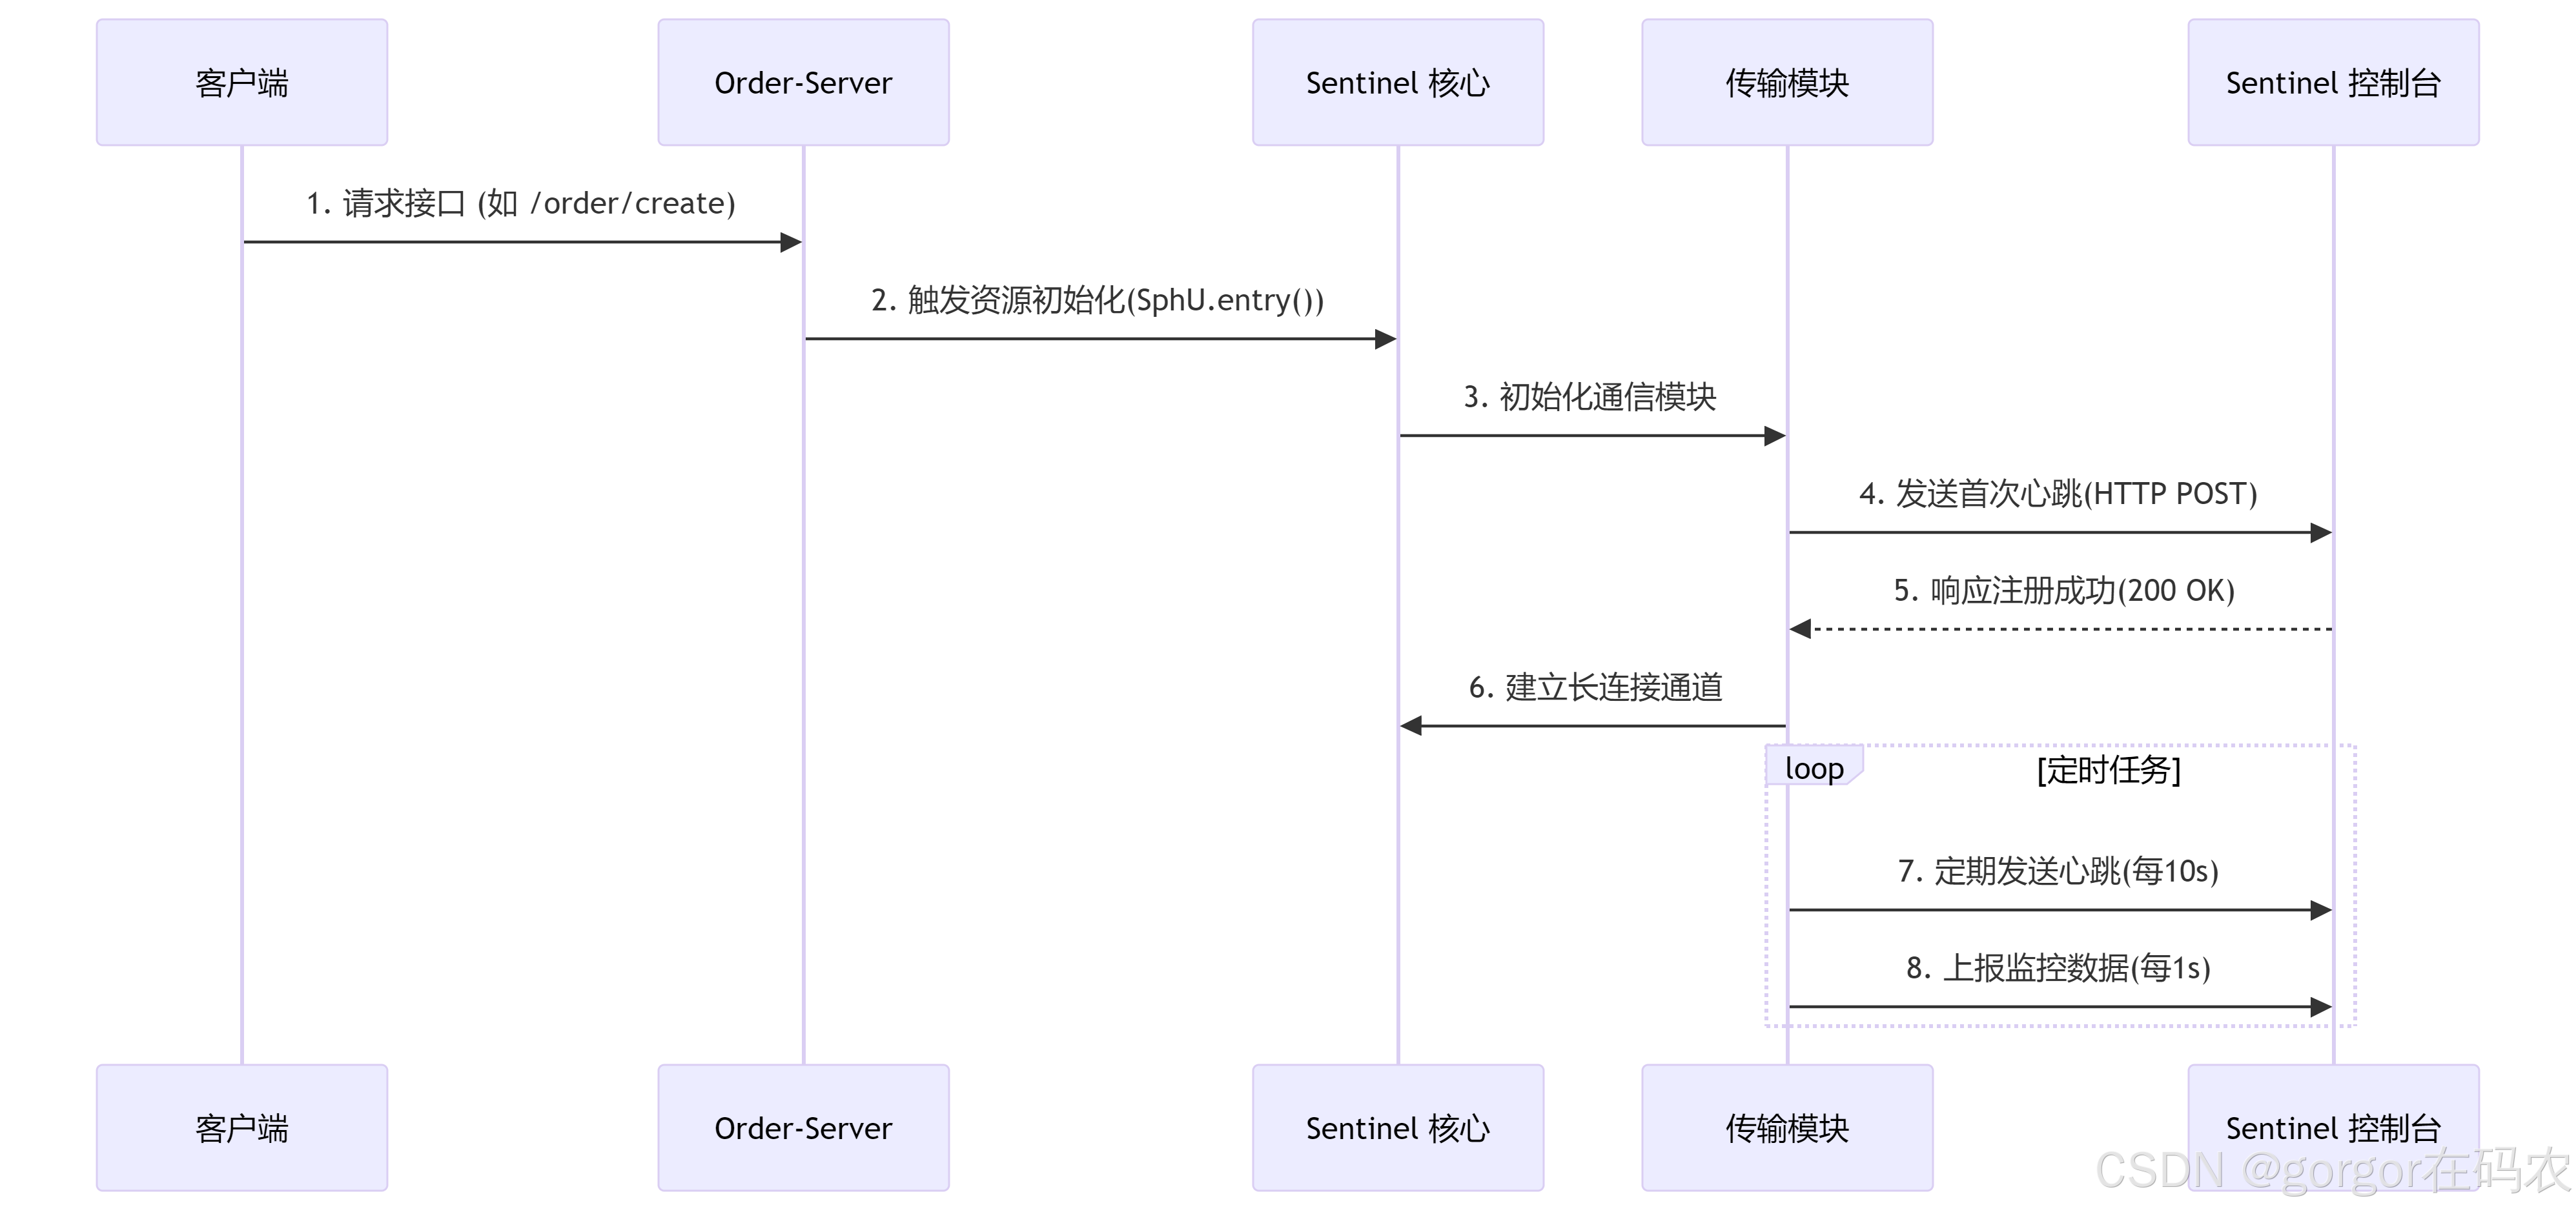
资源初始化入口 核心类:com.alibaba.csp.sentinel.Env
所以,我们如果想要配置服务下某个接口的限流降级策略,则需要先访问任意一个接口,然后才可以去配置。
三、Sentinel 控制台配置详情
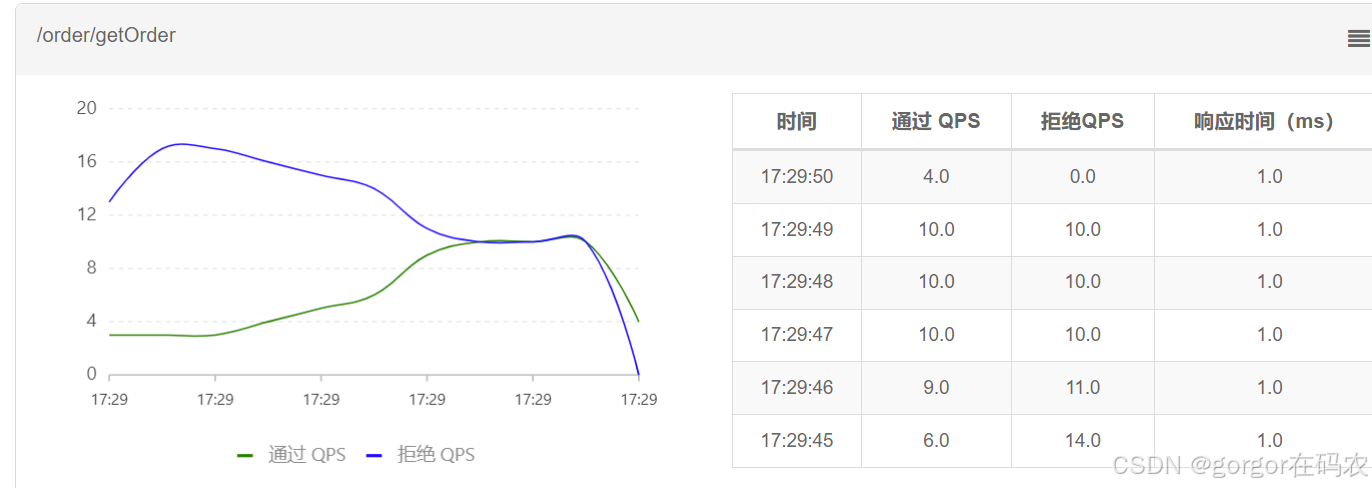
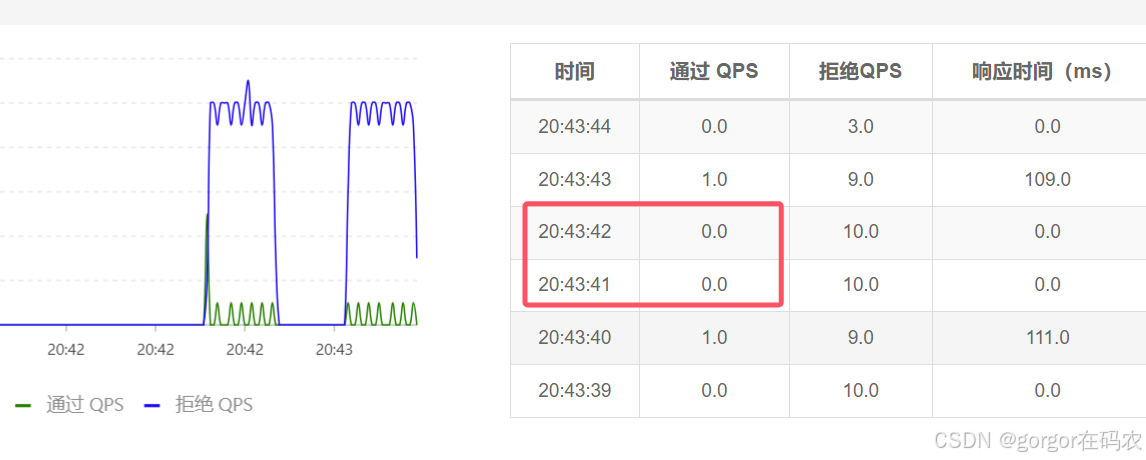
1. 实时监控
监控接口的通过的QPS 和拒绝的QPS
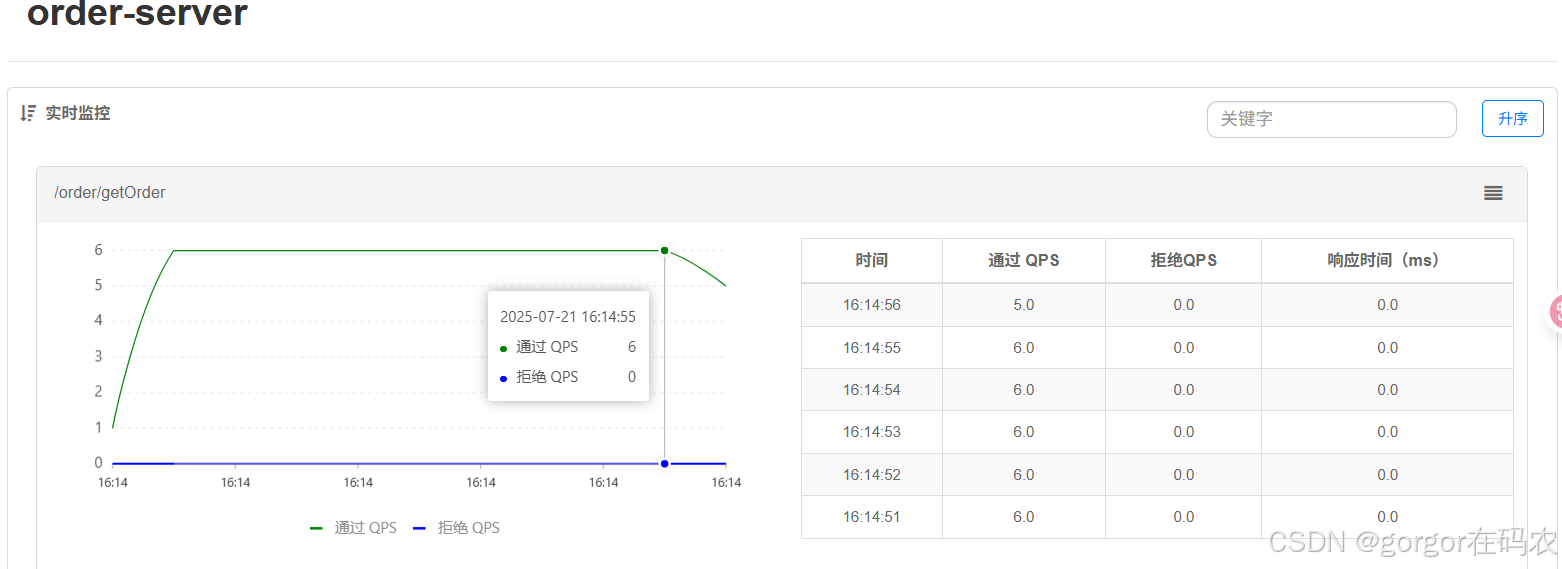
注意:请确保 Sentinel 控制台所在的机器时间与应用的机器时间保持一致,否则会导致拉不到实时的监控数据。
还有一个要注意的,实时监控仅存储5分钟以内的数据,如果需要持久化,需要通过调用实时监控接口来定制。
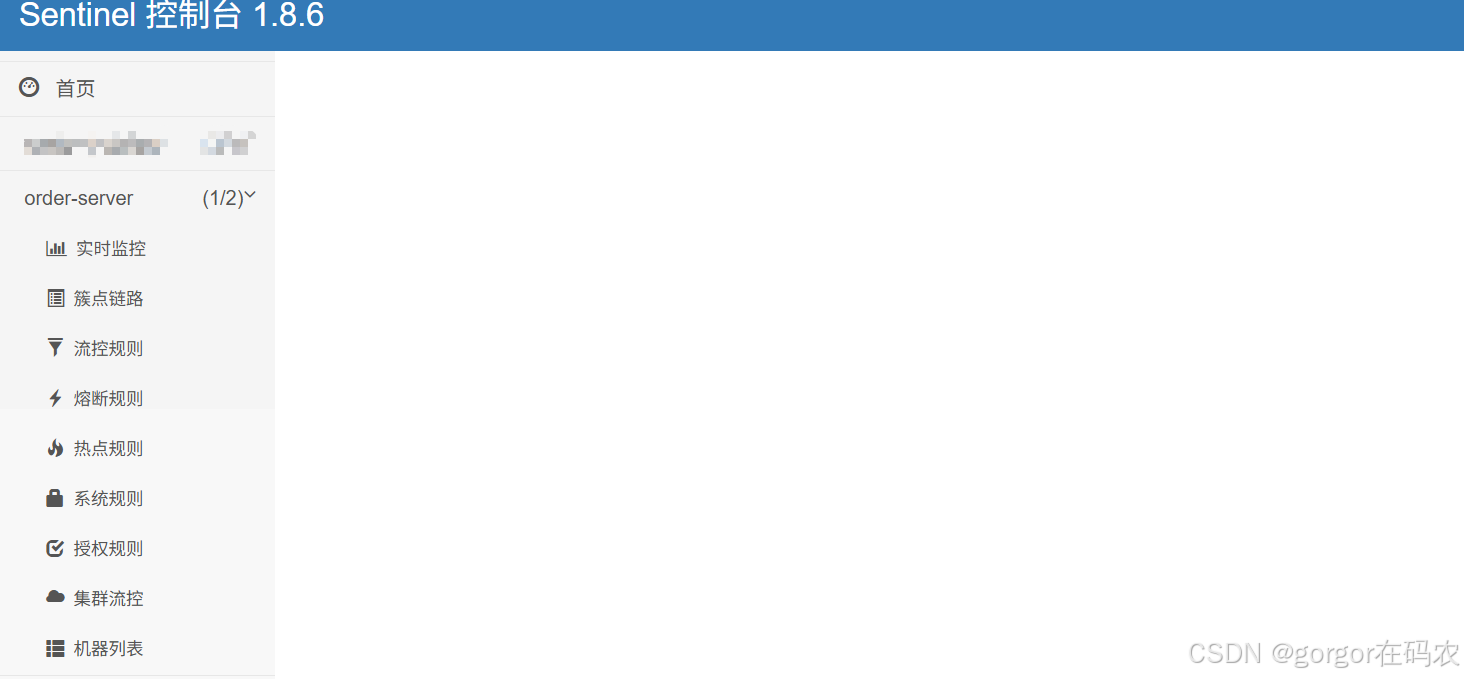
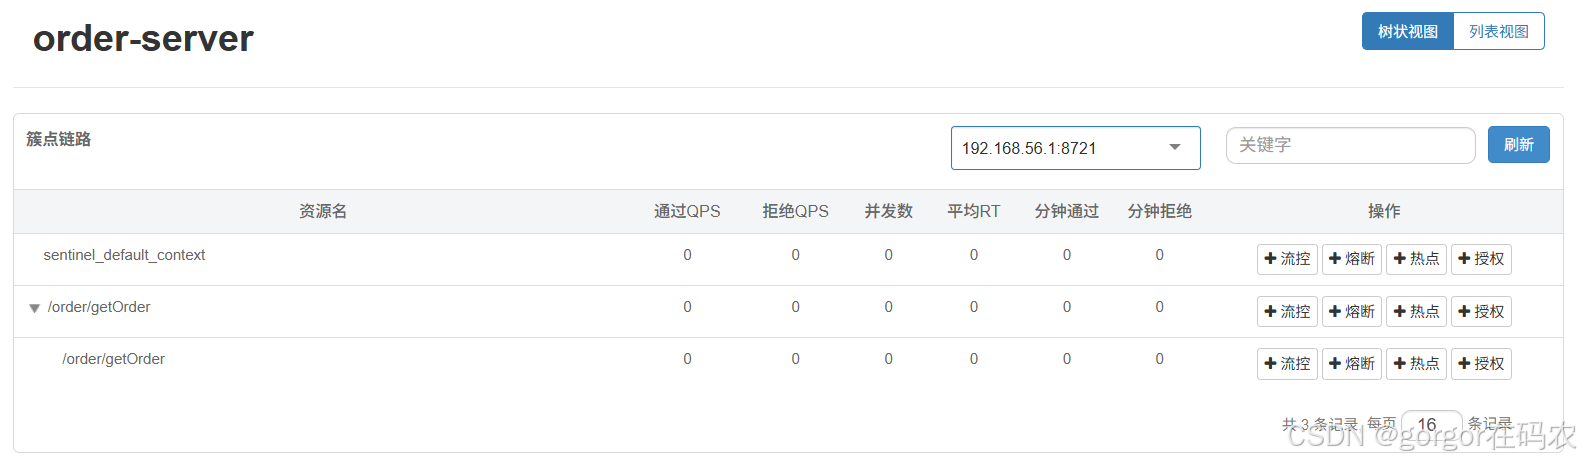
2. 族点链路
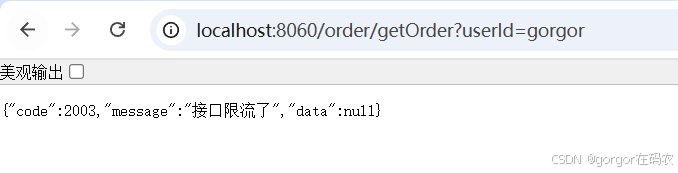
用来显示微服务所监控的 API,我们可以在这里配置流控、熔断,热点和授权规则。
访问 http://localhost:8060/order/getOrder?userId=gorgor
3.流控规则
一条限流规则主要由下面几个因素组成,我们可以组合这些元素来实现不同的限流效果:
resource:资源名,即限流规则的作用对象count: 限流阈值grade: 限流阈值类型,QPS 或线程数strategy: 根据调用关系选择策略
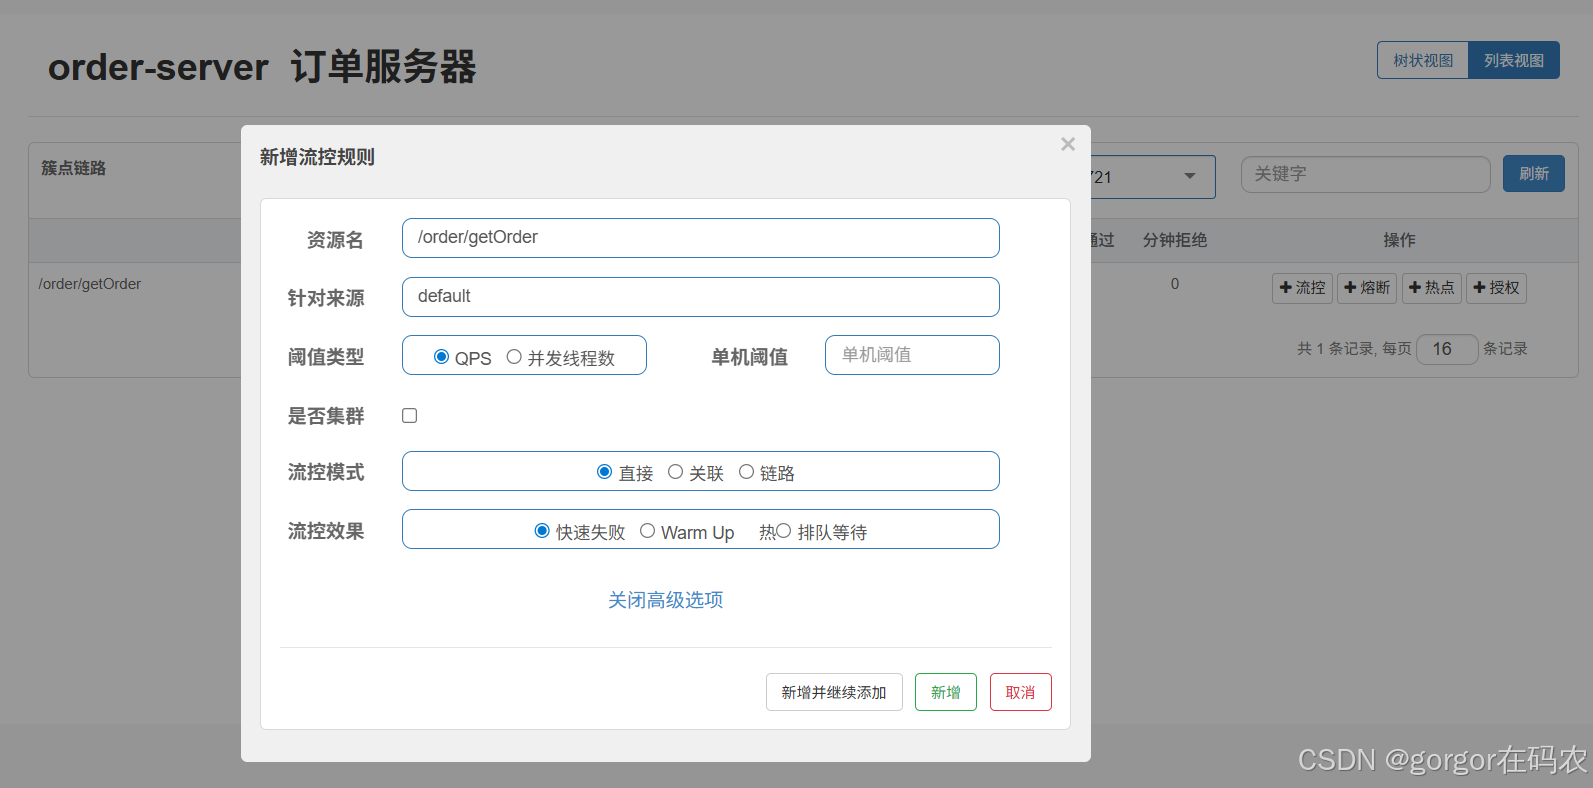
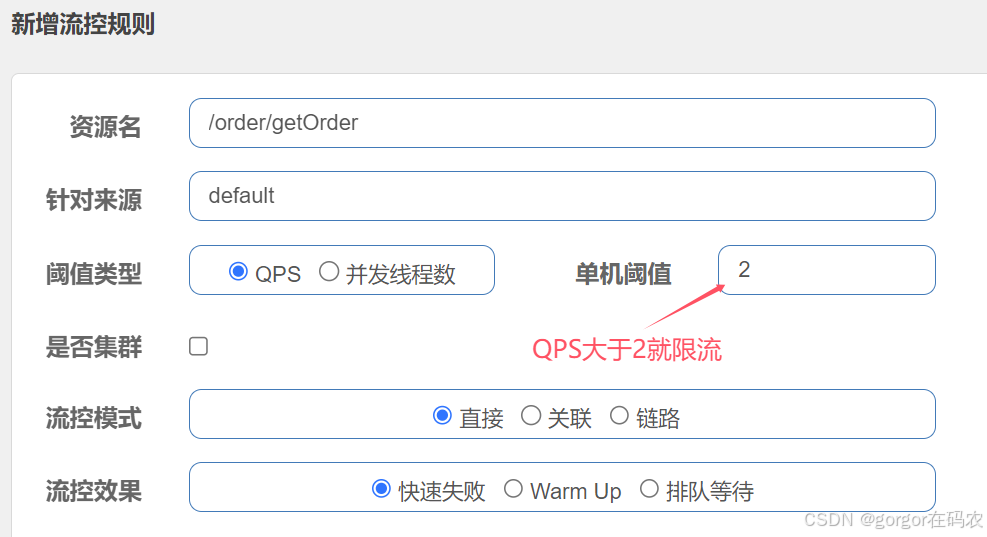
3.1 阀值类型
基于QPS/并发数的流量控制
流量控制主要有两种统计类型,一种是统计线程数,另外一种则是统计 QPS。类型由 FlowRule.grade 字段来定义。其中,0 代表根据并发数量来限流,1 代表根据 QPS 来进行流量控制。其中线程数、QPS 值,都是由 StatisticSlot 实时统计获取的。
-
QPS
配置流控规则
请求接口
流控效果

默认流控提示信息类为:com.alibaba.csp.sentinel.adapter.spring.webmvc.callback.DefaultBlockExceptionHandler
调用的地方是在 spring mvc 接口资源限流入口 HandlerInterceptor 的 AbstractSentinelInterceptor 的 preHandle 方法中,对异常的处理是 BlockExceptionHandler
如果需要更改流控的提示信息,则需要自己实现com.alibaba.csp.sentinel.adapter.spring.webmvc.callback.BlockExceptionHandler 接口。
自定义 BlockExceptionHandler 的实现类统一处理 BlockException
/**
 * 自定义限流异常处理,替换默认的异常处理类 DefaultBlockExceptionHandler
 */
@Slf4j
@Component
public class MyBlockExceptionHandler implements BlockExceptionHandler {


    public void handle(HttpServletRequest request, HttpServletResponse response, BlockException e) throws Exception {
        log.info("BlockExceptionHandler BlockException================"+e.getRule());

        Result r = null;

        if (e instanceof FlowException) {
            r = Result.failed("接口限流了");

        } else if (e instanceof DegradeException) {
            r = Result.failed("服务降级了");

        } else if (e instanceof ParamFlowException) {
            r = Result.failed("热点参数限流了");

        } else if (e instanceof SystemBlockException) {
            r = Result.failed("触发系统保护规则了");

        } else if (e instanceof AuthorityException) {
            r = Result.failed("授权规则不通过");
        }

        //返回json数据
        response.setStatus(500);
        response.setCharacterEncoding("utf-8");
        response.setContentType(MediaType.APPLICATION_JSON_VALUE);
        new ObjectMapper().writeValue(response.getWriter(), r);

    }
}
重启服务后测试流控效果。
-
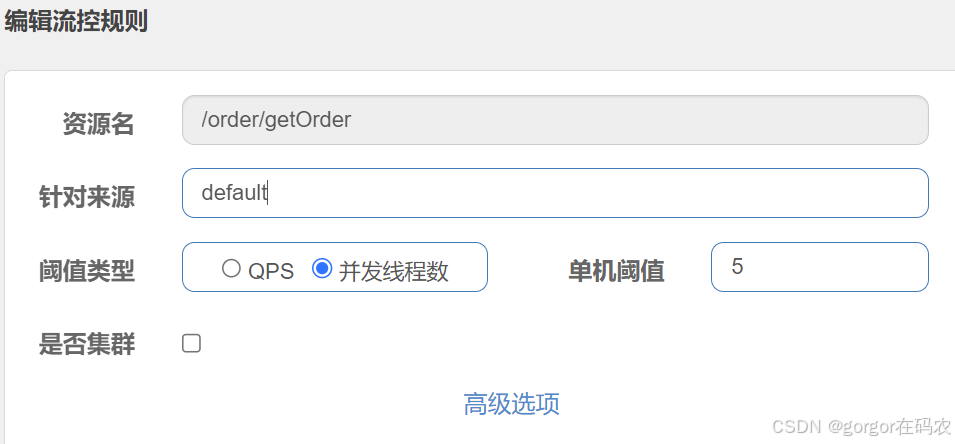
并发线程数
并发线程数控制用于保护业务线程池不被慢调用耗尽,简单统计当前请求上下文的线程数目(正在执行的调用数目),如果超出阀值,新的请求会被立即拒绝,效果类似于信号量隔离。
配置流控规则
测试效果
测试接口
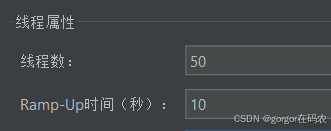
使用压测工具 jmeter 进行压测
线程组配置

流控效果
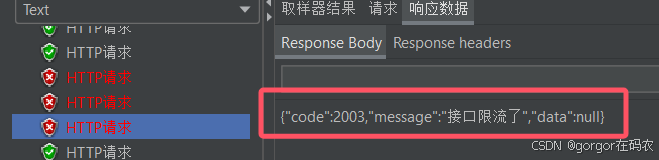
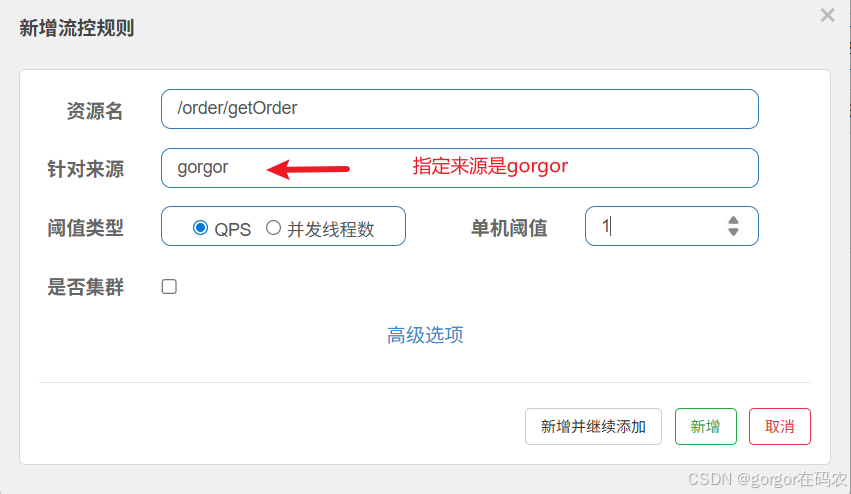
3.2 针对来源
基于调用针对来源关系的流量控制,根据调用方限流,origin 参数表明了调用方身份。默认是没有实现来源数据的,需要实现 RequestOriginParser 接口,如下:
@Component
public class MyRequestOriginParser implements RequestOriginParser {
    /**
     * 通过request获取来源标识,交给授权规则进行匹配
     * @param request
     * @return
     */
    public String parseOrigin(HttpServletRequest request) {
        // 标识字段名称可以自定义
        String origin = request.getParameter("userId");
//        if (StringUtil.isBlank(origin)){
//            throw new IllegalArgumentException("userId参数未指定");
//        }
        return origin;
    }
}
配置流控规则
流控效果
接口: http://localhost:8060/order/getOrder?userId=gorgor 会被流控
接口: http://localhost:8060/order/getOrder?userId=jj不会被流控

可以通过一下命令来展示不用的调用方对同一个资源的调用数据

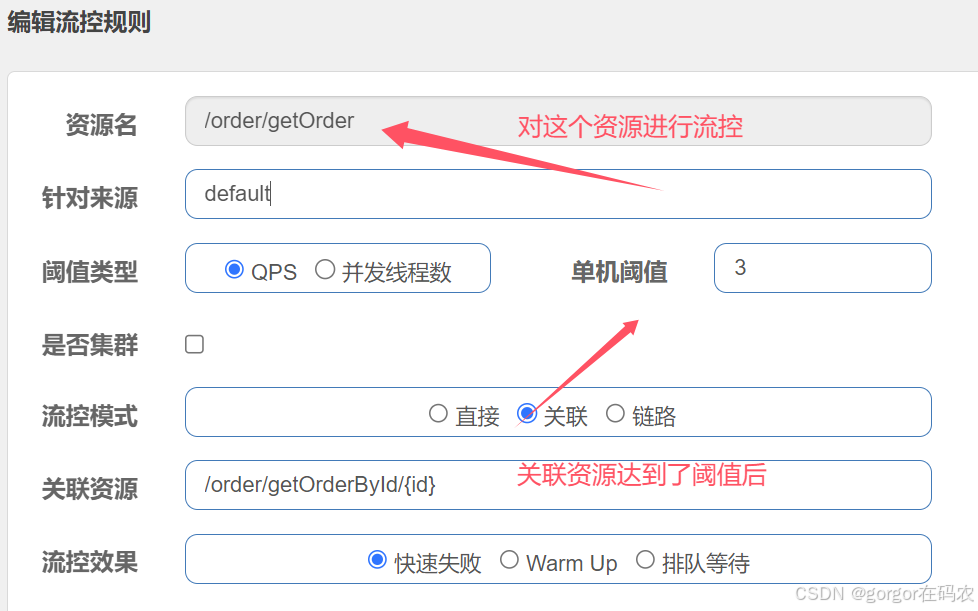
3.3 流控模式
-
关联
基于关联调用关系的流量控制,可以简单理解为,当关联资源A达到阀值的时候,对资源B进行流控。使用关联限流来避免具有关联关系的资源之间过度的争抢,比如当写库操作过于频繁时,可以配置一个法治,读数据的请求会被限流。
配置流控规则
测试效果
使用压测工具 jmeter 压测 http://localhost:8060/order/getRedOrderById/1 接口,
线程组配置
然后访问另外一个接口 http://localhost:8060/order/getOrder?userId=gorgor ,接口会被流控。
-
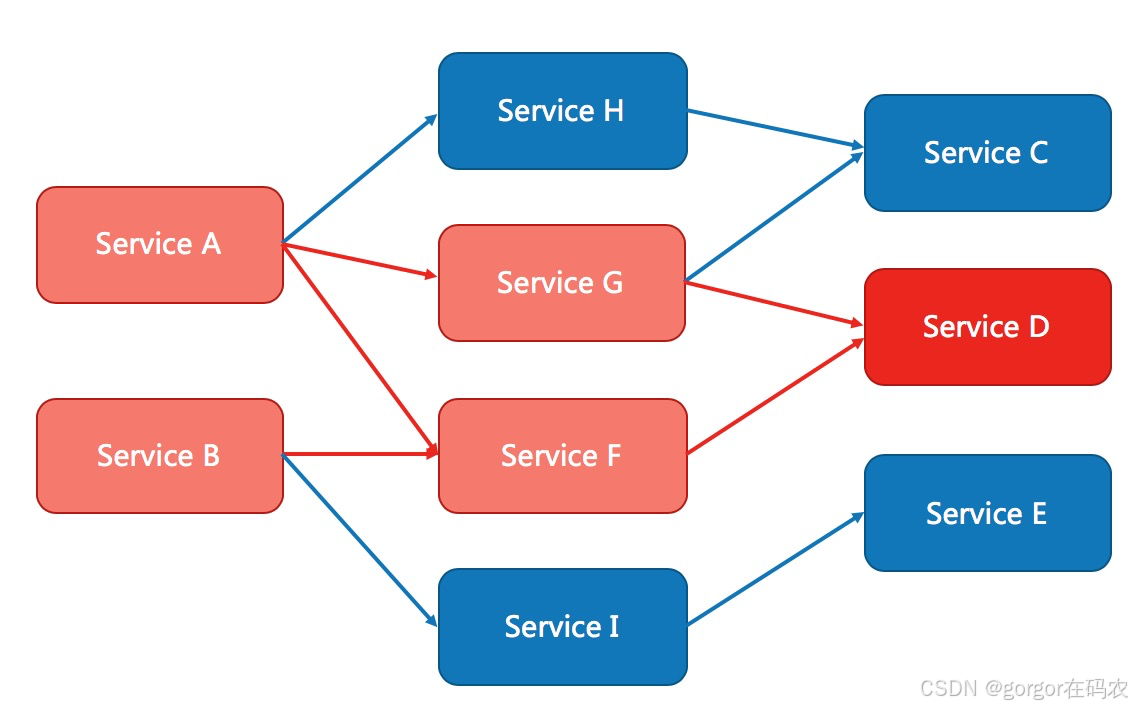
链路
基于链路调用关系的流量控制,可以简单理解为,资源A和B都会调用C,设置入口资源是A,当C达到阀值时,对入口资源A进行流控,而不会对B进行流控。
环境准备
OrderServicelmpl#getOrderByld 方法添加注解@SentinelResource进行资源保护
@SentinelResource(value = "getOrderById",blockHandler = "handleException")
    @Override
    public Result<?> getOrderById(Integer id) {

        Order order = orderMapper.getOrderById(id);
        return Result.success(order);
    }

    public Result handleException(Integer id, BlockException ex) {
        return  Result.failed("===被限流降级啦===");
    }
参考OrderController#getOrderByld方法 新增TestController测试类
@RestController
public class TestController {

    @Autowired
    private OrderService orderService;

    @GetMapping("/test1/{id}")
    public Result<?> test1(@PathVariable("id") Integer id){

        Result<?> res = null;
        try {
            res = orderService.getOrderById(id);
        }
        catch (BusinessException e) {
            return Result.failed(e.getMessage());
        }
        return res;
    }

    @GetMapping("/test2/{id}")
    public Result<?> test2(@PathVariable("id") Integer id){

        Result<?> res = null;
        try {
            res = orderService.getOrderById(id);
        }
        catch (BusinessException e) {
            return Result.failed(e.getMessage());
        }
        return res;
    }

}
配置流控规则
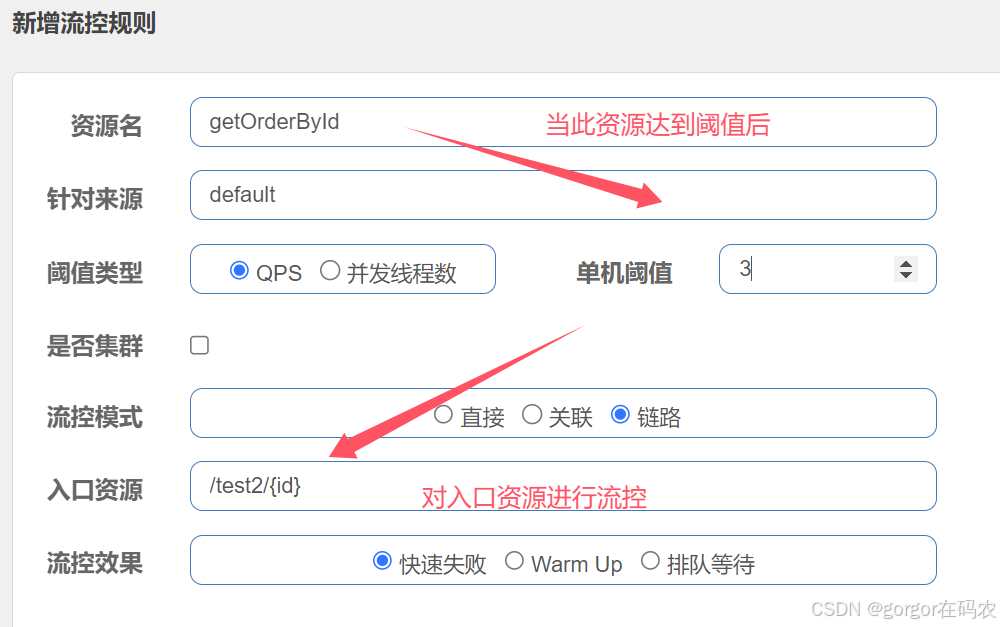
测试效果
- http://localhost:8060/test2/1 会被流控
- http://localhost:8060/test1/1 不会被流控
3.4 流控效果
-
快速失败(直接拒绝)
达到阈值后,新的请求会被立即拒绝并抛出FlowException异常。是默认的处理方式。
用于对系统处理能力确切已知的情况下,比如通过压测确定了系统的准确水位时。
-
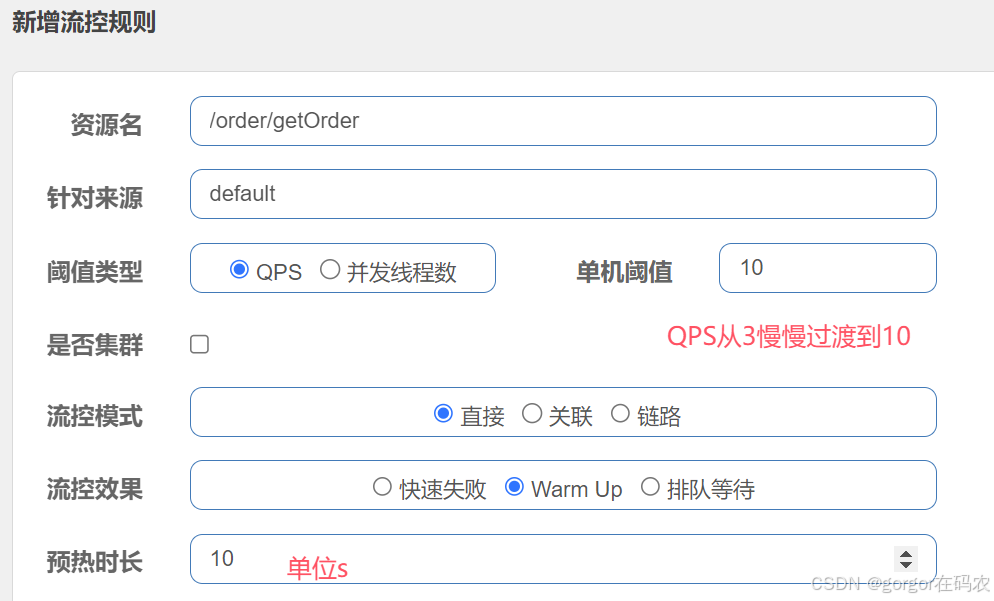
Warm Up(预热)
预热模式,对超出阈值的请求同样是拒绝并抛出异常。但这种模式阈值会动态变化,从一个较小值逐渐增加到最大阈值。
冷加载因子: codeFactor 默认是3,即请求 QPS 从 threshold/3 开始,经预热时长逐渐升至设定的 QPS 阈值。
配置流控规则
测试效果
测试接口
使用压测工具 jmeter 进行压测
线程组配置
流控效果
-
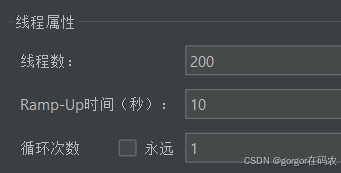
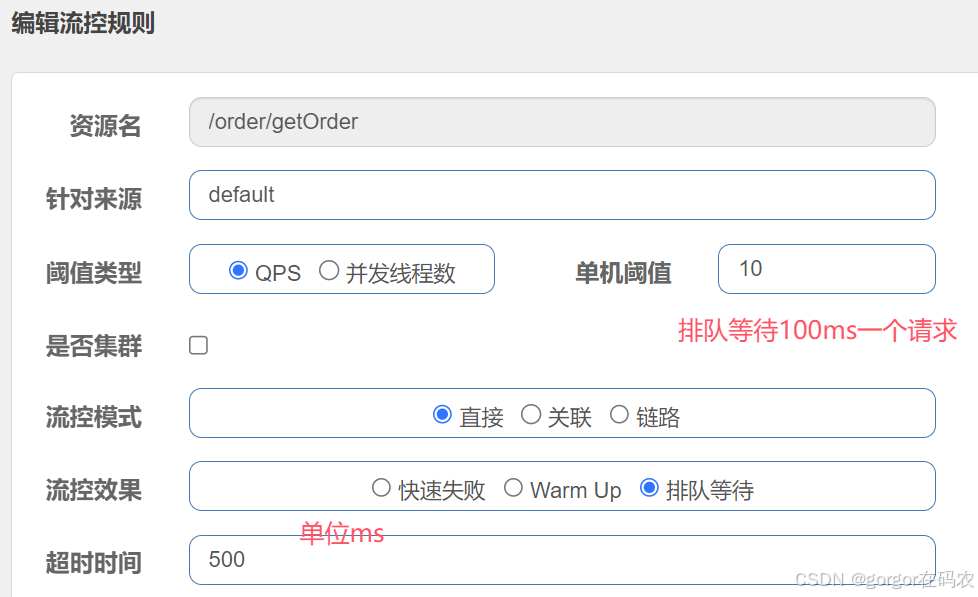
匀速排队(排队等待)
所有的请求按照先后次序排队执行,两个请求的间隔不能小于指定时长,请求的等待时间不能超过下面配置的超时时间,比如下面配置的单机阀值是 10,代表1秒钟只能通过10个请求,超过了则会被限流,然后10个请求会放到队列中,每隔 100 ms 执行一个请求,1秒内如果在队列中的请求超过500ms ,则同时也会被限流。
配置流控规则
测试效果
使用压测工具 jmeter 进行压测
测试接口
线程组配置

流控效果

4. 熔断规则
对不稳定的弱依赖服务调用进行熔断降级,暂时切断不稳定调用,避免局部不稳定因素导致整体的雪崩。
例如,支付的时候,可能需要远程调用银联提供的 API;查询某个商品的价格,可能需要进行数据库查询。然而,这个被依赖服务的稳定性是不能保证的。如果依赖的服务出现了不稳定的情况,请求的响应时间变长,那么调用服务的方法的响应时间也会变长,线程会产生堆积,最终可能耗尽业务自身的线程池,服务本身也变得不可用。此时,可以使用熔断降级机制,保护服务。
Sentinel 提供以下几种熔断策略:
- 慢调用比例 (
SLOW_REQUEST_RATIO):选择以慢调用比例作为阈值,需要设置允许的慢调用 RT(即最大的响应时间),请求的响应时间大于该值则统计为慢调用。当单位统计时长(statIntervalMs)内请求数目大于设置的最小请求数目,并且慢调用的比例大于阈值,则接下来的熔断时长内请求会自动被熔断。经过熔断时长后熔断器会进入探测恢复状态(HALF-OPEN 状态),若接下来的一个请求响应时间小于设置的慢调用 RT 则结束熔断,若大于设置的慢调用 RT 则会再次被熔断。 - 异常比例 (
ERROR_RATIO):当单位统计时长(statIntervalMs)内请求数目大于设置的最小请求数目,并且异常的比例大于阈值,则接下来的熔断时长内请求会自动被熔断。经过熔断时长后熔断器会进入探测恢复状态(HALF-OPEN 状态),若接下来的一个请求成功完成(没有错误)则结束熔断,否则会再次被熔断。异常比率的阈值范围是[0.0, 1.0],代表 0% - 100%。 - 异常数 (
ERROR_COUNT):当单位统计时长内的异常数目超过阈值之后会自动进行熔断。经过熔断时长后熔断器会进入探测恢复状态(HALF-OPEN 状态),若接下来的一个请求成功完成(没有错误)则结束熔断,否则会再次被熔断。
4.1 熔断策略-慢调用比例
当单位统计时长(statntervalMs)内请求数目大于设置的最小请求数目,并且慢调用的比例大于阈值,则接下来的熔断时长内请求会自动被熔断。
环境准备
添加测试代码
@RequestMapping("/test")
public String test() {
    try {
        Thread.sleep(100);
    } catch (InterruptedException e) {
        e.printStackTrace();
    }
    return "========test()========";
}
查询接口
配置降级规则

测试效果
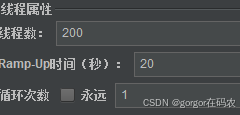
使用压测工具 jmeter 进行压测
线程组配置
查看实时监控,可以看到断路器熔断效果
此时浏览器访问会出现服务降级结果
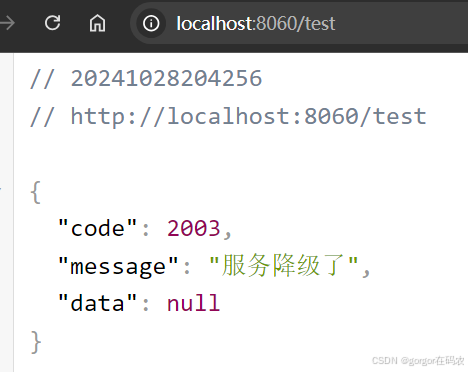
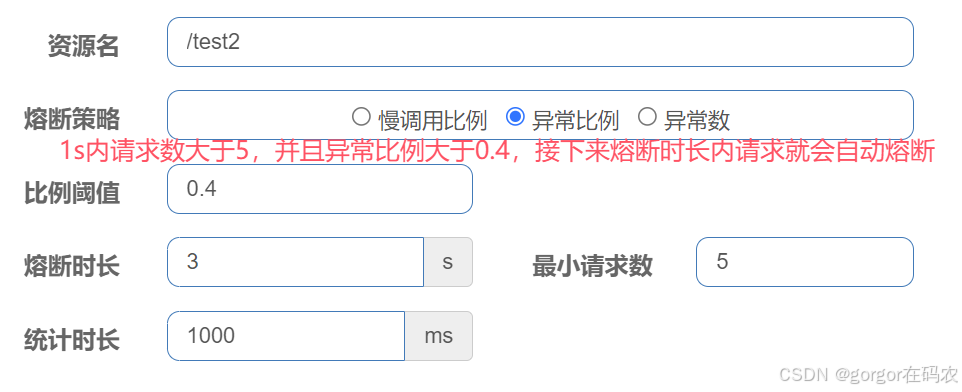
4.2 熔断策略-异常比例
当单位统计时长(statintervalMs)内请求数目大于设置的最小请求数目,并且异常的比例大于阈值,则接下来的熔断时长内请求会自动被熔断。
环境准备
添加测试代码
AtomicInteger atomicInteger = new AtomicInteger(0);
    @RequestMapping("/test2")
    public String test222() {
        atomicInteger.getAndIncrement();
        if (atomicInteger.get() % 2 == 0){
            //模拟异常和异常比率
            int i = 1/0;
        }

        return "========test2()========";
    }
查询接口
配置降级规则
测试效果
使用压测工具 jmeter 进行压测
线程组配置
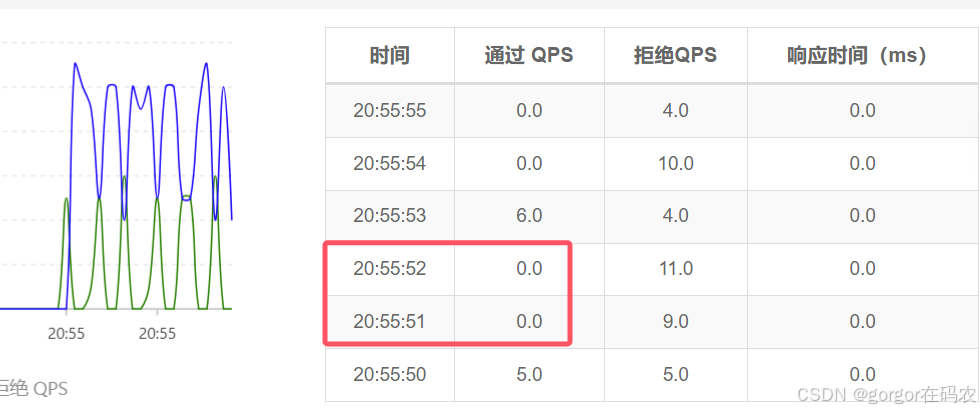
查看实时监控,可以看到断路器熔断效果
4.3 熔断策略-异常数
当单位统计时长内的异常数目超过阈值之后会自动进行熔断。
环境准备
添加测试代码
AtomicInteger atomicInteger = new AtomicInteger(0);
    @RequestMapping("/test2")
    public String test222() {
        atomicInteger.getAndIncrement();
        if (atomicInteger.get() % 2 == 0){
            //模拟异常和异常比率
            int i = 1/0;
        }

        return "========test2()========";
    }
查询接口
配置降级规则
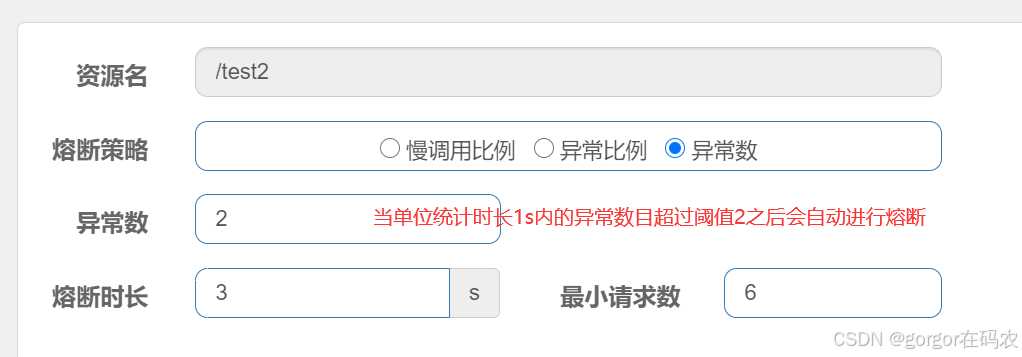
测试效果
使用压测工具 jmeter 进行压测
线程组配置

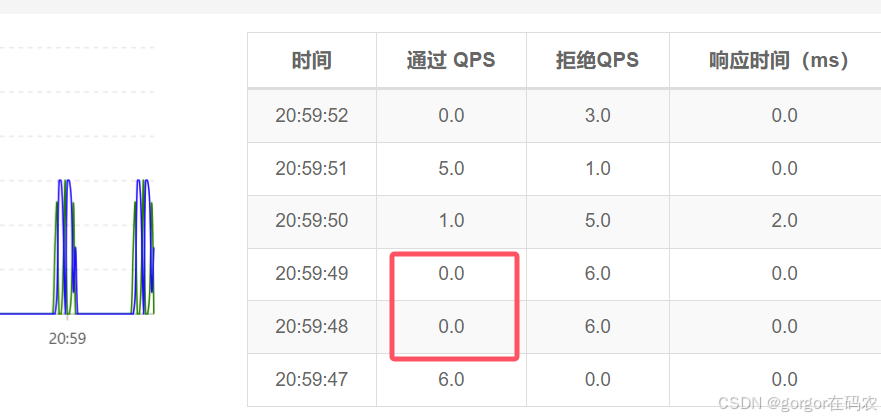
查看实时监控,可以看到断路器熔断效果
5. 热点规则
热点参数限流会统计传入参数中的热点参数,并根据配置的限流阈值与模式,对包含热点参数的资源调用进行限流。
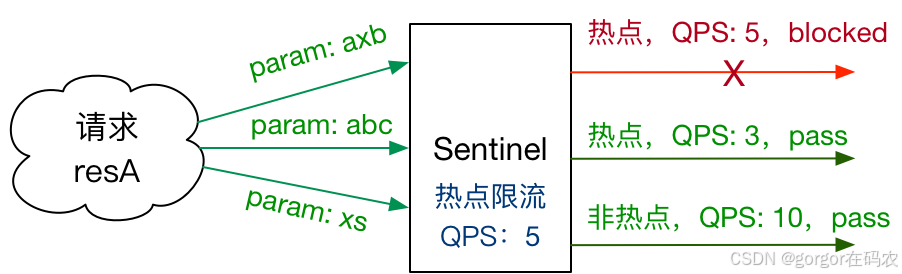
注意:
- 热点规则需要使用@SentinelResource("resourceName”)注解,否则不生效
- 参数必须是7种基本数据类型才会生效
配置热点规则
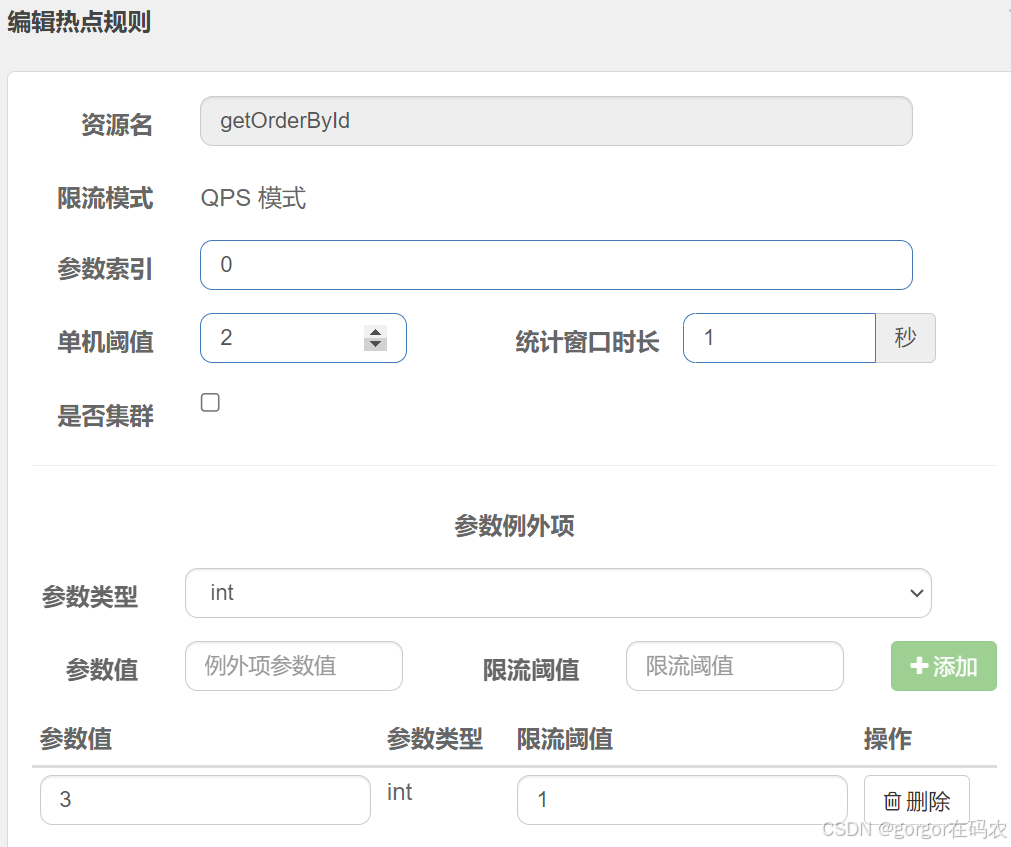
注意:资源名必须是@SentinelResource("资源名”) 中配置的资源名,热点规则依赖于注解
测试接口
测试效果
- http://localhost:8060/order/getOrderByld/3 限流的阈值为1
- http://localhost:8060/order/getOrderByld/1 限流的阈值为2
6. 系统规则
系统保护规则是应用整体维度的,而不是资源维度的,并且仅对入口流量生效。
系统自适应保护的目的
- 保证系统不被拖垮
- 在系统稳定的前提下,保持系统的吞吐量
系统规则支持以下的阈值类型
- .Load(仅对 Linux/Unix-ike 机器生效):当系统 load1 超过國值,且系统当前的并发线程数超过系统容量时才会触发系统保护。系统容量由系统的 maxQps* minRt 计算得出。设定参考值一般是 CPU cores* 2.5。
- CPU usage(1.5.0+ 版本):当系统 CPU 使用率超过阈值即触发系统保护(取值范围 0.0-1.0)
- RT:当单台机器上所有入口流量的平均 RT 达到阈值即触发系统保护,单位是毫秒。
- 线程数:当单台机器上所有入口流量的并发线程数达到阈值即触发系统保护,
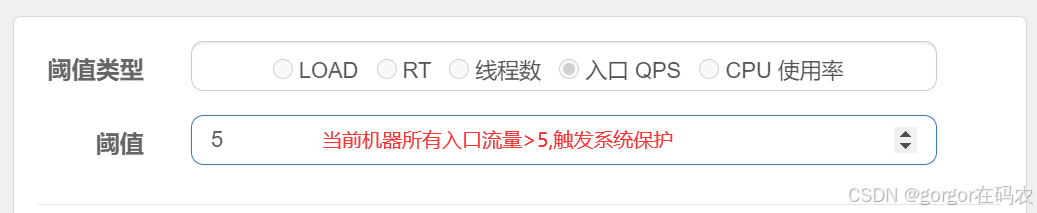
- 入口 QPS:当单台机器上所有入口流量的 QPS 达到阈值即触发系统保护。
配置系统规则
测试效果
使用压测工具 jmeter 进行压测
测试接口
线程组配置

查看实时监控,可以看到限流效果

7. 授权控制规则
来源访问控制(黑白名单)根据资源的请求来源(origin)限制资源是否通过,若配置白名单则只有请求来源位于白名单内时才可通过;若配置黑名单则请求来源位于黑名单时不通过,其余的请求通过。
配置项讲解
资源名(resource):限流规则的作用对象。
流控应用(limitApp):对应的黑名单/白名单,不同 origin 用,分隔,如 appA,appB。
授权类型(strategy):限制模式,AUTHORITY WHITE 为白名单模式,AUTHORITY BLACK 为黑名单模式,默认为白名单模式。
授权控制也要实现来源数据的,需要实现 RequestOriginParser 接口,如下:
@Component
public class MyRequestOriginParser implements RequestOriginParser {
    /**
     * 通过request获取来源标识,交给授权规则进行匹配
     * @param request
     * @return
     */
    public String parseOrigin(HttpServletRequest request) {
        // 标识字段名称可以自定义
        String origin = request.getParameter("userId");
//        if (StringUtil.isBlank(origin)){
//            throw new IllegalArgumentException("userId参数未指定");
//        }
        return origin;
    }
}
配置授权规则
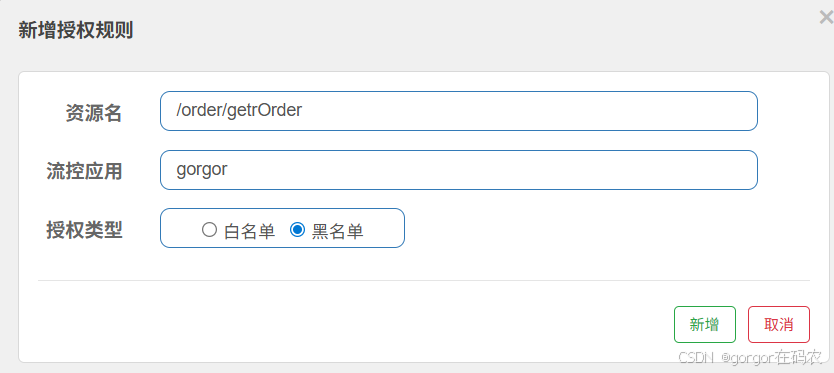
注意:自定义的RequestOriginParser接口实现类MyRequestOringinParse中指定了userId的值可以为来源。
测试效果
- http://localhost:8060/order/getOrder?userId=gorgor 会被限制访问
- http://localhost:8060/order/getOrder?userId=jj 不会被限制访问
四、Sentinel 规则持久化
Sentinel 默认将规则存储在内存中,应用重启后规则会丢失。生产环境必须实现规则持久化,而Sentinel没有提供持久化的功能,只有WritableDataSource抽象,需要我们自己自定义实现WritableDataSource 接口,将数据进行持久化。
官方推荐通过控制台设置规则后将规则推送到统一的规则中心,客户端实现 ReadableDataSource 接口端监听规则中心实时获取变更,流程如下:
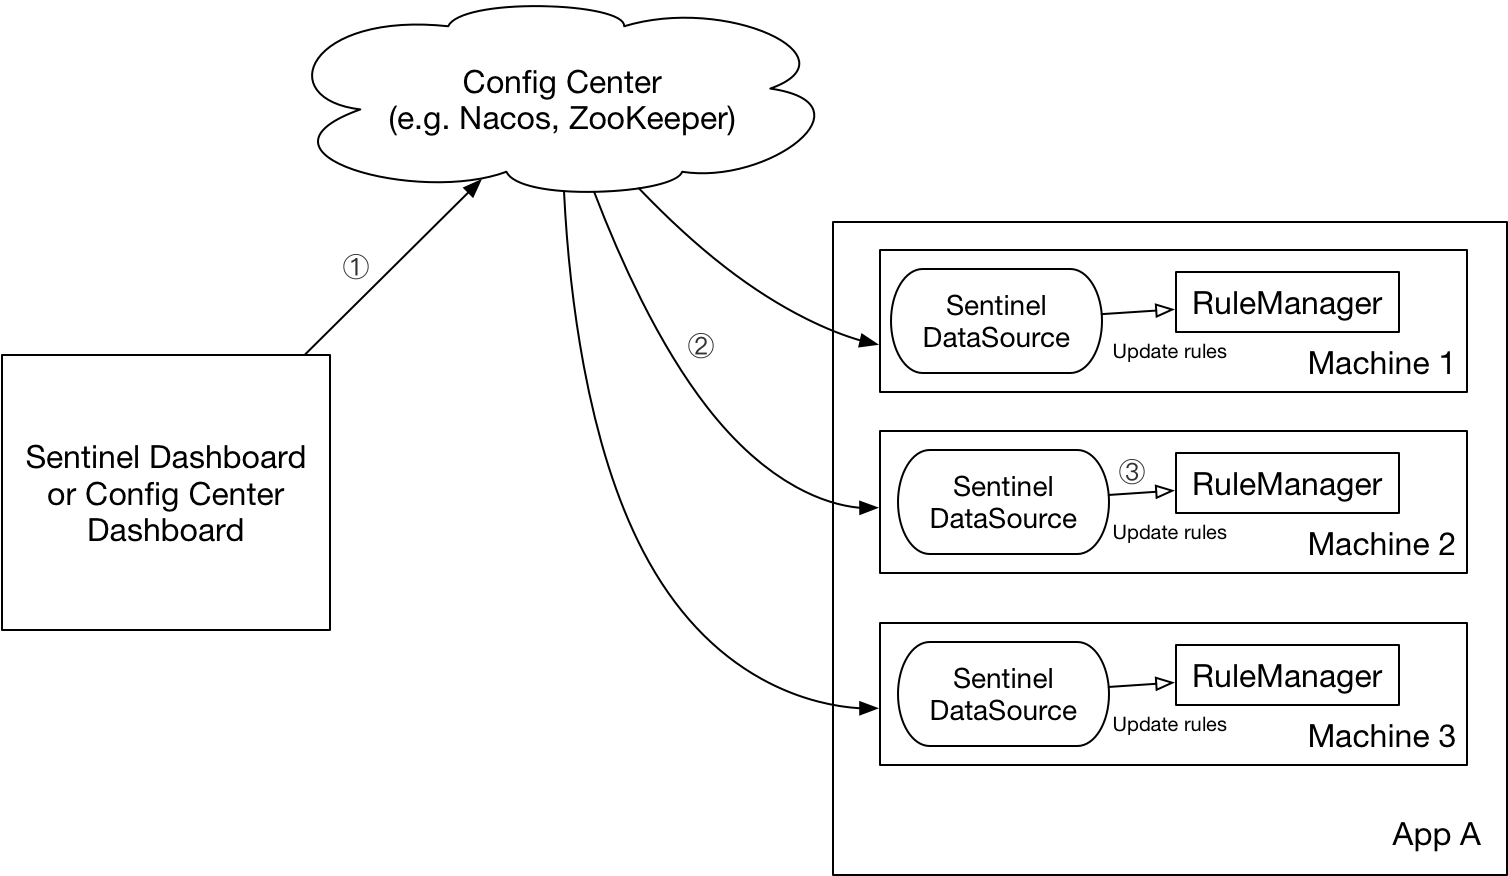
DataSource 扩展常见的实现方式有:
- 拉模式:客户端主动向某个规则管理中心定期轮询拉取规则,这个规则中心可以是 RDBMS、文件,甚至是 VCS 等。这样做的方式是简单,缺点是无法及时获取变更;
- 推模式:规则中心统一推送,客户端通过注册监听器的方式时刻监听变化,比如使用 Nacos、Zookeeper 等配置中心。这种方式有更好的实时性和一致性保证。
Sentinel 目前支持以下数据源扩展:
基于Nacos 配置中心实现推模式
-
从 Nacos 配置中心中获取配置
引入依赖
此依赖,可以从nacos中拉取配置,然后存在内存中,sentinel 控制台就会访问到这些数据。
<!--sentinel 从nacos拉取规则 -->
<dependency>
    <groupId>com.alibaba.csp</groupId>
    <artifactId>sentinel-datasource-nacos</artifactId>
</dependency>
配置 yml
spring:
  application:
    name: order-server

  cloud:
    nacos:
      discovery:
        server-addr: localhost:8848
        username: nacos
        password: nacos


    sentinel:
      # 将其配置为 false 即可根据不同的 URL 进行链路限流
      web-context-unify: false
      transport:
        # 添加sentinel的控制台地址
        dashboard: localhost:8889
        # 指定应用与Sentinel控制台交互的端口,应用会起一个HttpServer占用该端口
        port: 8719
      # 从nacos配置中心拉取规则信息
      datasource:
        flow-rules: #流控规则
          nacos:
            server-addr: localhost:8848
            username: nacos
            password: nacos
            dataId: ${spring.application.name}-flow-rules
            groupId: SENTINEL_GROUP   # 注意groupId对应Sentinel Dashboard中的定义
            data-type: json
            rule-type: flow
        degrade-rules: #熔断降级规则
          nacos:
            server-addr: localhost:8848
            dataId: ${spring.application.name}-degrade-rules
            groupId: SENTINEL_GROUP
            data-type: json
            rule-type: degrade
        param-flow-rules: #热点参数
          nacos:
            server-addr: localhost:8848
            dataId: ${spring.application.name}-param-flow-rules
            groupId: SENTINEL_GROUP
            data-type: json
            rule-type: param-flow
        authority-rules: #权限规则
          nacos:
            server-addr: localhost:8848
            dataId: ${spring.application.name}-authority-rules
            groupId: SENTINEL_GROUP
            data-type: json
            rule-type: authority
        system-rules: #系统规则
          nacos:
            server-addr: localhost:8848
            dataId: ${spring.application.name}-system-rules
            groupId: SENTINEL_GROUP
            data-type: json
            rule-type: system
从Nacos拉取流控规则配置的源码类:com.alibaba.cloud.sentinel.datasource.config.AbstractDataSourceProperties#postRegister
-
将Sentinel配置的规则推送到Nacos中
微服务端扩展自定义实现写数据源 WritableDataSource 接口,将规则保存到Nacos配置中心中。
处理类
public class SentinelNacosDataSourceHandler implements SmartInitializingSingleton {

    private final SentinelProperties sentinelProperties;

    public SentinelNacosDataSourceHandler(SentinelProperties sentinelProperties) {
        this.sentinelProperties = sentinelProperties;
    }

    public void afterSingletonsInstantiated() {
        sentinelProperties.getDatasource().values().forEach(this::registryWriter);
    }

    private void registryWriter(DataSourcePropertiesConfiguration dataSourceProperties) {
        final NacosDataSourceProperties nacosDataSourceProperties = dataSourceProperties.getNacos();
        if (nacosDataSourceProperties == null) {
            return;
        }
        final RuleType ruleType = nacosDataSourceProperties.getRuleType();
        switch (ruleType) {
            case FLOW:
                WritableDataSource<List<FlowRule>> flowRuleWriter = new NacosWritableDataSource<>(nacosDataSourceProperties, JSON::toJSONString);
                WritableDataSourceRegistry.registerFlowDataSource(flowRuleWriter);
                break;
            case DEGRADE:
                WritableDataSource<List<DegradeRule>> degradeRuleWriter = new NacosWritableDataSource<>(nacosDataSourceProperties, JSON::toJSONString);
                WritableDataSourceRegistry.registerDegradeDataSource(degradeRuleWriter);
                break;
            case PARAM_FLOW:
                WritableDataSource<List<ParamFlowRule>> paramFlowRuleWriter = new NacosWritableDataSource<>(nacosDataSourceProperties, JSON::toJSONString);
                ModifyParamFlowRulesCommandHandler.setWritableDataSource(paramFlowRuleWriter);
                break;
            case SYSTEM:
                WritableDataSource<List<SystemRule>> systemRuleWriter = new NacosWritableDataSource<>(nacosDataSourceProperties, JSON::toJSONString);
                WritableDataSourceRegistry.registerSystemDataSource(systemRuleWriter);
                break;
            case AUTHORITY:
                WritableDataSource<List<AuthorityRule>> authRuleWriter = new NacosWritableDataSource<>(nacosDataSourceProperties, JSON::toJSONString);
                WritableDataSourceRegistry.registerAuthorityDataSource(authRuleWriter);
                break;
            default:
                break;
        }
    }
}
写数据源
@Slf4j
public class NacosWritableDataSource<T> implements WritableDataSource<T> {

    private final Converter<T, String> configEncoder;
    private final NacosDataSourceProperties nacosDataSourceProperties;

    private final Lock lock = new ReentrantLock(true);
    private ConfigService configService = null;

    public NacosWritableDataSource(NacosDataSourceProperties nacosDataSourceProperties, Converter<T, String> configEncoder) {
        if (configEncoder == null) {
            throw new IllegalArgumentException("Config encoder cannot be null");
        }
        if (nacosDataSourceProperties == null) {
            throw new IllegalArgumentException("Config nacosDataSourceProperties cannot be null");
        }
        this.configEncoder = configEncoder;
        this.nacosDataSourceProperties = nacosDataSourceProperties;
        final Properties properties = buildProperties(nacosDataSourceProperties);
        try {
            // 也可以直接注入NacosDataSource,然后反射获取其configService属性
            this.configService = NacosFactory.createConfigService(properties);
        } catch (NacosException e) {
            log.error("create configService failed.", e);
        }
    }

    private Properties buildProperties(NacosDataSourceProperties nacosDataSourceProperties) {
        Properties properties = new Properties();
        if (!StringUtils.isEmpty(nacosDataSourceProperties.getServerAddr())) {
            properties.setProperty(PropertyKeyConst.SERVER_ADDR, nacosDataSourceProperties.getServerAddr());
        } else {
            properties.setProperty(PropertyKeyConst.ACCESS_KEY, nacosDataSourceProperties.getAccessKey());
            properties.setProperty(PropertyKeyConst.SECRET_KEY, nacosDataSourceProperties.getSecretKey());
            properties.setProperty(PropertyKeyConst.ENDPOINT, nacosDataSourceProperties.getEndpoint());
        }
        if (!StringUtils.isEmpty(nacosDataSourceProperties.getNamespace())) {
            properties.setProperty(PropertyKeyConst.NAMESPACE, nacosDataSourceProperties.getNamespace());
        }
        if (!StringUtils.isEmpty(nacosDataSourceProperties.getUsername())) {
            properties.setProperty(PropertyKeyConst.USERNAME, nacosDataSourceProperties.getUsername());
        }
        if (!StringUtils.isEmpty(nacosDataSourceProperties.getPassword())) {
            properties.setProperty(PropertyKeyConst.PASSWORD, nacosDataSourceProperties.getPassword());
        }
        return properties;
    }

    public void write(T value) throws Exception {
        lock.lock();
        // todo handle cluster concurrent problem
        try {
            String convertResult = configEncoder.convert(value);
            if (configService == null) {
                log.error("configServer is null, can not continue.");
                return;
            }
            // 规则配置数据推送到nacos配置中心
            final boolean published = configService.publishConfig(nacosDataSourceProperties.getDataId(), nacosDataSourceProperties.getGroupId(), convertResult);
            if (!published) {
                log.error("sentinel {} publish to nacos failed.", nacosDataSourceProperties.getRuleType());
            }
        } finally {
            lock.unlock();
        }
    }

    public void close() throws Exception {

    }
}
处理类生效
@Configuration(proxyBeanMethods = false)
@AutoConfigureAfter(SentinelAutoConfiguration.class)
public class SentinelNacosDataSourceConfiguration {
    @Bean
    @ConditionalOnMissingBean
    public SentinelNacosDataSourceHandler sentinelNacosDataSourceHandler(SentinelProperties sentinelProperties) {
        return new SentinelNacosDataSourceHandler(sentinelProperties);
    }
}
五、RestTemplate 整合 Sentinel
Spring Cloud Alibaba Sentinel 支持对 RestTemplate 的服务调用使用 Sentinel 进行保护,在构造 RestTemplate bean的时候需要加上@SentinelRestTemplate 注解。
代码如下
@Configuration
public class RestConfig {

    @Bean
    @LoadBalanced
    @SentinelRestTemplate(
            blockHandler = "handleBlockException",blockHandlerClass = ExceptionUtil.class,
            fallback = "handleFallback",fallbackClass = ExceptionUtil.class
    )
    public RestTemplate restTemplate() {
        return new RestTemplate();
    }
}
限流降级类
@Slf4j
public class ExceptionUtil {

    public static SentinelClientHttpResponse handleBlockException(HttpRequest request,
                                                                  byte[] body, ClientHttpRequestExecution execution, BlockException ex) {

        log.info("ExceptionUtil#handleBlockException方法,===限流啦===");
        Result result = Result.failed("===被限流啦===");
        try {
            return new SentinelClientHttpResponse(new ObjectMapper().writeValueAsString(result));
        } catch (JsonProcessingException e) {
            e.printStackTrace();
        }
        return null;
    }

    public static SentinelClientHttpResponse handleFallback(HttpRequest request,
                                                            byte[] body, ClientHttpRequestExecution execution, BlockException ex) {
        log.info("ExceptionUtil#handleFallback方法,===限流啦===");
        Result result = Result.failed("===被异常降级啦===");
        try {
            return new SentinelClientHttpResponse(new ObjectMapper().writeValueAsString(result));
        } catch (JsonProcessingException e) {
            e.printStackTrace();
        }
        return null;
    }

}
源码处理类
- com.alibaba.cloud.sentinel.custom.SentinelBeanPostProcessor
- com.alibaba.cloud.sentinel.custom.SentinelProtectInterceptor#intercept
六、OpenFeign 整合 Sentinel
Sentinel 也适配了 Feign 组件,对Feign之间的服务调用也可以进行流控的保护。
在 yml 开启 Sentinel 对 Feign 的支持
feign:
  sentinel:
    enabled: true  #开启Sentinel 对 Feign 的支持
在Feign的声明式接口上添加fallback或者fallbackFactory属性
@FeignClient(value = "tlmall-order-sentinel-demo",path = "/order",fallback = FallbackOrderFeignService.class)
public interface OrderFeignService {
降级逻辑FallbackOrderFeignService实现类
@Component   //必须交给spring 管理
public class FallbackOrderFeignService implements OrderFeignService {
    @Override
    public Result getOrder(String userId) {
        return Result.failed("=======服务降级了========");
    }

    @Override
    public Result<?> post1(OrderDTO orderDTO) {
        return Result.failed("=======服务降级了========");
    }

    @Override
    public Result<?> post2(OrderDTO orderDTO, String token) {
        return Result.failed("=======服务降级了========");
    }

    @Override
    public Result<?> post3(OrderDTO orderDTO, String userId) {
        return Result.failed("=======服务降级了========");
    }

    @Override
    public Result getOrderByUserId(String userId) {
        return Result.failed("=======服务降级了========");
    }
}
七、Gateway 整合 Sentinel
Sentinel 支持对 Spring Cloud Gateway、Zuul 等主流的 API Gateway 进行限流。
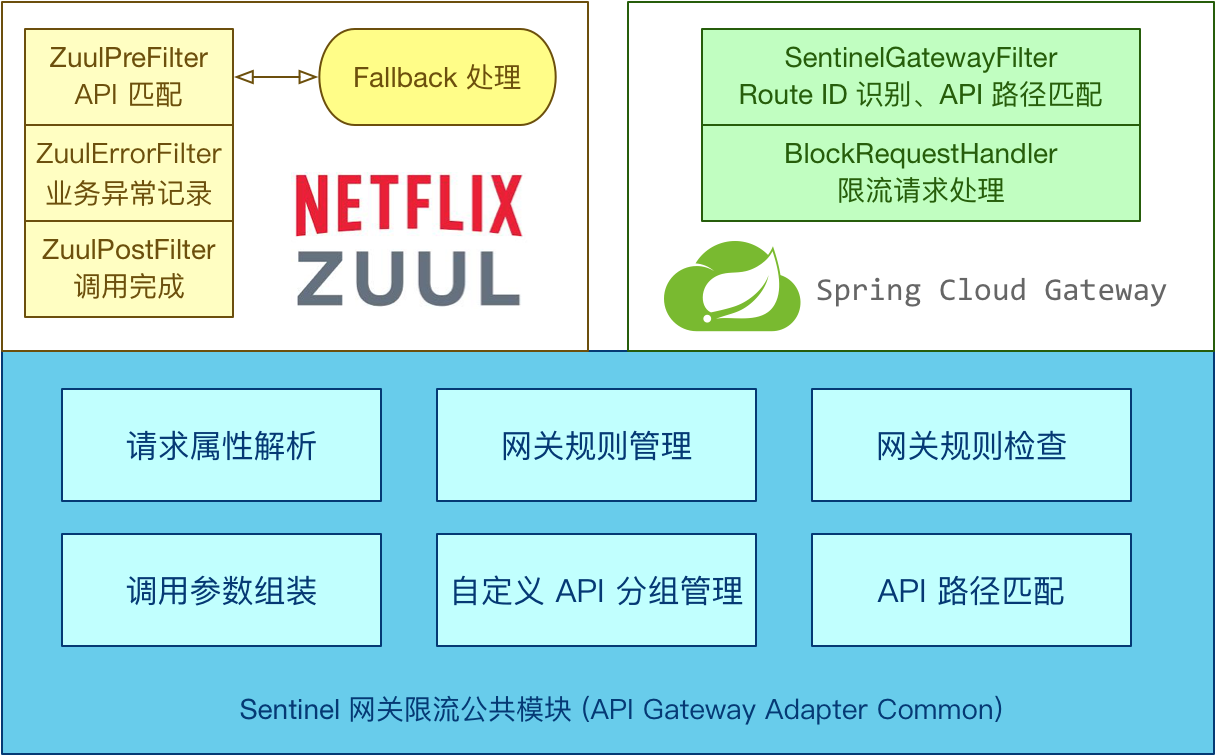
Sentinel 1.6.0 引入了 Sentinel API Gateway Adapter Common 模块,此模块中包含网关限流的规则和自定义 API 的实体和管理逻辑:
- route 维度:即在 Spring 配置文件中配置的路由条目,资源名为对应的 routeld
- 自定义 API 维度:用户可以利用 Sentinel 提供的 API 来自定义一些 API 分组
引入依赖
<!-- gateway接入sentinel  -->
<dependency>
    <groupId>com.alibaba.cloud</groupId>
    <artifactId>spring-cloud-alibaba-sentinel-gateway</artifactId>
</dependency>

<dependency>
    <groupId>com.alibaba.cloud</groupId>
    <artifactId>spring-cloud-starter-alibaba-sentinel</artifactId>
</dependency>
在 yml 配置 sentinel 控制台配置
spring:
  cloud:
    sentinel:
      transport:
        # 添加sentinel的控制台地址
        dashboard: tlmall-sentinel-dashboard:8889
注意:
基于SpringBoot3的 Spring Cloud Gateway和Sentinel存在兼容性问题,使用默认的
DefaultBlockRequestHandler会抛出异常,如下:

解决:
自定义实现 BlockRequestHandler 替换掉 DefaultBlockRequestHandler
public class MyBlockRequestHandler implements BlockRequestHandler {

    @Override
    public Mono<ServerResponse> handleRequest(ServerWebExchange exchange, Throwable t) {

        //返回json数据;
        return ServerResponse.status(HttpStatus.TOO_MANY_REQUESTS)
                .contentType(MediaType.APPLICATION_JSON_UTF8)
                .body(fromObject(buildErrorResult(t)));
    }

    private Result buildErrorResult(Throwable ex) {

        if (ex instanceof ParamFlowException) {
            return Result.failed("请求被限流了");
        }
        return Result.failed("系统繁忙");
    }


}
实现 ApplicationRunner接口,springboot启动之后替换异常处理类。
@Component
public class MyApplicationRunner implements ApplicationRunner {


    @Override
    public void run(ApplicationArguments args) throws Exception {
        GatewayCallbackManager.setBlockHandler(new MyBlockRequestHandler());
    }
}
火山引擎开发者社区是火山引擎打造的AI技术生态平台,聚焦Agent与大模型开发,提供豆包系列模型(图像/视频/视觉)、智能分析与会话工具,并配套评测集、动手实验室及行业案例库。社区通过技术沙龙、挑战赛等活动促进开发者成长,新用户可领50万Tokens权益,助力构建智能应用。
更多推荐
 0
0 0
0- 0


 已为社区贡献4条内容

所有评论(0)