【n8n教程笔记——工作流Workflow】文本课程(第二阶段)——2 处理不同数据类型 (Processing different data types)HTML XML 日期数据 pdf数据二进制
【代码】【n8n教程笔记——工作流Workflow】文本课程(第二阶段)——2 处理不同数据类型 (Processing different data types)HTML XML 日期数据 pdf数据二进制。
https://docs.n8n.io/courses/level-two/chapter-2/
文章目录
- Processing different data types
-
- HTML and XML data
- Date, time, and interval data
-
- Date Exercise
-
- 1. Add the **Customer Datastore (n8n training) node** with the **Get All People** action selected. Return All.
- 2. Add the **Date & Time node** to Round Up the created Date from the datastore to End of Month. Output this to field new-date. Include all input fields.
- 3. Add the **If node** to check if that new rounded date is after `1960-01-01 00:00:00`.
- 4. Add the **Wait node** to the True output of that node and set it to wait for one minute.
- 5. Add the **Edit Fields (Set) node** to set a new field called outputValue to a String containing new-date. Include all input fields.
- 6. Add the **Schedule Trigger node** at the beginning of the workflow to trigger it every 30 minutes. (You can keep the [Manual Trigger node](https://docs.n8n.io//integrations/builtin/core-nodes/n8n-nodes-base.manualworkflowtrigger) for testing!)
- Answer
-
- 1. Add the **Customer Datastore (n8n training) node** with the **Get All People** action selected.
- 2. Add a **Date & Time node** connected to the Customer Datastore node. Select the option to **Round a Date**.
- 3. Add an **If node** connected to the **Date & Time node**.
- 4. Add a **Wait node** to the True output of the **If node**.
- 5. Add an **Edit Fields (Set) node** to the **Wait node**.
- 6. Add a **Schedule Trigger node** at the beginning of the workflow.
- Binary data
-
- Concepts
- In n8n, you can process binary data with the following nodes:
- Note | Reading and writing files is only available on self-hosted n8n
- To read or write a binary file, you need to write the path (location) of the file in the node's `File(s) Selector` parameter (for the Read operation) or in the node's `File Path and Name` parameter (for the Write operation).
- Warning | Naming the right path
- Binary Exercise 1
- Binary Exercise 2
-
- 1. Make an HTTP request to the Poetry DB API `https://poetrydb.org/random/1`.
- 2. Convert the returned data from JSON to binary using the **Convert to File node**.
- 3. Write the new binary file data to the machine where n8n is running using the **Read/Write Files From Disk node**.
- 4. To check that it worked out, use the **Read/Write Files From Disk node** to read the generated binary file.
- Answer
Processing different data types
In this chapter, you will learn how to process different types of data using n8n core nodes.
HTML and XML data
You’re most likely familiar with HTML and XML.
Note | HTML vs. XML
HTML is a markup language used to describe the structure and semantics of a web page. XML looks similar to HTML, but the tag names are different, as they describe the kind of data they hold.
If you need to process HTML or XML data in your n8n workflows, use the HTML node or the XML node.
Use the HTML node to extract HTML content of a webpage by referencing CSS selectors. This is useful if you want to collect structured information from a website (web-scraping).
HTML Exercise
Let’s get the title of the latest n8n blog post:
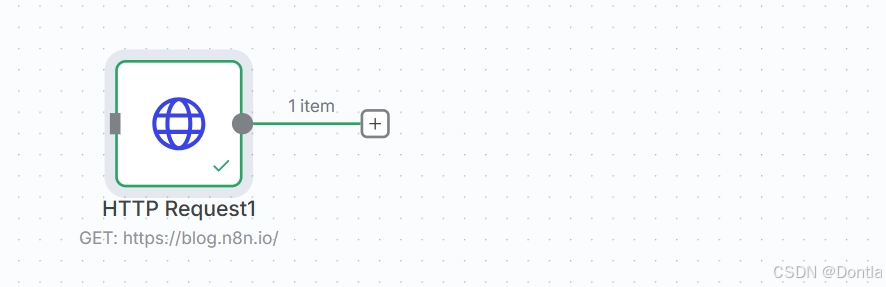
1. Use the HTTP Request node to make a GET request to the URL https://blog.n8n.io/ (this endpoint requires no authentication).
2. Connect an HTML node and configure it to extract the title of the first blog post on the page.
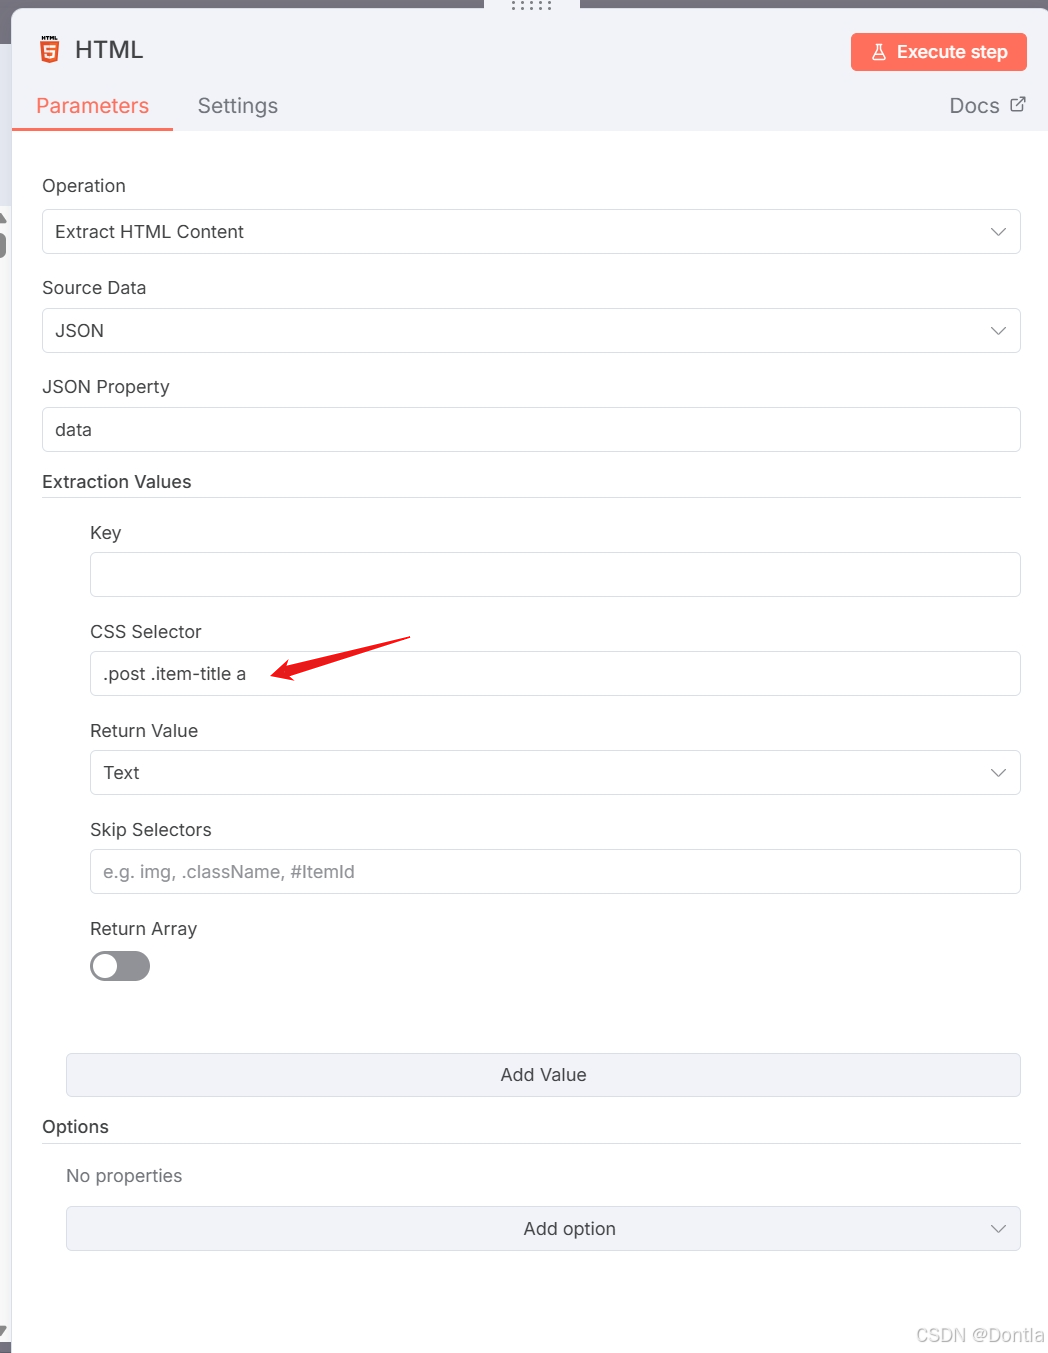
- Hint: If you’re not familiar with CSS selectors or reading HTML, the CSS selector
.post .item-title ashould help!
About CSS selector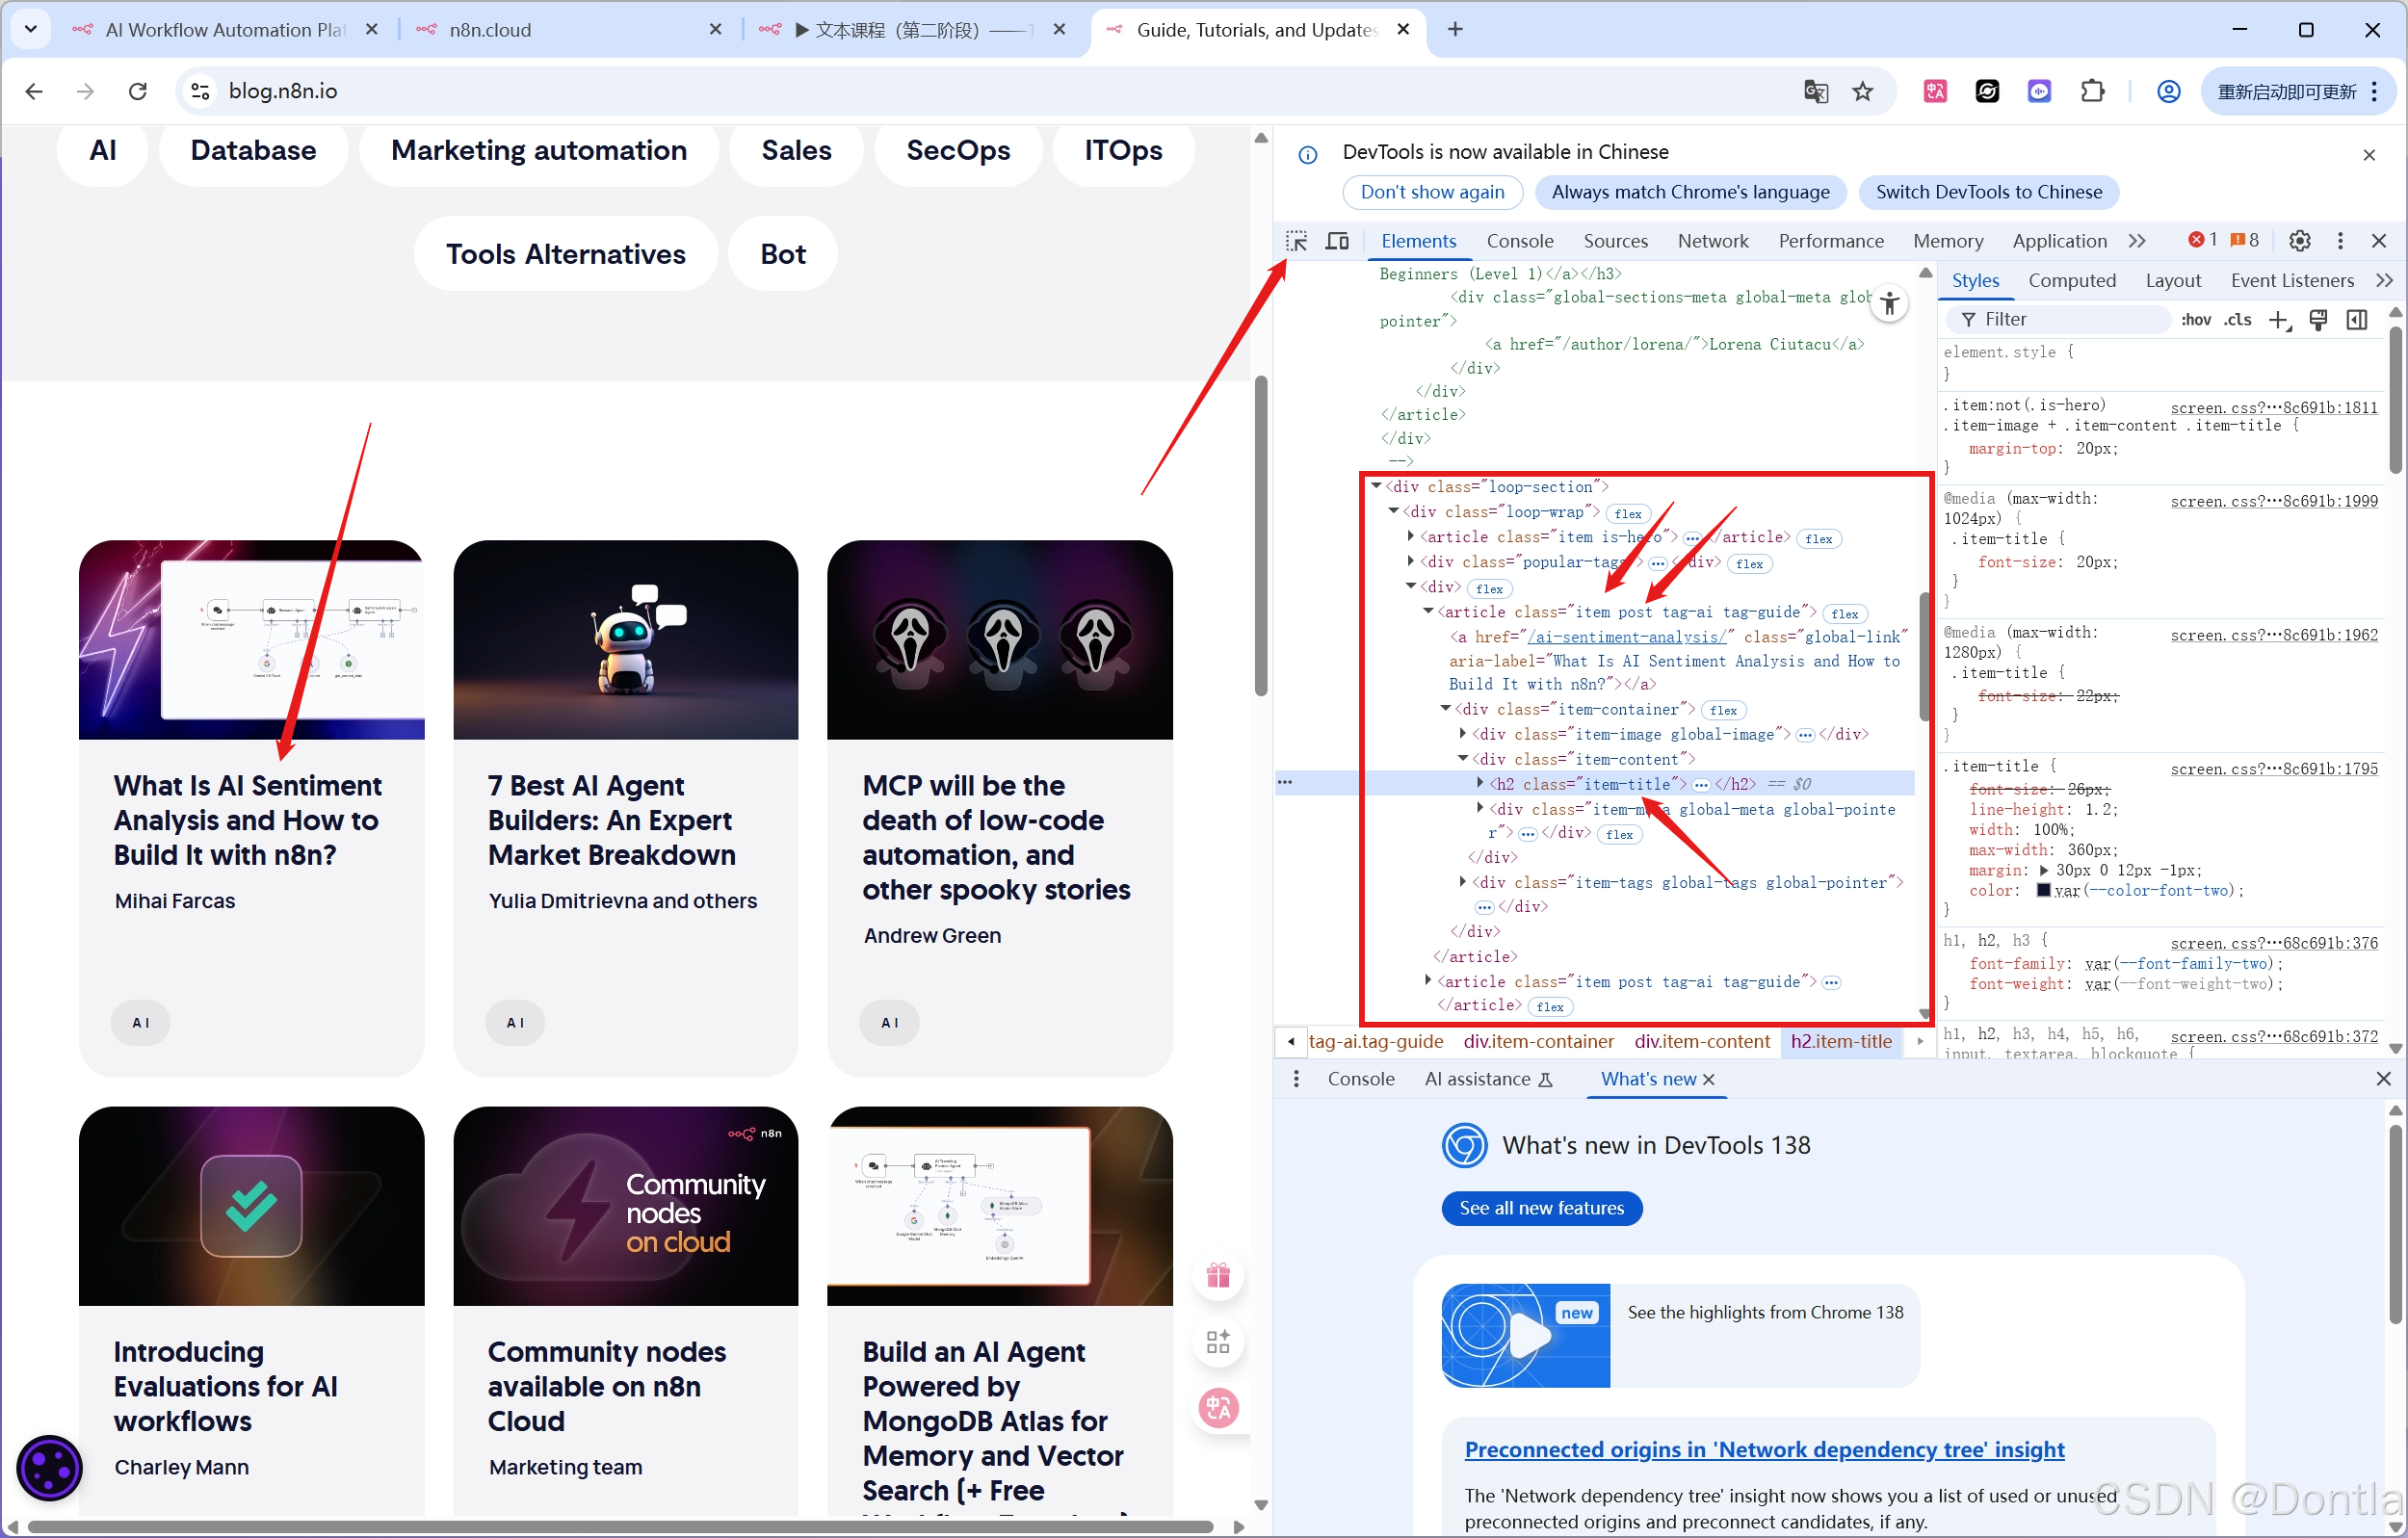
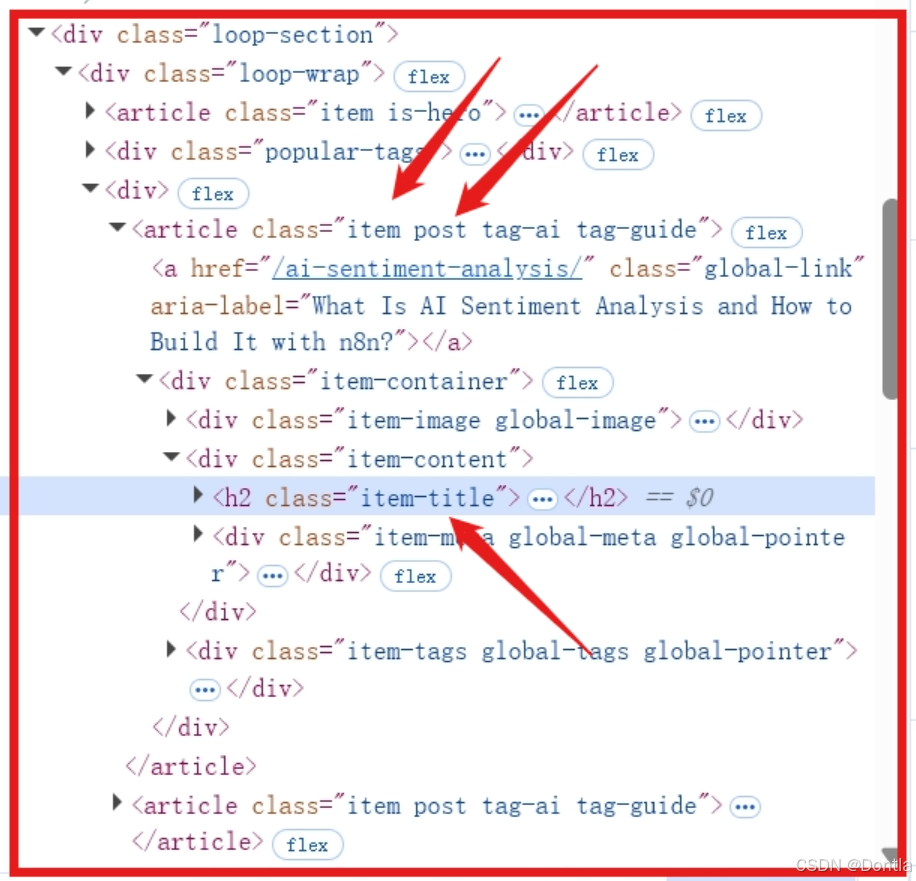
Answer
Note | “Show me the solution”
-
Configure the HTTP Request node with the following parameters:
- Authentication: None
- Request Method: GET
- URL: https://blog.n8n.io/
The result should look like this: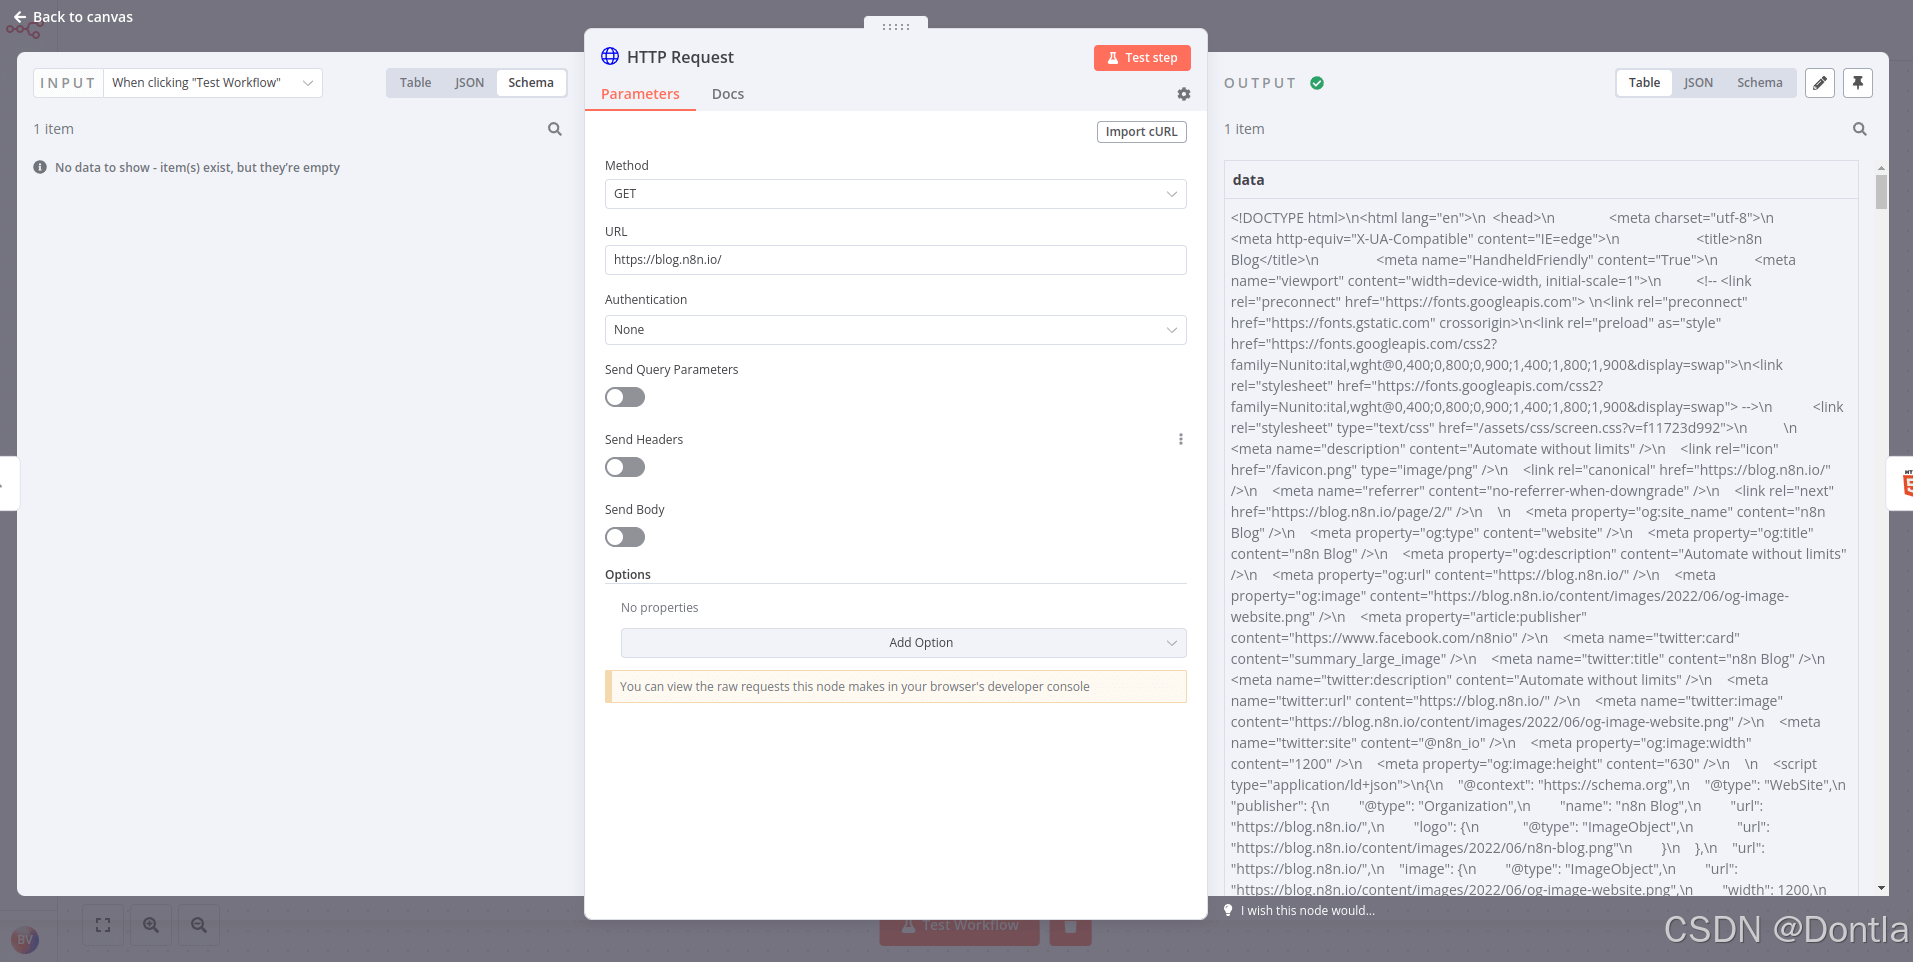
-
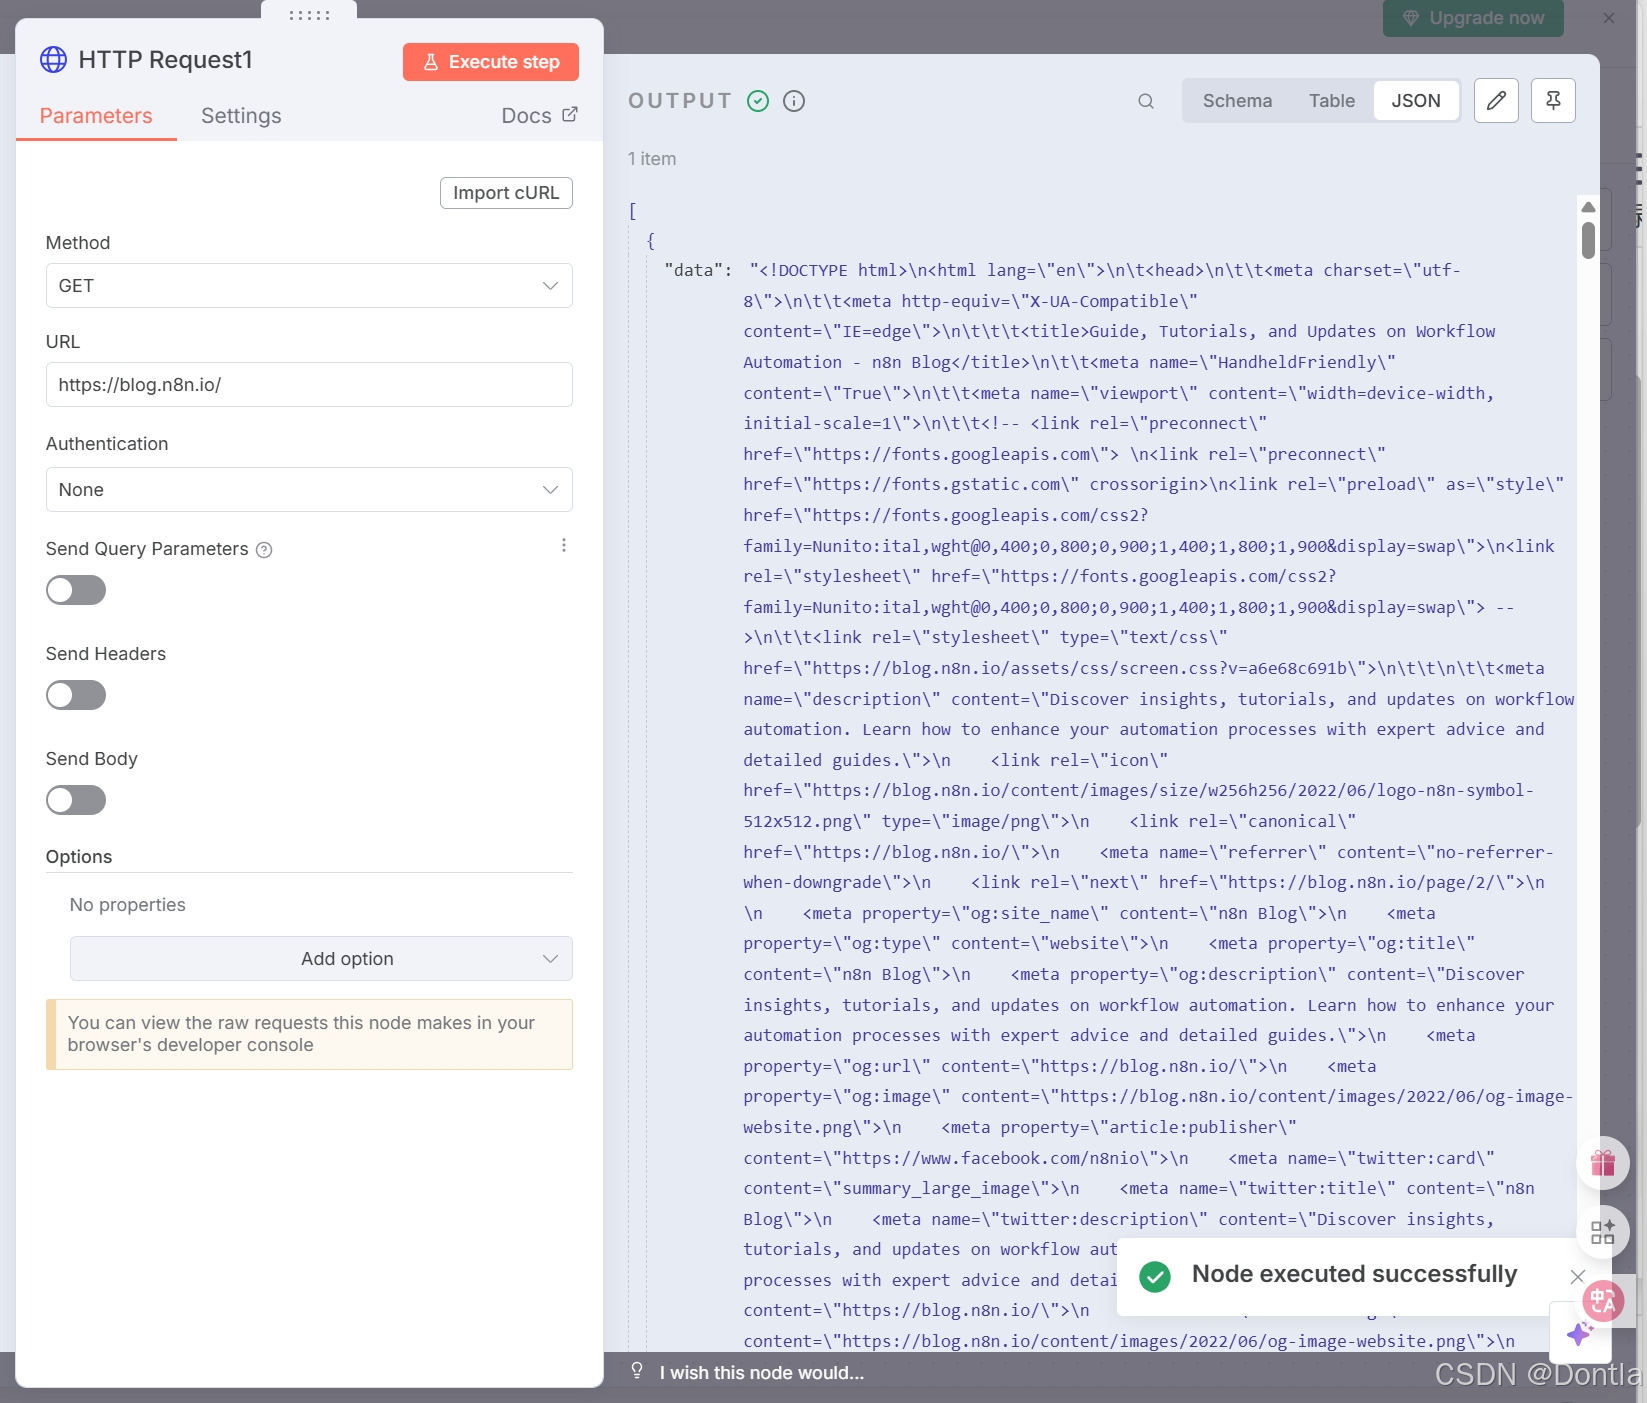
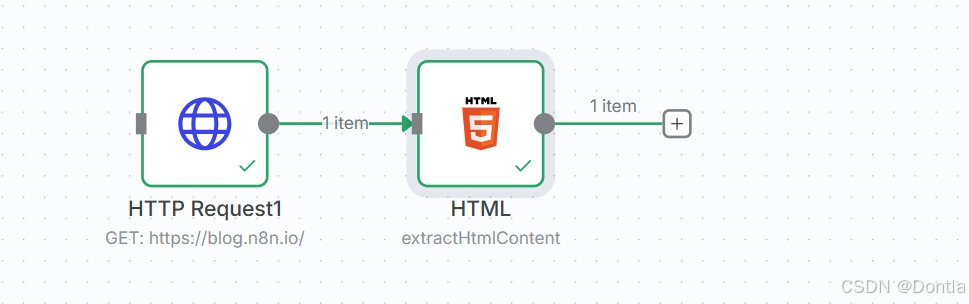
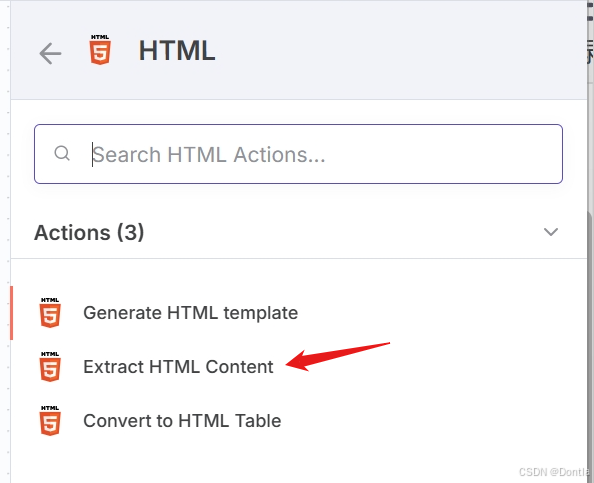
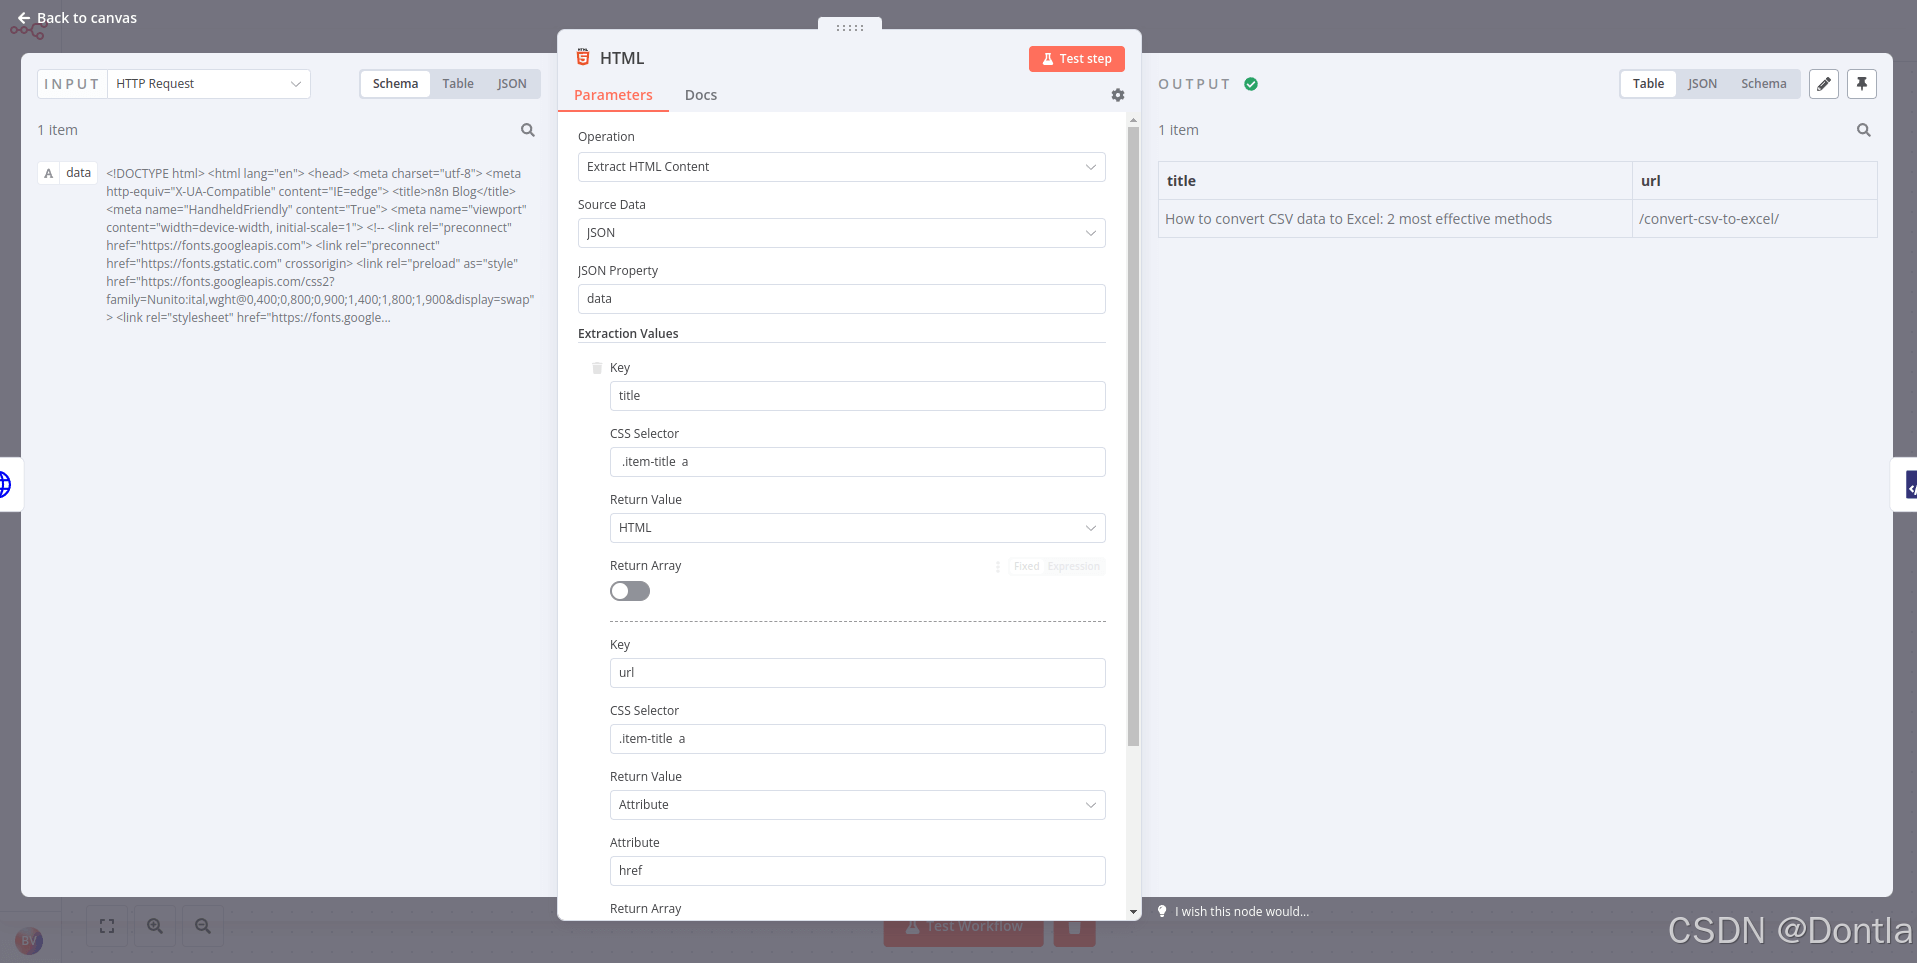
Connect an HTML node to the HTTP Request node and configure the former’s parameters:
- Operation: Extract HTML Content
- Source Data: JSON
- JSON Property: data
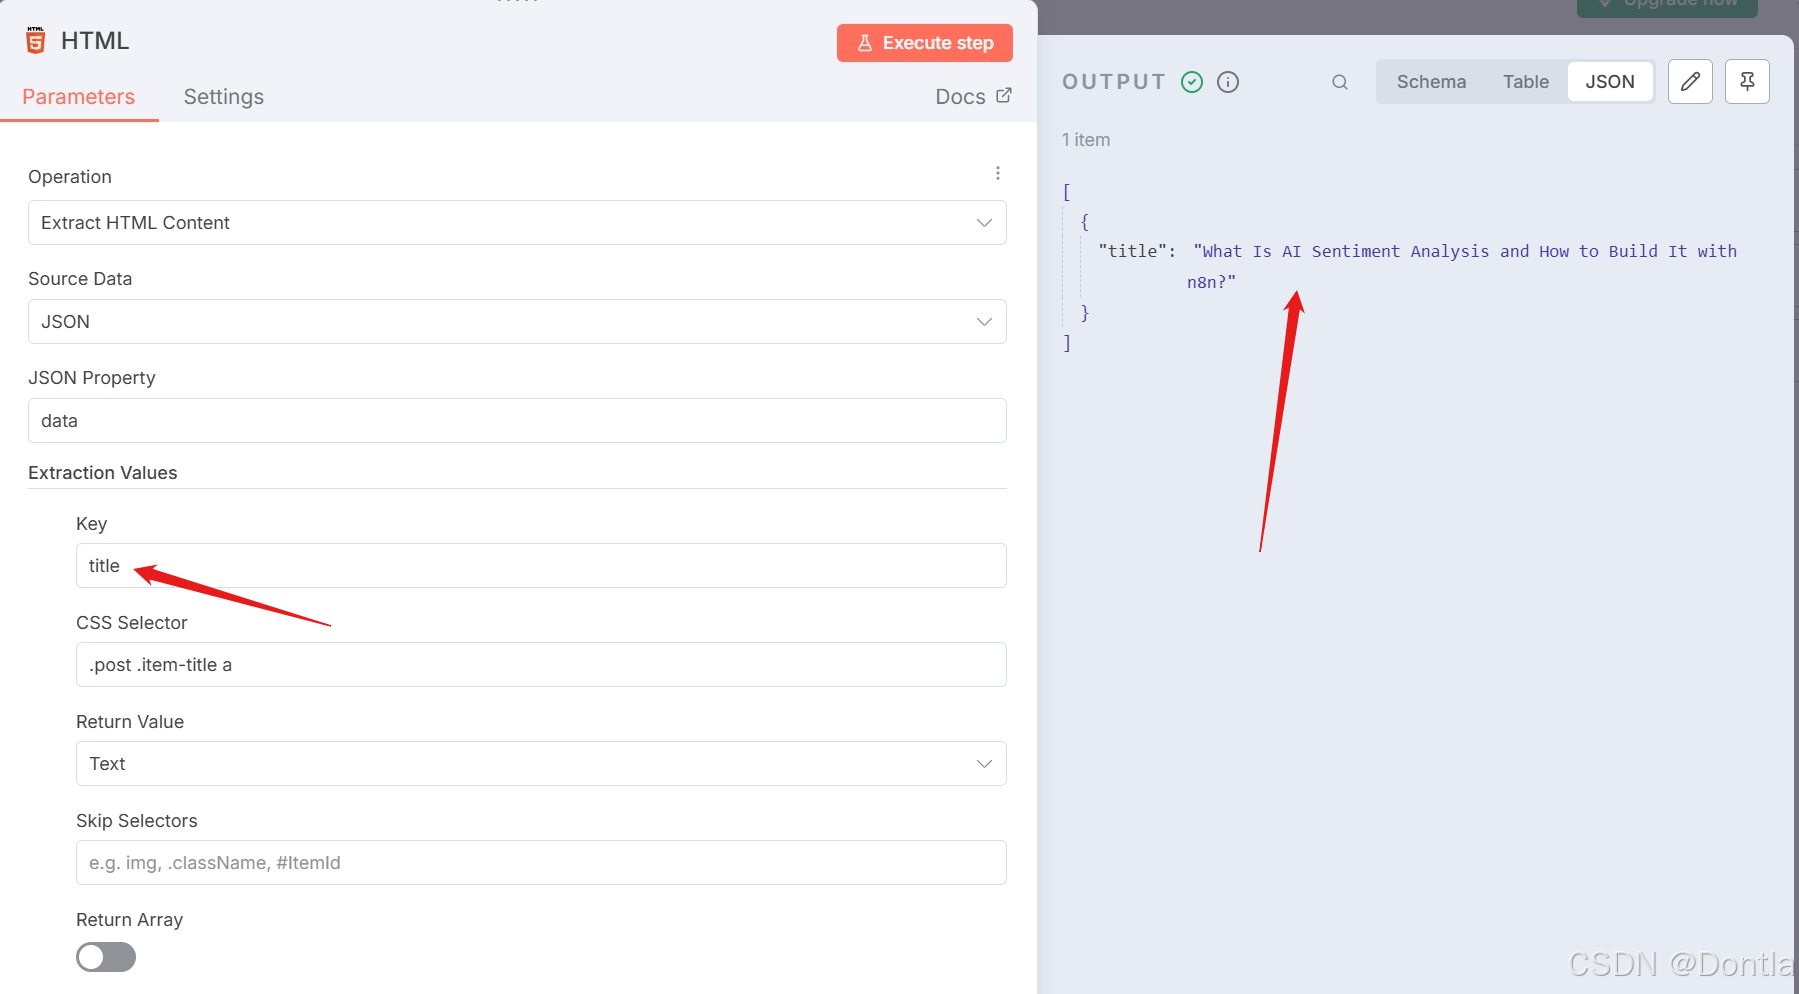
- Extraction Values:
- Key: title
- CSS Selector:
.post .item-title a - Return Value: HTML
You can add more values to extract more data.
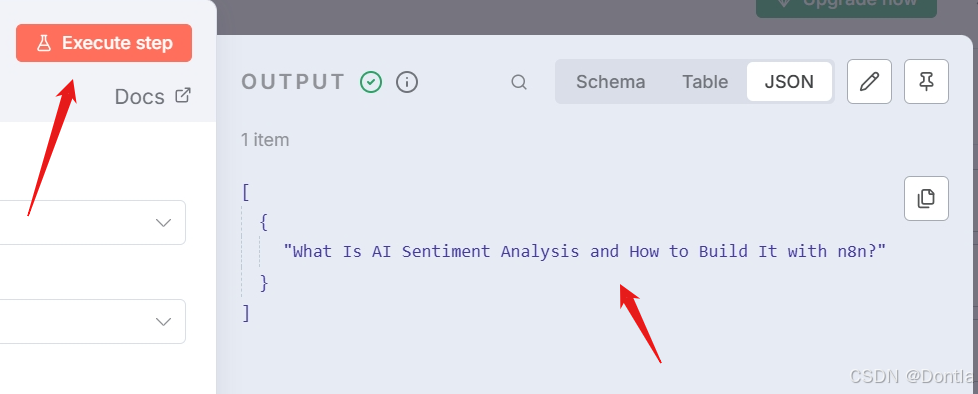
The result should look like this:
Summarize
Use the XML node to convert XML to JSON and JSON to XML. This operation is useful if you work with different web services that use either XML or JSON and need to get and submit data between them in the two formats.
XML Exercise
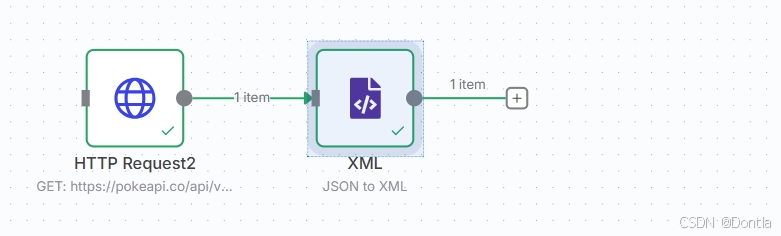
In the final exercise of Chapter 1, you used an HTTP Request node to make a request to the PokéAPI. In this exercise, we’ll return to that same API but we’ll convert the output to XML:
1. Add an HTTP Request node that makes the same request to the PokéAPI at https://pokeapi.co/api/v2/pokemon.

2. Use the XML node to convert the JSON output to XML.
Answer
Note | “Show me the solution”
-
To get the pokemon from the PokéAPI, execute the HTTP Request node with the following parameters:
- Authentication: None
- Request Method: GET
- URL: https://pokeapi.co/api/v2/pokemon
-
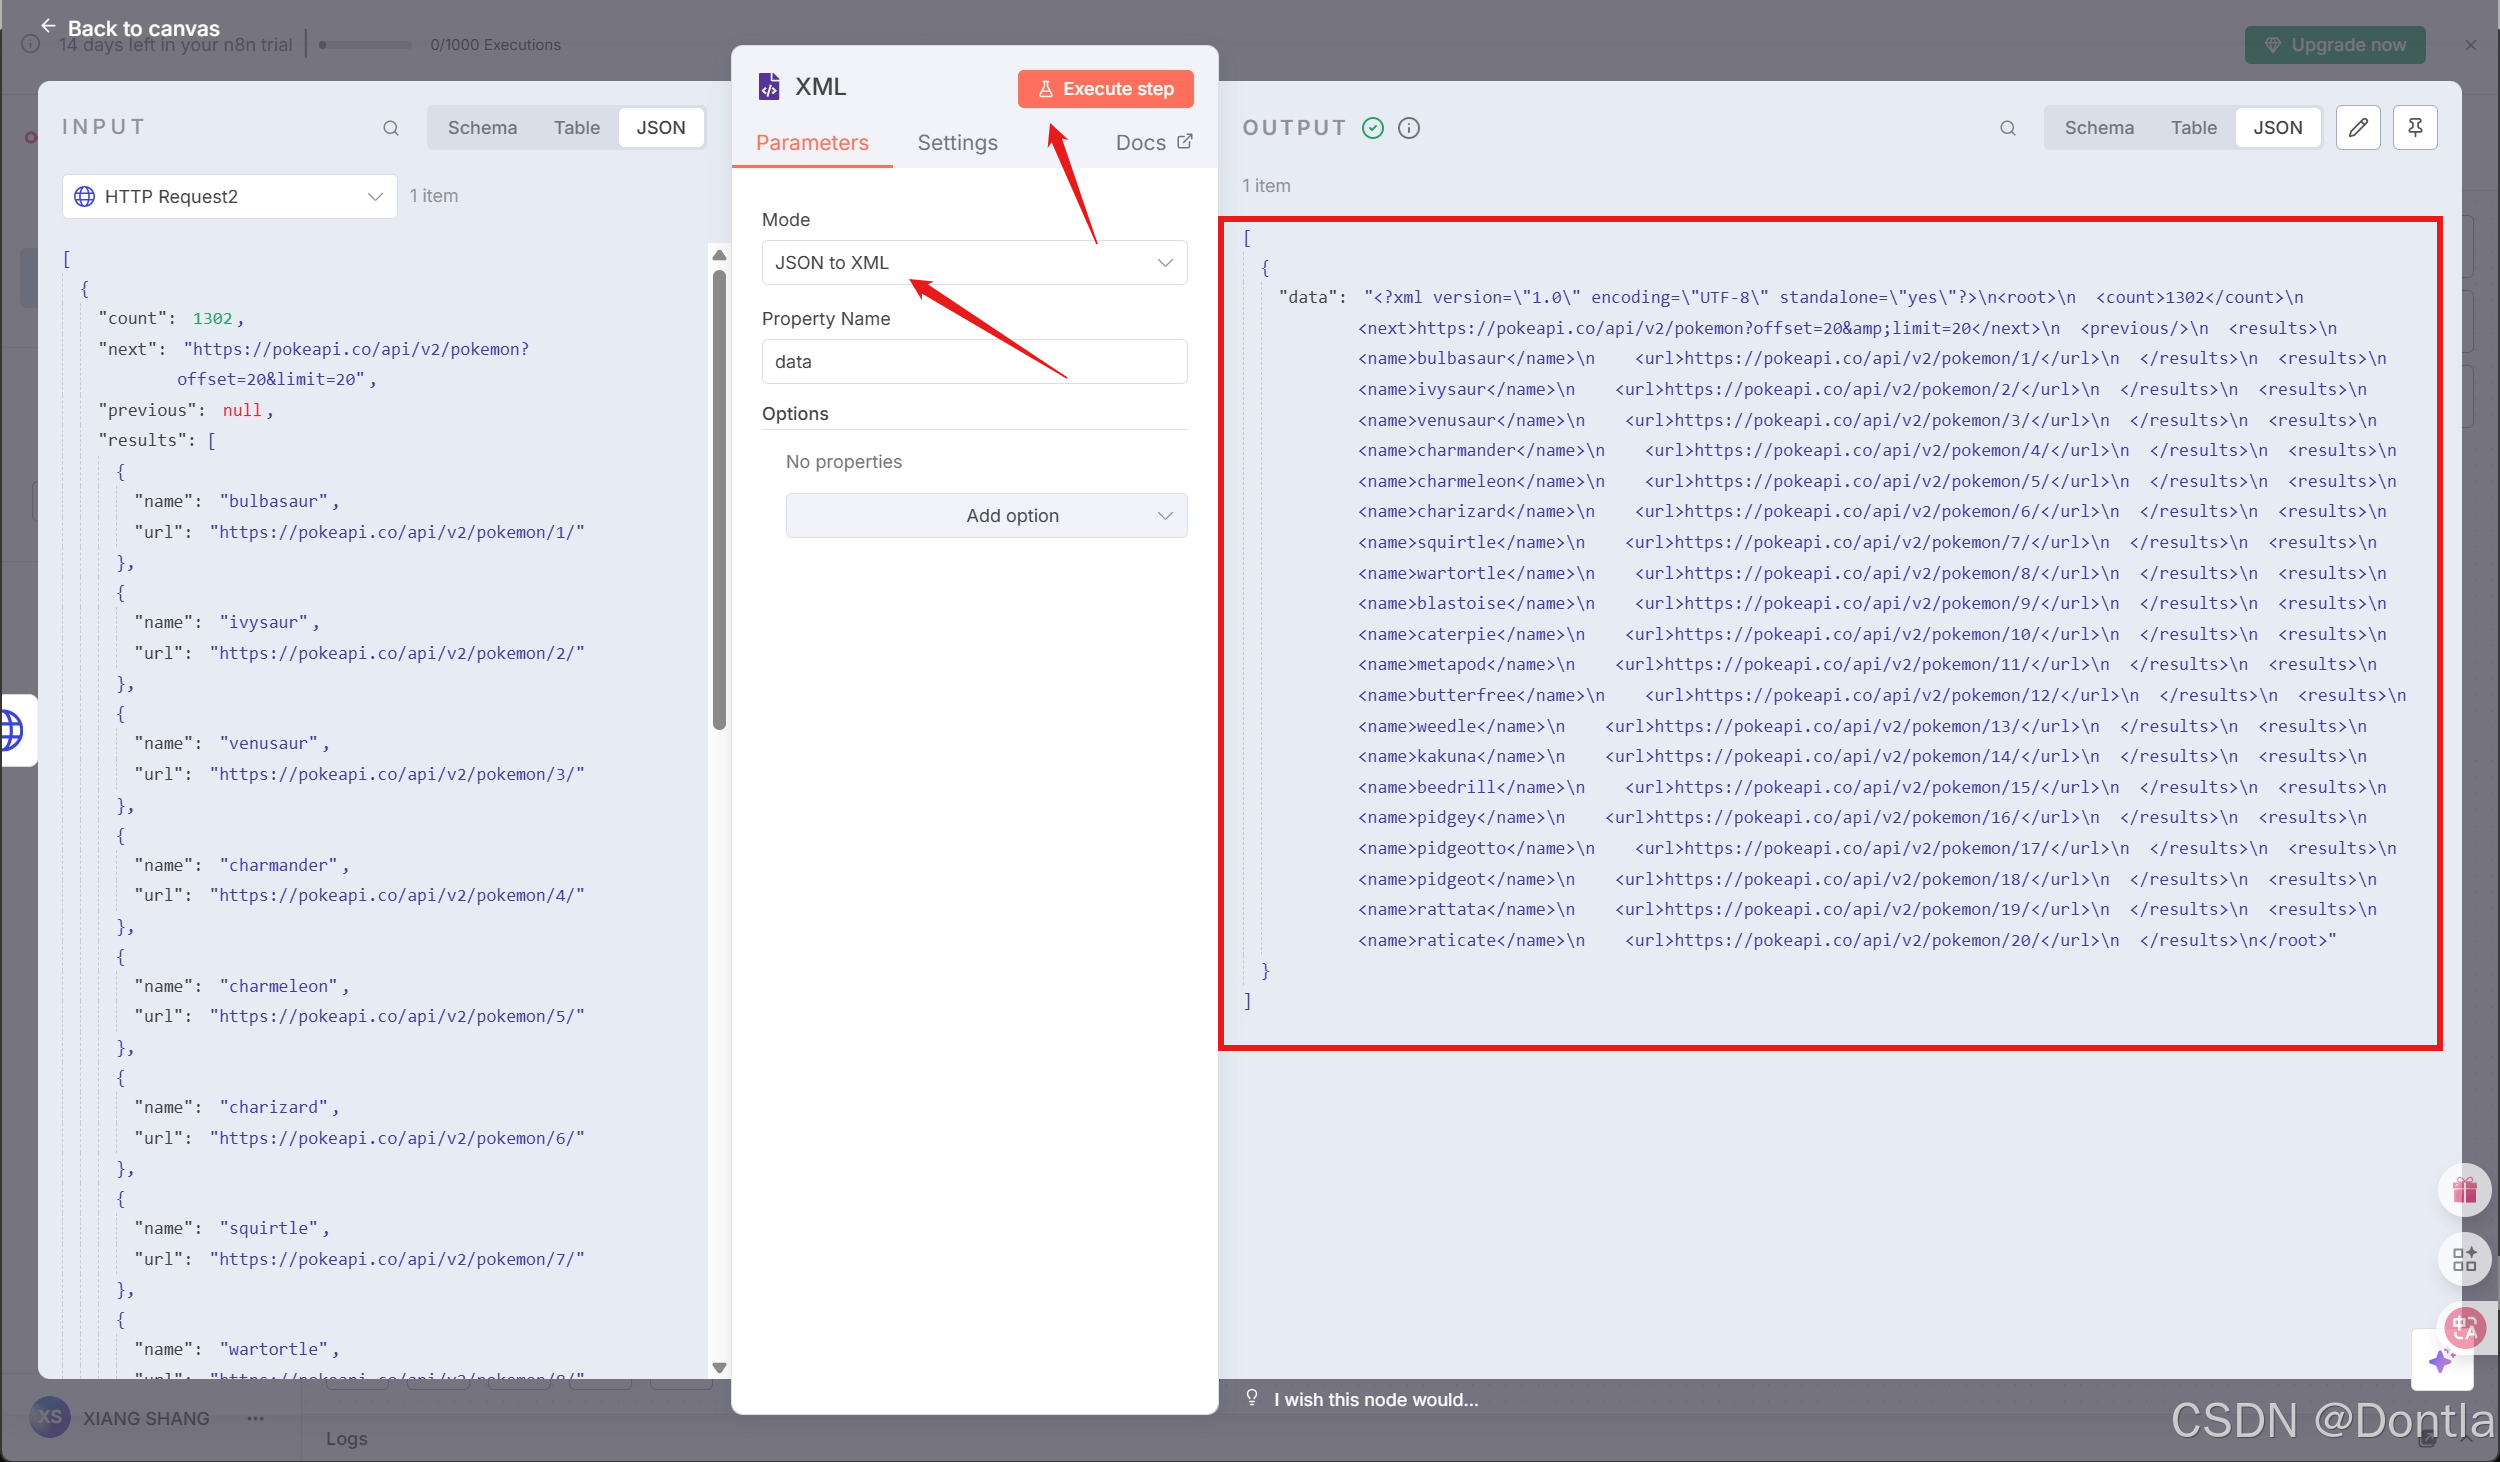
Connect an XML node to it with the following parameters:
- Mode: JSON to XML
- Property name: data
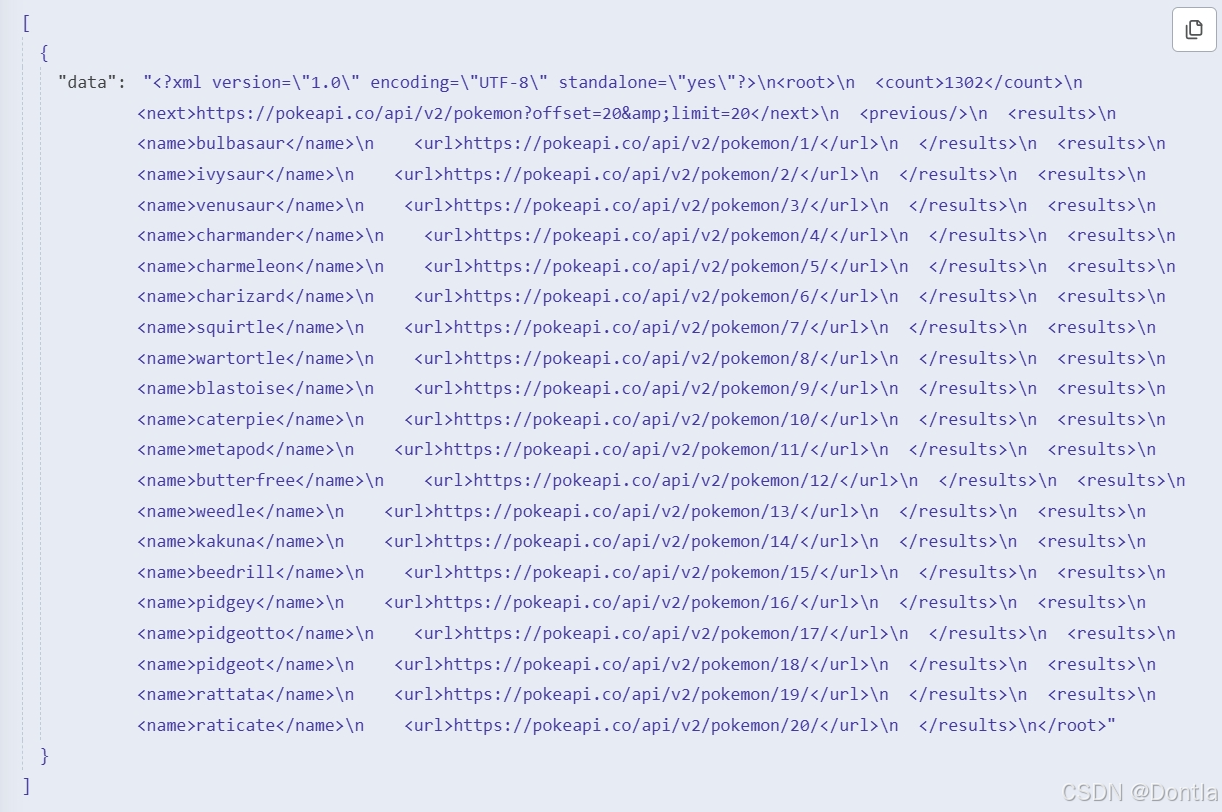
The result should look like this:
To transform data the other way around, select the mode XML to JSON.
Date, time, and interval data
Date and time data types include DATE, TIME, DATETIME, TIMESTAMP, and YEAR. The dates and times can be passed in different formats, for example:
DATE: March 29 2022, 29-03-2022, 2022/03/29TIME: 08:30:00, 8:30, 20:30DATETIME: 2022/03/29 08:30:00TIMESTAMP: 1616108400 (Unix timestamp), 1616108400000 (Unix ms timestamp)YEAR: 2022, 22
There are a few ways you can work with dates and times:
- Use the Date & Time node to convert date and time data to different formats and calculate dates.
- Use Schedule Trigger node to schedule workflows to run at a specific time, interval, or duration.
Sometimes, you might need to pause the workflow execution. This might be necessary if you know that a service doesn’t process the data instantly or it’s slow to return all the results. In these cases, you don’t want n8n to pass incomplete data to the next node.
If you run into situations like this, use the Wait node after the node that you want to delay. The Wait node pauses the workflow execution and will resume execution:
- At a specific time.
- After a specified time interval.
- On a webhook call.
Date Exercise
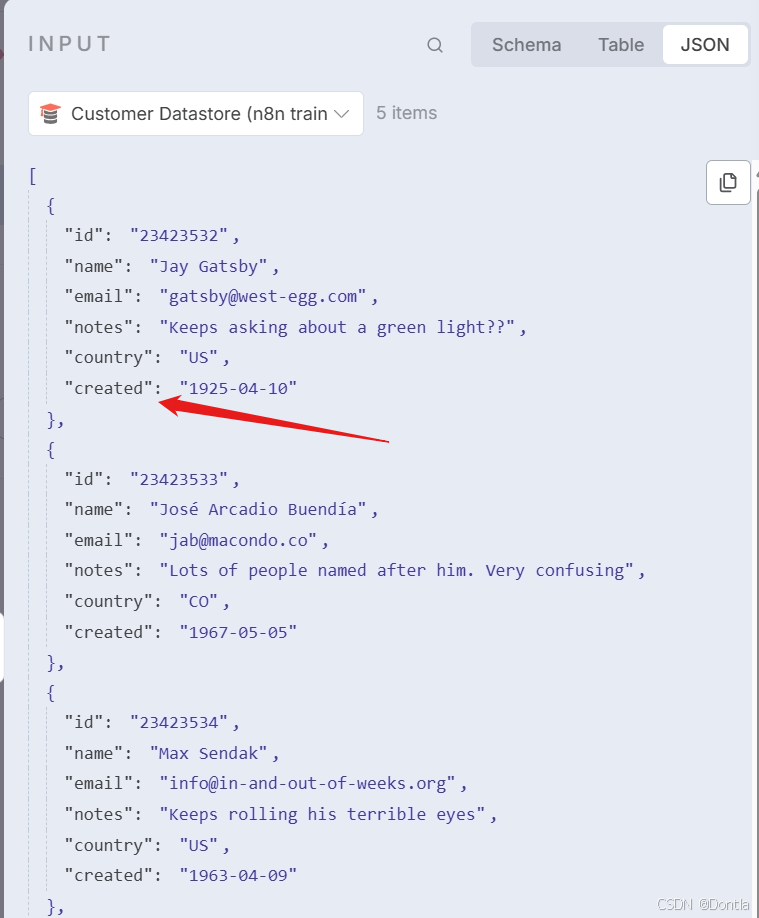
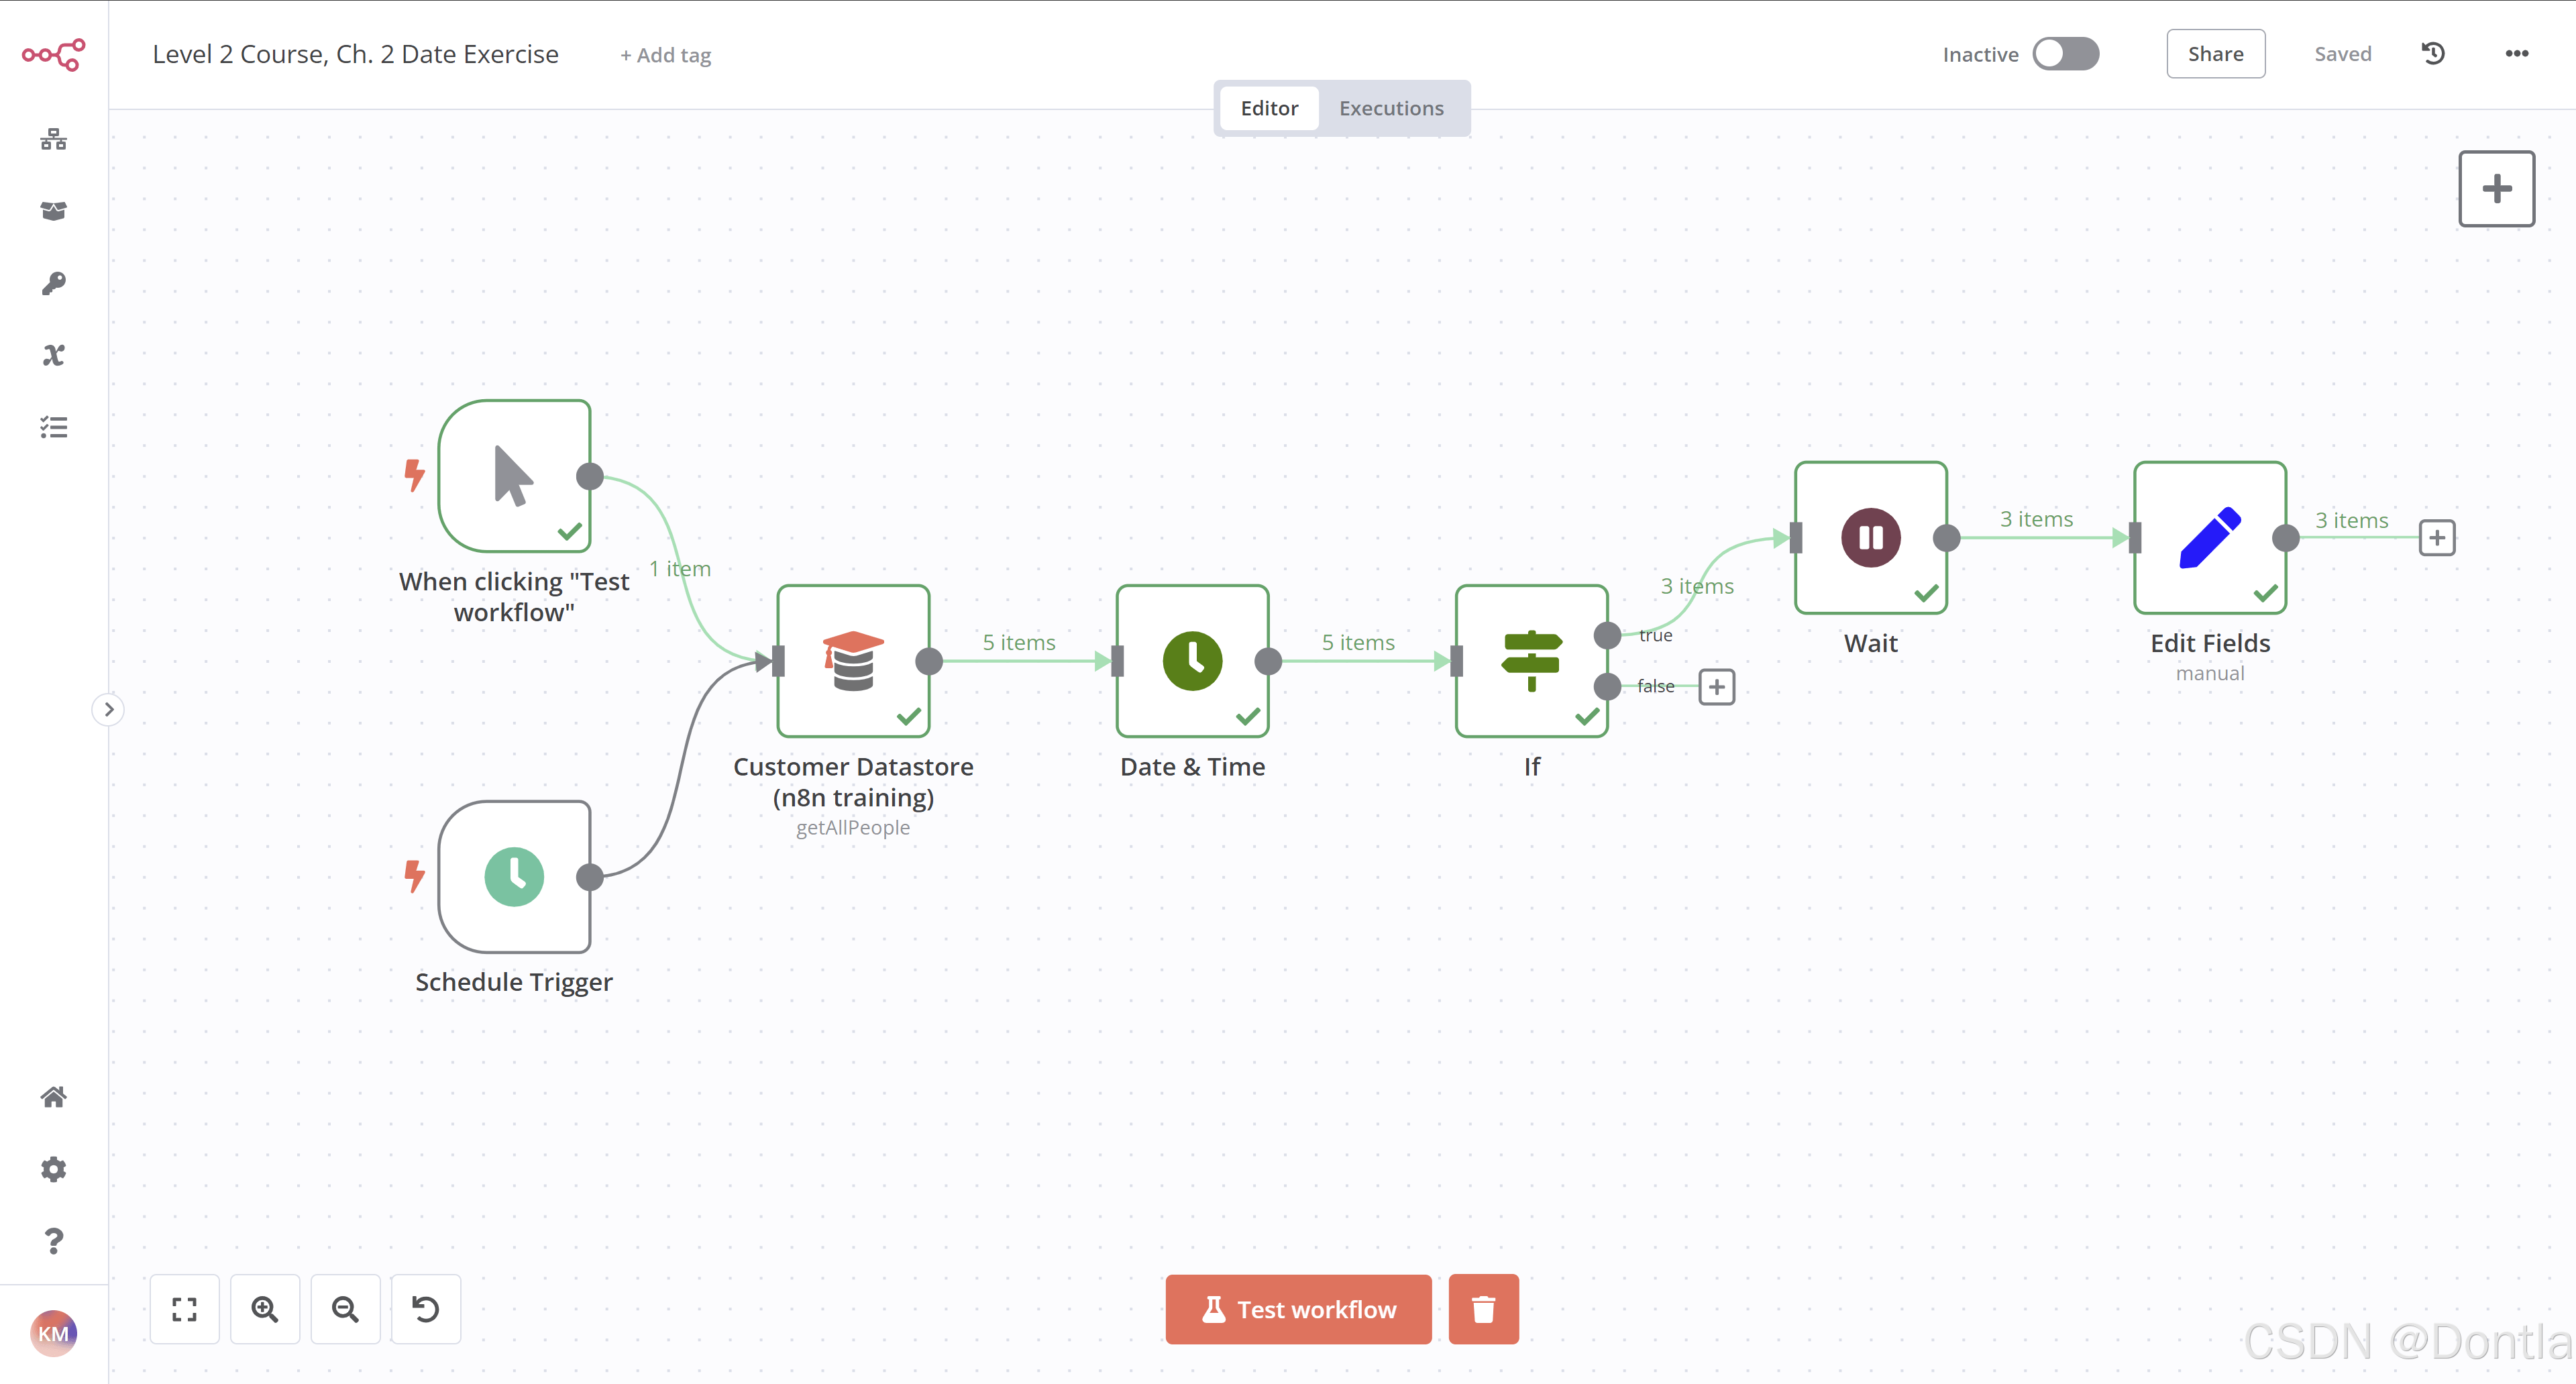
Build a workflow that adds five days to an input date from the Customer Datastore node that you used before. Then, if the calculated date occurred after 1959, the workflow waits 1 minute before setting the calculated date as a value. The workflow should be triggered every 30 minutes.
To begin:
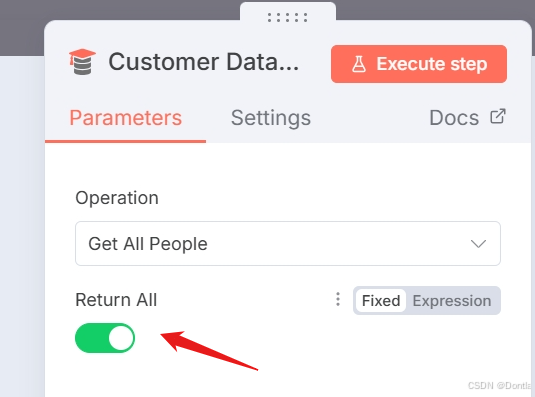
1. Add the Customer Datastore (n8n training) node with the Get All People action selected. Return All.

2. Add the Date & Time node to Round Up the created Date from the datastore to End of Month. Output this to field new-date. Include all input fields.

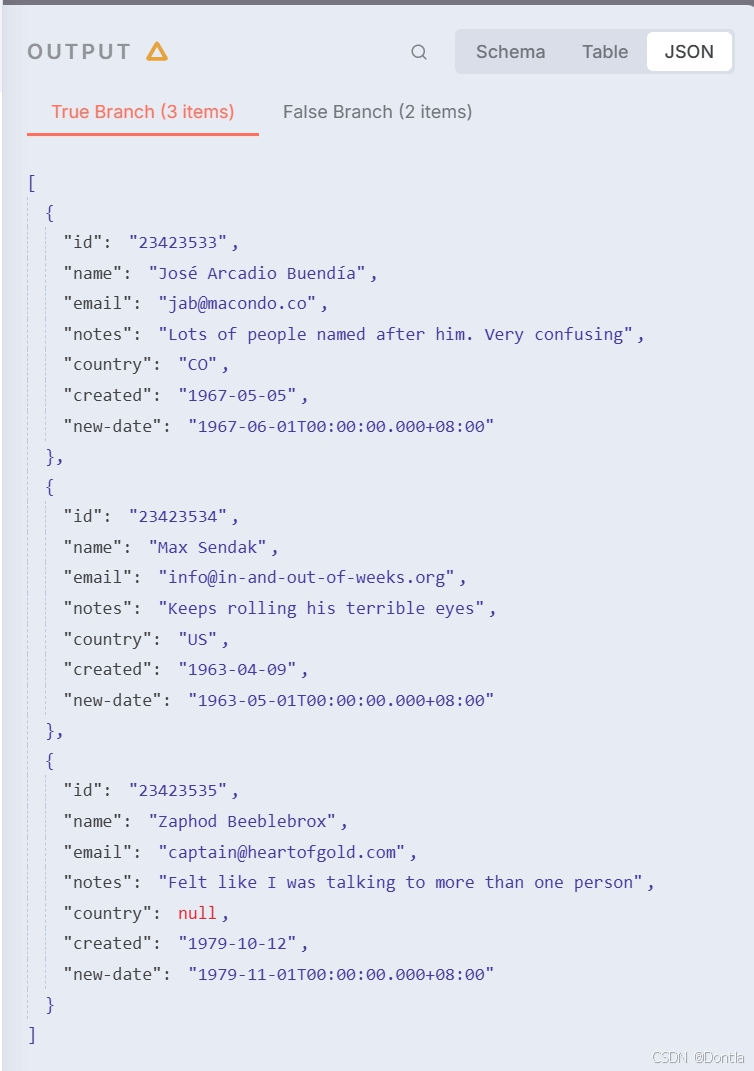
3. Add the If node to check if that new rounded date is after 1960-01-01 00:00:00.
4. Add the Wait node to the True output of that node and set it to wait for one minute.
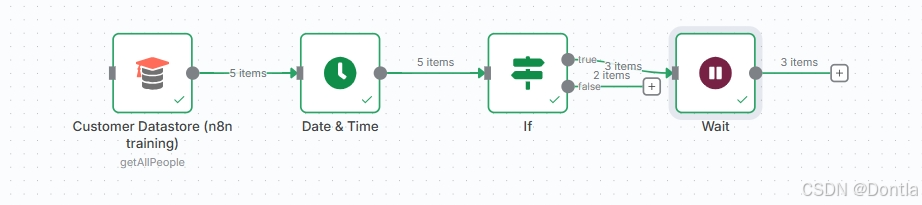
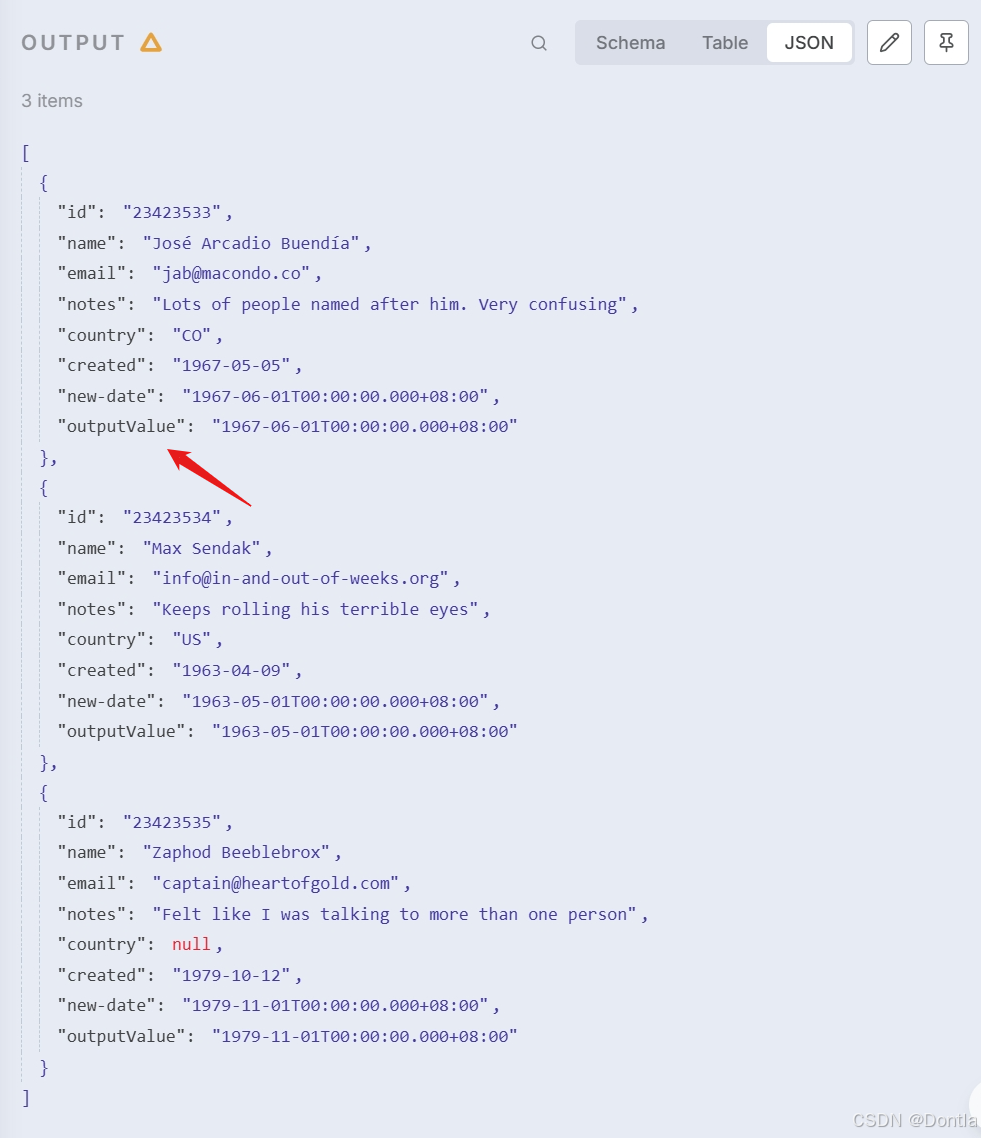
5. Add the Edit Fields (Set) node to set a new field called outputValue to a String containing new-date. Include all input fields.

6. Add the Schedule Trigger node at the beginning of the workflow to trigger it every 30 minutes. (You can keep the Manual Trigger node for testing!)

Answer
Note “Show me the solution”
1. Add the Customer Datastore (n8n training) node with the Get All People action selected.
- Select the option to Return All.
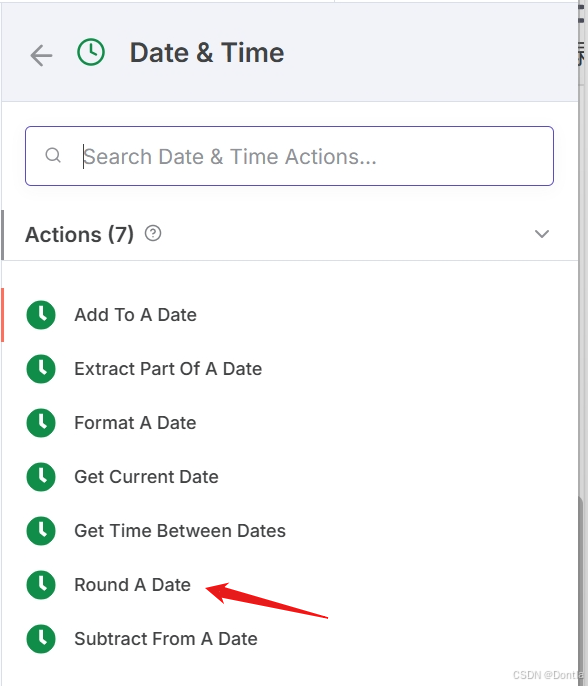
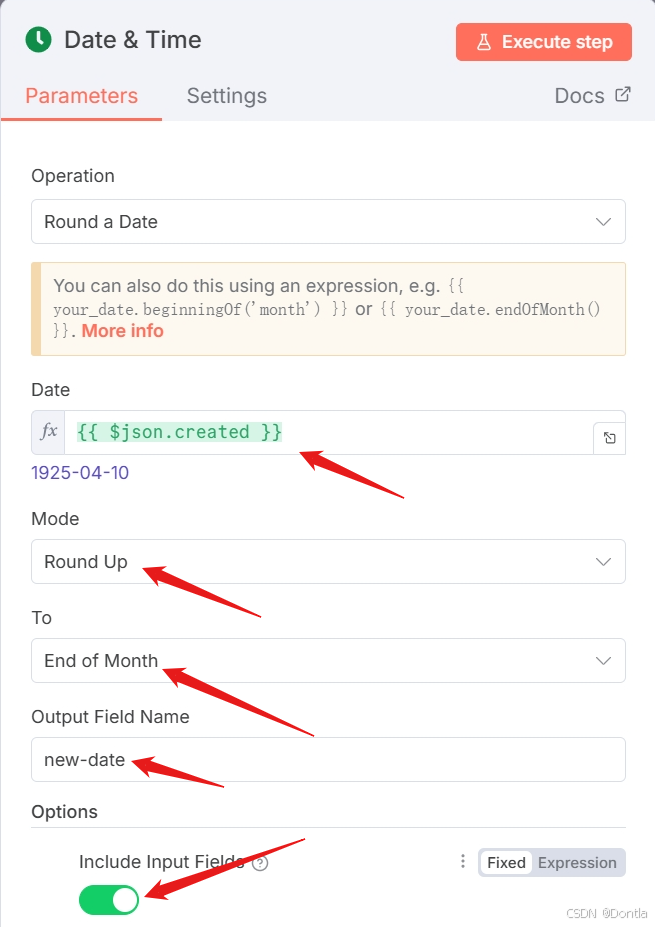
2. Add a Date & Time node connected to the Customer Datastore node. Select the option to Round a Date.
- Add the
createddate as the Date to round. - Select
Round Upas the Mode andEnd of Monthas the To. - Set the Output Field Name as
new-date. - In Options, select Add Option and use the control to Include Input Fields
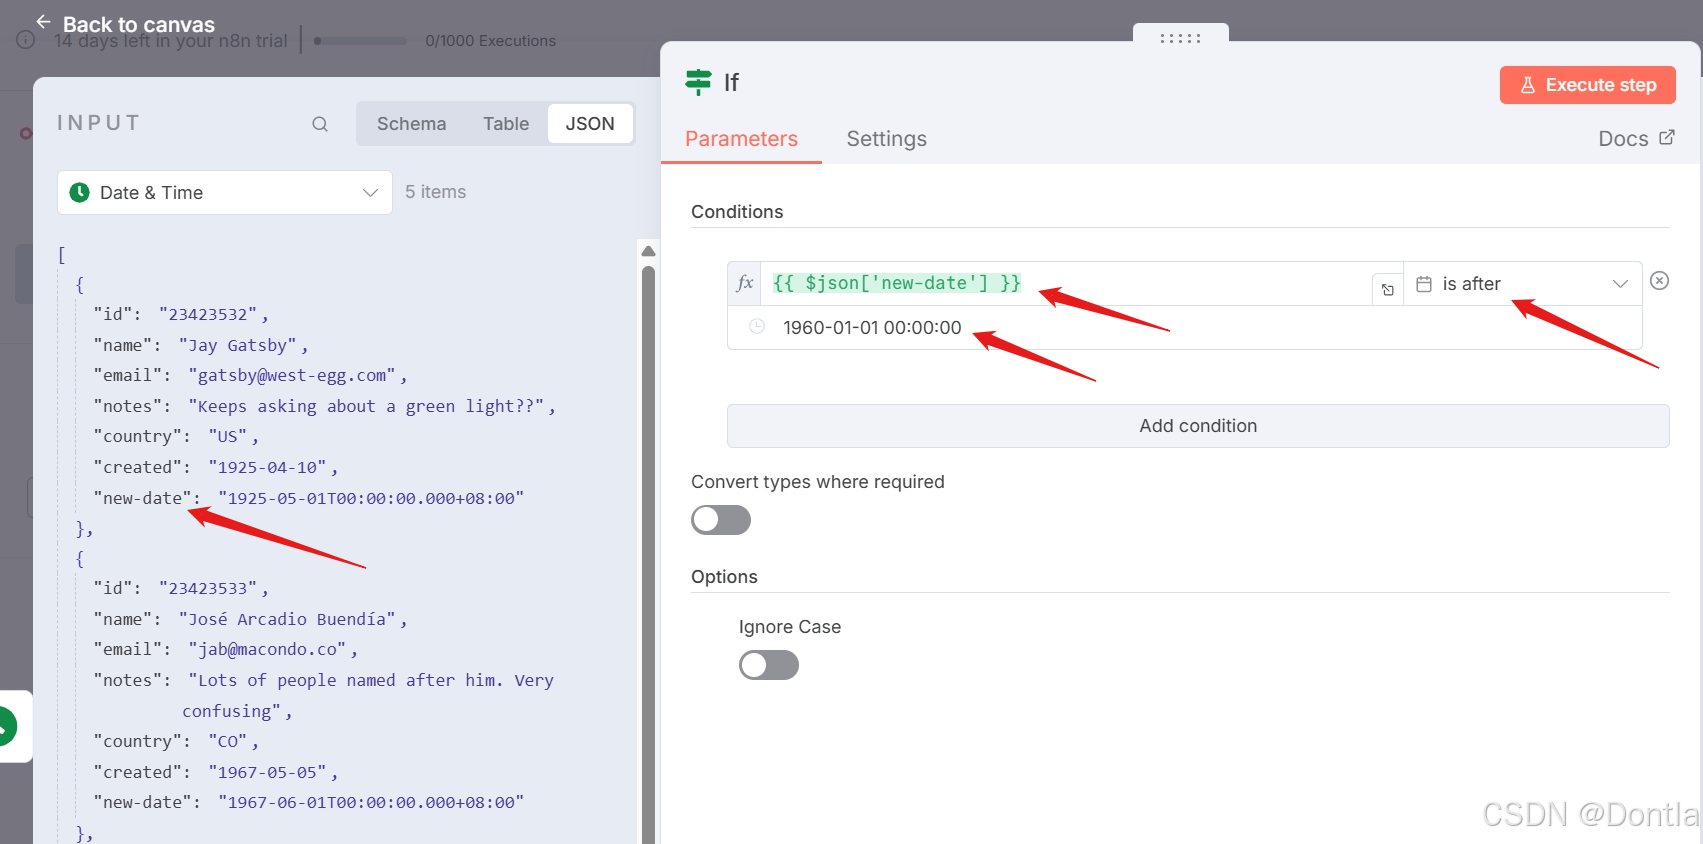
3. Add an If node connected to the Date & Time node.
- Add the new-date field as the first part of the condition.
- Set the comparison to Date &Time > is after
- Add
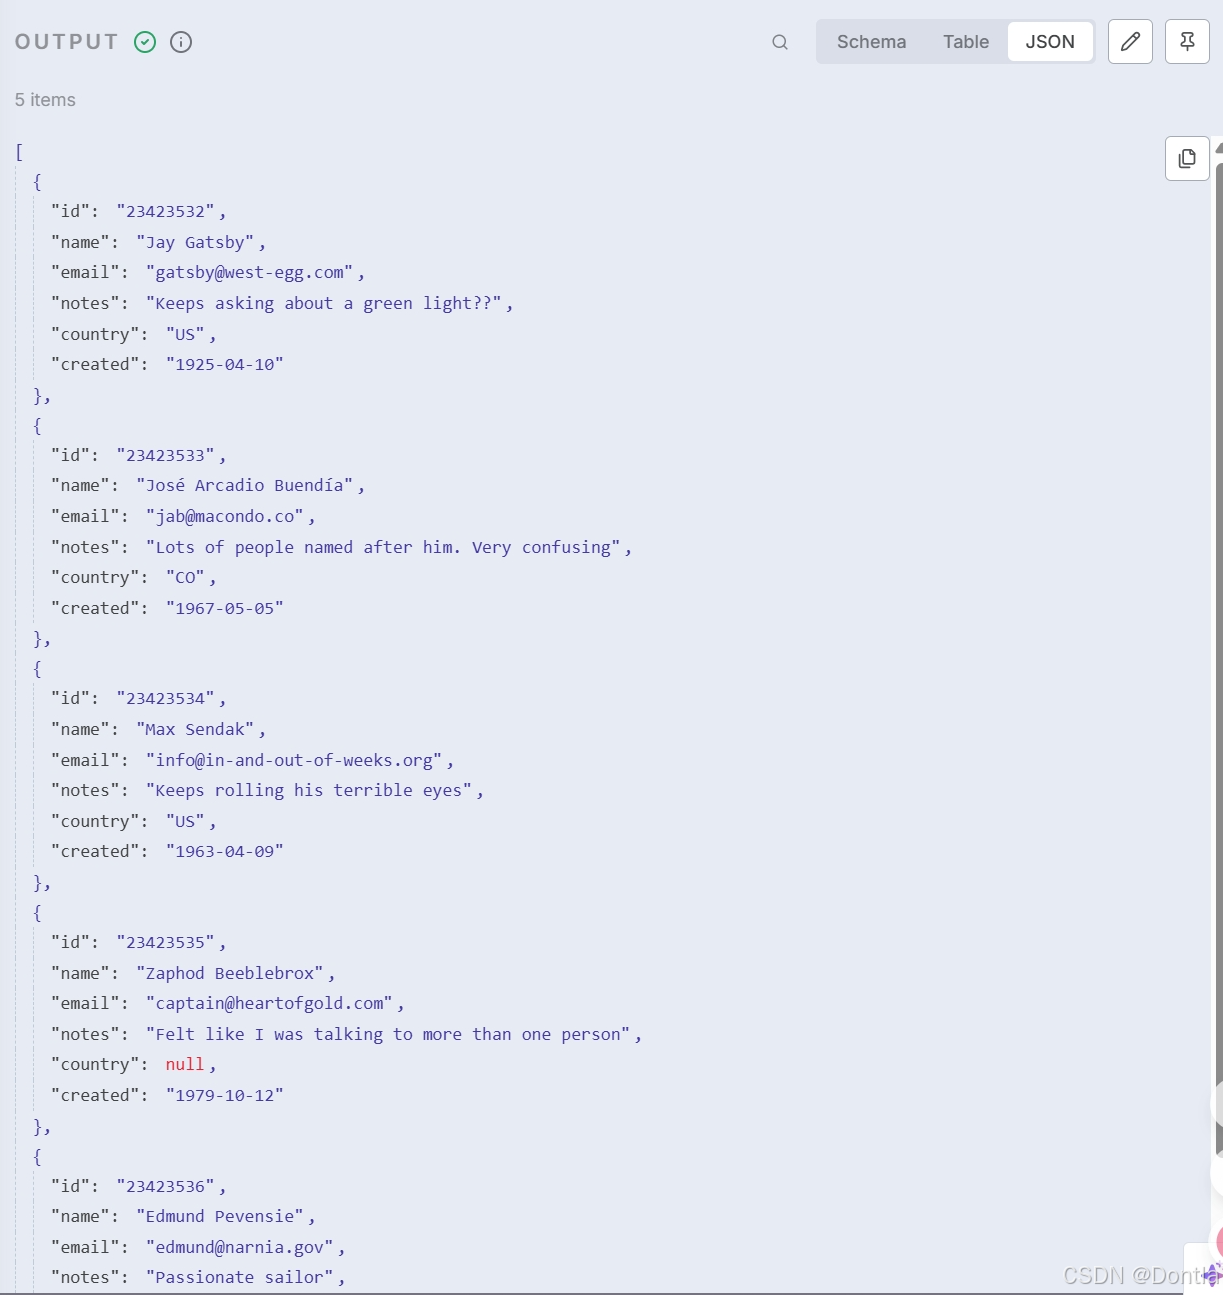
1960-01-01 00:00:00as the second part of the expression. (This should produce 3 items in the True Branch and 2 items in the False Branch)
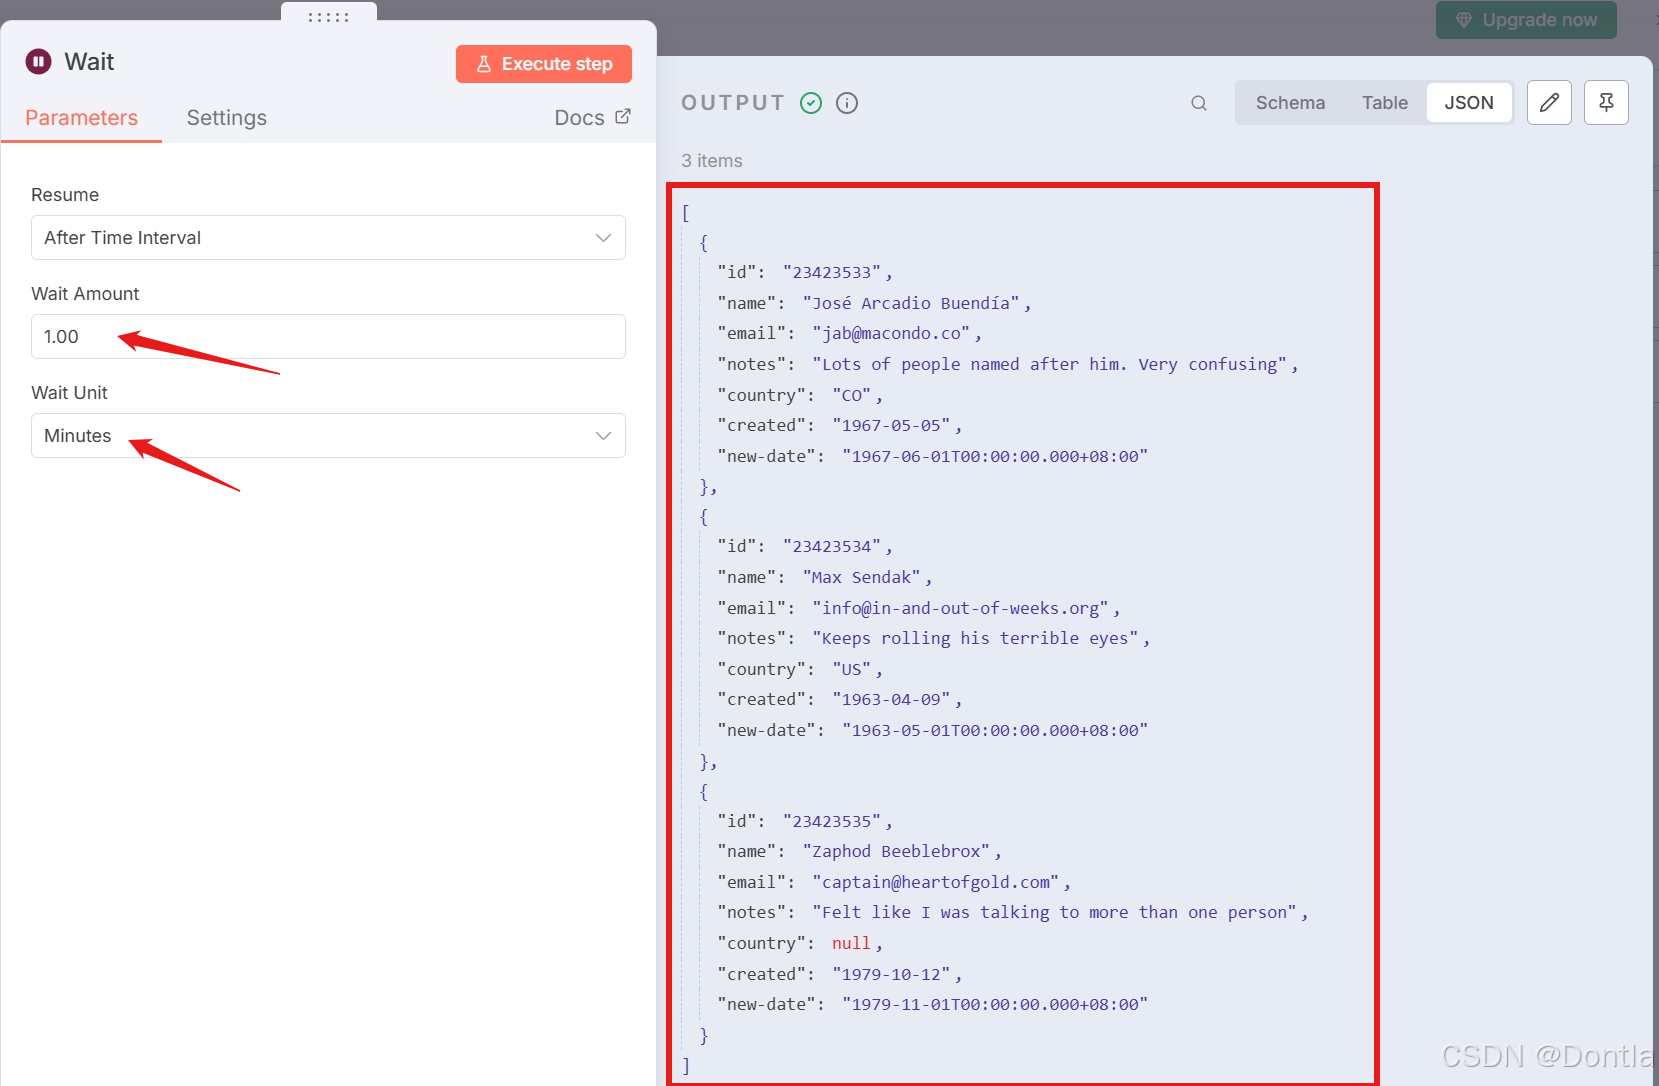
4. Add a Wait node to the True output of the If node.
- Set Resume to
After Time interval. - Set Wait Amount to
1.00. - Set Wait Unit to
Minutes.
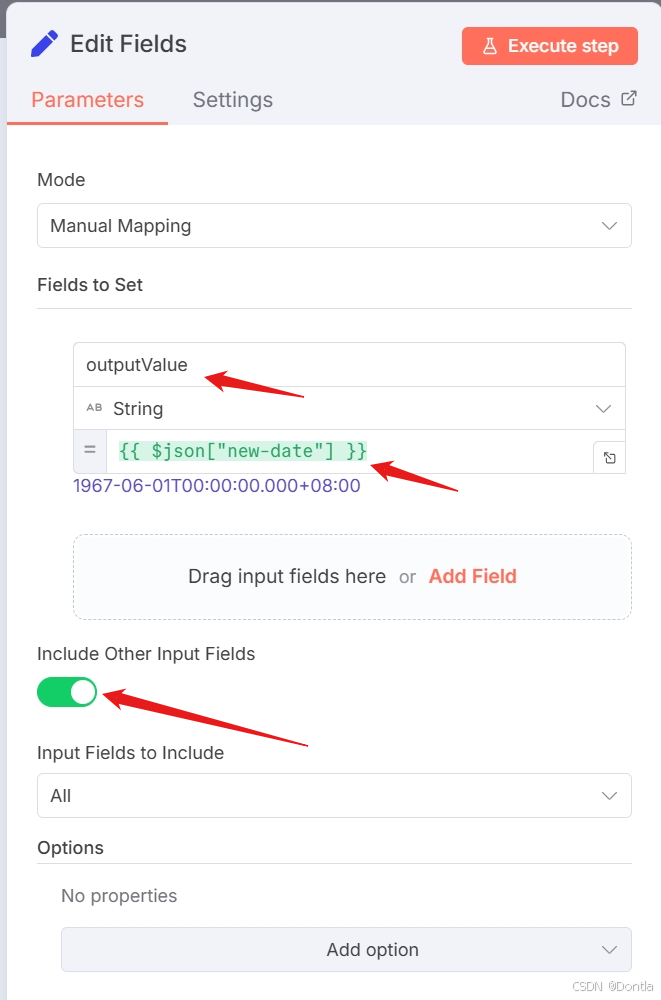
5. Add an Edit Fields (Set) node to the Wait node.
- Use either JSON or Manual Mapping Mode.
- Set a new field called
outputValueto be the value of the new-date field. - Select the option to Include Other Input Fields and include All fields.
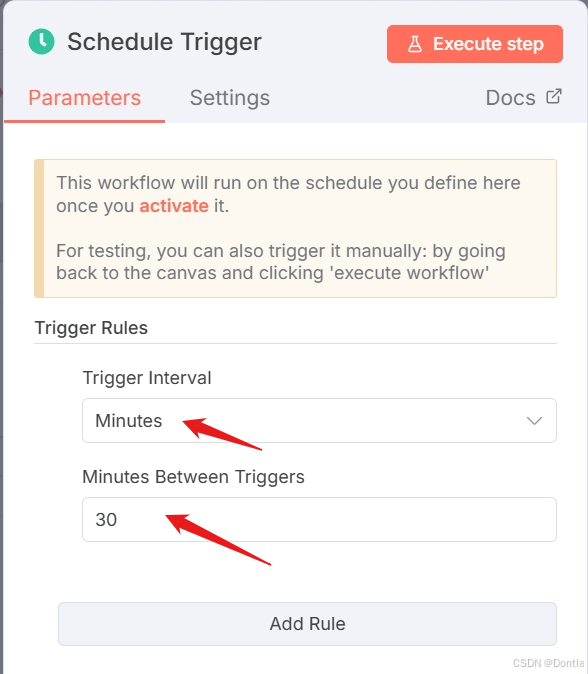
6. Add a Schedule Trigger node at the beginning of the workflow.
-
Set the Trigger Interval to use
Minutes. -
Set the Minutes Between Triggers to 30.
-
To test your schedule, be sure to activate the workflow.
-
Be sure to connect this node to the Customer Datastore (n8n training) node you began with!
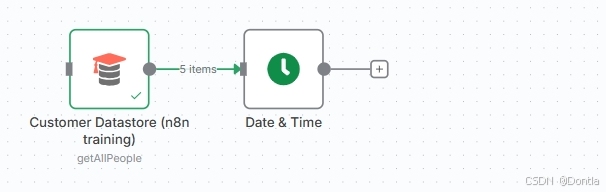
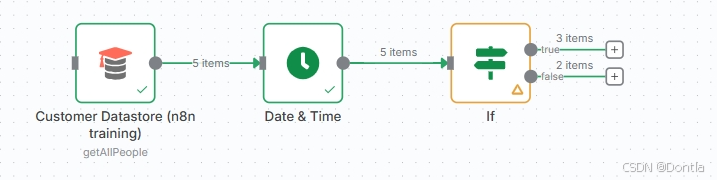
The workflow should look like this:
To check the configuration of each node, you can copy the JSON code of this workflow and either paste it into the Editor UI or save it as a file and import from file into a new workflow. See Export and import workflows for more information.
{
	"name": "Course 2, Ch 2, Date exercise",
	"nodes": [
		{
			"parameters": {},
			"id": "6bf64d5c-4b00-43cf-8439-3cbf5e5f203b",
			"name": "When clicking \"Execute workflow\"",
			"type": "n8n-nodes-base.manualTrigger",
			"typeVersion": 1,
			"position": [
				620,
				280
			]
		},
		{
			"parameters": {
				"operation": "getAllPeople",
				"returnAll": true
			},
			"id": "a08a8157-99ee-4d50-8fe4-b6d7e16e858e",
			"name": "Customer Datastore (n8n training)",
			"type": "n8n-nodes-base.n8nTrainingCustomerDatastore",
			"typeVersion": 1,
			"position": [
				840,
				360
			]
		},
		{
			"parameters": {
				"operation": "roundDate",
				"date": "={{ $json.created }}",
				"mode": "roundUp",
				"outputFieldName": "new-date",
				"options": {
					"includeInputFields": true
				}
			},
			"id": "f66a4356-2584-44b6-a4e9-1e3b5de53e71",
			"name": "Date & Time",
			"type": "n8n-nodes-base.dateTime",
			"typeVersion": 2,
			"position": [
				1080,
				360
			]
		},
		{
			"parameters": {
				"conditions": {
					"options": {
						"caseSensitive": true,
						"leftValue": "",
						"typeValidation": "strict"
					},
					"conditions": [
						{
							"id": "7c82823a-e603-4166-8866-493f643ba354",
							"leftValue": "={{ $json['new-date'] }}",
							"rightValue": "1960-01-01T00:00:00",
							"operator": {
								"type": "dateTime",
								"operation": "after"
							}
						}
					],
					"combinator": "and"
				},
				"options": {}
			},
			"id": "cea39877-6183-4ea0-9400-e80523636912",
			"name": "If",
			"type": "n8n-nodes-base.if",
			"typeVersion": 2,
			"position": [
				1280,
				360
			]
		},
		{
			"parameters": {
				"amount": 1,
				"unit": "minutes"
			},
			"id": "5aa860b7-c73c-4df0-ad63-215850166f13",
			"name": "Wait",
			"type": "n8n-nodes-base.wait",
			"typeVersion": 1.1,
			"position": [
				1480,
				260
			],
			"webhookId": "be78732e-787d-463e-9210-2c7e8239761e"
		},
		{
			"parameters": {
				"assignments": {
					"assignments": [
						{
							"id": "e058832a-2461-4c6d-b584-043ecc036427",
							"name": "outputValue",
							"value": "={{ $json['new-date'] }}",
							"type": "string"
						}
					]
				},
				"includeOtherFields": true,
				"options": {}
			},
			"id": "be034e9e-3cf1-4264-9d15-b6760ce28f91",
			"name": "Edit Fields",
			"type": "n8n-nodes-base.set",
			"typeVersion": 3.3,
			"position": [
				1700,
				260
			]
		},
		{
			"parameters": {
				"rule": {
					"interval": [
						{
							"field": "minutes",
							"minutesInterval": 30
						}
					]
				}
			},
			"id": "6e8e4308-d0e0-4d0d-bc29-5131b57cf061",
			"name": "Schedule Trigger",
			"type": "n8n-nodes-base.scheduleTrigger",
			"typeVersion": 1.1,
			"position": [
				620,
				480
			]
		}
	],
	"pinData": {},
	"connections": {
		"When clicking \"Execute workflow\"": {
			"main": [
				[
					{
						"node": "Customer Datastore (n8n training)",
						"type": "main",
						"index": 0
					}
				]
			]
		},
		"Customer Datastore (n8n training)": {
			"main": [
				[
					{
						"node": "Date & Time",
						"type": "main",
						"index": 0
					}
				]
			]
		},
		"Date & Time": {
			"main": [
				[
					{
						"node": "If",
						"type": "main",
						"index": 0
					}
				]
			]
		},
		"If": {
			"main": [
				[
					{
						"node": "Wait",
						"type": "main",
						"index": 0
					}
				]
			]
		},
		"Wait": {
			"main": [
				[
					{
						"node": "Edit Fields",
						"type": "main",
						"index": 0
					}
				]
			]
		},
		"Schedule Trigger": {
			"main": [
				[
					{
						"node": "Customer Datastore (n8n training)",
						"type": "main",
						"index": 0
					}
				]
			]
		}
	}
}
Binary data
Concepts
Up to now, you have mainly worked with text data. But what if you want to process data that’s not text, like images or PDF files? These types of files are represented in the binary numeral system, so they’re considered binary data. In this form, binary data doesn’t offer you useful information, so you’ll need to convert it into a readable form.
In n8n, you can process binary data with the following nodes:
- HTTP Request to request and send files from/to web resources and APIs.
- Read/Write Files from Disk to read and write files from/to the machine where n8n is running.
- Convert to File to take input data and output it as a file.
- Extract From File to get data from a binary format and convert it to JSON.
Note | Reading and writing files is only available on self-hosted n8n
Reading and writing files to disk isn’t available on n8n Cloud. You’ll read and write to the machine where you installed n8n. If you run n8n in Docker, your command runs in the n8n container and not the Docker host. The Read/Write Files From Disk node looks for files relative to the n8n install path. n8n recommends using absolute file paths to prevent any errors.
To read or write a binary file, you need to write the path (location) of the file in the node’s File(s) Selector parameter (for the Read operation) or in the node’s File Path and Name parameter (for the Write operation).
Warning | Naming the right path
The file path looks slightly different depending on how you are running n8n:
- npm:
~/my_file.json - n8n cloud / Docker:
/tmp/my_file.json
Binary Exercise 1
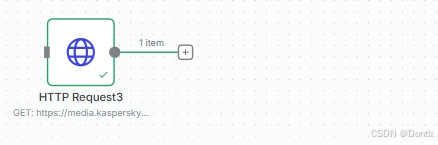
For our first binary exercise, let’s convert a PDF file to JSON:
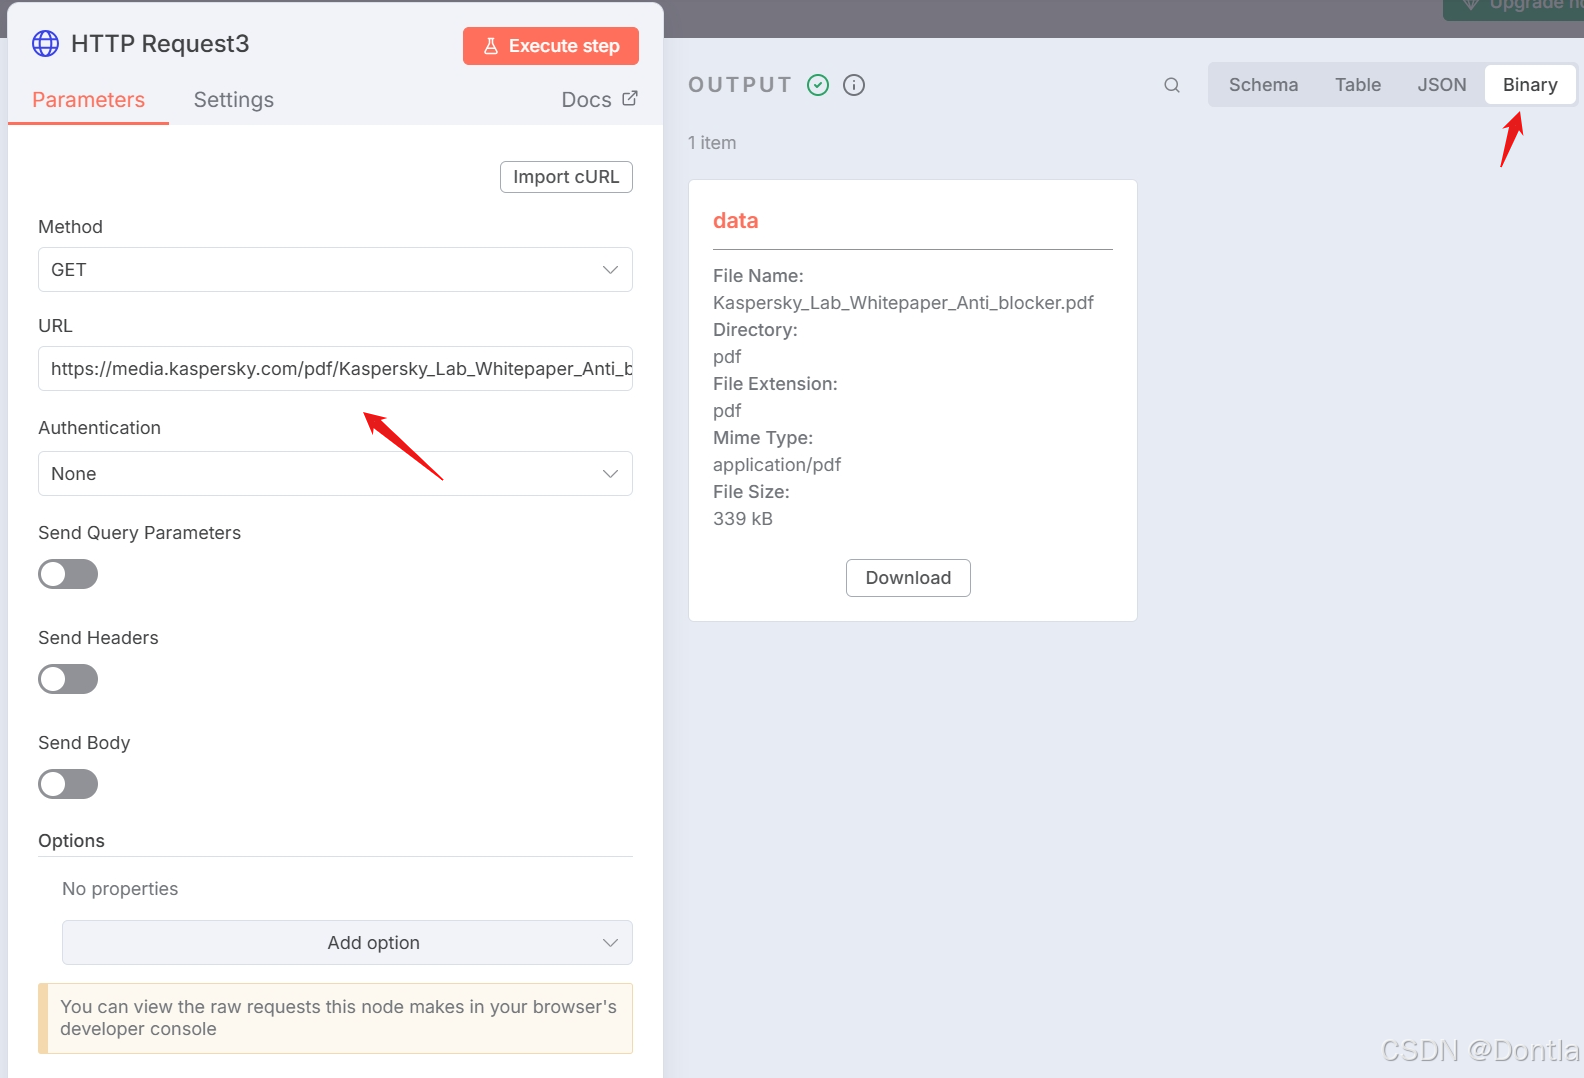
1. Make an HTTP request to get this PDF file: https://media.kaspersky.com/pdf/Kaspersky_Lab_Whitepaper_Anti_blocker.pdf.
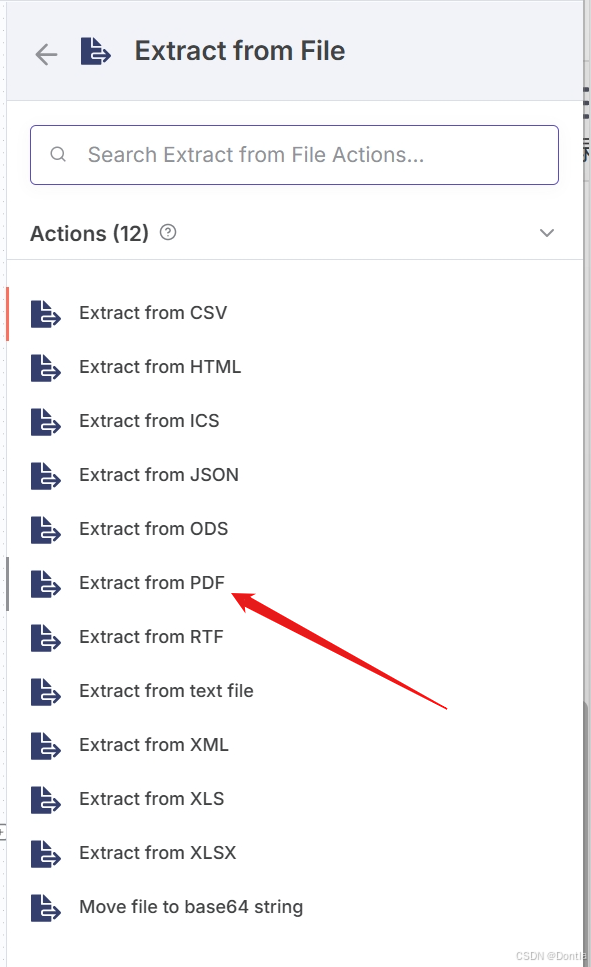
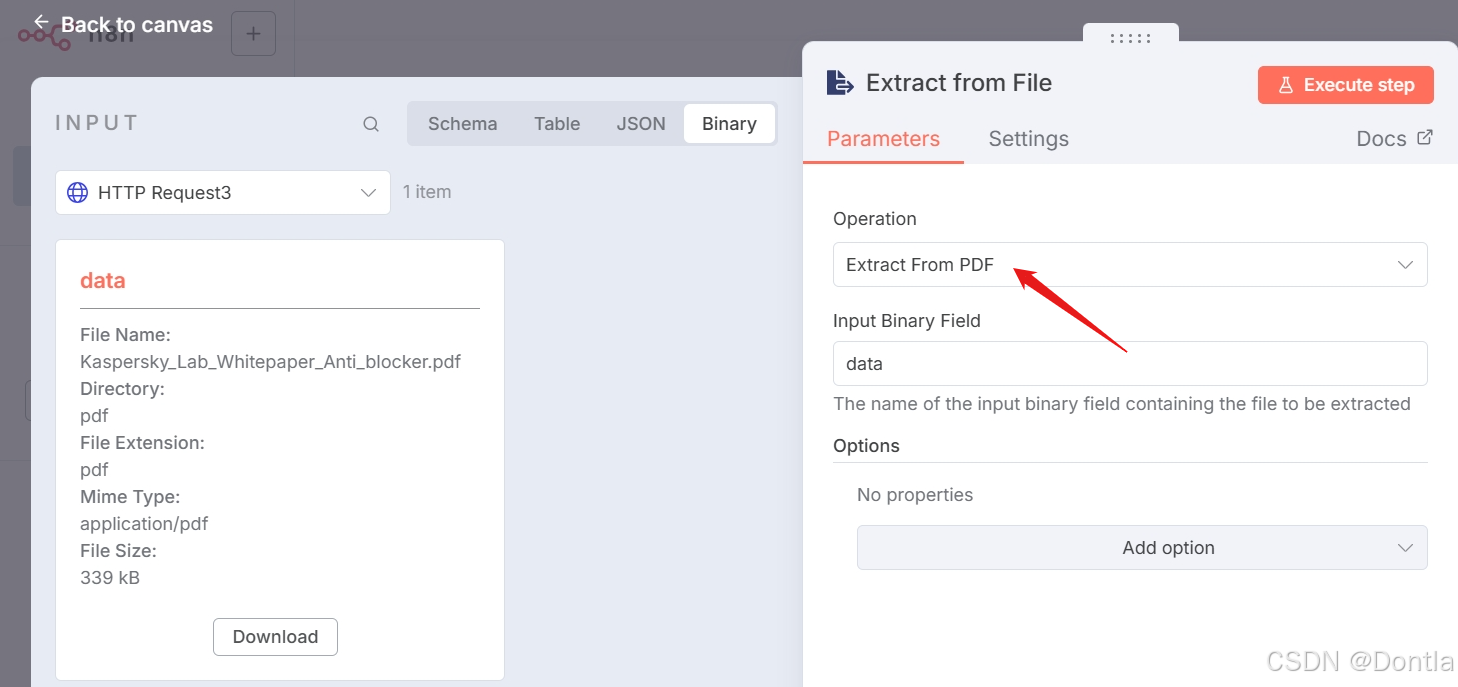
2. Use the Extract From File node to convert the file from binary to JSON.
Answer
Note “Show me the solution”
In the HTTP Request node, you should see the PDF file, like this:

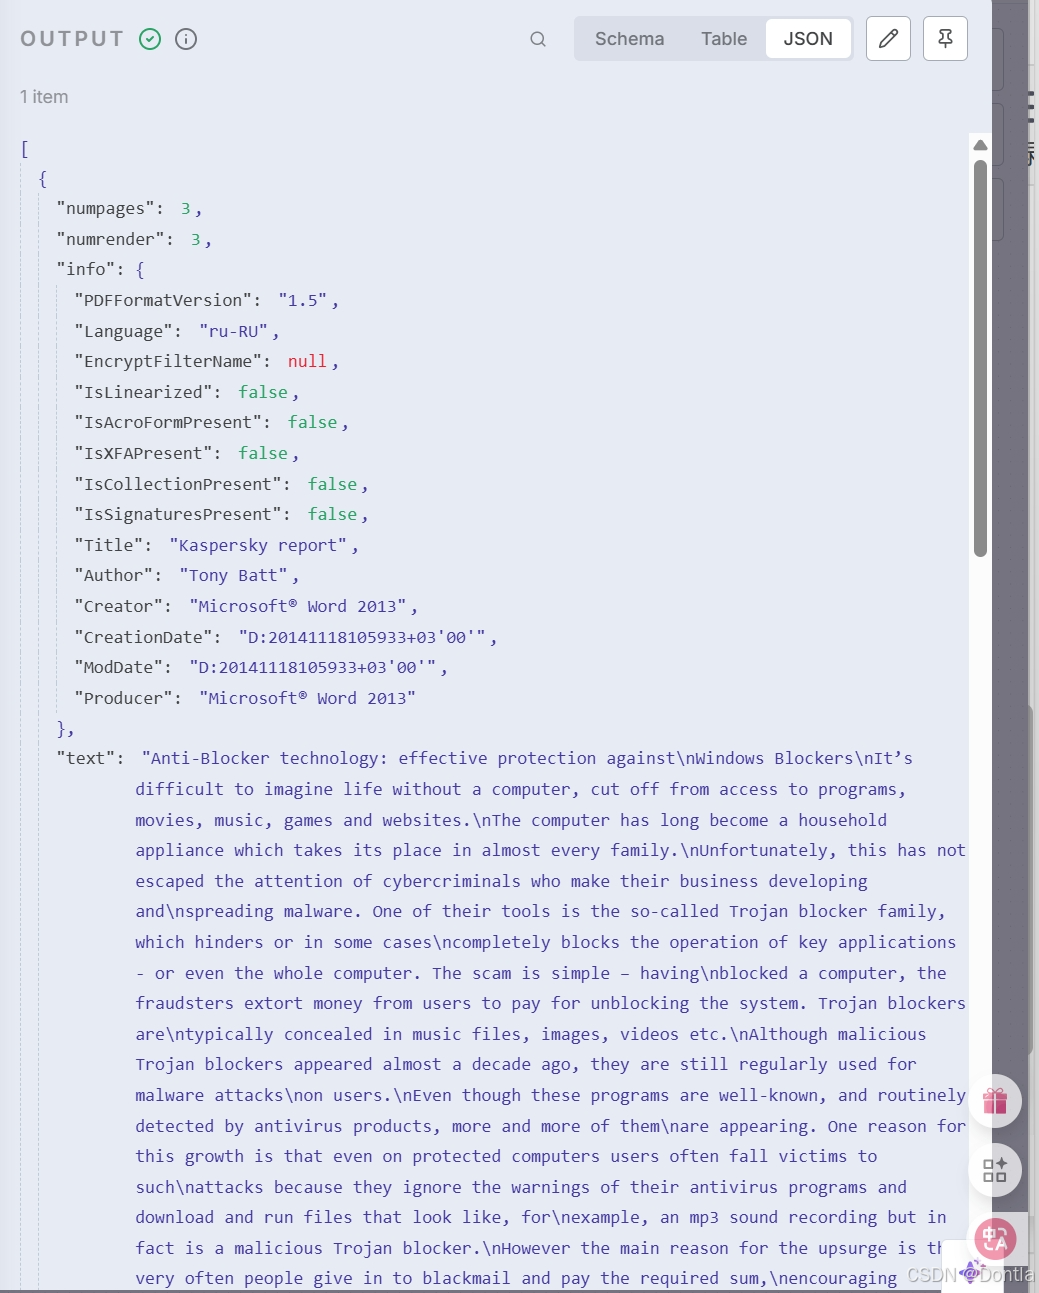
When you convert the PDF from binary to JSON using the Extract From File node, the result should look like this: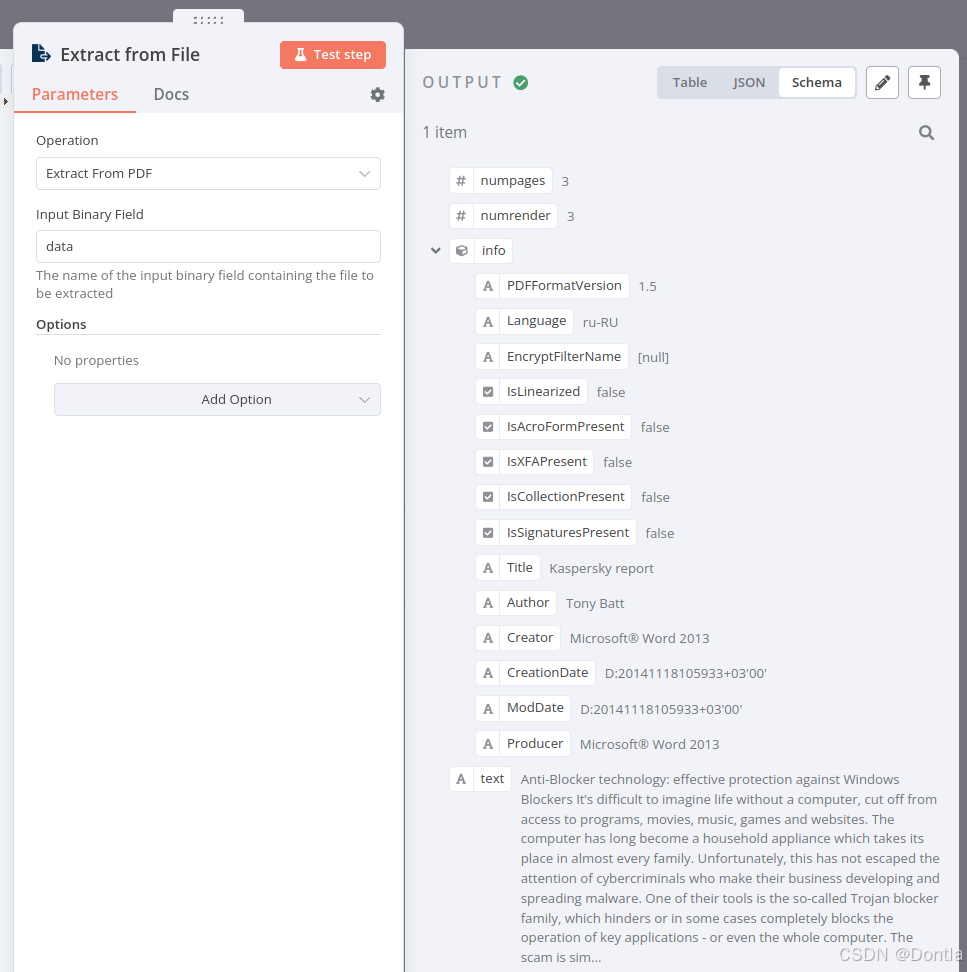
To check the configuration of the nodes, you can copy the JSON workflow code below and paste it into your Editor UI:
{
	"name": "Binary to JSON",
	"nodes": [
		{
			"parameters": {},
			"id": "78639a25-b69a-4b9c-84e0-69e045bed1a3",
			"name": "When clicking \"Execute Workflow\"",
			"type": "n8n-nodes-base.manualTrigger",
			"typeVersion": 1,
			"position": [
				480,
				520
			]
		},
		{
			"parameters": {
				"url": "https://media.kaspersky.com/pdf/Kaspersky_Lab_Whitepaper_Anti_blocker.pdf",
				"options": {}
			},
			"id": "a11310df-1287-4e9a-b993-baa6bd4265a6",
			"name": "HTTP Request",
			"type": "n8n-nodes-base.httpRequest",
			"typeVersion": 4.1,
			"position": [
				700,
				520
			]
		},
		{
			"parameters": {
				"operation": "pdf",
				"options": {}
			},
			"id": "88697b6b-fb02-4c3d-a715-750d60413e9f",
			"name": "Extract From File",
			"type": "n8n-nodes-base.extractFromFile",
			"typeVersion": 1,
			"position": [
				920,
				520
			]
		}
	],
	"pinData": {},
	"connections": {
		"When clicking \"Execute Workflow\"": {
			"main": [
				[
					{
						"node": "HTTP Request",
						"type": "main",
						"index": 0
					}
				]
			]
		},
		"HTTP Request": {
			"main": [
				[
					{
						"node": "Extract From File",
						"type": "main",
						"index": 0
					}
				]
			]
		}
	}
}
Binary Exercise 2
For our second binary exercise, let’s convert some JSON data to binary:
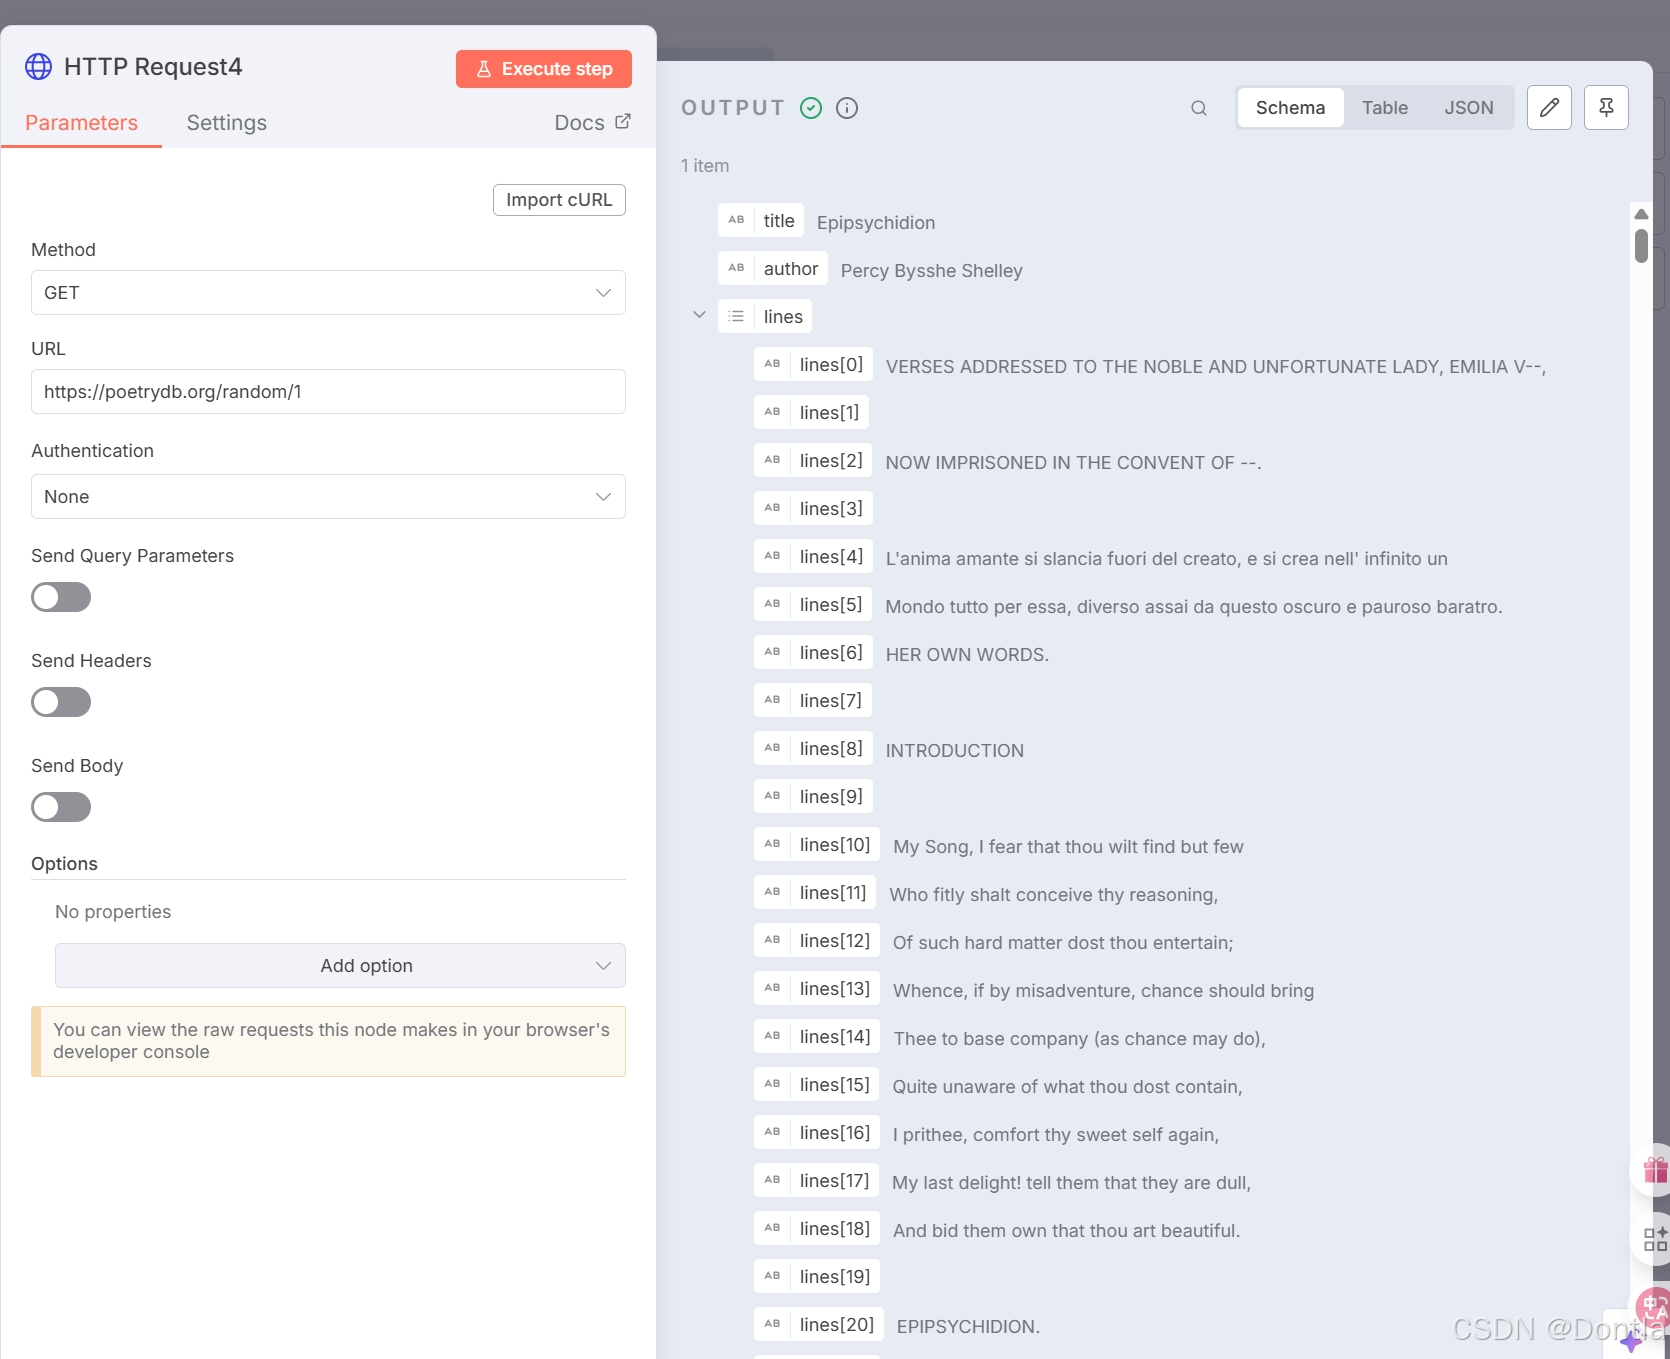
1. Make an HTTP request to the Poetry DB API https://poetrydb.org/random/1.

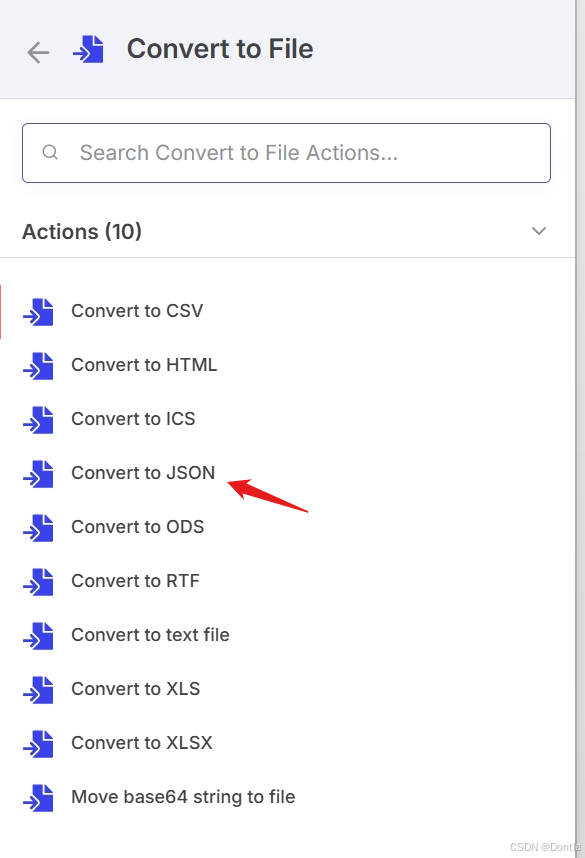
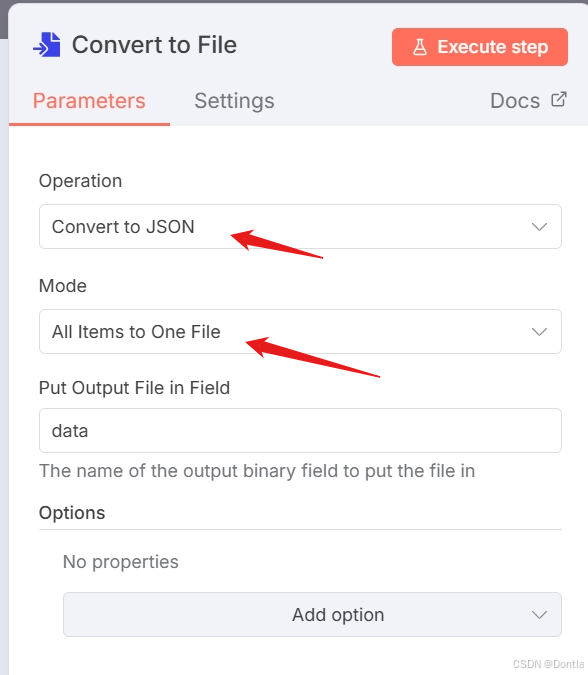
2. Convert the returned data from JSON to binary using the Convert to File node.

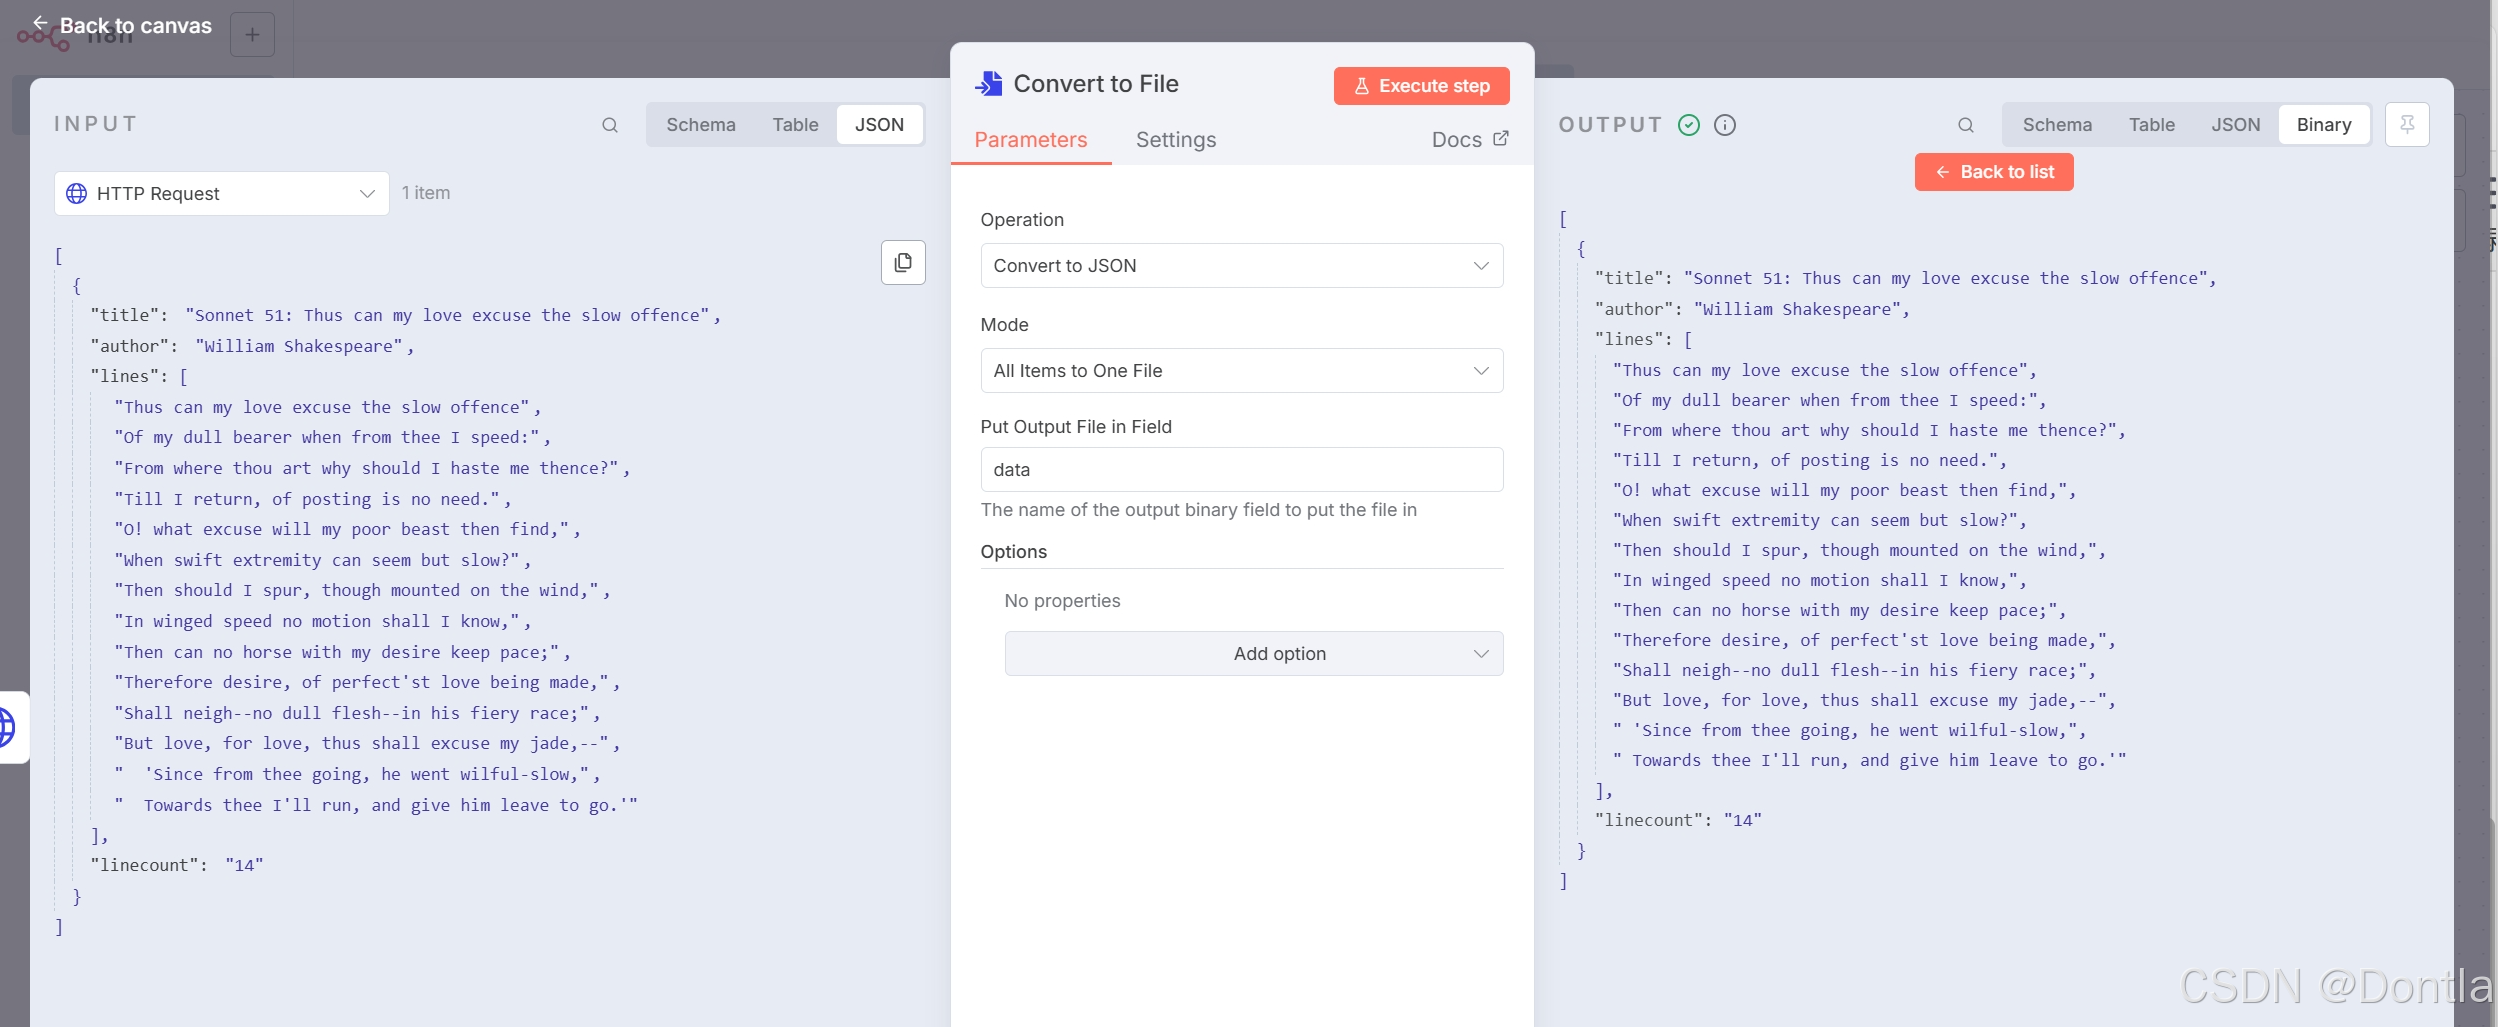
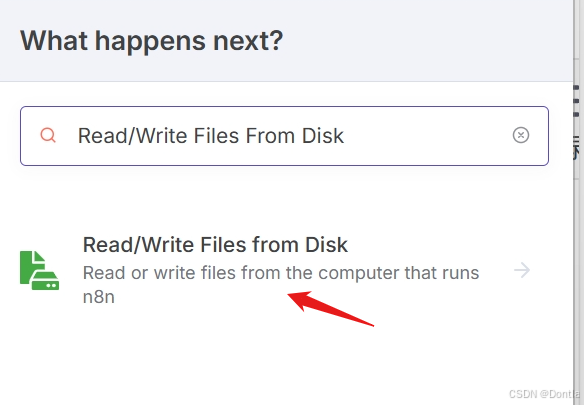
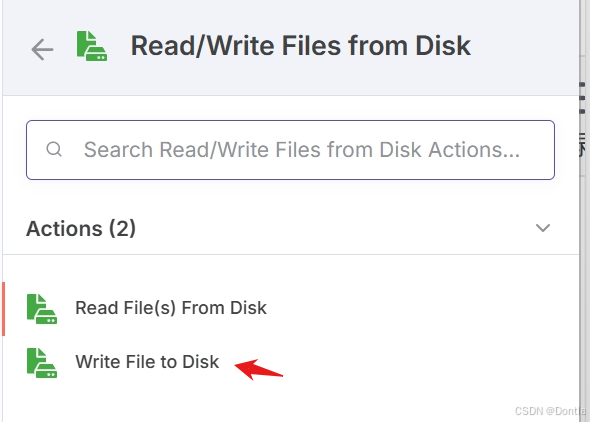
3. Write the new binary file data to the machine where n8n is running using the Read/Write Files From Disk node.

File Path and Name: /tmp/poetrydb.json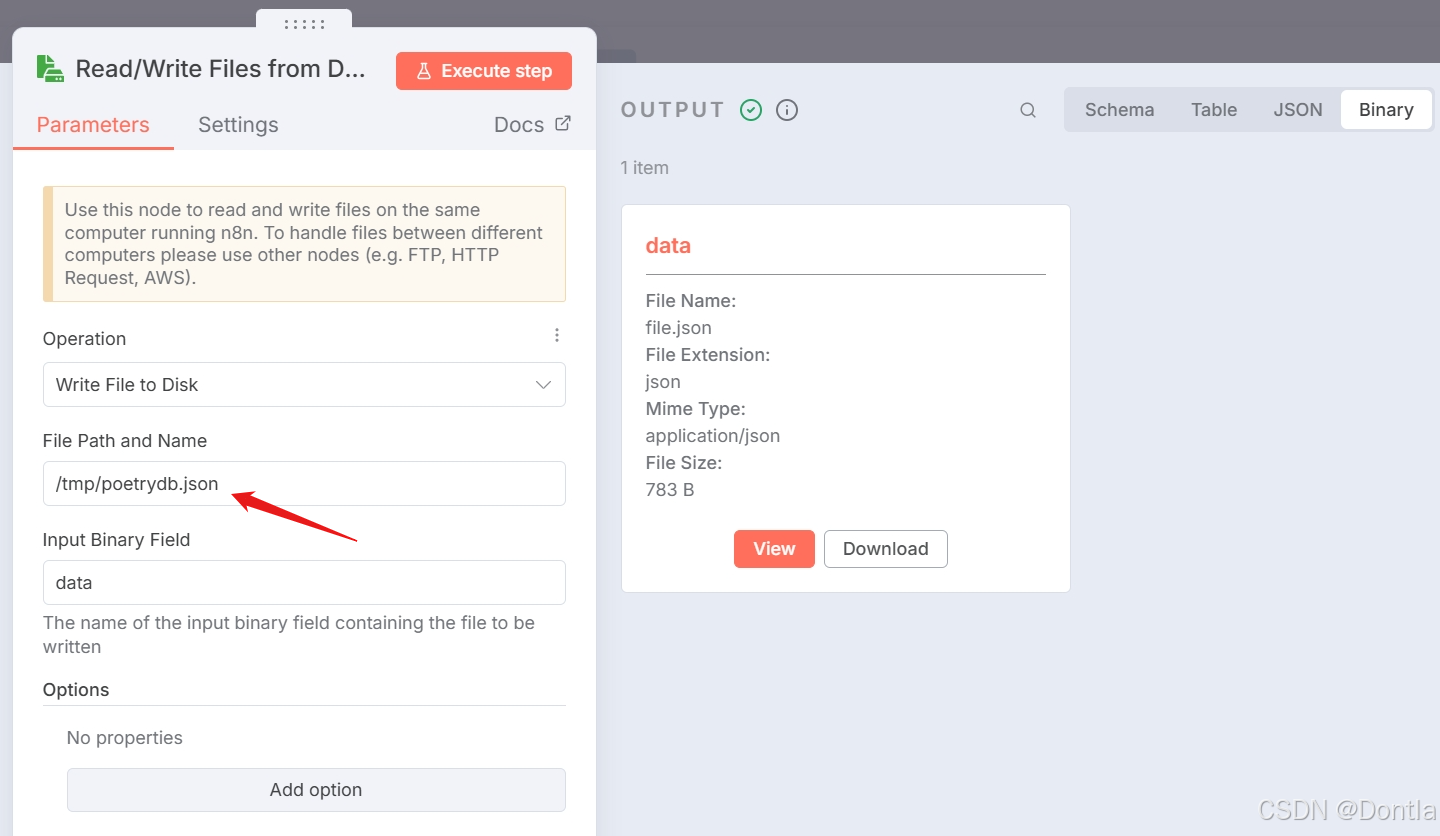
You can find this file at /tmp/poetrydb.json in the Docker container.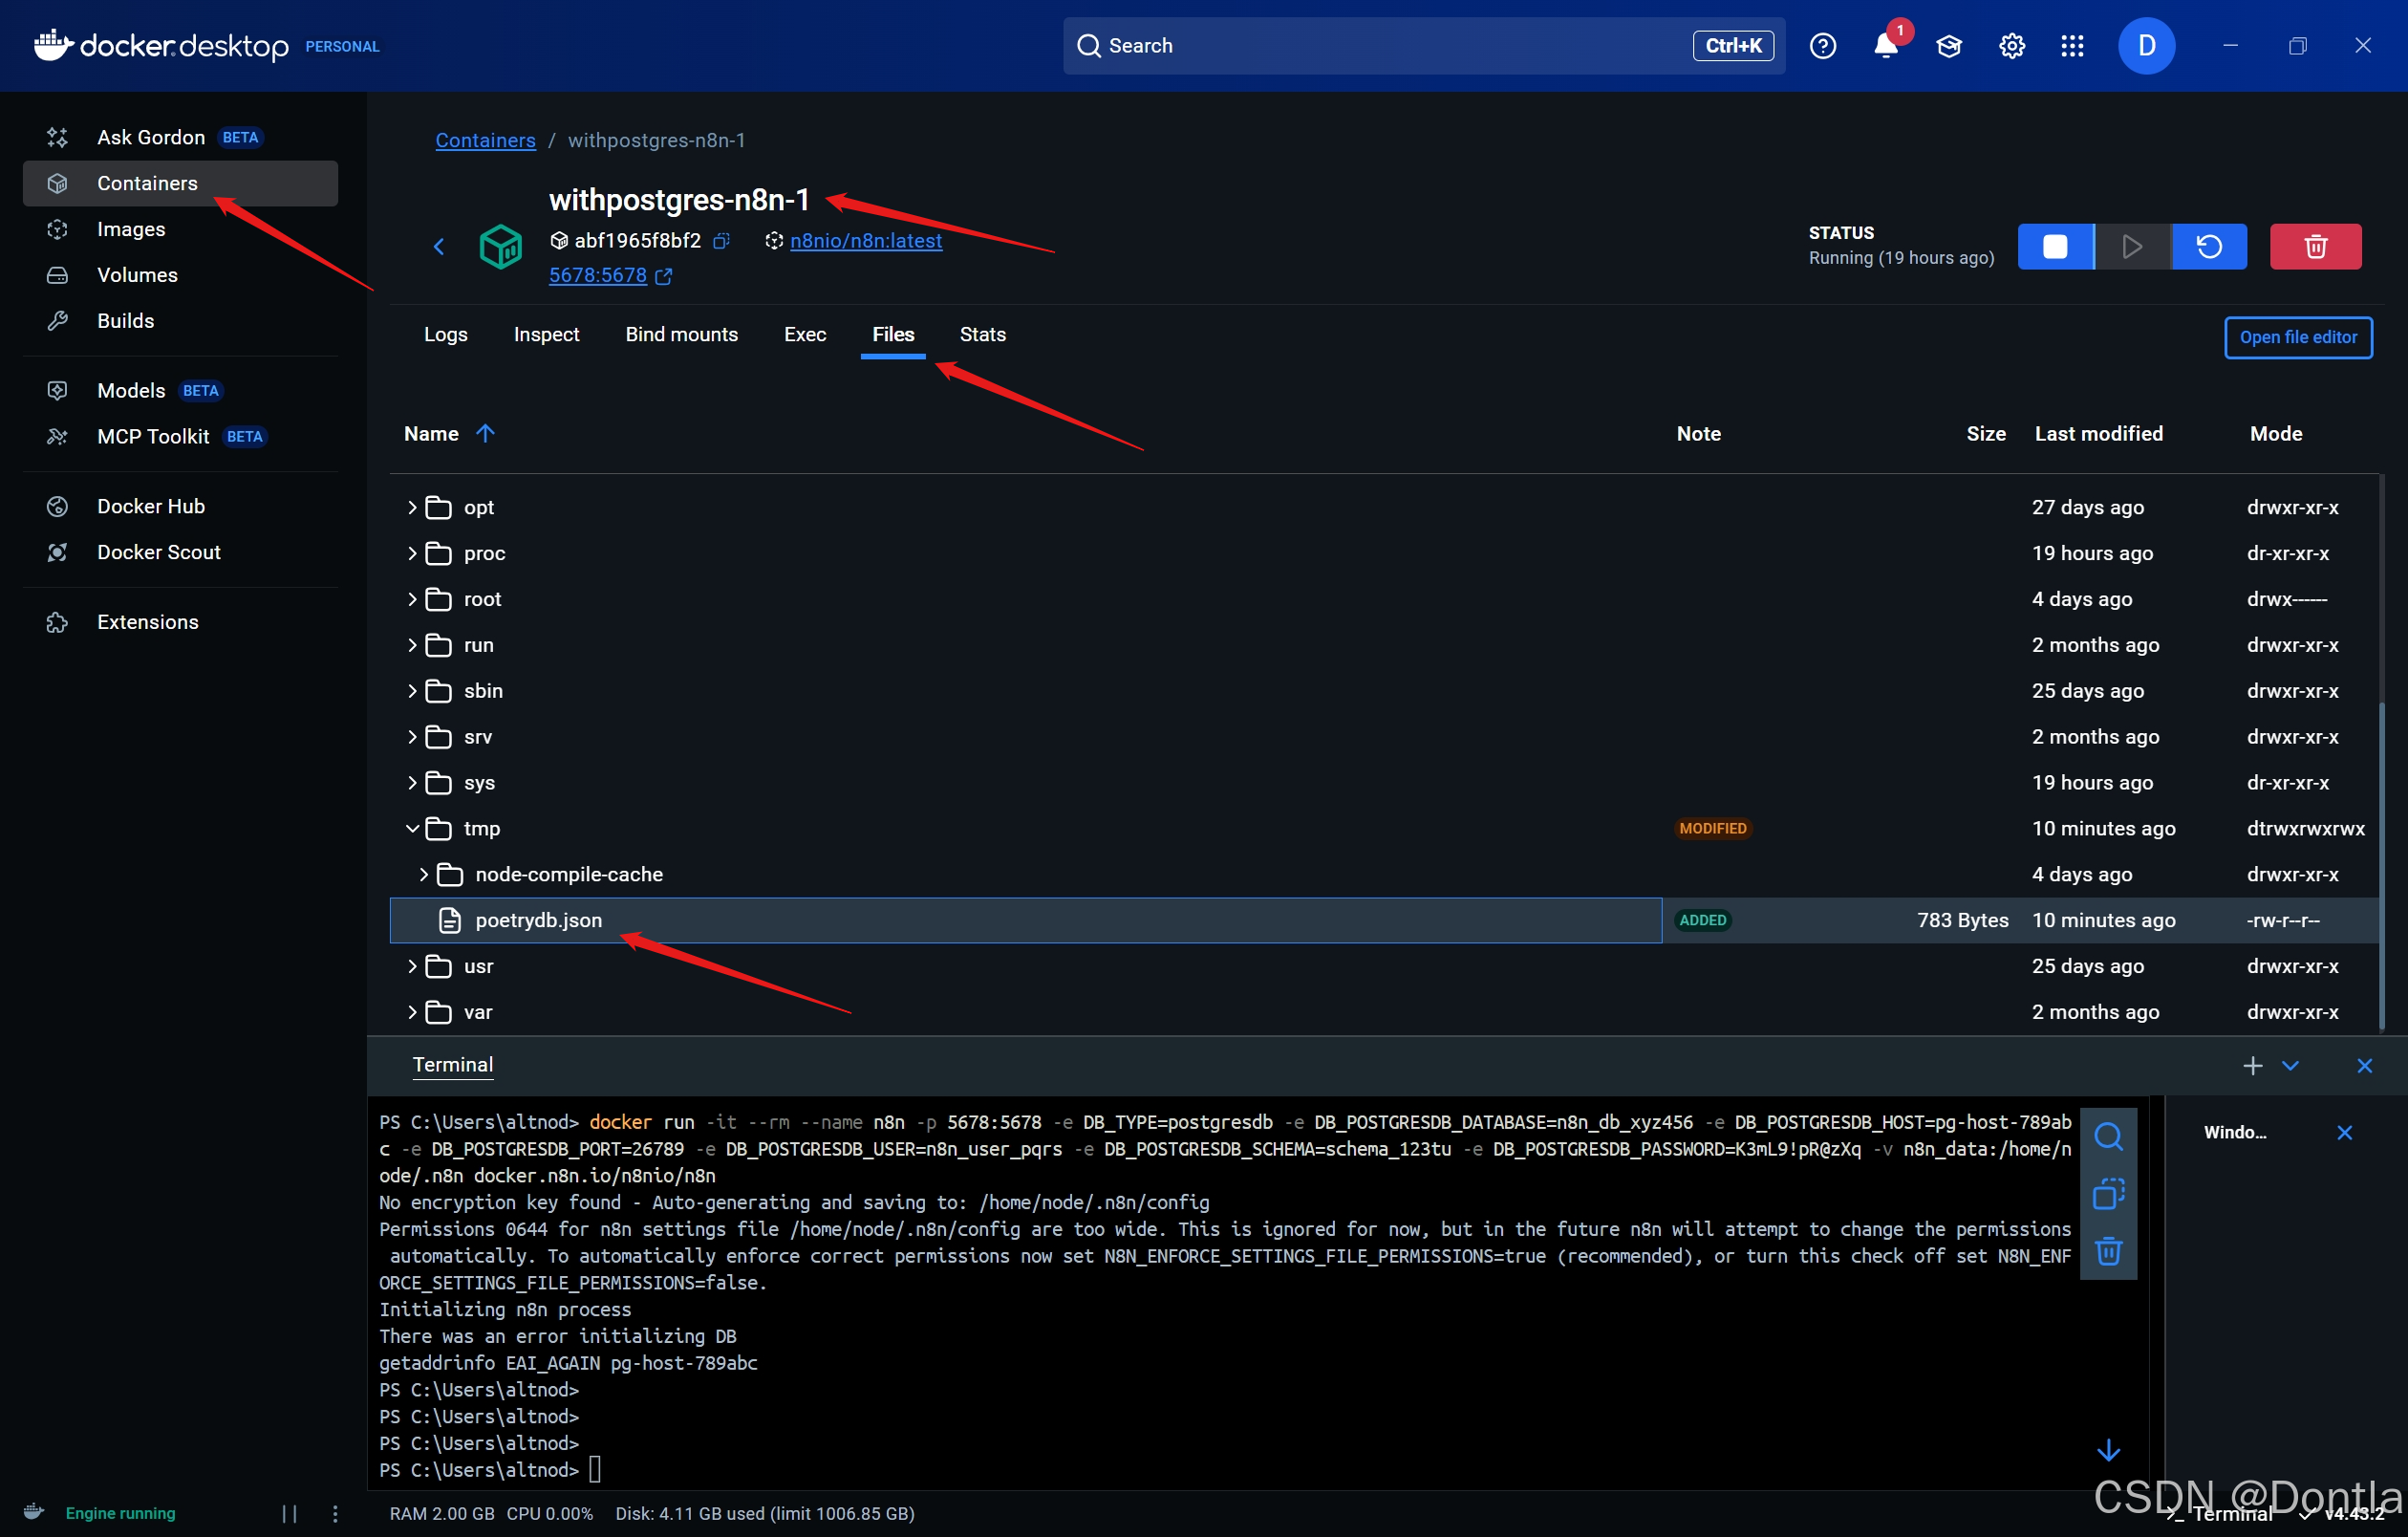
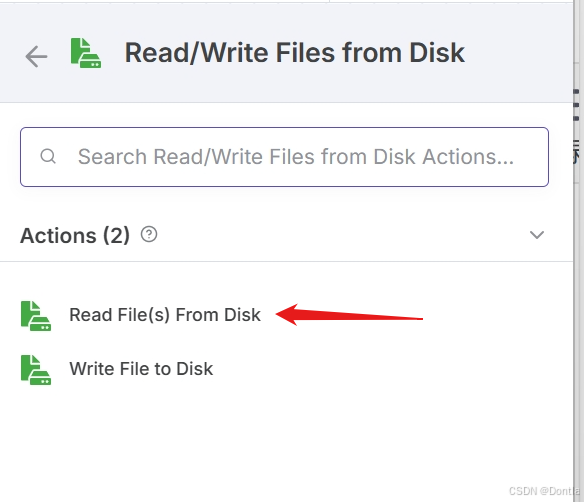
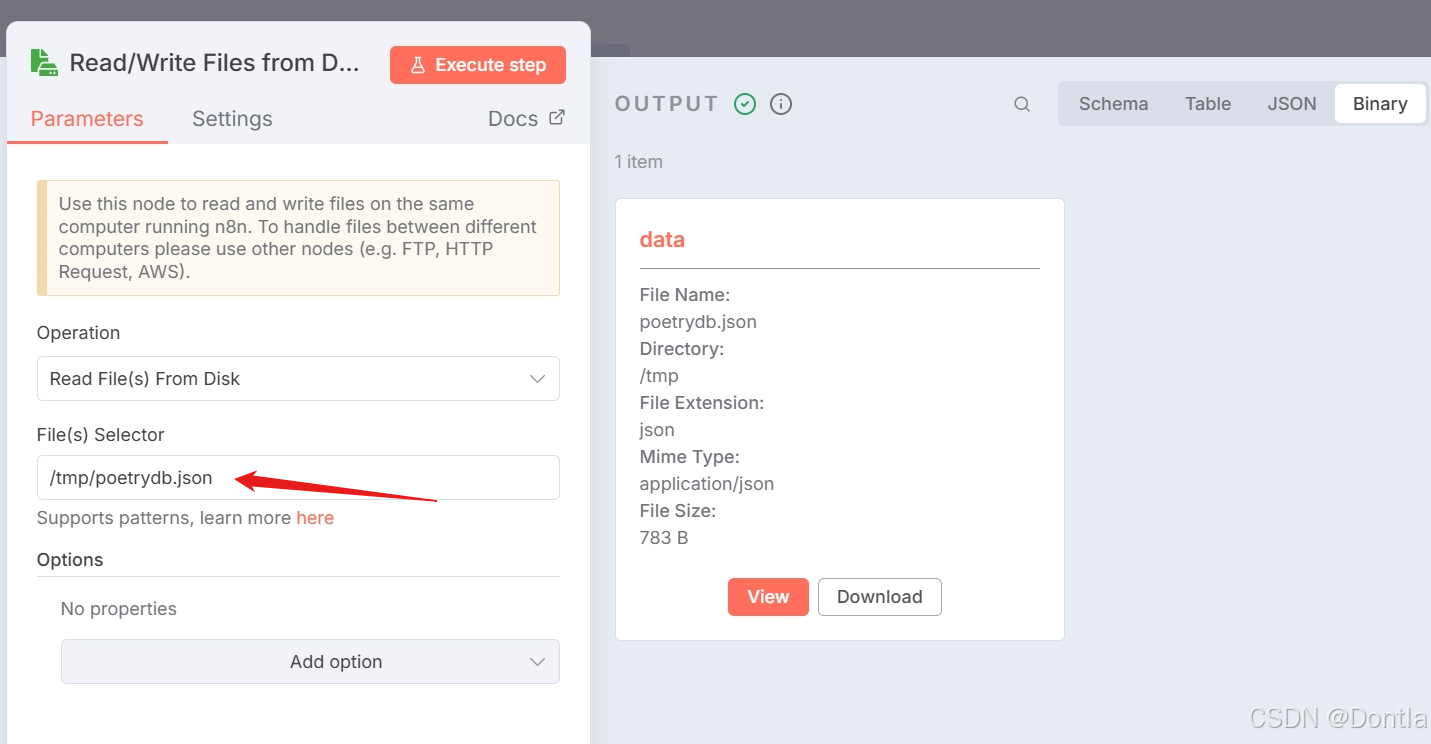
4. To check that it worked out, use the Read/Write Files From Disk node to read the generated binary file.
Answer
Note “Show me the solution”
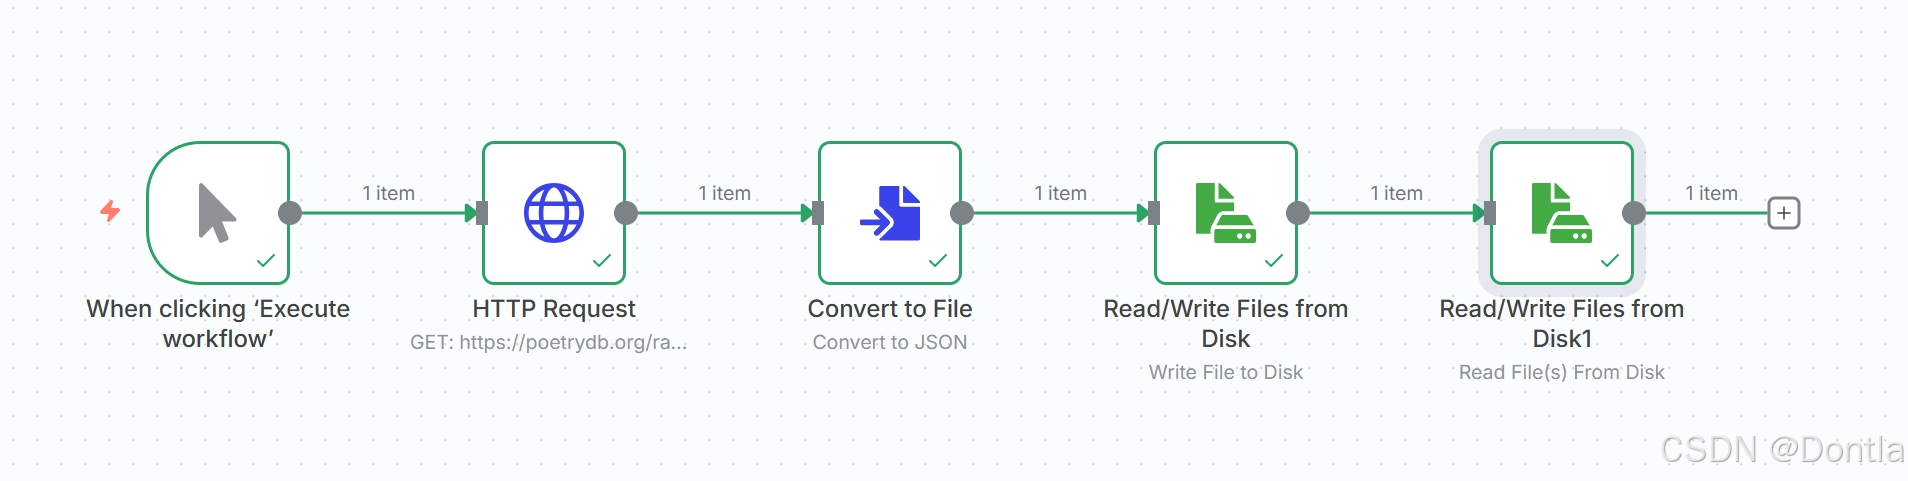
The workflow for this exercise looks like this: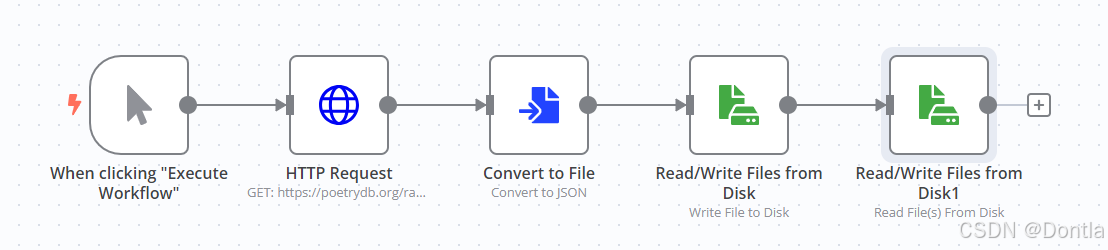
To check the configuration of the nodes, you can copy the JSON workflow code below and paste it into your Editor UI:
{
	"name": "JSON to file and Read-Write",
	"nodes": [
		{
		"parameters": {},
		"id": "78639a25-b69a-4b9c-84e0-69e045bed1a3",
		"name": "When clicking \"Execute Workflow\"",
		"type": "n8n-nodes-base.manualTrigger",
		"typeVersion": 1,
		"position": [
			480,
			520
		]
		},
		{
		"parameters": {
			"url": "https://poetrydb.org/random/1",
			"options": {}
		},
		"id": "a11310df-1287-4e9a-b993-baa6bd4265a6",
		"name": "HTTP Request",
		"type": "n8n-nodes-base.httpRequest",
		"typeVersion": 4.1,
		"position": [
			680,
			520
		]
		},
		{
		"parameters": {
			"operation": "toJson",
			"options": {}
		},
		"id": "06be18f6-f193-48e2-a8d9-35f4779d8324",
		"name": "Convert to File",
		"type": "n8n-nodes-base.convertToFile",
		"typeVersion": 1,
		"position": [
			880,
			520
		]
		},
		{
		"parameters": {
			"operation": "write",
			"fileName": "/tmp/poetrydb.json",
			"options": {}
		},
		"id": "f2048e5d-fa8f-4708-b15a-d07de359f2e5",
		"name": "Read/Write Files from Disk",
		"type": "n8n-nodes-base.readWriteFile",
		"typeVersion": 1,
		"position": [
			1080,
			520
		]
		},
		{
		"parameters": {
			"fileSelector": "={{ $json.fileName }}",
			"options": {}
		},
		"id": "d630906c-09d4-49f4-ba14-416c0f4de1c8",
		"name": "Read/Write Files from Disk1",
		"type": "n8n-nodes-base.readWriteFile",
		"typeVersion": 1,
		"position": [
			1280,
			520
		]
		}
	],
	"pinData": {},
	"connections": {
		"When clicking \"Execute Workflow\"": {
		"main": [
			[
			{
				"node": "HTTP Request",
				"type": "main",
				"index": 0
			}
			]
		]
		},
		"HTTP Request": {
		"main": [
			[
			{
				"node": "Convert to File",
				"type": "main",
				"index": 0
			}
			]
		]
		},
		"Convert to File": {
		"main": [
			[
			{
				"node": "Read/Write Files from Disk",
				"type": "main",
				"index": 0
			}
			]
		]
		},
		"Read/Write Files from Disk": {
		"main": [
			[
			{
				"node": "Read/Write Files from Disk1",
				"type": "main",
				"index": 0
			}
			]
		]
		}
	}
}

火山引擎开发者社区是火山引擎打造的AI技术生态平台,聚焦Agent与大模型开发,提供豆包系列模型(图像/视频/视觉)、智能分析与会话工具,并配套评测集、动手实验室及行业案例库。社区通过技术沙龙、挑战赛等活动促进开发者成长,新用户可领50万Tokens权益,助力构建智能应用。
更多推荐
 19
19 0
0- 0


 已为社区贡献65条内容

所有评论(0)