图像修复方法总结
目录
ICT
Paper: Wan Z, Zhang J, Chen D, et al. High-fidelity pluralistic image completion with transformers[C]//Proceedings of the IEEE/CVF International Conference on Computer Vision. 2021: 4692-4701.
Introduction: http://raywzy.com/ICT/
Code: https://github.com/raywzy/ICT
方法概要:
CNN 在纹理建模方面表现出色,但在理解全局结构和自然支持多元化补全方面表现不佳;Transformer 擅长建模长期关系和生成多样化结果,但计算复杂度与输入长度呈二次方关系,限制了在处理高分辨率图像方面的应用。因此,ICT 通过结合 Transformer 和 CNN 来进行多样化图像补全:利用 Transformer 进行外观先验重建,捕捉多样化的连贯结构和粗糙纹理;同时使用 CNN 用于纹理补充,增强了局部纹理细节。
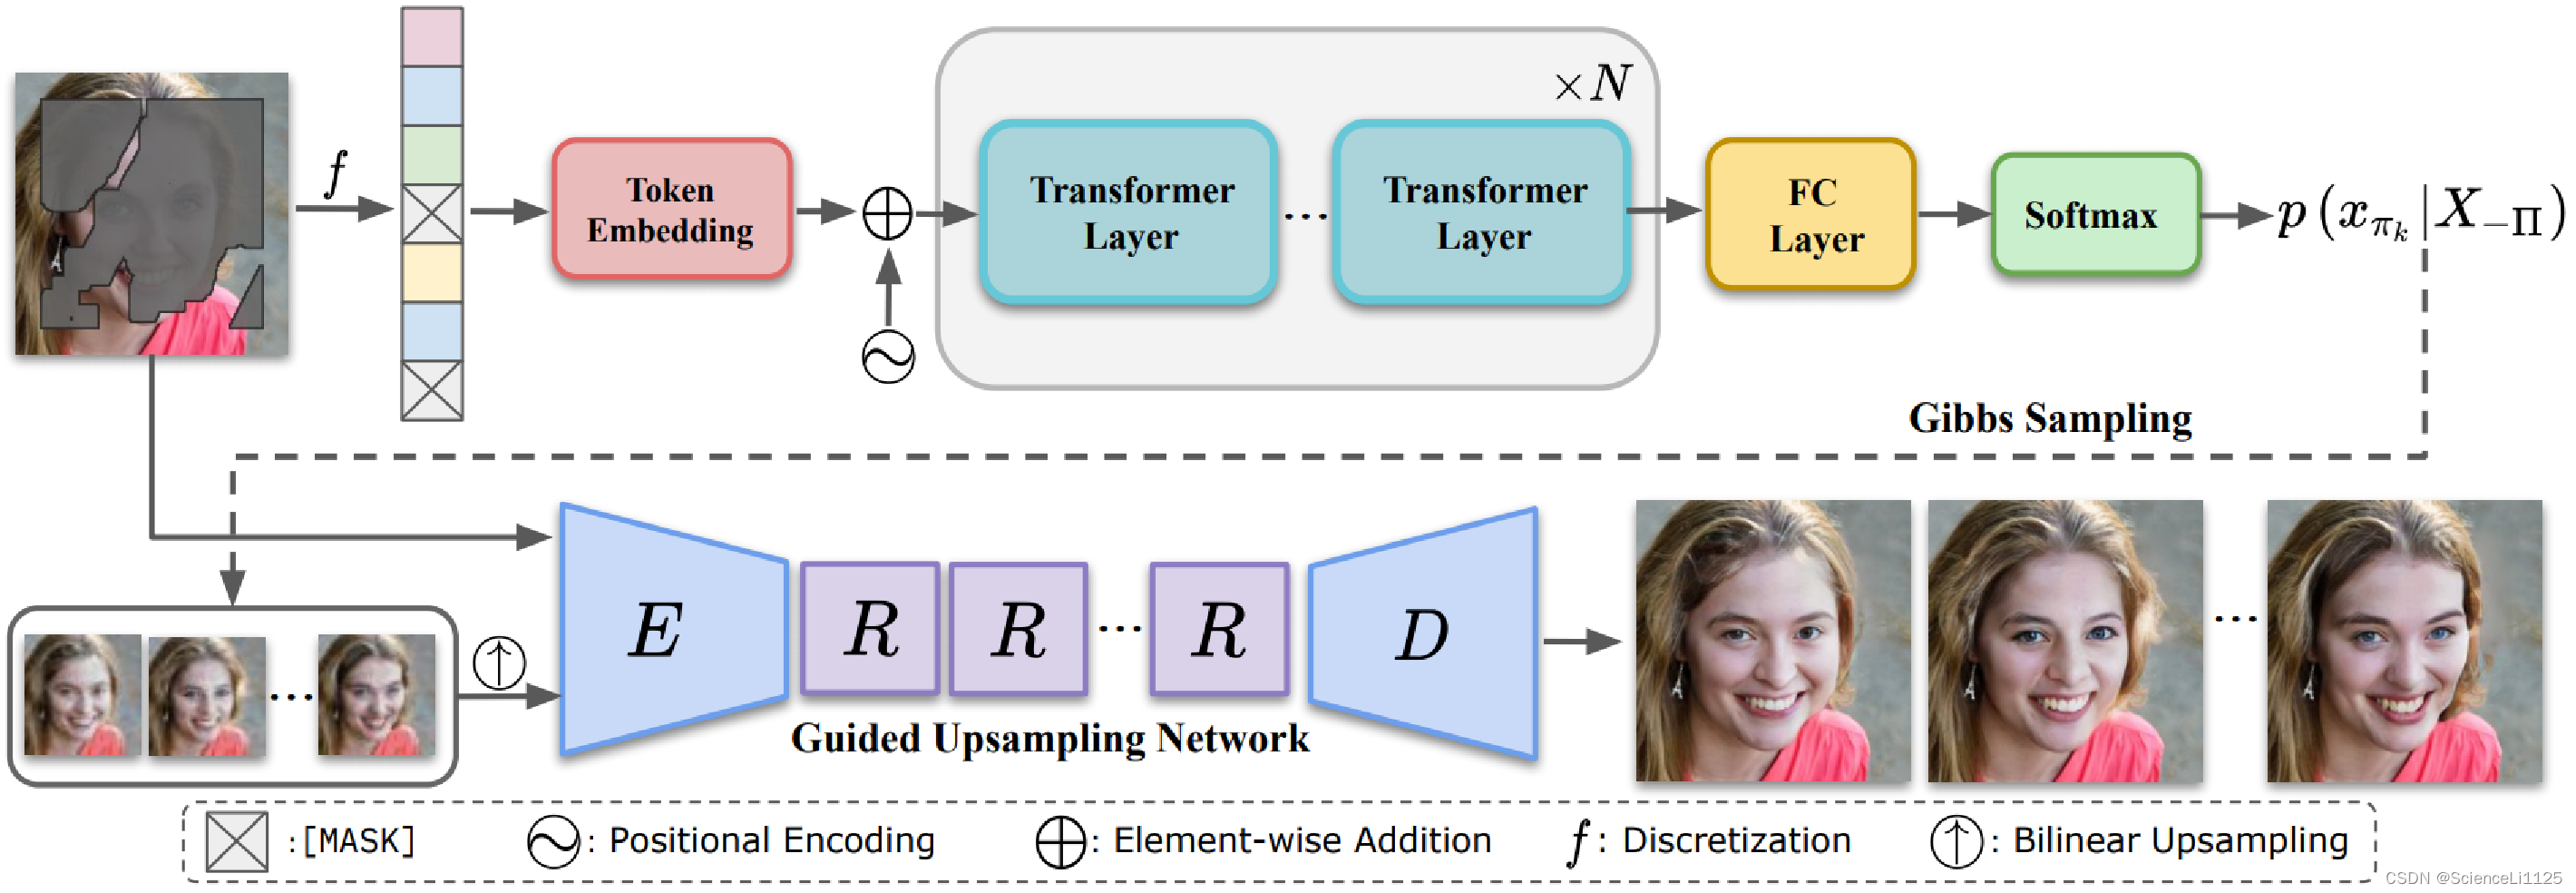
因为使用的是 Transformer + CNN 架构,该方法在图像修复的效率上比较低效。
实验过程:
- 平台:AutoDL
- 显卡:RTX 4090 24G
- 镜像:PyTorch 2.0.0、Python 3.8(ubuntu20.04)、Cuda 11.8
- 源码:https://github.com/raywzy/ICT
- 创建虚拟环境:
conda create -n ICT -y python=3.8,然后安装 Pytorch 和 cuDNN:conda install pytorch==2.0.0 torchvision==0.15.0 torchaudio==2.0.0 pytorch-cuda=11.8 -c pytorch -c nvidia,conda install https://mirrors.tuna.tsinghua.edu.cn/anaconda/cloud/conda-forge/win-64/cudnn-8.0.5.39-h36d860d_1.tar.bz2。这里选择较低版本是因为高版本的 Python 和 Pytorch 会和其他的包产生冲突; - 由于时间较久远,
requirements.txt中的一些包难以和其他依赖兼容,因此将requirements.txt中的所有版本约束去掉,默认安装最新版本。此外,安装requirements.txt前,还需要先安装scikit-build和Cython:pip install scikit-build,这样后面才能成功构建opencv-python和scikit-image; - 使用预训练模型直接进行推理,需要下载 预训练模型;
- 推理时,因为依赖包安装的都是最新版,所以出现了一些冲突:
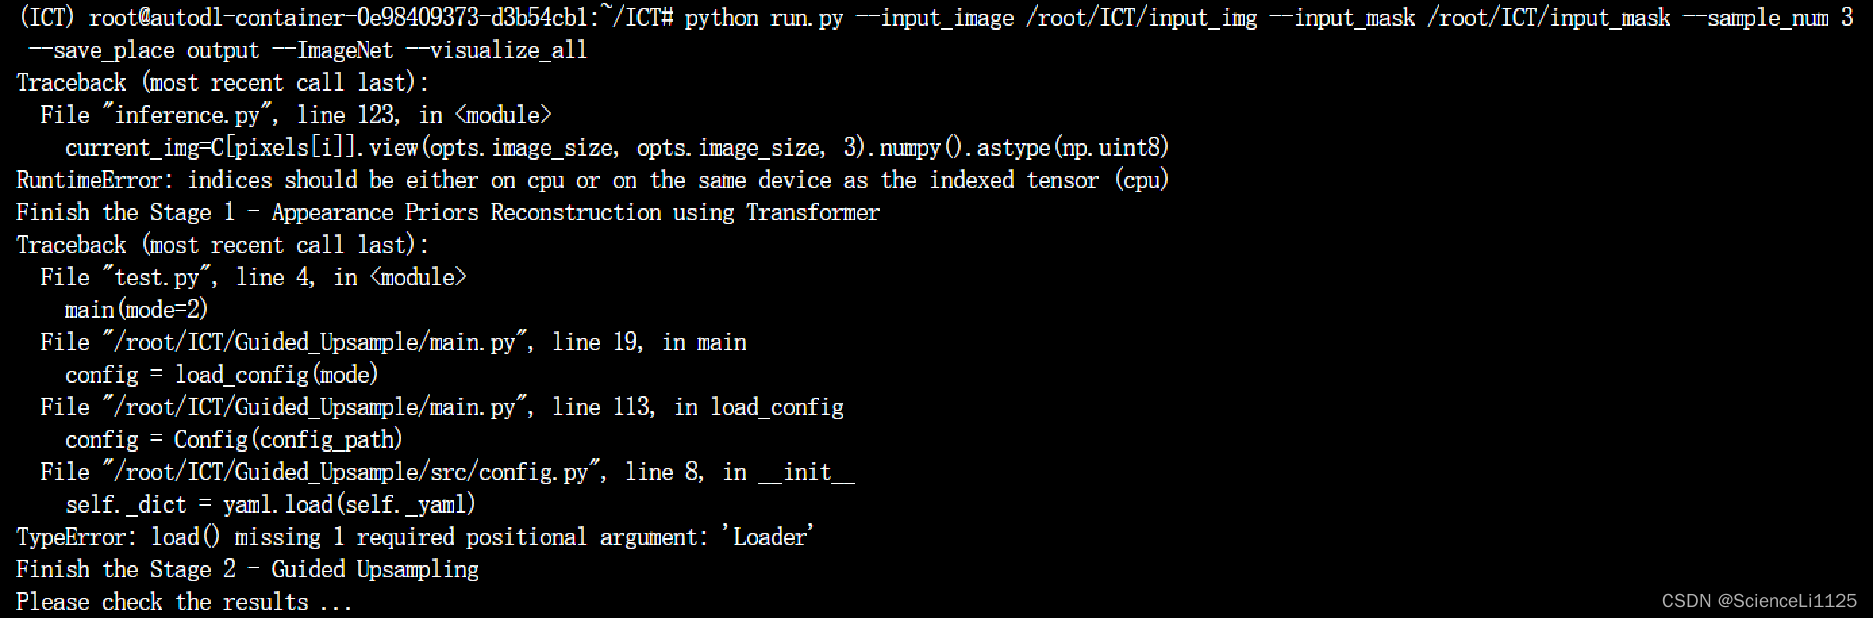
yaml.load()函数需要参数loader,将Guided_Upsample/src/config.py中第 8 行的self._dict = yaml.load(self._yaml)修改为self._dict = yaml.safe_load(self._yaml)即可 1; Transformer/inference.py中还有设备不一致问题:
将第 123 行的pixels[i]移动至 CPU 即可:current_img=C[pixels[i].cpu()].view(opts.image_size, opts.image_size, 3).numpy().astype(np.uint8);- 因为只有一块 GPU,无法并行计算,因此需要将
Guided_Upsample/src/models.py中第 71 行的两块 GPU 并行计算修改为在同一块 GPU 上运行:if len(config.GPU) > 1: generator = nn.DataParallel(generator, config.GPU[0:1]) discriminator = nn.DataParallel(discriminator , config.GPU[0:1]) - 运行
python run.py --input_image /root/ICT/input_img --input_mask /root/ICT/input_mask --sample_num 3 --save_place output --ImageNet --visualize_all指令训练;
Cr-fill
Paper: Zeng Y, Lin Z, Lu H, et al. Cr-fill: Generative image inpainting with auxiliary contextual reconstruction[C]//Proceedings of the IEEE/CVF international conference on computer vision. 2021: 14164-14173.
Introduction:
Code: https://github.com/zengxianyu/crfill
方法概要:
MAT
Paper: Li W, Lin Z, Zhou K, et al. Mat: Mask-aware transformer for large hole image inpainting[C]//Proceedings of the IEEE/CVF conference on computer vision and pattern recognition. 2022: 10758-10768.
Introduction:
Code: https://github.com/fenglinglwb/MAT
方法概要:
ZITS_inpainting
Paper: Dong Q, Cao C, Fu Y. Incremental transformer structure enhanced image inpainting with masking positional encoding[C]//Proceedings of the IEEE/CVF Conference on Computer Vision and Pattern Recognition. 2022: 11358-11368.
Introduction: https://dqiaole.github.io/ZITS_inpainting/
Code: https://github.com/DQiaole/ZITS_inpainting
方法概要:
RealFill
Paper: Tang L, Ruiz N, Chu Q, et al. Realfill: Reference-driven generation for authentic image completion[J]. arXiv preprint arXiv:2309.16668, 2023.
Introduction: https://realfill.github.io/
Code: https://github.com/thuanz123/realfill
方法概要:
RealFill 使用少量的参考图像(可以是其他视角、光照条件,甚至是风格的图像)微调 diffusion 来学习原始图像的内容和风格,从而实现对原始图像的补全。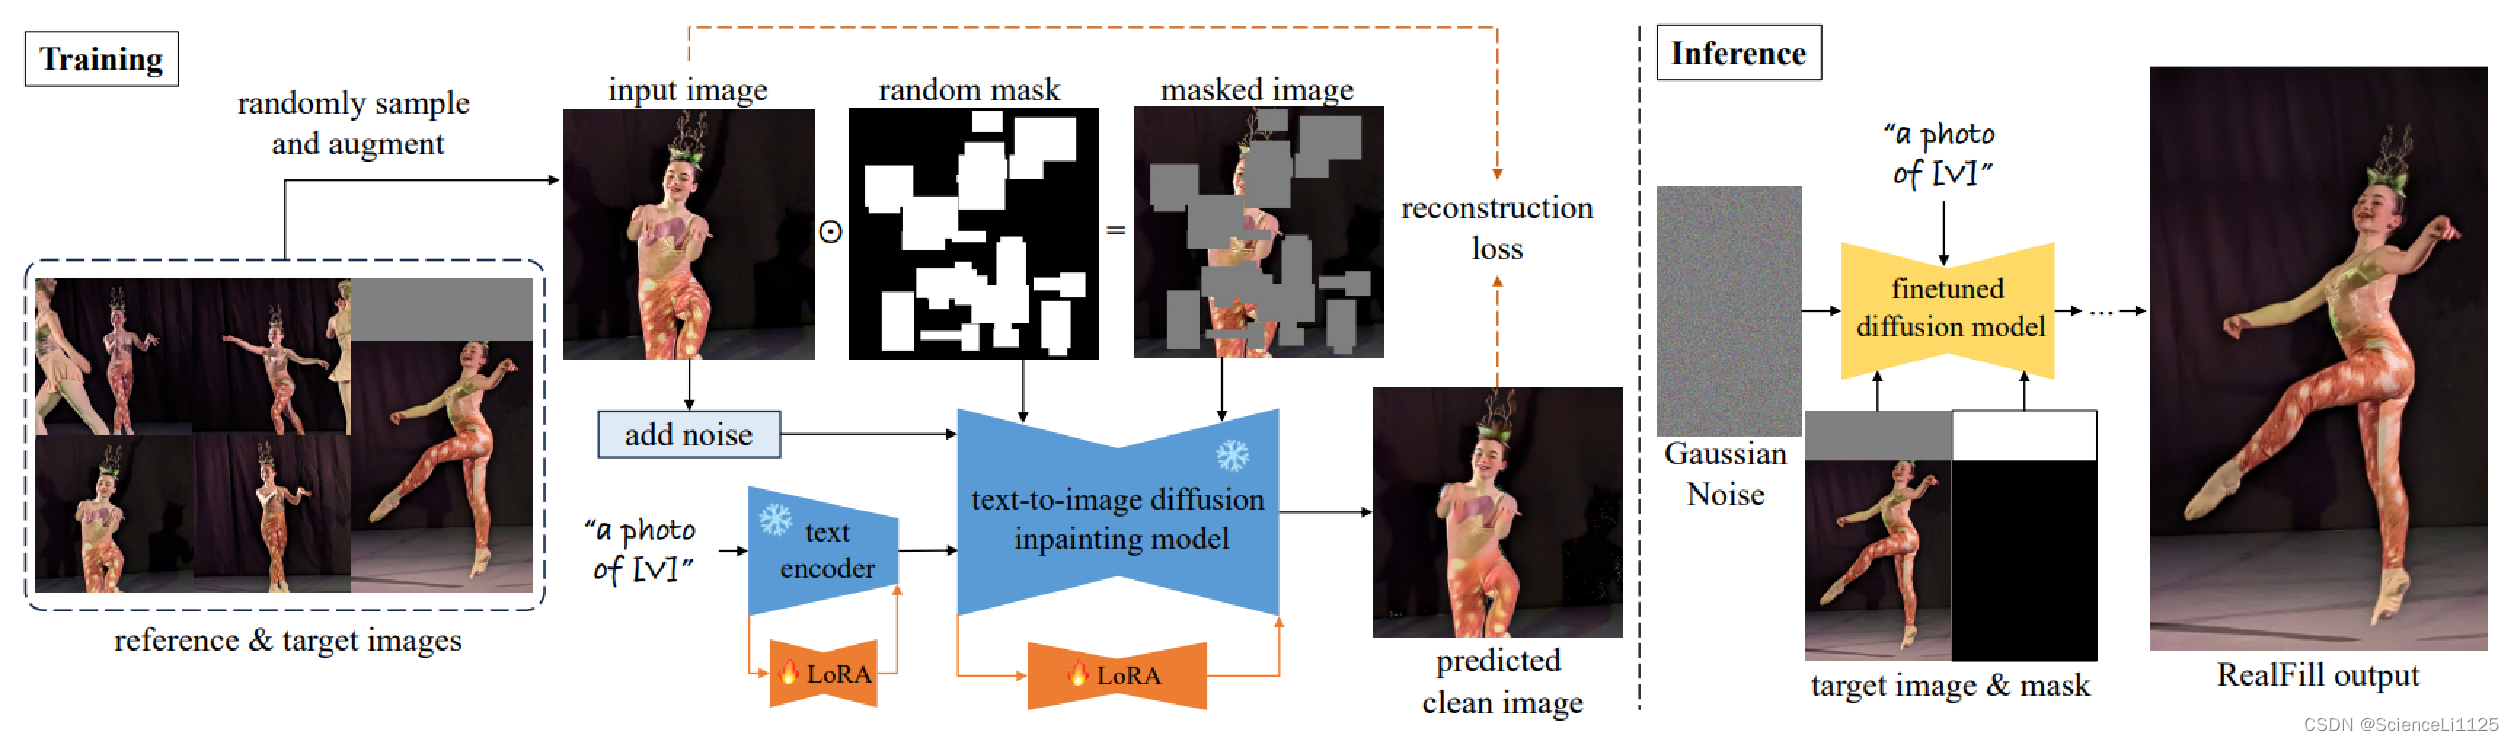
RealFill 可以广泛用于各种 Inpainting 和 Outpainting 任务,但缺点是需要提供与原始图像相近的参考图像,这大大限制了该方法的通用性。
实验过程:
- 平台:AutoDL
- 显卡:RTX 4090 24G
- 镜像:PyTorch 2.0.0、Python 3.8(ubuntu20.04)、Cuda 11.8
- 源码:https://github.com/thuanz123/realfill
- 创建虚拟环境:
conda create -n realfill -y python=3.8,然后安装requirements.txt,并初始化Accelerate环境的默认配置; - 下载 stabilityai/stable-diffusion-2-inpainting 节点 512-inpainting-ema.ckpt 并上传至
stabilityai/stable-diffusion-2-inpainting文件夹下; - 训练 realfill 时,遇到
OSError: stabilityai/stable-diffusion-2-inpainting does not appear to have a file named tokenizer/config.json报错: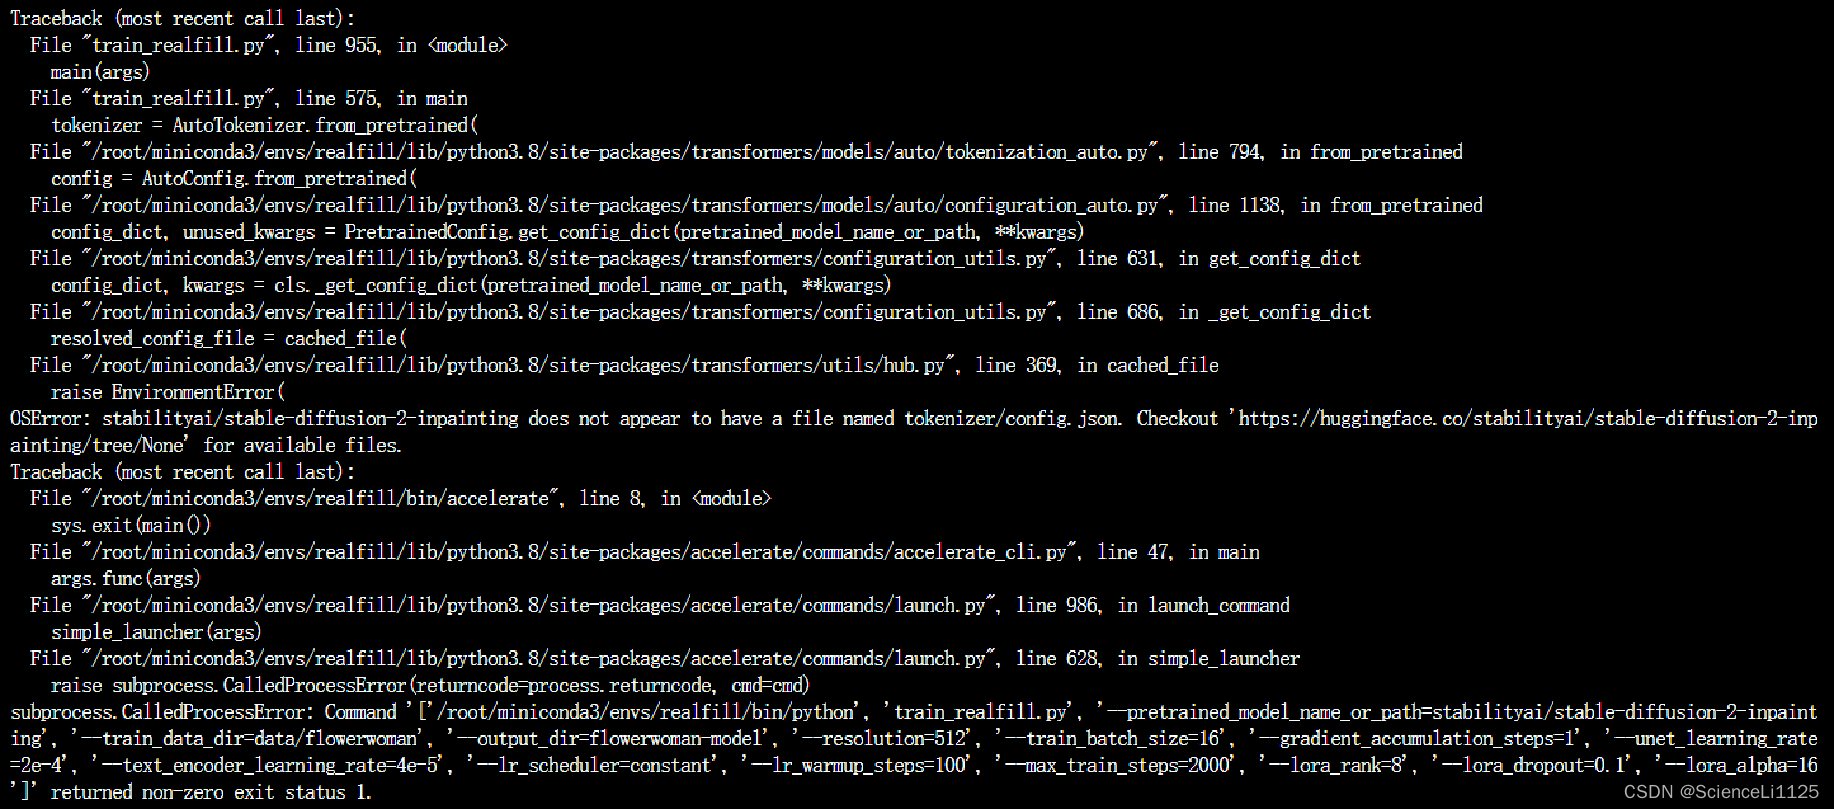
查询资料发现是transformers的版本问题 2,将其将成 4.22.1 版本后解决,但又出现了ImportError: cannot import name 'CLIPTextModelWithProjection' from 'transformers'报错: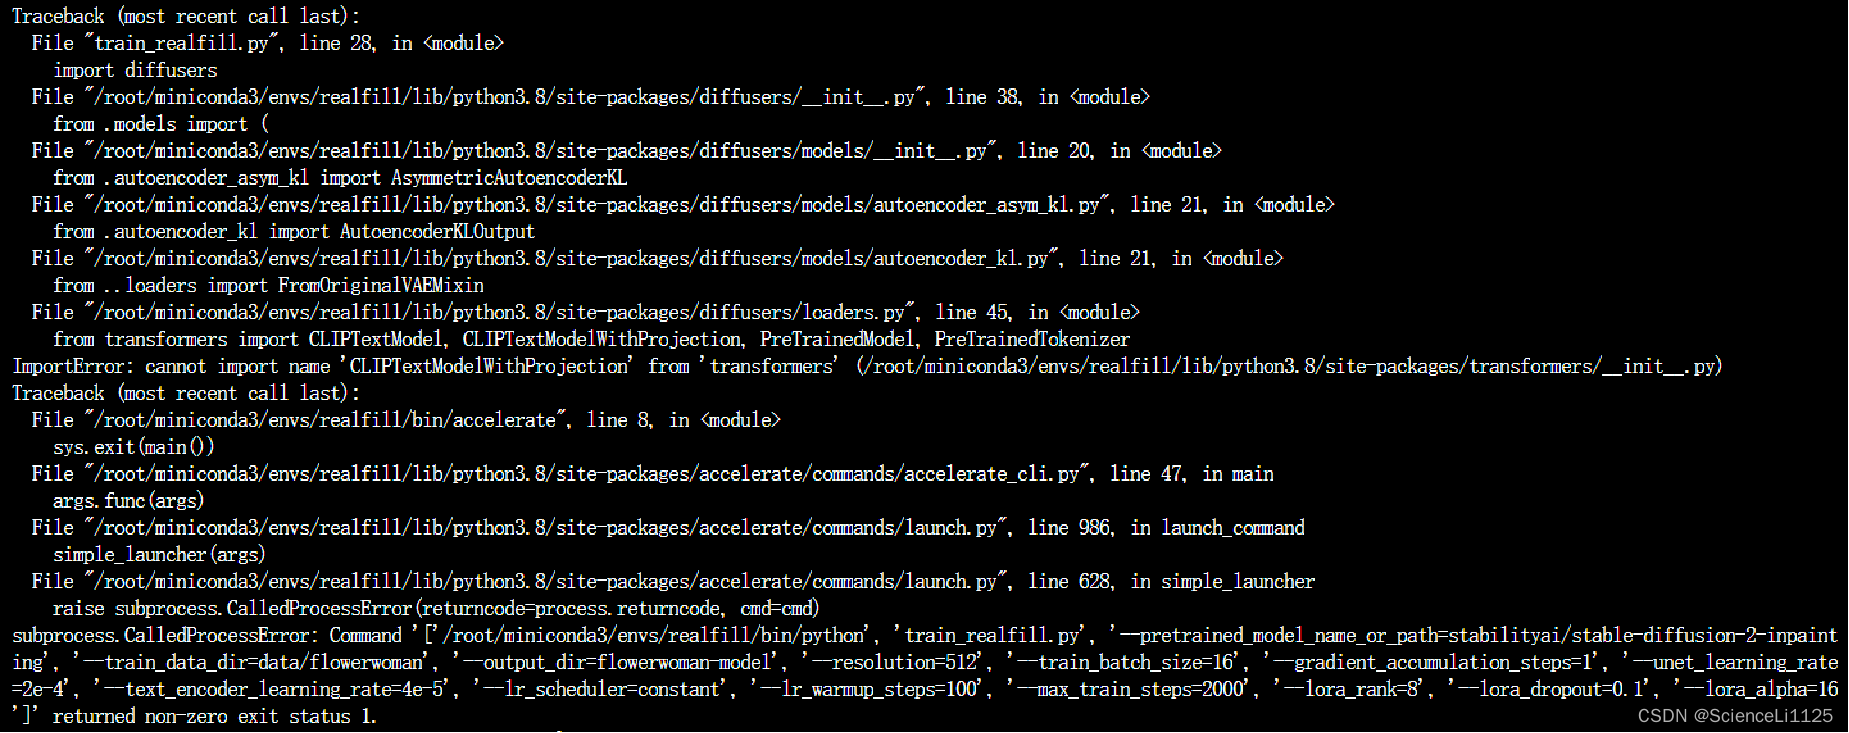
后来询问作者得知requirements.txt中的 pytorch 版本有误 3,pip install torch==2.2.1 torchvision==0.17.1后问题解决; - 设置环境变量后,就可以运行
accelerate launch train_realfill.py --pretrained_model_name_or_path=$MODEL_NAME --train_data_dir=$TRAIN_DIR --output_dir=$OUTPUT_DIR --resolution=512 --train_batch_size=16 --gradient_accumulation_steps=1 --unet_learning_rate=2e-4 --text_encoder_learning_rate=4e-5 --lr_scheduler="constant" --lr_warmup_steps=100 --max_train_steps=2000 --lora_rank=8 --lora_dropout=0.1 --lora_alpha=16指令进行训练;
Inst-inpaint
Paper: Yildirim A B, Baday V, Erdem E, et al. Inst-inpaint: Instructing to remove objects with diffusion models[J]. arXiv preprint arXiv:2304.03246, 2023.
Introduction: https://instinpaint.abyildirim.com/
Code: https://github.com/abyildirim/inst-inpaint
方法概要:
LaMa
Paper: Suvorov R, Logacheva E, Mashikhin A, et al. Resolution-robust large mask inpainting with fourier convolutions[C]//Proceedings of the IEEE/CVF winter conference on applications of computer vision. 2022: 2149-2159.
Introduction: https://advimman.github.io/lama-project/
Code: https://github.com/advimman/lama
方法概要:
LaMa (large mask inpainting) 克服了传统图像修复方法在处理大面积缺失区域、复杂几何结构和高分辨率图像时缺乏感受野的困难,通过使用快速傅立叶卷积 (Fast Fourier Convolution, FFC),高效地在图像上进行卷积,扩大了图像的感受野。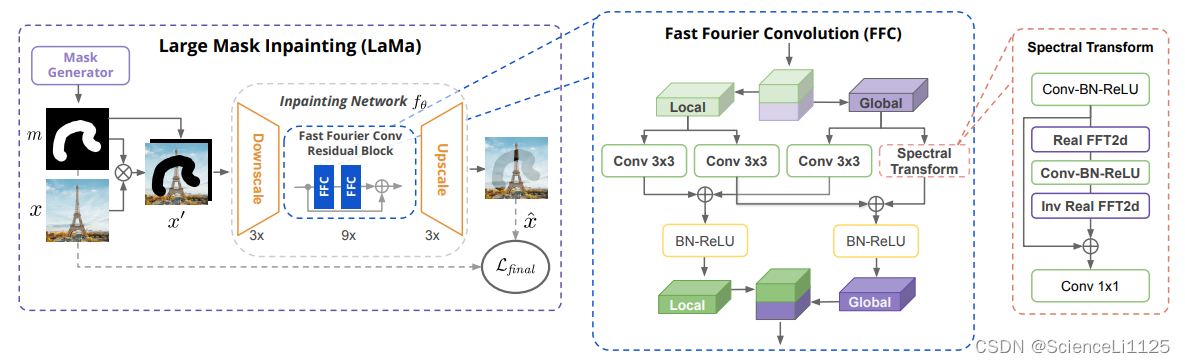
可以直接在 Colab 提供的 Demo 上修复。
Inpaint-Anything
Paper: Yu T, Feng R, Feng R, et al. Inpaint anything: Segment anything meets image inpainting[J]. arXiv preprint arXiv:2304.06790, 2023.
Introduction:
Code: https://github.com/geekyutao/Inpaint-Anything
方法概要:
Inpaint-Anything 结合了 SAM、LaMa 和 Stable Diffusion,支持 Remove / Fill / Replace Anything 任务。
RePaint
Paper: Lugmayr A, Danelljan M, Romero A, et al. Repaint: Inpainting using denoising diffusion probabilistic models[C]//Proceedings of the IEEE/CVF conference on computer vision and pattern recognition. 2022: 11461-11471.
Introduction:
Code: https://github.com/andreas128/RePaint
方法概要:
RePaint 针对现有图像修复方法只适用少量的 mask 分布、使用像素级感知损失函数训练只能扩展纹理而不是语义信息等问题,使用预训练的 DDPM 模型作为先验,在逆扩散过程中补全图像: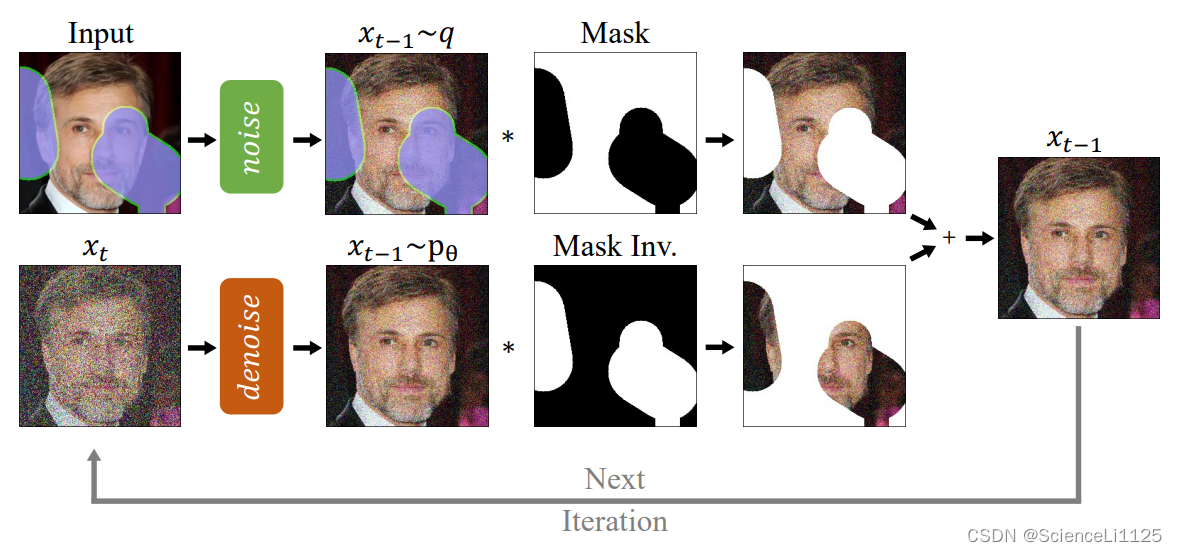
RePaint 使用的是无条件 DDPM 模型,因此生成过程并不可控,且高度依赖预训练的先验。此外,RePaint 只在少量特定任务上表现出较好的效果,而且比较费时。不过 RePaint 开启了使用 Diffusion 修复图像的时代,在 Stable Diffusion 问世之前代表着当时的 SOTA 水平。
实验过程:
- 平台:AutoDL
- 显卡:RTX 4090 24G
- 镜像:PyTorch 2.0.0、Python 3.8(ubuntu20.04)、Cuda 11.8
- 源码:https://github.com/andreas128/RePaint
- 按照 README 中克隆仓库、安装环境、下载预训练节点和数据即可;
- 运行
python test.py --conf_path confs/face_example.yml命令即可对RePaint/data/datasets/gts/horns下每张图像对应RePaint/data/datasets/gt_keep_masks/horns中 mask 区域进行重绘,每张图像的重绘都需要几分钟时间: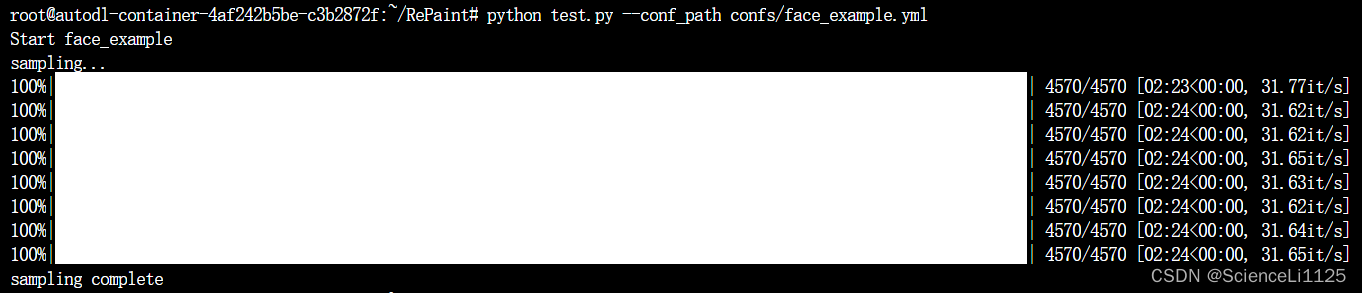
- 想要运行自己的图像,将原始图像和对应 mask 传入相应文件夹下即可,并仿照
RePaint/confs/face_example.yml编写配置文件。一般只需要修改gt_path、mask_path、max_len和paths即可; - 由于
face_example.yml配置文件中选用的模型celeba256_250000.pt更适用于人脸绘制,如果想用于其他场景建议将配置文件中的model_path修改为./data/pretrained/places256_300000.pt;
实验结果:
-
face_example重绘效果如下: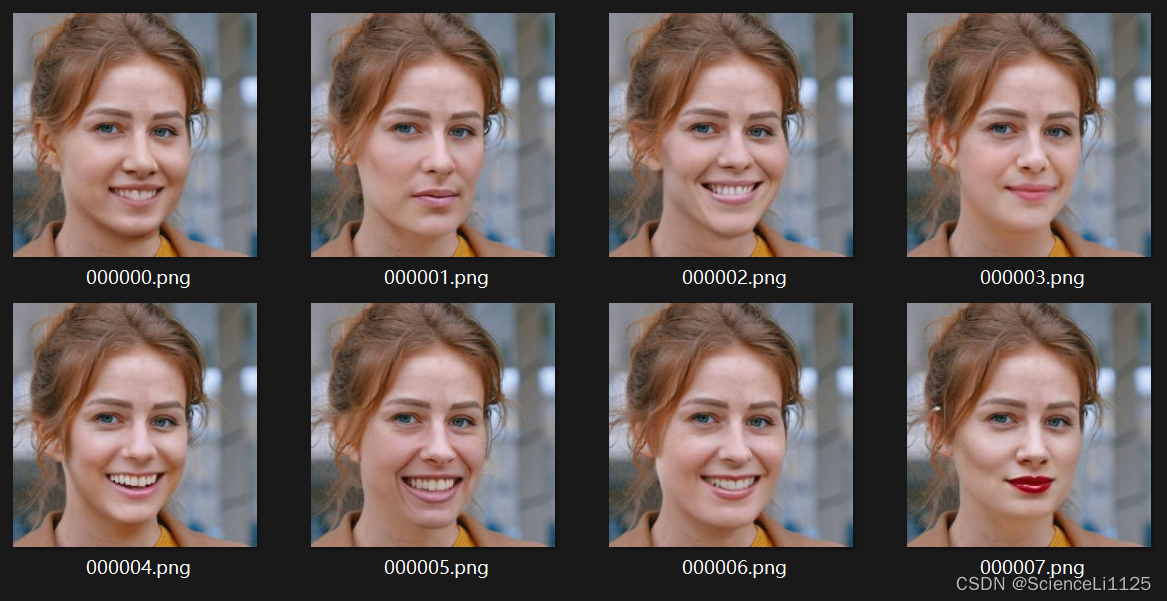
-
horns重绘效果如下: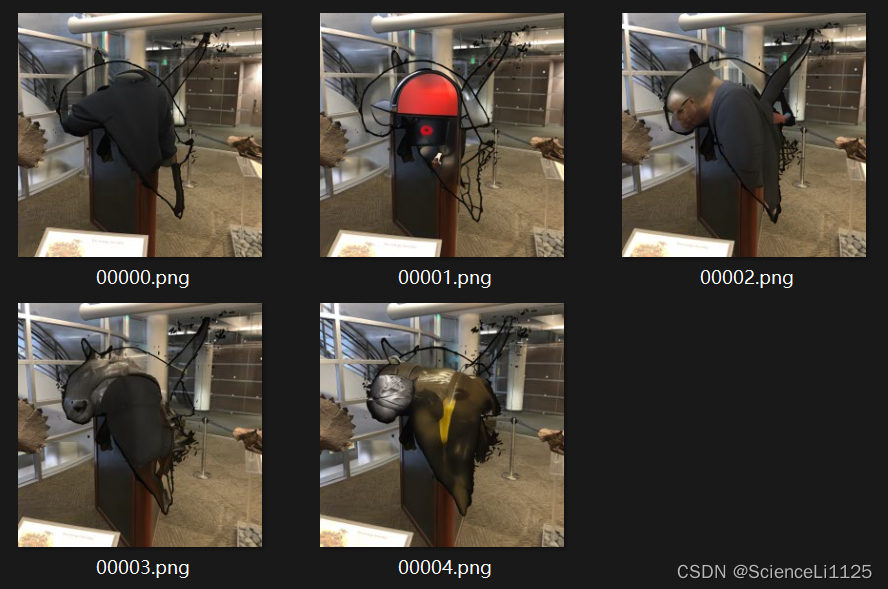
Stable Diffusion
Paper:
Introduction: https://huggingface.co/runwayml/stable-diffusion-inpainting
Code: https://github.com/CompVis/stable-diffusion
Stable diffusion 是 Stability AI 开发的一款生成式大模型,可以根据用户指令或者示例图片生成用户想要的图片。由于 Stable diffusion 是在隐空间上扩散的,并且引入了 CLIP 进行监督,所以生成过程更加快速且稳定。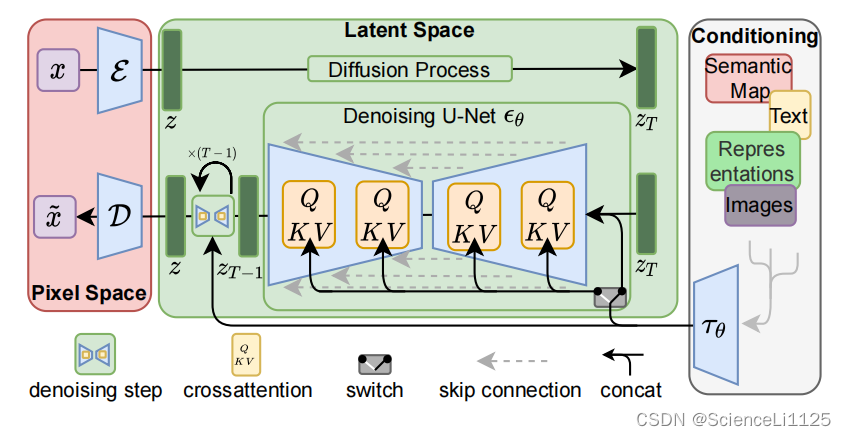
Hugging Face 将 Stable Diffusion 封装成了 diffusers 库,可以直接调用 API,非常方便。runwayml/stable-diffusion-inpainting 在 Stable Diffusion 上进行了微调,更加适用于 Inpainting 任务。Stable Diffusion 是当前 SOTA 的方法,代表了当今图像生成与编辑的最高水平。
实验过程:
- 平台:AutoDL
- 显卡:RTX 4090 24G
- 镜像:PyTorch 2.0.0、Python 3.8(ubuntu20.04)、Cuda 11.8
- 源码:https://huggingface.co/runwayml/stable-diffusion-inpainting
- 按照 diffusers 仓库中 README 安装依赖:
pip install --upgrade diffusers[torch]、pip install transformers; - 按照 diffusers.StableDiffusionInpaintPipeline 中的 Pipeline 示例调用即可。第一次使用时需要下载一些组件,耗时较长,耐心等待即可;
- 如果想要生成多个结果,
pipe(prompt, image, mask_image, num_images_per_prompt).images中的num_images_per_prompt参数不宜调太大,否则显存会爆; - 单张图像的推理过程大概需要 20G 的显存,如果没有那么大的显存,可以降低浮点数的精度(如 16 位浮点数):
pipe = StableDiffusionInpaintPipeline.from_pretrained( "runwayml/stable-diffusion-inpainting", revision="fp16", # 16 位浮点数 torch_dtype=torch.float16 ) - 如果因为网络问题无法直接访问 HuggingFace,可以先下载节点:
git clone https://huggingface.co/runwayml/stable-diffusion-inpainting,然后再离线加载模型 4:pipeline = StableDiffusionPipeline.from_pretrained("path/to/stable/diffusion/inpainting");
实验结果:
horns重绘效果如下: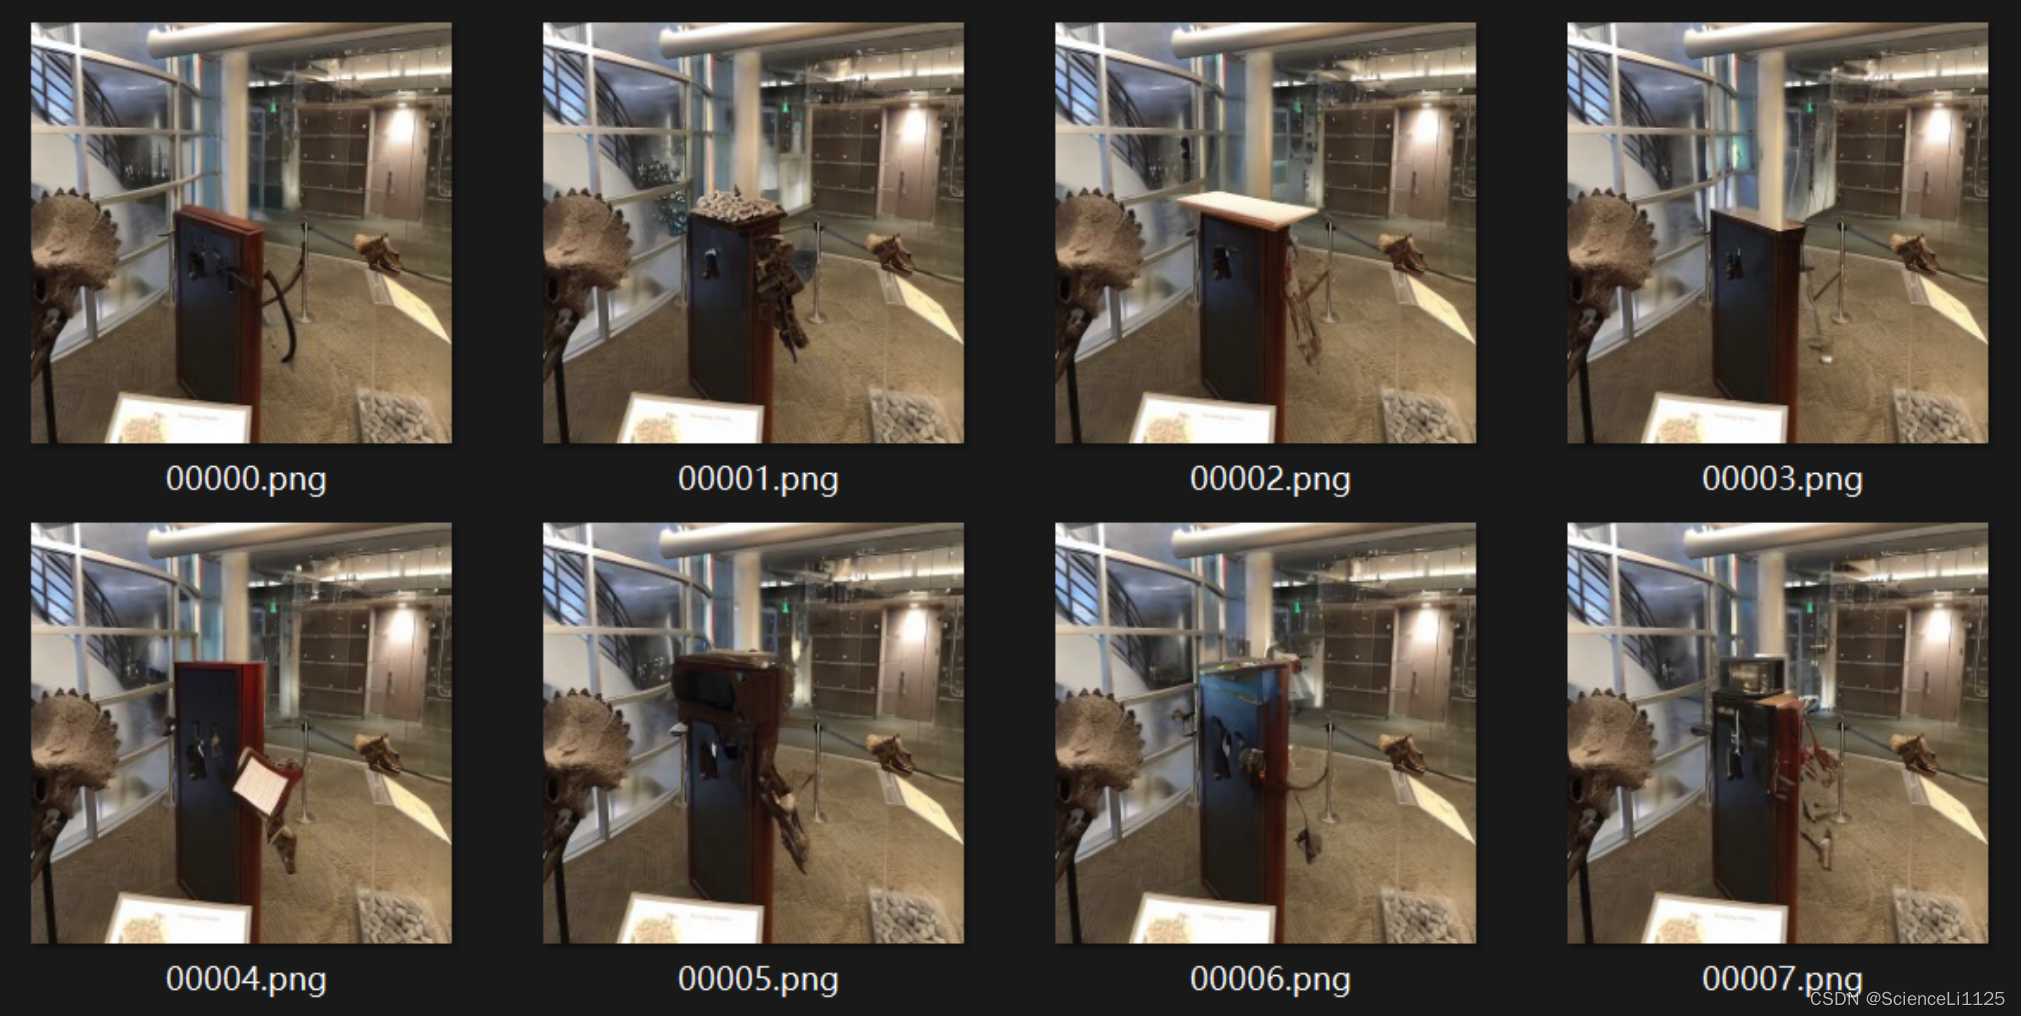
更多二维图像修复方法参见:
- https://github.com/search?q=inpainting&type=repositories
- https://github.com/topics/image-completion
- Image Inpainting: An Overview
- Object Detection in 20 Years: A Survey
- Xue X, Wu J, Kong Y, et al. Rethinking Referring Object Removal[J]. arXiv preprint arXiv:2403.09128, 2024.
- 【CVPR 2023的AIGC应用汇总(4)】图像恢复8篇,基于GAN生成对抗/diffusion扩散模型方法

中国智能体开发者社区,聚焦智能体与大模型开发,提供前沿资讯、实用工具链、开源项目及行业案例。通过技术沙龙、开发者大赛等活动,促进经验交流与协作,助力开发者快速构建创新智能应用。
更多推荐
 24
24 0
0- 0


 已为社区贡献2条内容

所有评论(0)