dify如何进行源码断点单步调试
0. 写在最前面
这篇文章没有多少技术含量,只是简单的环境搭建,目的是可以通过集成环境能对 dify源码进行单步调试,以此进行源码分析,作为对后续源码结构和疑难杂症的基础环境说明
0.1 基础环境
本机环境:
操作系统:win10
集成环境: pycharm
linux环境:
ubantu22.04 裸金属机器
这里进行说明:
- 调试机器使用的是win10,dify源码及环境在 ubantu22.04
- 使用win10 通过pycharm 进行远程开发,远程环境是 ubantu22.04
- ubantu22.04上使用conda管理python环境,和dify官方有一些区别
0.1.1 为什么不同uv?
因为不熟
0.1.2 为什么不用wsl或者虚拟机
虚拟机和裸金属基本差别不大, wsl搭环境不知道是不是玄学,我是搭的比较蛋疼,试了几次还是放弃了
0.2 有什么区别
0.2.1 成本问题
金属裸机需要你自己搭一台额外的机器,如果预算ok,那么随意,不太ok,那么可以和我一样走垃圾佬路线,E5 + 32G ddr4 + 两块2080 显卡,实在不ok,那么走虚拟机或者wsl
0.2.2 其他问题
因为我用的是anaconda/miniconda 作为python的环境管理,在wsl上比较诡异,也可能是玄学问题,所以我还是推荐虚拟机或者金属逻辑,wsl大佬可以无视我这句话
1. 软件环境
1.1 dify简介
Dify 是一款开源的大语言模型(LLM)应用开发平台。它融合了后端即服务(Backend as Service)和 LLMOps 的理念,使开发者可以快速搭建生产级的生成式 AI 应用。即使你是非技术人员,也能参与到 AI 应用的定义和数据运营过程中。由于 Dify 内置了构建 LLM 应用所需的关键技术栈,包括对数百个模型的支持、直观的 Prompt 编排界面、高质量的 RAG 引擎、稳健的 Agent 框架、灵活的工作流,并同时提供了一套易用的界面和 API。这为开发者节省了许多重复造轮子的时间,使其可以专注在创新和业务需求上。
1.1.1 为什么用dify
或许可以把 LangChain 这类的开发库(Library)想象为有着锤子、钉子的工具箱。与之相比,Dify 提供了更接近生产需要的完整方案,Dify 好比是一套脚手架,并且经过了精良的工程设计和软件测试。
如果工程比较难,有人有时间并且需要走标准软件研发流程,需求->概要设计->详细设计->代码实现->测试->发布全套流程,需要走devops全流程,需要走cicd发布,那么不建议用dify,建议走langchain
如果团队 only u, 工程比较简单,且老板希望迅速看到结果,那么走dify。
1.2 dify源码环境搭建
dify运行的方式有几种,归结下来就是docker还是code,docker相对比较简单,dify默认给出了docker compose的方案,如果要走k8s,需要自行改造,这里暂不是重点。
重点是源码如何启动。
环境搭建可以先参考
https://docs.dify.ai/zh-hans/getting-started/install-self-hosted/local-source-code
1.2.1 源码下载
git clone https://github.com/langgenius/dify.git

1.2.2 通过docker compose 启动dify依赖的中间件
Dify 后端服务需要一系列用于存储(如 PostgreSQL / Redis / Weaviate(如果本地不可用))和扩展能力(如 Dify 的 sandbox 和 plugin-daemon 服务)的中间件。通过运行以下命令使用 Docker Compose 启动中间件:
cd docker
(base) root@djz-pc:/home/djz/data/code/dify/v210/dify/docker# ls -l
总计 340
drwxr-xr-x  2 root root   4096  7月 19 13:14 certbot
drwxr-xr-x  2 root root   4096  7月 19 13:14 couchbase-server
-rw-r--r--  1 root root   8687  7月 19 13:14 docker-compose.middleware.yaml
-rw-r--r--  1 root root 174447  7月 19 13:14 docker-compose.png
-rw-r--r--  1 root root  27009  7月 19 13:14 docker-compose-template.yaml
-rw-r--r--  1 root root  58038  7月 19 13:14 docker-compose.yaml
drwxr-xr-x  2 root root   4096  7月 19 13:14 elasticsearch
-rwxr-xr-x  1 root root   4097  7月 19 13:14 generate_docker_compose
-rw-r--r--  1 root root   5228  7月 19 13:22 middleware.env
-rw-r--r--  1 root root   5228  7月 19 13:14 middleware.env.example
drwxr-xr-x  4 root root   4096  7月 19 13:14 nginx
drwxr-xr-x  2 root root   4096  7月 19 13:14 pgvector
-rw-r--r--  1 root root   6883  7月 19 13:14 README.md
drwxr-xr-x  2 root root   4096  7月 19 13:14 ssrf_proxy
drwxr-xr-x  2 root root   4096  7月 19 13:14 startupscripts
drwxr-xr-x  3 root root   4096  7月 19 13:14 tidb
drwxr-xr-x 10 root root   4096  7月 19 13:24 volumes
(base) root@djz-pc:/home/djz/data/code/dify/v210/dify/docker# cp middleware.env.example middleware.env
(base) root@djz-pc:/home/djz/data/code/dify/v210/dify/docker# docker compose -f docker-compose.middleware.yaml up -d
docker ps -a

...
fbc08bca0f24   ubuntu/squid:latest                         "sh -c 'cp /docker-e…"   25 hours ago   Up 18 hours                     0.0.0.0:3128->3128/tcp, [::]:3128->3128/tcp, 0.0.0.0:8194->8194/tcp, [::]:8194->8194/tcp   docker-ssrf_proxy-1
41a5387b951f   langgenius/dify-sandbox:0.2.12              "/main"                   25 hours ago   Up 18 hours (healthy)                                                                                                      docker-sandbox-1
8f2ae581cc19   redis:6-alpine                              "docker-entrypoint.s…"   25 hours ago   Up 18 hours (healthy)           0.0.0.0:6379->6379/tcp, [::]:6379->6379/tcp                                                docker-redis-1
8d7a994e1a34   postgres:15-alpine                          "docker-entrypoint.s…"   25 hours ago   Up 18 hours (healthy)           0.0.0.0:5432->5432/tcp, [::]:5432->5432/tcp                                                docker-db-1
b
231e09c916a3   semitechnologies/weaviate:1.19.0            "/bin/weaviate --hos…"   25 hours ago   Up 18 hours                     0.0.0.0:8080->8080/tcp, [::]:8080->8080/tcp                                                docker-weaviate-1
...
1.2.3 conda环境
并没有觉得uv不好,只是自己用conda多一些
1.2.3.1 下载
下载地址
https://www.anaconda.com/download/success
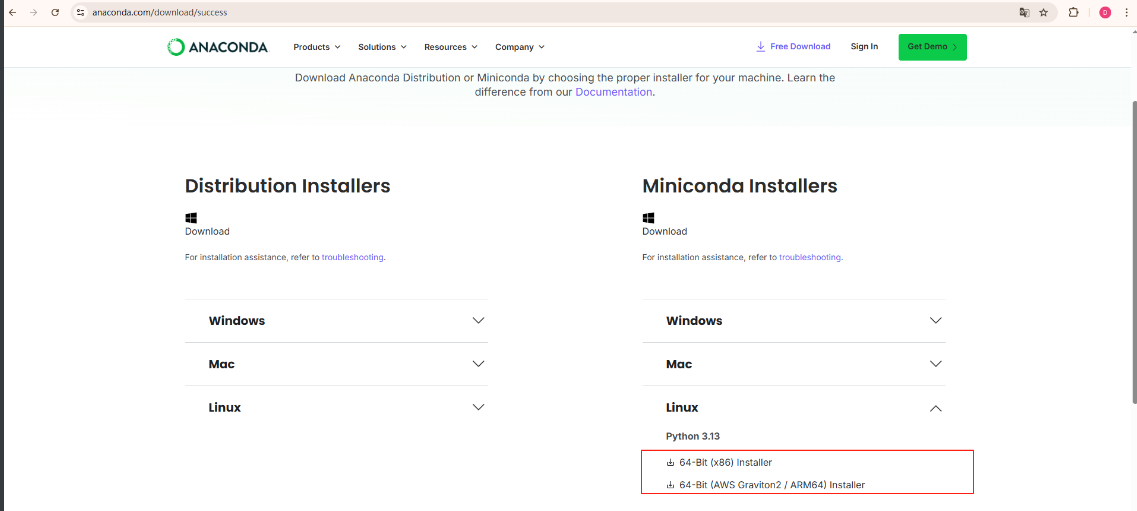
需要根据自己的dify安装平台自行找 安装器,本质上是一个.sh文件,win10下载需要自行上传到ubantu进行执行,如果是ubantu,且向通过国内镜像,建议
wget -c https://mirrors.tuna.tsinghua.edu.cn/anaconda/miniconda/Miniconda3-latest-Linux-x86_64.sh
1.2.3.2 安装
请参考conda官网 miniconda的安装说明
大致步骤如下
https://www.anaconda.com/docs/getting-started/miniconda/install#linux
赋予执行权限
chmod 777 Miniconda3-latest-Linux-x86_64.sh
静默安装(推荐服务器):
bash Miniconda3-latest-Linux-x86_64.sh -b -p ~/miniconda3
生效环境变量:
source ~/.bashrc # 或 zsh 用 source ~/.zshrc
验证安装:
conda --version

(base) root@djz-pc:/home/djz/data/code/dify/v210/dify/docker# conda --version
conda 24.9.2
1.2.3.3 conda 安装 python 3.12
step1 基于国内网络环境,最好先把conda 的 环境指向国内镜像源
(base) root@djz-pc:/home/djz/data/code/dify/v210/dify/docker# vim ~/.condarc


# 显示源地址,方便验证
show_channel_urls: true
# 完全替换默认官方源(关键:删除 defaults)
default_channels:
  - https://mirrors.ustc.edu.cn/anaconda/pkgs/main
  - https://mirrors.ustc.edu.cn/anaconda/pkgs/r
  - https://mirrors.ustc.edu.cn/anaconda/pkgs/msys2

# 补全自定义频道的完整路径(必须带子目录)
custom_channels:
  conda-forge: https://mirrors.ustc.edu.cn/anaconda/cloud/conda-forge/
  bioconda: https://mirrors.ustc.edu.cn/anaconda/cloud/bioconda/
  pytorch: https://mirrors.ustc.edu.cn/anaconda/cloud/pytorch/

# 禁止出现任何 "channels: - defaults" 或官方源地址
内容改为上边的样子
最好也直接把pip的源指向国内
mkdir ~/.pip  # 创建 pip 配置目录(如已存在可跳过)
touch ~/.pip/pip.conf  # 创建配置文件


vim ~/.pip/pip.conf
[global]
index-url = https://mirrors.aliyun.com/pypi/simple

[install]
trusted-host = mirrors.aliyun.com
查看是否改成功
(base) root@djz-pc:/home/djz/data/code/dify/v210/dify/docker# pip config list
global.index-url='https://mirrors.aliyun.com/pypi/simple/'
install.trusted-host='mirrors.aliyun.com'

step2 安装python 3.12
conda create -n env_name python=3.12 -y
这里的xxx 指的是你的环境名字,例如我的环境名字是 dify_v210,那么命令为
conda create -n dify_v210 python=3.12 -y
激活环境
conda activate dify_v210
step3 在 conda中安装 uv
pip install uvicorn -i https://mirrors.aliyun.com/pypi/simple/
1.3.1 启动api
参考 https://docs.dify.ai/zh-hans/getting-started/install-self-hosted/local-source-code
step1 导航到 api 目录:
(base) root@djz-pc:/home/djz/data/code/dify/v210/dify/api# ls
app_factory.py  commands.py  constants  controllers  dify_app.py  Dockerfile  extensions  fields  migrations  mypy.ini     pyproject.toml  README.md     requirements.txt  services  tasks      tests
app.py          configs      contexts   core         docker       events      factories   libs    models      __pycache__  pytest.ini      repositories  schedule          storage   templates  uv.lock
(base) root@djz-pc:/home/djz/data/code/dify/v210/dify/api#
step2 准备环境变量配置文件
cp .env.example .env
step3 生成随机密钥并替换 .env 文件中的 SECRET_KEY 值
awk -v key="$(openssl rand -base64 42)" '/^SECRET_KEY=/ {sub(/=.*/, "=" key)} 1' .env > temp_env && mv temp_env .env
step4 安装依赖 使用 uv 管理依赖。 通过运行以下命令使用 uv 安装所需依赖:
uv sync
step5 执行数据库迁移 执行数据库迁移到最新版本:
uv run flask db upgrade
这里可以使用 官方给的命令启动 api服务,本质上是使用的源码进行启动,但是没有通过ide,无法断点调试
uv run flask run --host 0.0.0.0 --port=5001 --debug
1.3.2 启动worker服务
uv run celery -A app.celery worker -P gevent -c 1 --loglevel INFO -Q dataset,generation,mail,ops_trace
1.3.3 启动web服务
启动web服务需要提前装好 npm和pnpm
1.3.3.1 npm安装
我这里选择的是npm包安装
https://nodejs.org/zh-cn/download
因为是金属裸机,也不需要docker环境,所以选择如下
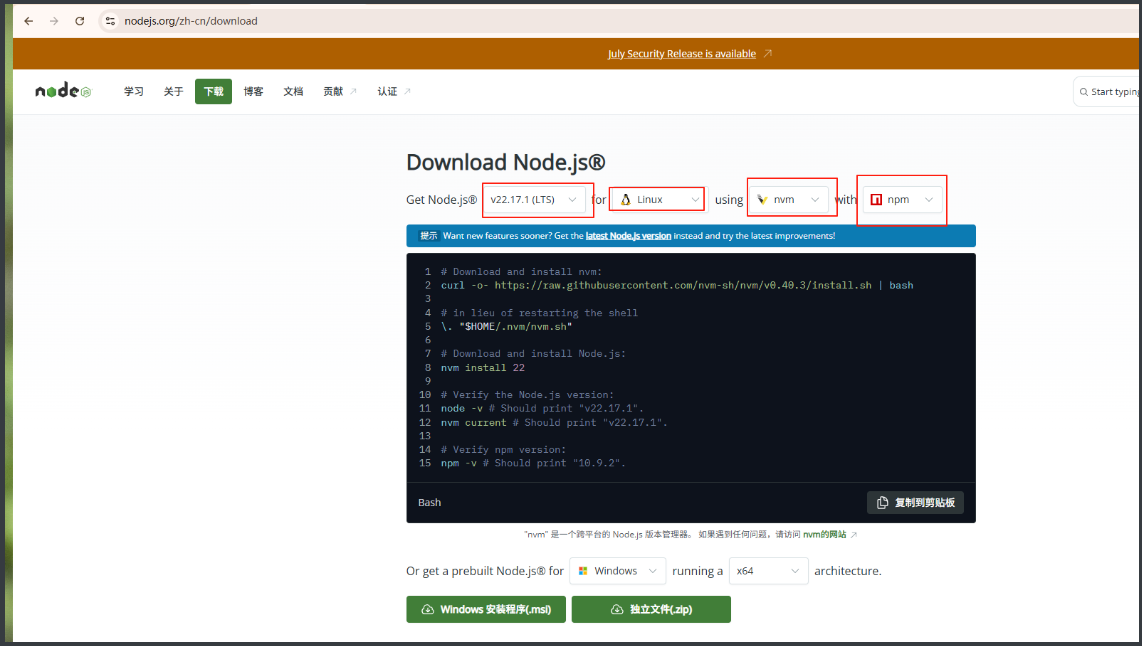
# Download and install nvm:
curl -o- https://raw.githubusercontent.com/nvm-sh/nvm/v0.40.3/install.sh | bash

# in lieu of restarting the shell
\. "$HOME/.nvm/nvm.sh"

# Download and install Node.js:
nvm install 22

# Verify the Node.js version:
node -v # Should print "v22.17.1".
nvm current # Should print "v22.17.1".

# Verify npm version:
npm -v # Should print "10.9.2".
这几行命令逐个去就行
1.3.3.2 pnpm安装
参考
https://pnpm.io/installation
个人测试,觉得npm直接安装会比较顺利
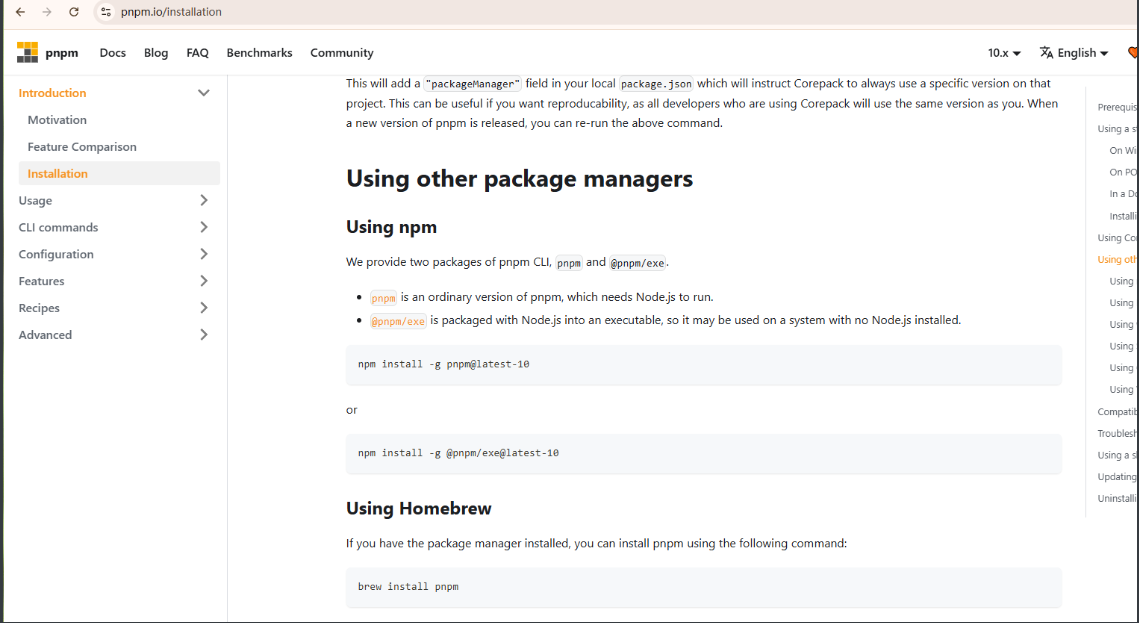
npm install -g pnpm@latest-10
直接通过 npm 安装 pnpm10
1.3.3.3 启动
step1 进入 web 目录
(base) root@djz-pc:/home/djz/data/code/dify/v210/dify# cd web/
(base) root@djz-pc:/home/djz/data/code/dify/v210/dify/web# ls
app     config   Dockerfile         hooks           jest.setup.ts  models          node_modules    postcss.config.js  service                    themes         typography.js
assets  context  eslint.config.mjs  i18n            middleware.ts  next.config.js  package.json    public             tailwind-common-config.ts  tsconfig.json  utils
bin     docker   global.d.ts        jest.config.ts  __mocks__      next-env.d.ts   pnpm-lock.yaml  README.md          tailwind.config.js         types
step2 安装依赖
pnpm install --frozen-lockfile
step3 准备变量配置文件
cp .env.example .env.local
根据需求修改内容
# For production release, change this to PRODUCTION
NEXT_PUBLIC_DEPLOY_ENV=DEVELOPMENT
# The deployment edition, SELF_HOSTED or CLOUD
NEXT_PUBLIC_EDITION=SELF_HOSTED
# The base URL of console application, refers to the Console base URL of WEB service if console domain is
# different from api or web app domain.
# example: http://cloud.dify.ai/console/api
NEXT_PUBLIC_API_PREFIX=http://localhost:5001/console/api
# The URL for Web APP, refers to the Web App base URL of WEB service if web app domain is different from
# console or api domain.
# example: http://udify.app/api
NEXT_PUBLIC_PUBLIC_API_PREFIX=http://localhost:5001/api

# SENTRY
NEXT_PUBLIC_SENTRY_DSN=
NEXT_PUBLIC_SENTRY_ORG=
NEXT_PUBLIC_SENTRY_PROJECT=
我这里后续需要ide启动,而我的机器是 192.168.1.11,所以改成这样
(base) root@djz-pc:/home/djz/data/code/dify/v210/dify/web# vim .env.local

# For production release, change this to PRODUCTION
NEXT_PUBLIC_DEPLOY_ENV=DEVELOPMENT
# The deployment edition, SELF_HOSTED
NEXT_PUBLIC_EDITION=SELF_HOSTED
# The base URL of console application, refers to the Console base URL of WEB service if console domain is
# different from api or web app domain.
# example: http://cloud.dify.ai/console/api
NEXT_PUBLIC_API_PREFIX=http://192.168.1.11:5001/console/api
# The URL for Web APP, refers to the Web App base URL of WEB service if web app domain is different from
# console or api domain.
# example: http://udify.app/api
NEXT_PUBLIC_PUBLIC_API_PREFIX=http://192.168.1.11:5001/api
# The API PREFIX for MARKETPLACE
NEXT_PUBLIC_MARKETPLACE_API_PREFIX=https://marketplace.dify.ai/api/v1
# The URL for MARKETPLACE
NEXT_PUBLIC_MARKETPLACE_URL_PREFIX=https://marketplace.dify.ai

# SENTRY
NEXT_PUBLIC_SENTRY_DSN=

# Disable Next.js Telemetry (https://nextjs.org/telemetry)
NEXT_TELEMETRY_DISABLED=1

# Disable Upload Image as WebApp icon default is false
NEXT_PUBLIC_UPLOAD_IMAGE_AS_ICON=false

# The timeout for the text generation in millisecond
NEXT_PUBLIC_TEXT_GENERATION_TIMEOUT_MS=60000

                                                                                                                                                                                                                    1,1          顶端
2. ide启动
2.1 ide选择
一般选择的是 pycharm或者 vscode
vscode宇宙第一idea,免费,但是vscode 远程环境配置比较尴尬,不知道为什么,我配置vllm工程就ok,dify就有问题,玄学。。。
pycharm,远程开发需要license,但是对我这种从idea/android studio开始的jetbrain重度患者来说么,比较友好
不过,本质上要做的操作原理是一样的。
这里以pycharm作为例子进行说明,vscode如果后续搞通了在进行补充。
2.2.1 pycharm
我的版本是
PyCharm 2024.2.1 (Professional Edition)
启动远程开发之后的pycharm是 PyCharm 2024.3.2 RC
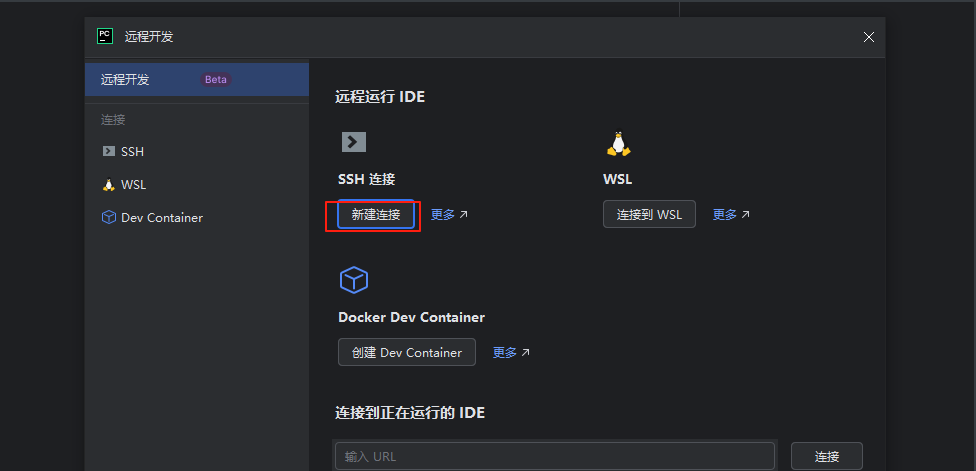
进入pycharm,选择远程开发
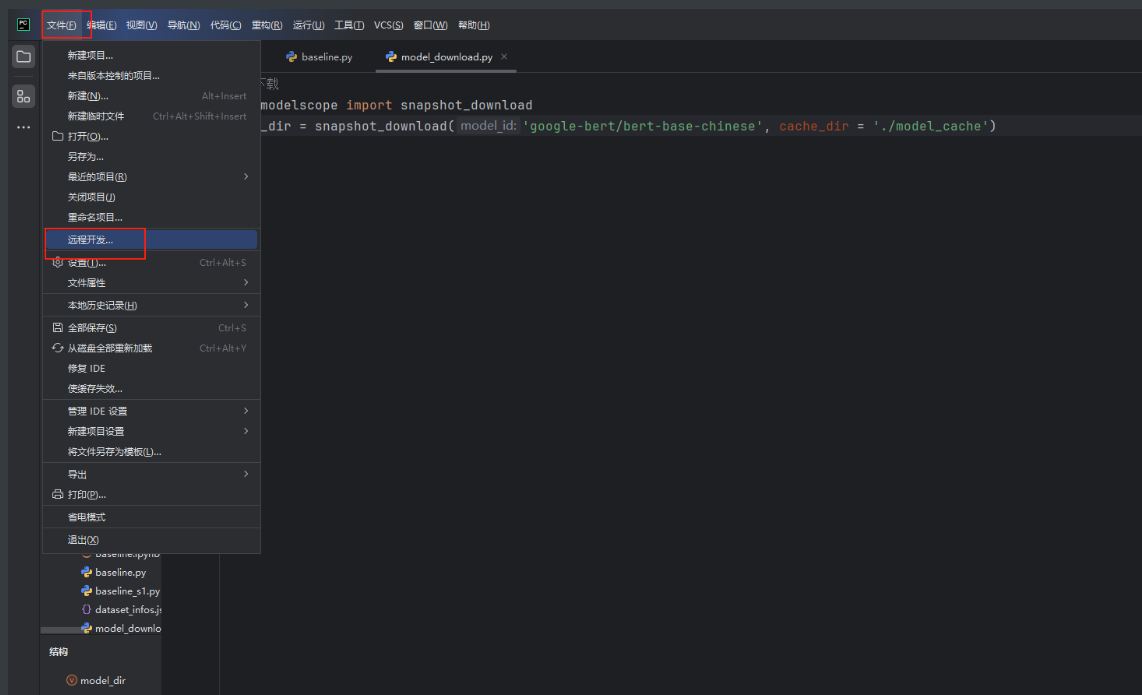
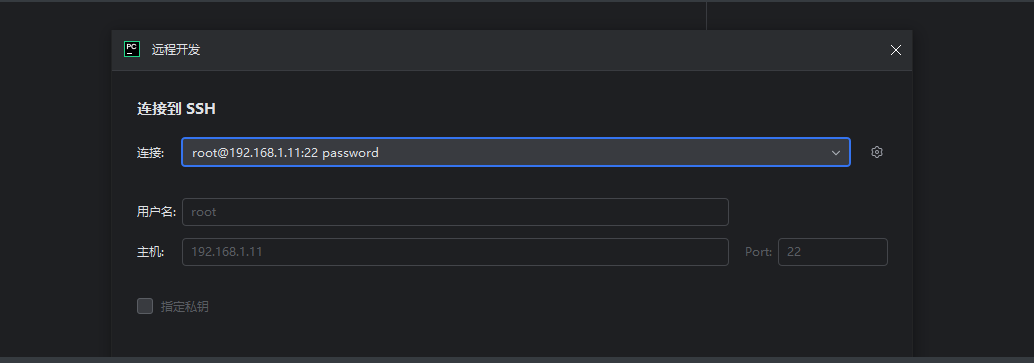
ssh信息输入
输入之后选择 工程根目录,这里选择你要做的最小工程目录,我试过直接选ubantu的根,那是直接挂掉,如果用vscode就不会有这种问题
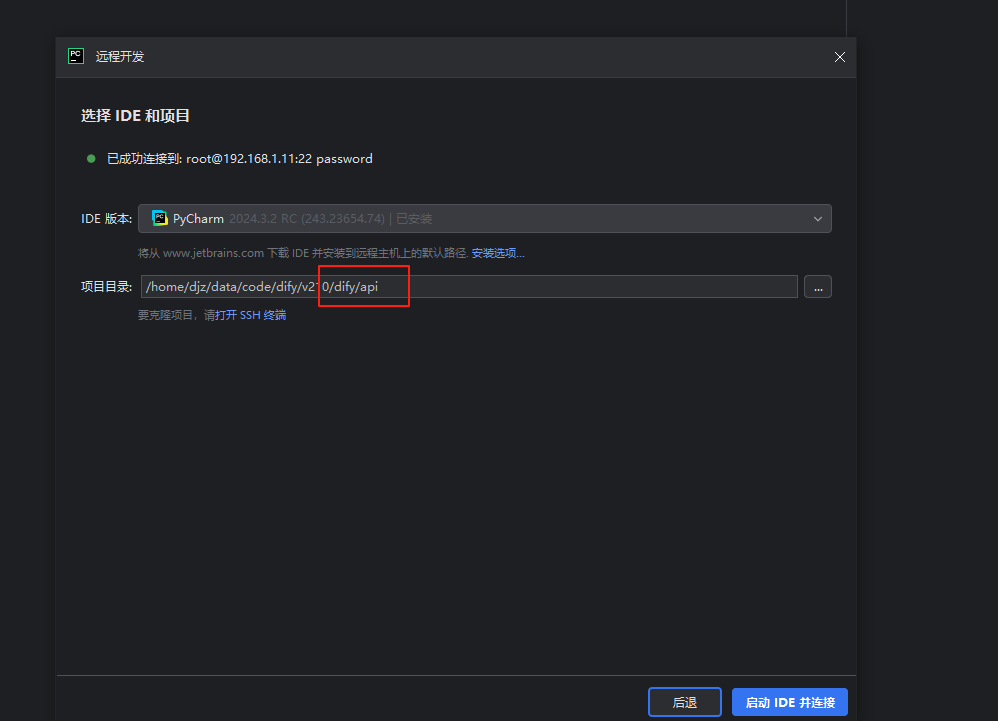
我选择的是api目录,如果ok,那么显示如下
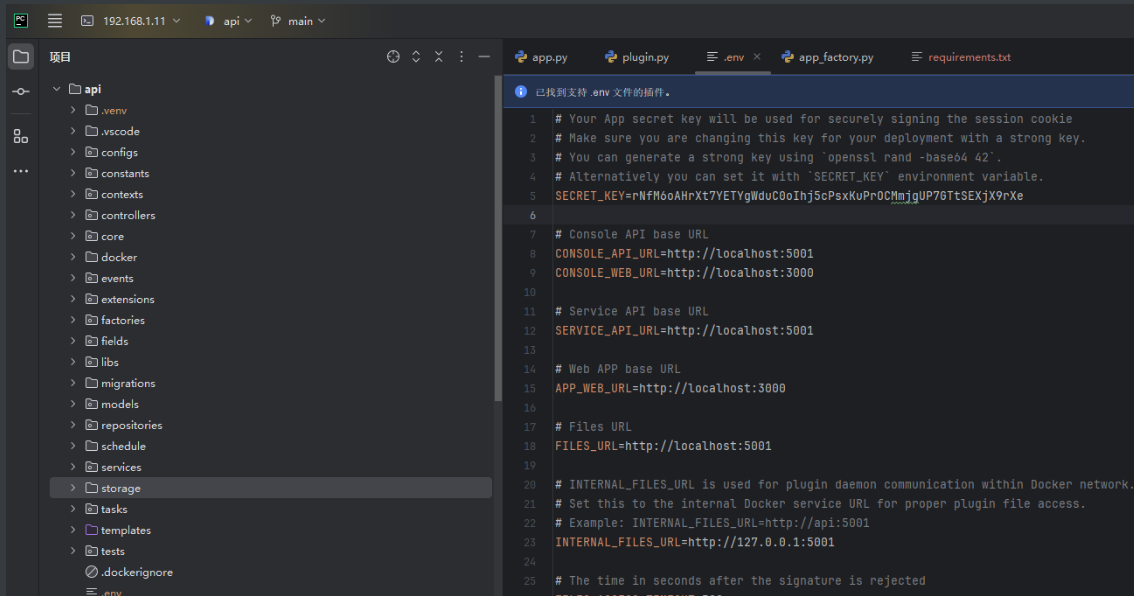
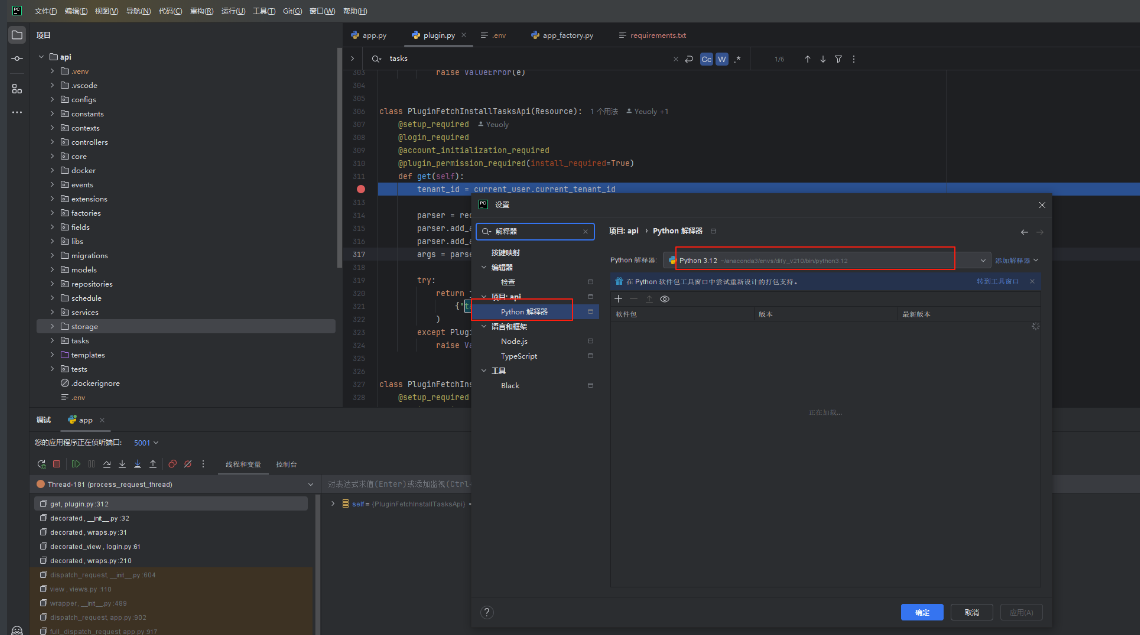
python解释器需要使用之前 配置好的 dify_v210
2.2.1.1 api的入口
根据api代码启动可知,api本质上是一个flask模块,所有我们比较容易的找到入口位于 app.py
import os
import sys


def is_db_command():
    if len(sys.argv) > 1 and sys.argv[0].endswith("flask") and sys.argv[1] == "db":
        return True
    return False


# create app
if is_db_command():
    from app_factory import create_migrations_app

    app = create_migrations_app()
else:
    # It seems that JetBrains Python debugger does not work well with gevent,
    # so we need to disable gevent in debug mode.
    # If you are using debugpy and set GEVENT_SUPPORT=True, you can debug with gevent.
    if (flask_debug := os.environ.get("FLASK_DEBUG", "0")) and flask_debug.lower() in {"false", "0", "no"}:
        from gevent import monkey

        # gevent
        monkey.patch_all()

        from grpc.experimental import gevent as grpc_gevent  # type: ignore

        # grpc gevent
        grpc_gevent.init_gevent()

        import psycogreen.gevent  # type: ignore

        psycogreen.gevent.patch_psycopg()

    from app_factory import create_app

    app = create_app()
    celery = app.extensions["celery"]

if __name__ == "__main__":
    app.run(host="0.0.0.0", port=5001)
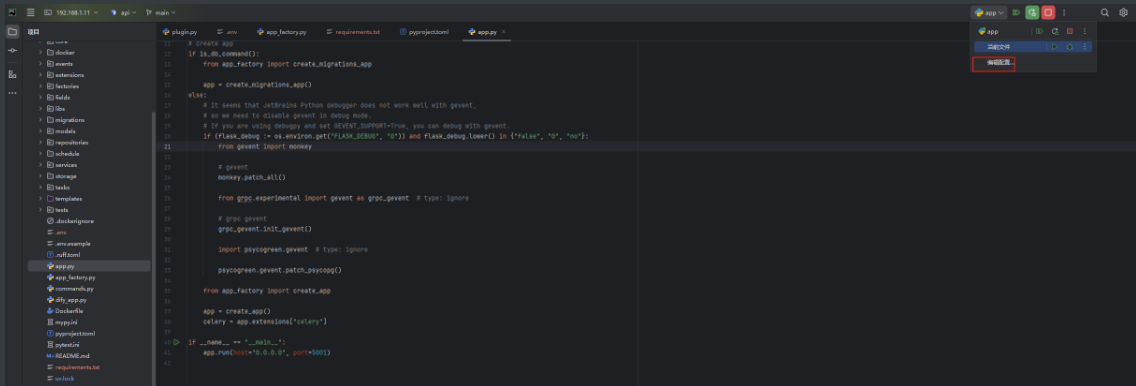
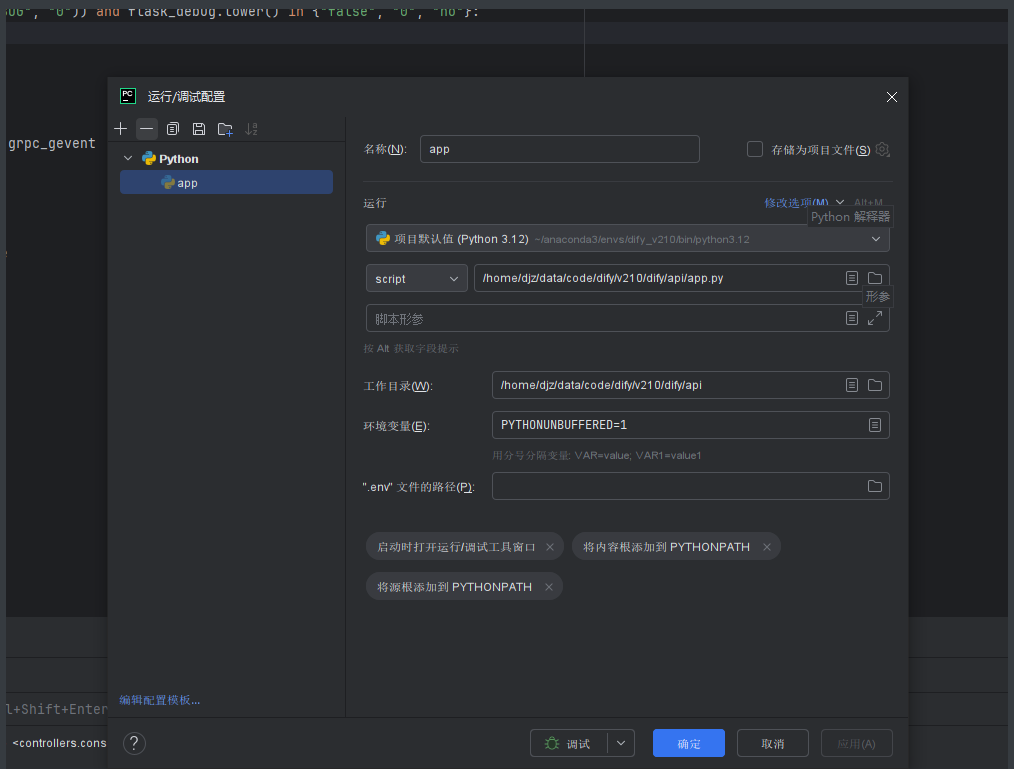
所以pycharm的配置如下
2.2.1.2 依赖
如果这个时候直接进行调试或者运行,会出现各种依赖不存在的报错
源码是通过 pyproject.toml进行管理
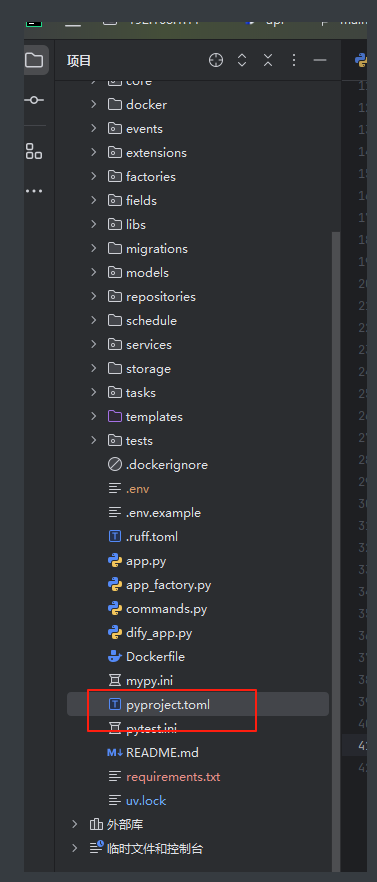
而我使用的是conda,所以需要将pyproject.toml转化成conda的requirements.txt,这个工作可以通过大模型帮我们转换,可以得到内容为
# 核心依赖(project.dependencies)
arize-phoenix-otel~=0.9.2
authlib==1.3.1
azure-identity==1.16.1
beautifulsoup4==4.12.2
boto3==1.35.99
bs4~=0.0.1
cachetools~=5.3.0
celery~=5.5.2
chardet~=5.1.0
flask~=3.1.0
flask-compress~=1.17
flask-cors~=6.0.0
flask-login~=0.6.3
flask-migrate~=4.0.7
flask-restful~=0.3.10
flask-sqlalchemy~=3.1.1
gevent~=24.11.1
gmpy2~=2.2.1
google-api-core==2.18.0
google-api-python-client==2.90.0
google-auth==2.29.0
google-auth-httplib2==0.2.0
google-cloud-aiplatform==1.49.0
googleapis-common-protos==1.63.0
gunicorn~=23.0.0
httpx[socks]~=0.27.0
jieba==0.42.1
json-repair>=0.41.1
langfuse~=2.51.3
langsmith~=0.1.77
mailchimp-transactional~=1.0.50
markdown~=3.5.1
numpy~=1.26.4
openai~=1.61.0
openpyxl~=3.1.5
opik~=1.7.25
opentelemetry-api==1.27.0
opentelemetry-distro==0.48b0
opentelemetry-exporter-otlp==1.27.0
opentelemetry-exporter-otlp-proto-common==1.27.0
opentelemetry-exporter-otlp-proto-grpc==1.27.0
opentelemetry-exporter-otlp-proto-http==1.27.0
opentelemetry-instrumentation==0.48b0
opentelemetry-instrumentation-celery==0.48b0
opentelemetry-instrumentation-flask==0.48b0
opentelemetry-instrumentation-sqlalchemy==0.48b0
opentelemetry-propagator-b3==1.27.0
opentelemetry-proto==1.27.0
opentelemetry-sdk==1.27.0
opentelemetry-semantic-conventions==0.48b0
opentelemetry-util-http==0.48b0
pandas[excel,output-formatting,performance]~=2.2.2
pandoc~=2.4
psycogreen~=1.0.2
psycopg2-binary~=2.9.6
pycryptodome==3.19.1
pydantic~=2.11.4
pydantic-extra-types~=2.10.3
pydantic-settings~=2.9.1
pyjwt~=2.8.0
pypdfium2==4.30.0
python-docx~=1.1.0
python-dotenv==1.0.1
pyyaml~=6.0.1
readabilipy~=0.3.0
redis[hiredis]~=6.1.0
resend~=2.9.0
sentry-sdk[flask]~=2.28.0
sqlalchemy~=2.0.29
starlette==0.41.0
tiktoken~=0.9.0
transformers~=4.51.0
unstructured[docx,epub,md,ppt,pptx]~=0.16.1
weave~=0.51.0
yarl~=1.18.3
webvtt-py~=0.5.1
sseclient-py>=1.8.0
httpx-sse>=0.4.0
sendgrid~=6.12.3

# 开发依赖(dependency-groups.dev)
coverage~=7.2.4
dotenv-linter~=0.5.0
faker~=32.1.0
lxml-stubs~=0.5.1
mypy~=1.16.0
ruff~=0.12.3
pytest~=8.3.2
pytest-benchmark~=4.0.0
pytest-cov~=4.1.0
pytest-env~=1.1.3
pytest-mock~=3.14.0
types-aiofiles~=24.1.0
types-beautifulsoup4~=4.12.0
types-cachetools~=5.5.0
types-colorama~=0.4.15
types-defusedxml~=0.7.0
types-deprecated~=1.2.15
types-docutils~=0.21.0
types-jsonschema~=4.23.0
types-flask-cors~=5.0.0
types-flask-migrate~=4.1.0
types-gevent~=24.11.0
types-greenlet~=3.1.0
types-html5lib~=1.1.11
types-markdown~=3.7.0
types-oauthlib~=3.2.0
types-objgraph~=3.6.0
types-olefile~=0.47.0
types-openpyxl~=3.1.5
types-pexpect~=4.9.0
types-protobuf~=5.29.1
types-psutil~=7.0.0
types-psycopg2~=2.9.21
types-pygments~=2.19.0
types-pymysql~=1.1.0
types-python-dateutil~=2.9.0
types-pywin32~=310.0.0
types-pyyaml~=6.0.12
types-regex~=2024.11.6
types-requests~=2.32.0
types-requests-oauthlib~=2.0.0
types-shapely~=2.0.0
types-simplejson>=3.20.0
types-six>=1.17.0
types-tensorflow>=2.18.0
types-tqdm>=4.67.0
types-ujson>=5.10.0
boto3-stubs>=1.38.20
types-jmespath>=1.0.2.20240106
hypothesis>=6.131.15
types_pyOpenSSL>=24.1.0
types_cffi>=1.17.0
types_setuptools>=80.9.0
pandas-stubs~=2.2.3
scipy-stubs>=1.15.3.0
types-python-http-client>=3.3.7.20240910

# 存储依赖(dependency-groups.storage)
azure-storage-blob==12.13.0
bce-python-sdk~=0.9.23
cos-python-sdk-v5==1.9.30
esdk-obs-python==3.24.6.1
google-cloud-storage==2.16.0
opendal~=0.45.16
oss2==2.18.5
supabase~=2.8.1
tos~=2.7.1

# 工具依赖(dependency-groups.tools)
cloudscraper~=1.2.71
nltk~=3.9.1

# 向量数据库依赖(dependency-groups.vdb)
alibabacloud_gpdb20160503~=3.8.0
alibabacloud_tea_openapi~=0.3.9
chromadb==0.5.20
clickhouse-connect~=0.7.16
couchbase~=4.3.0
elasticsearch==8.14.0
opensearch-py==2.4.0
oracledb==3.0.0
pgvecto-rs[sqlalchemy]~=0.2.1
pgvector==0.2.5
pymilvus~=2.5.0
pymochow==1.3.1
pyobvector~=0.1.6
qdrant-client==1.9.0
tablestore==6.2.0
tcvectordb~=1.6.4
tidb-vector==0.0.9
upstash-vector==0.6.0
volcengine-compat~=1.0.0
weaviate-client~=3.24.0
xinference-client~=1.2.2
mo-vector~=0.1.13
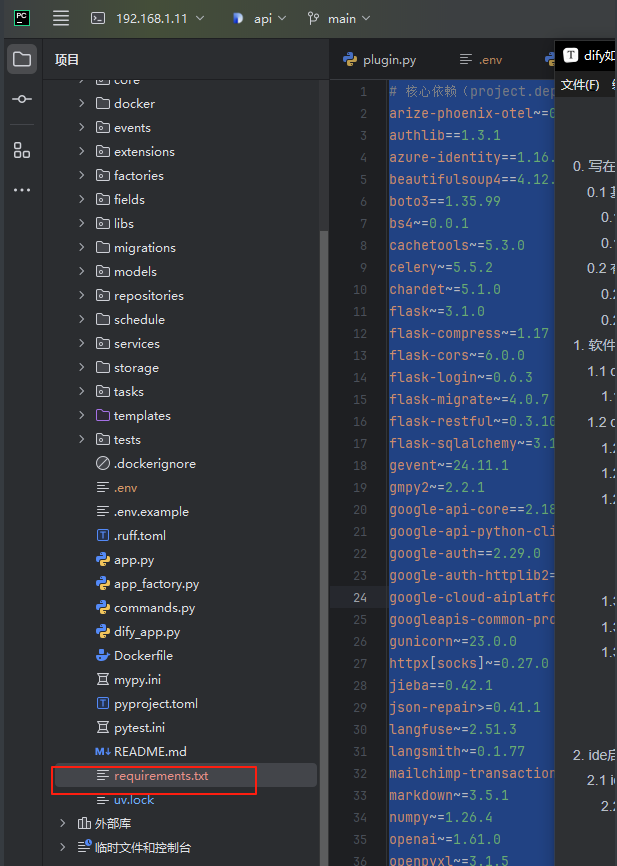
这个时候可以下面的命令进行依赖安装
(dify_v210) root@djz-pc:/home/djz/data/code/dify/v210/dify/api# pip install -r requirements.txt
然后点击绿色的虫子debug执行代码
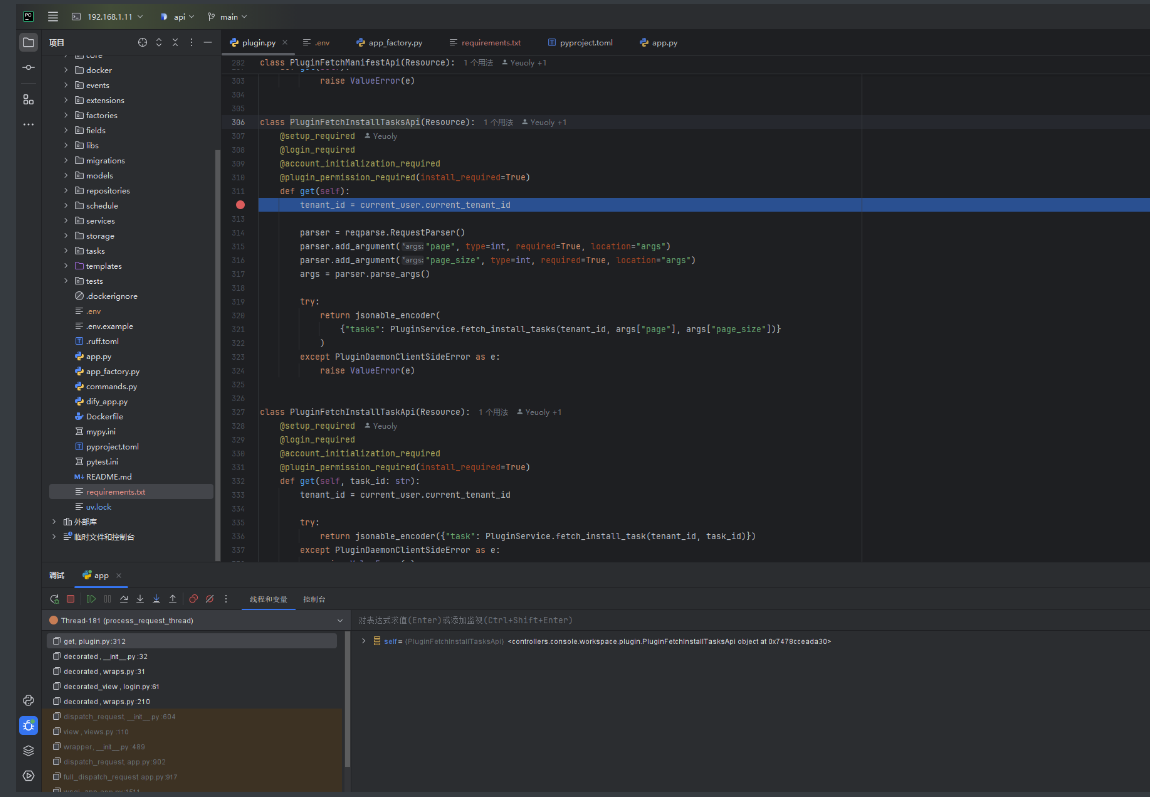
2.2.1.3 断点
我们之前通过命令行代码启动的方式启动了web前段工程
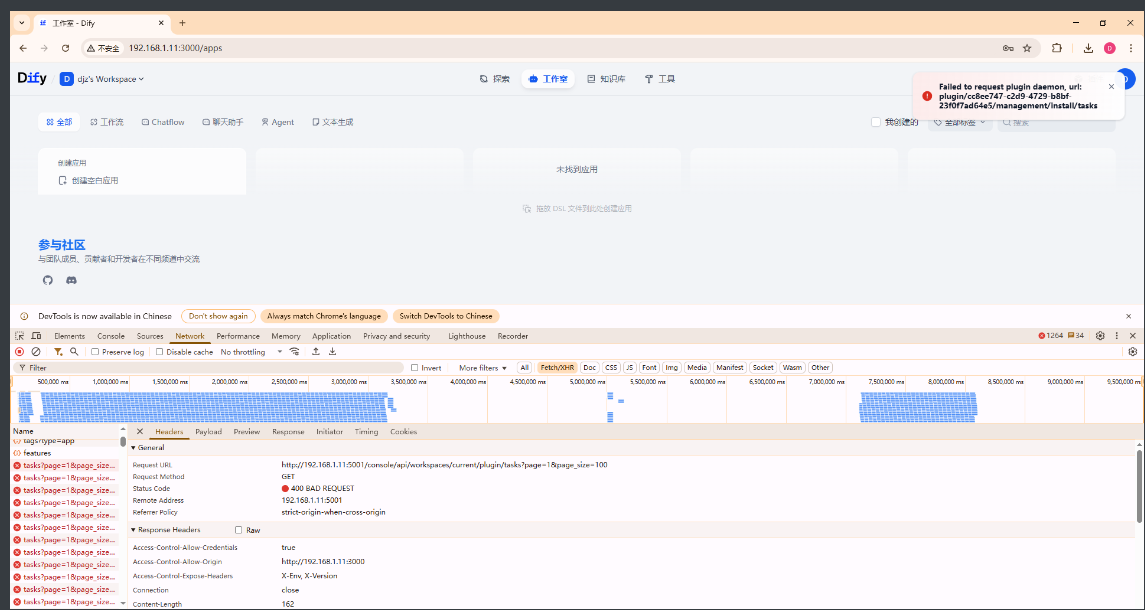
找到
http://192.168.1.11:5001/console/api/workspaces/current/plugin/tasks?page=1&page_size=100
接口
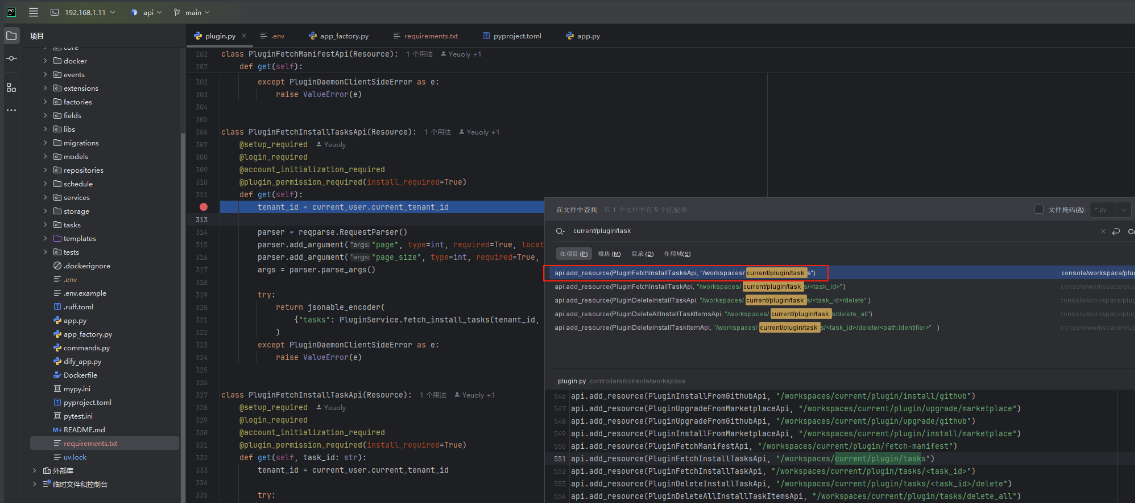
进入这个路由
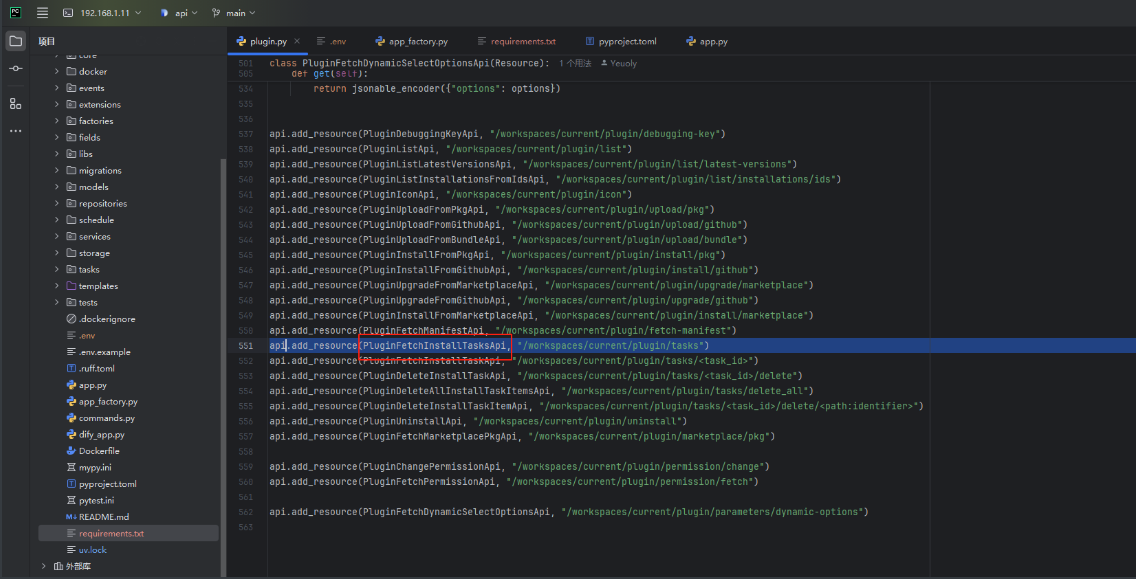
打住一个断点
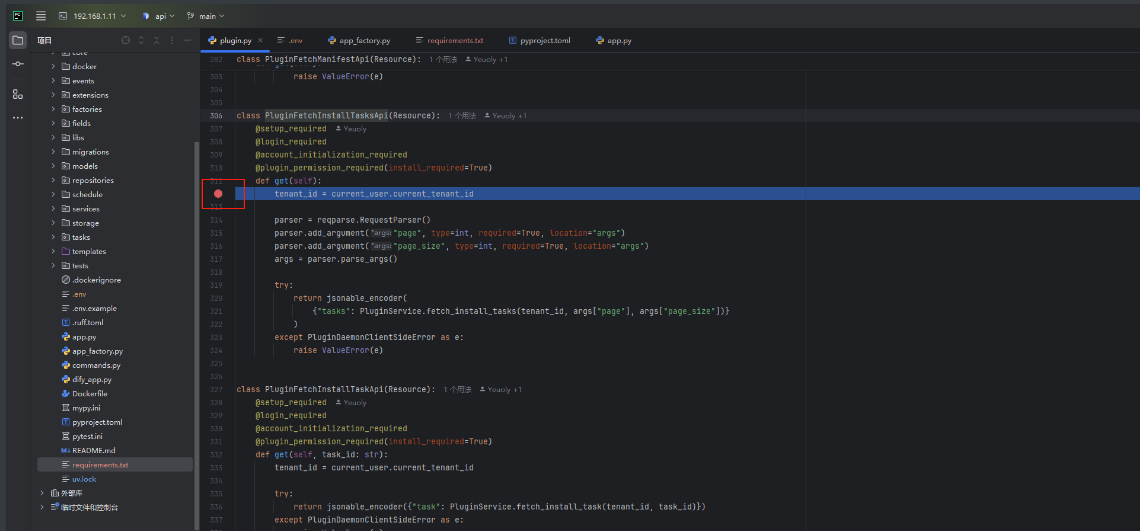
前段出发了这个api之后代码断点执行
2.2.2 vscode
to be continue

中国智能体开发者社区,聚焦智能体与大模型开发,提供前沿资讯、实用工具链、开源项目及行业案例。通过技术沙龙、开发者大赛等活动,促进经验交流与协作,助力开发者快速构建创新智能应用。
更多推荐


 22
22 0
0- 0


 已为社区贡献2条内容

所有评论(0)