在 Linux 本地玩转大模型(二): QwenVL Lora微调与部署的高效实践
前言
书接上文,在使用VLLM部署Qwen3成功后,笔者突然想尝试一下不同于大语言模型的视觉大模型的全套应用流水线:Lora微调、层合并、本地部署与调用,遂作此文。闲言少叙,让我们一起开始玩转QwenVL吧!
什么是QwenVL

下面是通义千问官方对最新模型Qwen2.5-VL的介绍:
- 视觉理解能力:Qwen2.5-VL不仅擅长识别常见的物体如花、鸟、鱼和昆虫,而且在分析图像中的文本、图表、图标、图形和布局方面也非常出色。
- 自主代理能力:Qwen2.5-VL可以直接作为视觉代理,能够进行推理并动态指导工具的使用,具备计算机和手机操作的能力。
- 理解和捕捉长视频中的事件:Qwen2.5-VL可以理解超过1小时的视频,并且这次新增了通过定位相关视频片段来捕捉事件的能力。
- 不同格式下的视觉定位能力:Qwen2.5-VL可以通过生成边界框或点准确地在图像中定位物体,并能提供稳定的JSON输出,包括坐标和属性。
- 生成结构化输出:对于发票扫描件、表格等数据,Qwen2.5-VL支持其内容的结构化输出,适用于金融、商业等领域。
简而言之,不同于大语言模型(比如说笔者上篇文章提到的Qwen3系列模型),QwenVL是视觉理解模型,这种模型结合了视觉和语言信息,能够处理图像并生成与图像相关的文本,从而实现更复杂的多模态任务,如图像描述、内容分析等。
前置准备
模型下载
首先我们要进行模型的选择并将其下载到本地:
Qwen2.5VL具备众多版本的基模型(Base Model),这里笔者推荐选择7B版本进行开发,最终实测显存占用 < 20GB ,在消费级显卡上也能部署成功。
模型下载指令如下:
pip install modelscope  # 如果当前py环境未安装过modelscope依赖
modelscope download --model Qwen/Qwen2.5-VL-7B-Instruct --local_dir ./目标文件夹
模型测试
下载完毕后我们首先要对下载好的模型进行部署测试:
pip install vllm # 如果当前py环境未安装过vllm依赖
VLLM_USE_MODELSCOPE=true vllm serve /path/to/Qwen2.5-VL-7B-Instruct/ --gpu-memory-utilization 0.5 --max-model-len 1024 --limit-mm-per-prompt image=1 --dtype bfloat16 --host 0.0.0.0 --port 8000
指令关键参数:
| 参数 | 作用 |
|---|---|
| /path/to/Qwen2.5-VL-7B-Instruct/ | 模型下载存储路径 |
| gpu-memory-utilization | 分配的显存比例,单卡建议0.8~0.9 |
| limit-mm-per-prompt | 每条请求能上传的图片数量 |
若控制台输出如下,则模型运行成功:
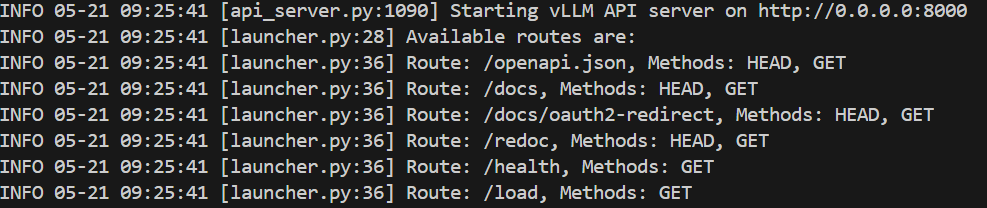
随后可通过访问 http://localhost:8000/docs 查看模型API接口信息。
Lora微调
为了能让大模型能在特定领域/下游任务具备更好的性能,我们常常会对模型进行Lora微调,视觉模型同样也可以通过微调以获取更好的性能。
框架选择

微调框架五花八门,笔者这里选择了最近风头正盛的Unsloth框架
环境准备指令如下:
pip install unsloth #如果当前py环境未安装过unsloth依赖
代码构建
数据集准备
Unsloth官方对于微调视觉模型的数据集具备严格的形式要求:
[
{ "role": "user",
  "content": [{"type": "text",  "text": instruction}, {"type": "image", "image": image} ]
},
{ "role": "assistant",
  "content": [{"type": "text",  "text": answer} ]
},
]
下面是一个具体的例子:
{'messages': [{'role': 'user',
   'content': [{'type': 'text',
     'text': 'You are an expert radiographer. Describe accurately what you see in this image.'},
    {'type': 'image',
     'image': <PIL.PngImagePlugin.PngImageFile image mode=L size=657x442>}]},
  {'role': 'assistant',
   'content': [{'type': 'text',
     'text': 'Panoramic radiography shows an osteolytic lesion in the right posterior maxilla with resorption of the floor of the maxillary sinus (arrows).'}]}]}
为了能够简洁快速地构建出符合这样标准的数据集,我们可以退而求其次,先构建好如下形式的jsonl数据集:
{"image_path": "PATH/TO/001.jpg", "prompt": "用户的文字指令", "response": "预先使用特定模型得到的高质量文字响应"}
然后利用代码来将对应路径的图片转为PIL形式保存到image字段中:
from datasets import load_dataset, Dataset, Features, Value, Image
from PIL import Image as PILImage
import os

# 加载数据
dataset = load_dataset(
    "json",
    data_files="/PATH/TO/train.jsonl", # 上文数据集的存储路径
    split="train"
)

# 辅助函数:加载图像并返回PIL对象
def load_image(image_path):
    if not image_path:
        return None
    # 如果路径是相对的,添加基础路径
    if not os.path.isabs(image_path):
        base_path = "/PATH/TO/数据集的父文件夹的路径"
        image_path = os.path.join(base_path, image_path)
    try:
        return PILImage.open(image_path)
    except Exception as e:
        print(f"Error loading image {image_path}: {e}")
        return None

# 转换函数
def convert_to_conversation(sample):
    user_content = []

    # 添加文本内容
    if sample.get("prompt"):
        user_content.append({"type": "text", "text": sample["prompt"]})

    # 添加图像内容
    if sample.get("image_path"):
        pil_image = load_image(sample["image_path"])
        user_content.append({"type": "image", "image": pil_image})

    # 构建消息列表
    messages = [
        {
            "role": "user",
            "content": user_content
        },
        {
            "role": "assistant",
            "content": [
                {"type": "text", "text": sample["response"]}
            ]
        }
    ]

    return {"messages": messages}

# 转换数据集
converted_dataset = [convert_to_conversation(sample) for sample in dataset]

# 验证数据格式
print(converted_dataset[0])
模型载入
import os
os.environ["CUDA_VISIBLE_DEVICES"] = "0" #指定使用的GPU编号
os.environ["NCCL_P2P_DISABLE"] = "1" #禁用NCCL点对点通信|40系显卡专用
os.environ["NCCL_IB_DISABLE"] = "1" #禁用InfiniBand支持|40系显卡专用

from unsloth import FastVisionModel # FastLanguageModel for LLMs
import torch

model, tokenizer = FastVisionModel.from_pretrained(
    "/PATH/TO/Qwen2.5-VL-7B-Instruct",
    load_in_4bit = False, # Use 4bit to reduce memory use. False for 16bit LoRA.
    use_gradient_checkpointing = "unsloth", # True or "unsloth" for long context
)
Lora参数配置
model = FastVisionModel.get_peft_model(
    model,
    finetune_vision_layers     = True, # False if not finetuning vision layers
    finetune_language_layers   = True, # False if not finetuning language layers
    finetune_attention_modules = True, # False if not finetuning attention layers
    finetune_mlp_modules       = True, # False if not finetuning MLP layers

    r = 16,           # The larger, the higher the accuracy, but might overfit
    lora_alpha = 16,  # Recommended alpha == r at least
    lora_dropout = 0, # 正则化参数,可以调整到1~2 来防止过拟合
    bias = "none",
    random_state = 3407,
    use_rslora = False,  # We support rank stabilized LoRA
    loftq_config = None, # And LoftQ
    # target_modules = "all-linear", # Optional now! Can specify a list if needed
)
训练参数配置
from unsloth import is_bf16_supported
from unsloth.trainer import UnslothVisionDataCollator
from trl import SFTTrainer, SFTConfig

FastVisionModel.for_training(model) # Enable for training!

trainer = SFTTrainer(
    model = model,
    tokenizer = tokenizer,
    data_collator = UnslothVisionDataCollator(model, tokenizer), # Must use!
    train_dataset = converted_dataset,
    args = SFTConfig(
        per_device_train_batch_size = 2,
        gradient_accumulation_steps = 4,
        warmup_steps = 5,
        # max_steps = 30,
        num_train_epochs = 2, # Set this instead of max_steps for full training runs
        learning_rate = 2e-4,
        fp16 = not is_bf16_supported(),
        bf16 = is_bf16_supported(),
        logging_steps = 1,
        optim = "adamw_8bit",
        weight_decay = 0.01,
        lr_scheduler_type = "linear",
        seed = 3407,
        output_dir = "/PATH/TO/Unsloth-Lora-Qwen2.5-VL-7B-Instruct",
        report_to = "none",     # For Weights and Biases

        # You MUST put the below items for vision finetuning:
        remove_unused_columns = False,
        dataset_text_field = "",
        dataset_kwargs = {"skip_prepare_dataset": True},
        dataset_num_proc = 4,
        max_seq_length = 2048,
    ),
)

trainer_stats = trainer.train()
保存Lora层
model.save_pretrained("/PATH/TO/Unsloth-Lora-Qwen2.5-VL-7B-Instruct")  # Local saving
tokenizer.save_pretrained("/PATH/TO/Unsloth-Lora-Qwen2.5-VL-7B-Instruct")
至此,我们已经成功实现了在特定数据集上对QwenVL进行Lora微调,下一步就是部署合并Lora层后的VL模型并进行运行测试!
合并部署VL模型
VLLM_USE_MODELSCOPE=true vllm serve /path/to/Qwen2.5-VL-7B-Instruct/ --enable-lora --lora-modules LoraName=/PATH/TO/Unsloth-Lora-Qwen2.5-VL-7B-Instruct --gpu-memory-utilization 0.5 --max-model-len 1024 --limit-mm-per-prompt image=1 --dtype bfloat16 --host 0.0.0.0 --port 8000
新增参数介绍
| 参数 | 作用 |
|---|---|
| enable-lora | 启用Lora配置 |
| lora-modules | 为当前Lora层指定名称和系统路径 |
随后再次通过访问 http://localhost:8000/docs 来验证模型Lora层部署情况。
选中/v1/models接口并执行(execute),即可看到模型部署情况,类似下图:
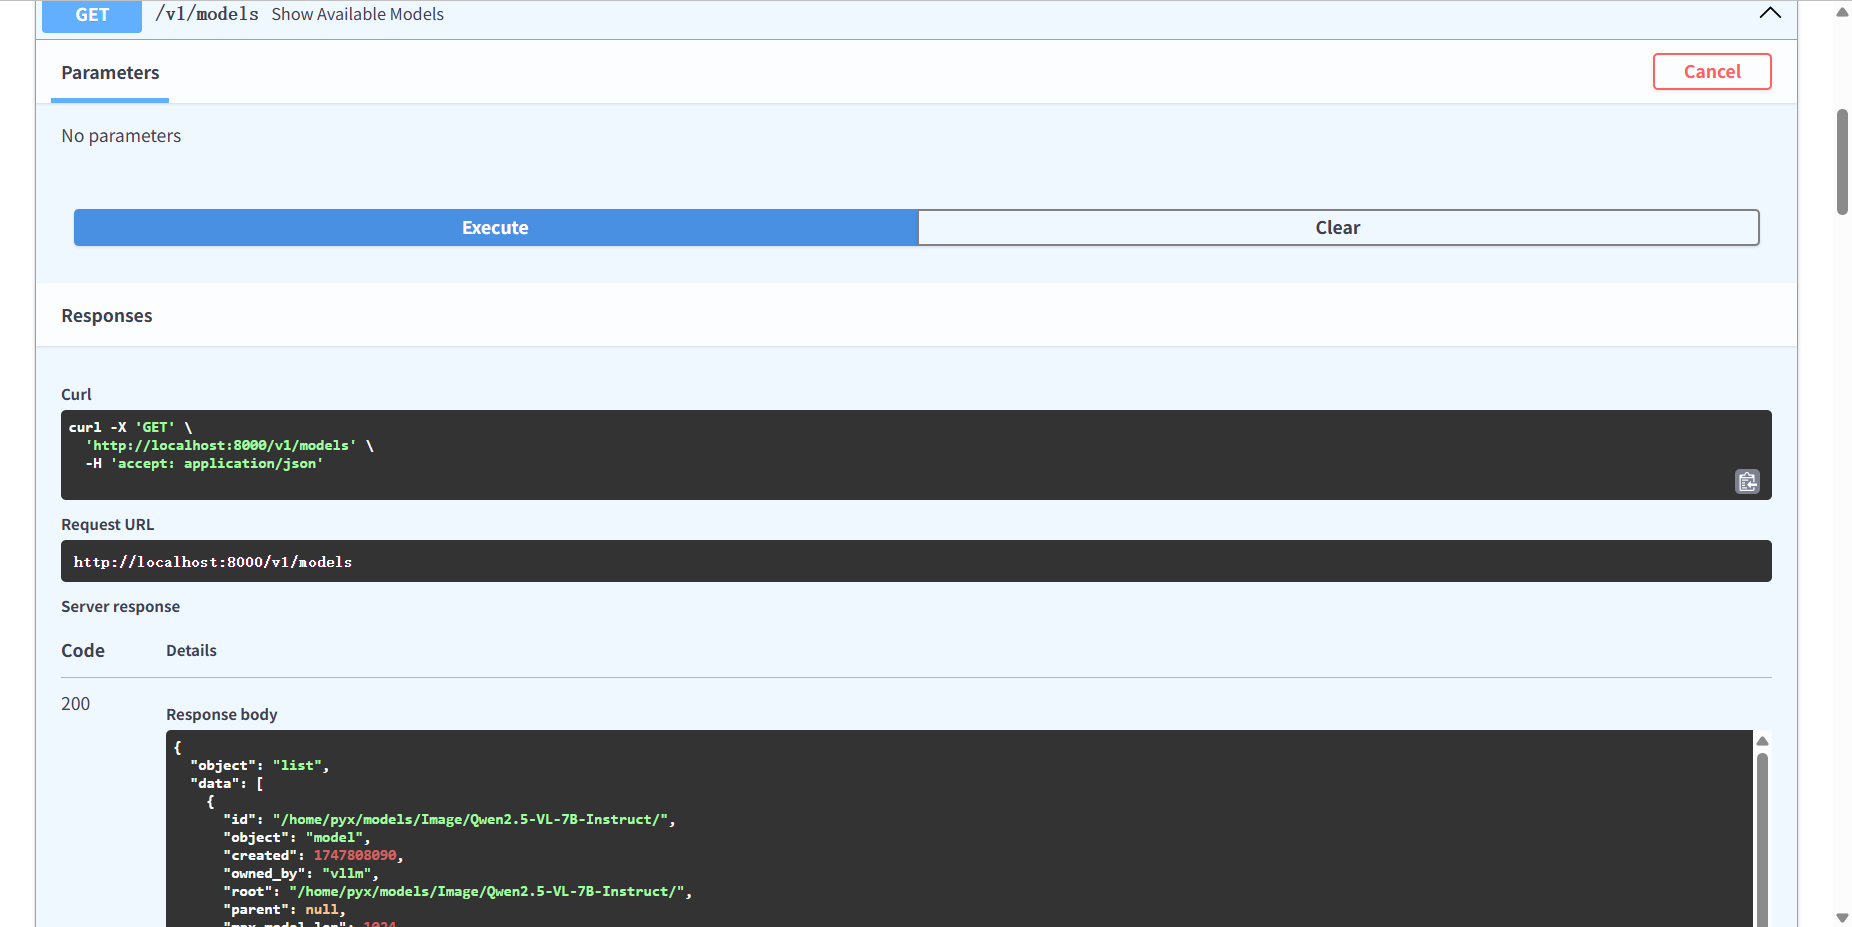
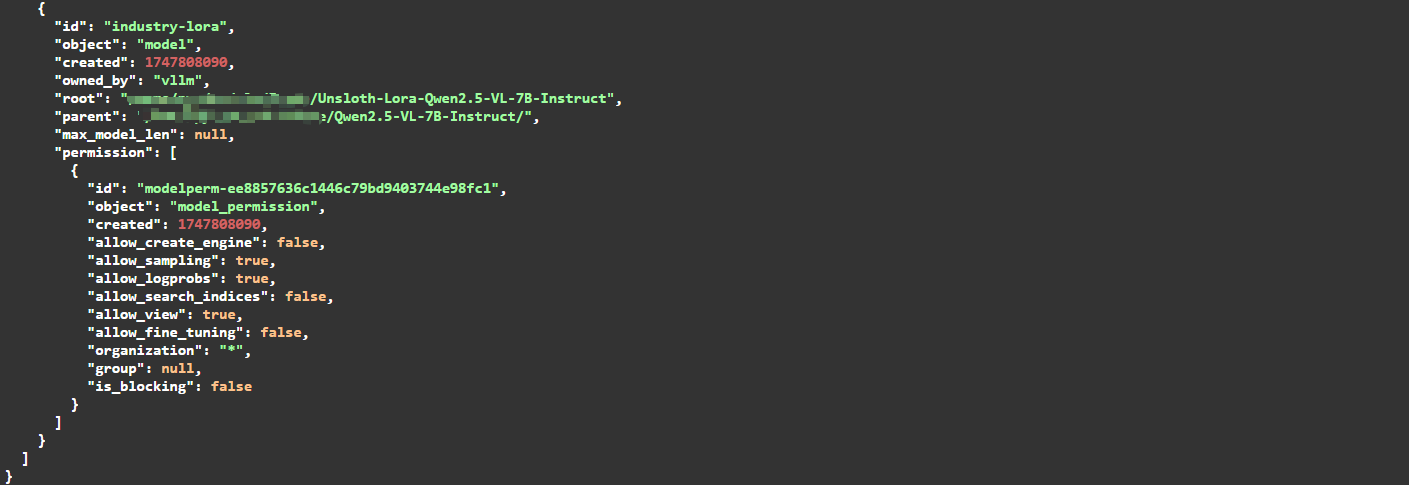
在返回体界面下滑,若看到自己刚刚命名的lora层信息,则合并部署成功!
运行测试
使用VLLM合并部署好VL模型后,我们可以通过构造标准Openai格式的响应结构进行测试:
import openai
import base64
from PIL import Image
import os

# 配置信息
config = {
    "retry_times": 3,  # API重试次数
    "retry_delay": 5,  # 重试延迟(秒),
    "max_image_size": 1024  # 图像最大尺寸(防止过大图像)
}

client = openai.OpenAI(api_key='ANYTHING', base_url='http://localhost:8000/v1') # 本地vllm部署模型

def resize_image(image_path: str) -> str:
    """调整图像大小并返回base64编码"""
    try:
        with Image.open(image_path) as img:
            if max(img.size) > config["max_image_size"]:
                img.thumbnail((config["max_image_size"], config["max_image_size"]))

            buffered = io.BytesIO()
            img.convert("RGB").save(buffered, format="JPEG")
            return base64.b64encode(buffered.getvalue()).decode('utf-8')
    except Exception as e:
        print(f"调整图像大小时出错: {e}")
        raise

def call_vision_api(image_base64: str) -> str:

    for attempt in range(config["retry_times"]):
        try:
            print(f"尝试调用本地模型 (尝试 {attempt + 1}/{config['retry_times']})")
            local_response = Localclient.chat.completions.create(
                model="自命名Lora层的名字",
                messages=[
                    {
                        "role": "user",
                        "content": [
                            {"type": "image_url", "image_url": {"url": f"data:image/jpeg;base64,{image_base64}"}},
                            {"type": "text", "text": "在这里输入你想让VL模型根据图片做出行动的指令"}
                        ]
                    }
                ],
            )
            # Assuming the local response has similar structure to OpenAI response
            if hasattr(local_response, 'choices') and local_response.choices:
                print("本地模型调用成功")
                local_success = True
                print("本地视觉模型响应:"+ local_response.choices[0].message.content)
                return local_response.choices[0].message.content
            else:
                print("本地模型返回异常响应")
                break
        except Exception as e:
            print(f"本地模型调用出错: {str(e)},等待{config['retry_delay']}秒后重试 ({attempt + 1}/{config['retry_times']})")
            time.sleep(config["retry_delay"])
# 获取VL返回值 image_description
image_base64 = resize_image(image_path) # 这里输入图片绝对路径
image_description = call_vision_api(image_base64)
总结
经过这一系列实践,我们从零开始完成了Qwen2.5-VL视觉大模型的完整应用流水线:
- 模型获取:通过
ModelScope下载了Qwen2.5-VL-7B-Instruct基模型 - 本地部署:使用
vLLM框架成功部署了视觉大模型 - Lora微调:采用
Unsloth框架在特定数据集上进行了高效微调 - 模型合并:将训练好的
Lora层与基模型合并部署 - 应用测试:通过
OpenAI兼容API实现了模型调用
希望你对本篇博客满意,我是Tex-mind,我们下期再见!

中国智能体开发者社区,聚焦智能体与大模型开发,提供前沿资讯、实用工具链、开源项目及行业案例。通过技术沙龙、开发者大赛等活动,促进经验交流与协作,助力开发者快速构建创新智能应用。
更多推荐


 16
16 0
0- 0


 已为社区贡献2条内容

所有评论(0)